The Tennessee Music Box Project - Everything Dulcimer
The Tennessee Music Box Project - Everything Dulcimer
The Tennessee Music Box Project - Everything Dulcimer

You also want an ePaper? Increase the reach of your titles
YUMPU automatically turns print PDFs into web optimized ePapers that Google loves.
<strong>The</strong> <strong>Tennessee</strong> <strong>Music</strong> <strong>Box</strong> <strong>Project</strong><br />
By Dave Murray 2003<br />
Objective<br />
<strong>The</strong> objective of this project is to bring music, and the mountain dulcimer, to as many people as possible<br />
by providing plans for a very inexpensive and easy to build <strong>Tennessee</strong> <strong>Music</strong> <strong>Box</strong>.<br />
<strong>The</strong> cardboard dulcimer is a popular and inexpensive dulcimer that is often used for class rooms, but<br />
when they come from a commercial source there is a mark-up that raises the price. <strong>The</strong> price of these<br />
commercially available cardboard dulcimers is very reasonable and if your time is worth more to you<br />
than the small amount of money that makes up the labor and profit, then they are to be recommended.<br />
For people on a very tight budget, or those who just wish to put something of them self into the<br />
dulcimers, the home made <strong>Tennessee</strong> music box might be a good way to go. Two fret board options and<br />
three tuner options are provided.<br />
<strong>The</strong>se plans assume that the builder has some knowledge of what a mountain dulcimer is and can use<br />
common hand tools. <strong>The</strong>y also assume that the builder is capable of making some decisions where room<br />
for choice is given. <strong>The</strong> parts list goes from "simple and cheap" to "this will be a nice instrument".<br />
READ AND UNDERSTAND THE INSTRUCTIONS COMPLETELY - BEFORE YOU<br />
START!<br />
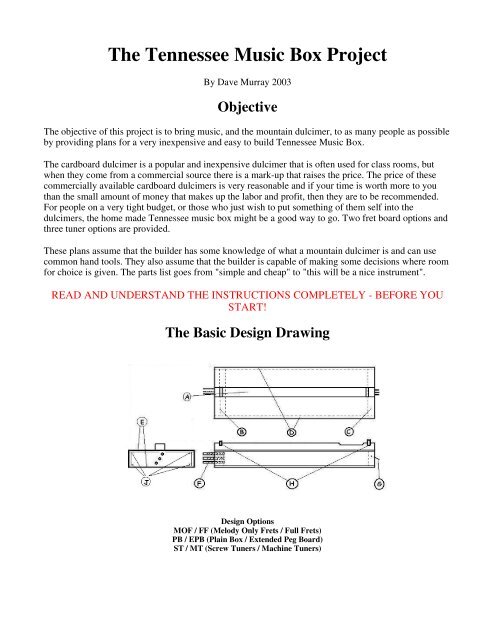
<strong>The</strong> Basic Design Drawing<br />
Design Options<br />
MOF / FF (Melody Only Frets / Full Frets)<br />
PB / EPB (Plain <strong>Box</strong> / Extended Peg Board)<br />
ST / MT (Screw Tuners / Machine Tuners)
Parts Identification For Basic Drawing<br />
Call Item Details / Materials<br />
A Fret Board See detail A<br />
1" x 2" x 36" hard wood ( ¾ x 1½ dressed )<br />
Fret board stock from supply house.<br />
B Peg head board Double this for sufficient thickness to prevent tuning screw<br />
slipping.<br />
1" x 3" x 21" hard wood ( ¾ x 2½ dressed) [for B & C]<br />
C Tail board Thick enough to support pull of strings on nails.<br />
D Side boards Can be thin if kerfting is used.<br />
¼ plywood - non-critical<br />
Side board stock from supply house<br />
E Sound & bottom boards Thin enough to vibrate well.<br />
cardboard (cheapest)<br />
1/8" door skin (cheap)<br />
sound and bottom board from supply store<br />
F Tuning screws (3 ea) ¼ x 3 wire tie screws (cheap)<br />
tuning machines from supply store<br />
G String attachment nails Small head or grind heads off.<br />
H Nut & bridge Something hard, but not something that will eat away the<br />
strings.<br />
plastic (not recommended)<br />
hard wood<br />
bone<br />
delrin from supply house<br />
corian scrap or samples<br />
J Kerfing Strips of wood glued to side boards to increase glue surface<br />
for sound and bottom boards.<br />
K Strings See chart.
Step<br />
Assembly Instructions<br />
Instruction<br />
1 Decision time - Style - Tuning machines are easier to tune and if they fit into the budget they<br />
are a good idea. If you have never built a mountain dulcimer of any kind before it might not be<br />
a bad idea to plan for the first one that you make to be a wall hanger and go the cheap screw<br />
tuner route for an inexpensive learning experience, even if you plan to ultimately build deluxe<br />
ones with good tuning machines. Size - For young children, a 24" string length is probably a<br />
good choice. A 26" is comfortable for most people to play. A 28" might be difficult for people<br />
with small hands, or limitations, to play chords, but a larger dulcimer will likely have more<br />
volume, and better bass. Quality/Cost - A <strong>Tennessee</strong> music box can potentially be a quality<br />
instrument, but quality costs. A wide range of trade-offs can be made to keep costs down. <strong>The</strong><br />
purpose of this project is inexpensive dulcimers, but a very nice instrument can also be<br />
constructed for a lot less money than buying a dulcimer.<br />
2 Get materials - Fret wire and tuning machines are not available at your local hardware store<br />
and you will probably need to order them by mail. If you are going to buy any components<br />
from an instrument supply company, you might want to also consider getting nut and bridge, a<br />
good, straight, hardwood fret board, and a good quality sound board while you are at it, if this<br />
is to be a high quality instrument.<br />
If you are going for inexpensive then you can get all but fret wire and tuning machines at your<br />
local home builder and or craft store. Buy wood with minimum waste in mind. You'll be paying<br />
for it by the foot. For your fret board stock, get the straightest wood possible.<br />
3 Cut materials to size - Since assembly time is stretched out by waiting for glue to dry, it is not<br />
essential to precut everything, but it is a good idea.<br />
You'll notice that I did not provide dimensions in the basic diagram. It is not an oversight, the<br />
size is up to you. Since you can get plenty of volume by making the sides deep, it is probably<br />
best to make it no wider than 8", but a wider one, even wide enough to make a courting<br />
dulcimer is OK. For a small 24" fret board for young children, a 6-7" width is probably ideal.<br />
Note that the side boards are attached to the ends of the peg head and tail piece boards so the<br />
side board width must be added before cutting the sound and bottom boards. Cut them a little<br />
wider than that so they can be sanded down flush with the sides so they can be smooth and<br />
splinter free. Also note that the bridge is actually a bit farther from the nut than the theoretical<br />
string length. Also, if you are putting a 0 fret and the bottom of the slots in the nut will be<br />
lower than the frets than additional space must be provided. You will need to leave some wood<br />
extending past the cuts for the nut and bridge for strength, so the length will be a couple of<br />
inches longer than the string length. For a 26" dulcimer, you actually will have a 28" overall<br />
length for the fret board, sound, bottom and side boards. Important - If you are building with<br />
tuning machines or an extended peg head design with screws, add about 5" more to the length<br />
of the fret board.<br />
4 Prepare fret board - <strong>The</strong> fret board is the most critical piece and the adage measure twice, cut<br />
once is especially important here. See detail A, and the fret chart. Measure and mark the fret<br />
board. If you are making a 24" child's dulcimer, you might only put frets out to position #15<br />
since 16 & 17 will be too close together to be useful. Cut, or grind, the strum hollow. Fret<br />
boards are often routed out on the underside, but I don't recommend it for these inexpensive,<br />
easy to build dulcimers.
4a<br />
4b<br />
If you are making the extended peg head, cut to shape as shown in detail A and drill for tuning<br />
machines or screws. If you are using screws, drill small holes to prevent wood splitting but not<br />
so large that the screws do not get plenty of bite. Cut slots, saw and small chisel, for nut and<br />
bridge if you do not plan to empirically set the intonation. If you plan to fine tune the<br />
intonation, only cut out the nut slot at first. See the Bear Meadow web sight for details on<br />
intonation.<br />
Bent over nails option - Drill holes (very nearly the diameter of the nails) one nail diameter<br />
away from the edge of the fret board. If you are using a wood sound board, glue the fret board<br />
to the sound board (down the center), weight it and let it dry to set. If you are using cardboard,<br />
do not glue it on now since it will be crushed when the fred nails are driven in. Place the fret<br />
board (with sound board if applicable) over a scrap piece of wood. Drive the nails through the<br />
fret board and into the scrap wood so there is enough nail not driven in to bend over 1/3 of the<br />
fret board. [driving the nails into the scrap wood is to give support during the bending process<br />
so that the fret board is not split. You should also put one nail fret for the bass string at fret 4 so<br />
the instrument can be self tuned. <strong>The</strong>re is no need for extra frets with this model since it will<br />
most likely be tuned I-V-V. This is recommended for using the dulcimer to teach music.<br />
Fret wire option - use a miter and fret saw to cut the slots for the frets where you marked-up<br />
the fret board. Press fit the frets. Cut slots for nut and bridge (see comments on intonation<br />
before cutting the bridge slot). If you don't know about installing extra frets at the 6+/13+ and<br />
or 1+/8+ positions, I recommend that you read about their purpose on my webpage (link at the<br />
end of this article). If your purpose is to dulcimers for young music students, you can leave<br />
them off and tune I-V-V and reduce confusion.<br />
Detail A - Fret Board
Fret Chart - Distance: Nut (Fret 0) to Fret<br />
24" 26" 28"<br />
1 2.62 2.84 3.05<br />
1+ 3.82 4.14 4.45<br />
2 4.95 5.36 5.78<br />
3 6.02 6.52 7.02<br />
4 7.98 8.65 9.31<br />
5 9.73 10.54 11.35<br />
6 10.53 11.41 12.29<br />
6+ 11.29 12.23 13.17<br />
7 12.00 13.00 14.00<br />
8 13.31 14.42 15.53<br />
8+ 13.91 15.07 16.23<br />
9 14.47 15.68 16.89<br />
10 15.01 16.26 17.51<br />
11 15.99 17.32 18.66<br />
12 16.86 18.27 19.68<br />
13 17.27 18.70 20.14<br />
13+ 17.64 19.11 20.58<br />
14 18.00 19.50 21.00<br />
15 18.66 20.21 21.76<br />
16 19.24 20.84 22.44<br />
17 19.50 21.13 22.76<br />
Bridge<br />
(See note)<br />
24.24 26.24 28.24
Step<br />
Assembly Instructions (continued)<br />
Instruction<br />
5 Frame assembly - Glue and clamp the side boards to the head and tail pieces. After it has set,<br />
if the side boards are thin (recommended) glue some 1/2" square strips to the side boards flush<br />
with the bottom and top to provide additional surface for gluing the bottom and sound boards<br />
to. <strong>The</strong>y also stiffen the entire structure for added strength. If you are putting the tuning screws<br />
directly into the head piece, glue two pieces together to provide plenty of wood for good<br />
friction (second piece inside the frame).<br />
6 Attach bottom board - Glue the bottom board to the frame with a bit extending beyond the<br />
edges to be sanded down latter. If you are using cardboard for the bottom and sound boards,<br />
cut them exactly to size and put some fake wood self sticking shelf paper on the side that will<br />
show with a bit wrapping around the edges to dress them, before gluing them to the frame.<br />
7 Attach sound board - If the fret board is not already attached to the sound board, glue it on<br />
now. Drill/cut the sound holes before gluing the soundboard to the frame.<br />
If you are building the extended peg head for screw tuning pegs, it's time to glue another piece<br />
of wood to the bottom of it if it is not thick enough to give a good friction bite if you haven't<br />
alredy done it. Extend the undersized pilot holes into the new wood.<br />
8 Sand it down - Time to take off the rough edges.<br />
9 Install tuners and nails in the tail piece - Insert the nut and bridge. String it up.<br />
Screw eyes with coarse pitch slipped, use 1/4" x " wire ties if you are using screw tuners.<br />
Note: <strong>The</strong> bridge goes a little farther out than the theoretical string length. Errors in placement<br />
will cause the notes to go progressively more flat or sharp as you work your way along the fret<br />
board. It is a good idea to find the right spot with a temporary bridge before cutting a slot for it.<br />
See the Bear Meadow web page for instructions on setting up intonation (link at bottom of this<br />
article).<br />
10 Tuning - <strong>The</strong> most common tunings for mountain dulcimers are DAa and DAd. D=bass<br />
A=middle A/D=treble. <strong>The</strong> chart that follows gives recommended string gauges for these<br />
tunings.<br />
String Gauge Chart<br />
24" 26" 28"<br />
Bass D 24W 22W 22W<br />
Midle A 16 16 14<br />
Treble A 16 16 14<br />
Treble D 12 12 10
Sundry Materials<br />
<br />
<br />
<br />
<br />
Wood glue<br />
Shellac for finishing.<br />
Leather scrap for ends of fret board to prevent wire from cutting into it. Also if you are using<br />
screw tuners, to cover threads to protect fret wire.<br />
Sand paper, steel wool, etc<br />
Recommended Reading/Sources<br />
Link Name<br />
http://www.bearmeadow.com Bear Meadow - Information about<br />
building fine mountain dulcimers<br />
including an article on setting<br />
intonation.<br />
http://home.centurytel.net/Dulciaddict/dulciaddict.htm Dulciaddict - Information about<br />
building mountain dulcimers aimed<br />
at the hobbyist. This helped me<br />
build my first 'from scratch'<br />
dulcimer in so many ways.<br />
http://www.everythingdulcimer.com/discuss <strong>Everything</strong> <strong>Dulcimer</strong> - Discussion<br />
list for building dulcimers; ask<br />
questions.<br />
http://www.folkcraft.com/newwood.html Folkcraft - parts, supplies,etc.<br />
http://www.stewmac.com Stewart-MacDonald - parts,<br />
supplies,etc.<br />
© Dave Murray 2003<br />
Permission to reprint this article in it's entirety, including this notice, is granted.