Pentair Kreepy Krauly
Pentair Kreepy Krauly
Pentair Kreepy Krauly

You also want an ePaper? Increase the reach of your titles
YUMPU automatically turns print PDFs into web optimized ePapers that Google loves.
If <strong>Kreepy</strong> <strong>Krauly</strong> tracks in a repetitive pattern.<br />
• Check the swivel on the top of <strong>Kreepy</strong> <strong>Krauly</strong>. It should turn freely.<br />
• Check the return line water flow and re-direct as necessary with an eyeball diverter. Refer<br />
to page 9.<br />
• Check <strong>Kreepy</strong> <strong>Krauly</strong>’s hose to ensure it has not become bent or kinked. It only takes one<br />
bent or kinked hose section to hinder the cleaning coverage. One way to check for kinks in<br />
your hose is to lay each section flat on your pool’s deck (or other flat surface). The hose<br />
should be perfectly straight and flat. Do not coil the hose when taking your <strong>Kreepy</strong><br />
<strong>Krauly</strong> out of the pool because it will retain the coil shape, forming a bend or kink.<br />
If <strong>Kreepy</strong> <strong>Krauly</strong> gets stuck on pool obstructions such as a<br />
safety ledge, ladders, steps, swim-outs, benches, etc.<br />
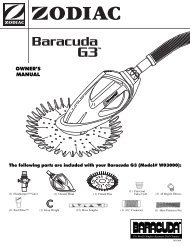
• Remove dive float restrictor and install a wall climb adjuster<br />
(Part #K12065). Snap the wall climb adjuster into place as<br />
shown in Figure 17. This will keep <strong>Kreepy</strong> <strong>Krauly</strong> on the<br />
pool’s floor and away from pool obstructions. Make sure<br />
the narrow end of the wall climb adjuster points down to the<br />
drive tubes.<br />
• If <strong>Kreepy</strong> <strong>Krauly</strong> gets stuck under your pool ladder, install a<br />
Ladder Guard (Part #K12330) according to the instructions<br />
contained in the packaging. (These accessories are available<br />
for purchase from your <strong>Pentair</strong> Pool Products dealer.)<br />
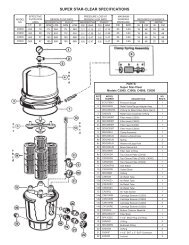
To Remove Debris From The Flapper<br />
• Sometimes debris may clog the bottom of the cleaner and<br />
prevent flapper movement or restrict flow. The flapper is<br />
located inside the main body and must move freely at all<br />
times. You can see the flapper through the opening in the<br />
baffle plate, when you turn the cleaner upside down as shown<br />
in Figure 18. Jiggle the flapper with your finger or flush the<br />
cavity with a hose to force out any debris lodged inside the<br />
main body.<br />
• If debris is still lodged inside, you must remove the flapper.<br />
First, lift the lip of the foot pad and insert a flat-head<br />
screwdriver along side one of the two tabs found on the<br />
baffle plate. See Figure 19. Push the tab inward with the screwdriver until the baffle plate releases.<br />
Place a finger into the center opening of the baffle plate and pull up until it pops out. Then pull<br />
the flapper out. NOTE: You should be able to do this without taking the foot pad off.<br />
• Once the debris is dislodged, insert the flapper back into the main body and snap the baffle<br />
plate back into position. Be sure that it is securely in place. See Figure 19.<br />
Figure 19<br />
Figure 17<br />
Figure 18<br />
Bottom View of Cleaner<br />
Flapper is<br />
Inside<br />
Baffle Plate<br />
Wall Climb<br />
Adjuster<br />
Dive Float<br />
Baffle Plate Flapper Main Body<br />
Foot Pad<br />
Pleated<br />
Seal<br />
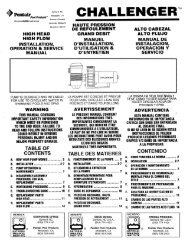
Step 5. Attach The Hose Weights And Assemble The Hose<br />
The <strong>Kreepy</strong> <strong>Krauly</strong> hose comes in sections which must be assembled. You’ll need enough sections to<br />
reach from where <strong>Kreepy</strong> <strong>Krauly</strong> is connected, to the farthest part of your pool, plus one section. You will<br />
also have to attach hose weights to the hose to neutralize the hose’s buoyancy in water. The number of<br />
hose weights required is determined by the maximum depth of your pool. The deeper your pool, the more<br />
weight is needed. The number of hose weights appropriate for your pool is explained in Table A.<br />
Twist and push the female ends onto the<br />
male ends after dipping the ends into the<br />
pool to wet them. See Figure 6. Continue<br />
until you’ve connected all the sections you<br />
need. After connecting the hose weights<br />
to the hose as described in “Table A”, then<br />
connect the hose to <strong>Kreepy</strong> <strong>Krauly</strong>. See Figure 7.<br />
One of the hose sections has 2 female ends.<br />
This section should be fitted last and<br />
attached to the pool’s vacuum connection.<br />
Figure 6<br />
Male Hose End<br />
Female Hose End<br />
TABLE A<br />
Pool depth Weight Placement<br />
4 feet or less 1 weight: 4 to 12 inches from<br />
<strong>Kreepy</strong> <strong>Krauly</strong>’s swivel head.<br />
More than 4 feet,<br />
but less than 7 feet<br />
More than 7 feet,<br />
but less than 12 feet<br />
More than 12 feet<br />
2 weights: one 4 to 12 inches<br />
and one 6 feet from<br />
the swivel head.<br />
3 weights: one 4 to 12 inches,<br />
one 6 feet and one<br />
10 feet from the swivel head.<br />
4 weights:* one 4 to 12 inches,<br />
one 6 feet, one 10 feet,<br />
and one 12 feet from the<br />
swivel head.<br />
* Contact your <strong>Pentair</strong> Pool Products dealer if you need to purchase additional hose weights.<br />
Before attaching the Female/Female<br />
Section to your vacuum connection you will<br />
first need to install the hose protector on to the Female/Female hose section. The hose protector is<br />
used to protect the hose from wear.<br />
NOTE: May substitute 4 inch Female/Female hose.<br />
Your fully assembled <strong>Kreepy</strong> <strong>Krauly</strong> should look like this.<br />
Figure 7<br />
Female End of a Male/Female Section<br />
Swivel Head<br />
4''-12''<br />
Hose Weights<br />
NOTE: The hose length<br />
illustrated is not representative<br />
of actual size. You will need to<br />
use more sections than shown.<br />
Female/Female Section<br />
with hose protector<br />
to be added last<br />
Foot Pad<br />
(not necessary to remove)<br />
6' 10'<br />
12<br />
5