User Guide - EFI
User Guide - EFI
User Guide - EFI

You also want an ePaper? Increase the reach of your titles
YUMPU automatically turns print PDFs into web optimized ePapers that Google loves.
<strong>EFI</strong> Balance <br />
SERVER & CONTROLLER SOLUTIONS<br />
<strong>User</strong> <strong>Guide</strong>
© 2004 Electronics for Imaging, Inc. The information in this publication is covered<br />
under Legal Notices for this product.<br />
45047815<br />
17 December 2004
3<br />
LEGAL NOTICES<br />
Patents<br />
This product documentation is protected by copyright, and all rights are reserved. No part of it may be<br />
reproduced or transmitted in any form or by any means for any purpose without express prior written<br />
consent from Electronics for Imaging, Inc. (“<strong>EFI</strong>”), except as expressly permitted herein. Information<br />
in this document is subject to change without notice and does not represent a commitment on the part<br />
of <strong>EFI</strong>.<br />
This product documentation is provided in conjunction with the <strong>EFI</strong> software (“Software”) and any<br />
other <strong>EFI</strong> product described in this documentation. The Software is furnished under license and may<br />
only be used or copied in accordance with the terms of the Software License Agreement set forth below.<br />
This product may be covered by one or more of the following U.S. Patents:<br />
4,716,978, 4,828,056, 4,917,488, 4,941,038, 5,109,241, 5,170,182, 5,212,546, 5,260,878,<br />
5,276,490, 5,278,599, 5,335,040, 5,343,311, 5,398,107, 5,424,754, 5,442,429, 5,459,560,<br />
5,467,446, 5,506,946, 5,517,334, 5,537,516, 5,543,940, 5,553,200, 5,563,689, 5,565,960,<br />
5,583,623, 5,596,416, 5,615,314, 5,619,624, 5,625,712, 5,640,228, 5,666,436, 5,745,657,<br />
5,760,913, 5,799,232, 5,818,645, 5,835,788, 5,859,711, 5,867,179, 5,940,186, 5,959,867,<br />
5,970,174, 5,982,937, 5,995,724, 6,002,795, 6,025,922, 6,035,103, 6,041,200, 6,065,041,<br />
6,112,665, 6,116,707, 6,122,407, 6,134,018, 6,141,120, 6,166,821, 6,173,286, 6,185,335,<br />
6,201,614, 6,215,562, 6,219,155, 6,219,659, 6,222,641, 6,224,048, 6,225,974, 6,226,419,<br />
6,238,105, 6,239,895, 6,256,108, 6,269,190, 6,271,937, 6,278,901, 6,279,009, 6,289,122,<br />
6,292,270, 6,299,063, 6,310,697, 6,321,133, 6,327,047, 6,327,050, 6,327,052, 6,330,071,<br />
6,330,363, 6,331,899, 6,340,975, 6,341,017, 6,341,018, 6,341,307, 6,347,256, 6,348,978,<br />
6,356,359, 6,366,918, 6,369,895, 6,381,036, 6,400,443, 6,429,949, 6,449,393, 6,476,927,<br />
6,490,696, 6,501,565, 6,519,053, 6,539,323, 6,543,871, 6,546,364, 6,549,294, 6,549,300,<br />
6,550,991, 6,552,815, 6,559,958, 6,572,293, 6,590,676, 6,606,165, 6,633,396, 6,636,326,<br />
6,643,317, 6,647,149, 6,657,741, 6,662,199, 6,678,068, 6,707,563, 6,741,262, 6,748,471,<br />
6,753,845, 6,757,436, 6,757,440, RE33,973, RE36,947, D341,131, D406,117, D416,550,<br />
D417,864, D419,185, D426,206, D439,851, D444,793.<br />
Trademarks<br />
Auto-Count, ColorCal, ColorWise, Command WorkStation, DocBuilder Pro, EDOX, <strong>EFI</strong>, Fiery,<br />
the Fiery logo, Fiery Driven, the Fiery Driven logo, Fiery Spark, MicroPress, OneFlow, Printcafe,<br />
PrinterSite, PrintMe, Prograph, Proteus, RIP-While-Print, Splash, and Spot-On are registered<br />
trademarks of Electronics for Imaging, Inc. in the U.S. Patent and Trademark Office and/or certain<br />
other foreign jurisdictions. Bestcolor is a registered trademark of Best GmbH in the U.S. Patent and<br />
Trademark Office.<br />
ADS, AutoCal, Balance, Build, Digital StoreFront, DocStream, Fiery Link, Fiery Prints, FreeForm,<br />
Hagen, Intelligent Device Management, Logic, PrintFlow, PrintSmith, PrintSmith Site, PSI, PSI Flexo,<br />
RIPChips, Scan, SendMe, VisualCal, WebTools, the <strong>EFI</strong> logo, the Fiery Prints logo, and Essential to<br />
Print are trademarks of Electronics for Imaging, Inc. Best, the Best logo, Colorproof, PhotoXposure,<br />
Remoteproof, and Screenproof are trademarks of Best GmbH.<br />
All other terms and product names may be trademarks or registered trademarks of their respective<br />
owners, and are hereby acknowledged.
4<br />
Legal Notifications<br />
FCC Information<br />
APPLE COMPUTER, INC. (“APPLE”) MAKES NO WARRANTIES, EXPRESS OR<br />
IMPLIED, INCLUDING WITHOUT LIMITATION THE IMPLIED WARRANTIES OF<br />
MERCHANTABILITY AND FITNESS FOR A PARTICULAR PURPOSE, REGARDING<br />
THE APPLE SOFTWARE. APPLE DOES NOT WARRANT, GUARANTEE, OR MAKE ANY<br />
REPRESENTATIONS REGARDING THE USE OR THE RESULTS OF THE USE OF THE<br />
APPLE SOFTWARE IN TERMS OF ITS CORRECTNESS, ACCURACY, RELIABILITY,<br />
CURRENTNESS, OR OTHERWISE. THE ENTIRE RISK AS TO THE RESULTS AND<br />
PERFORMANCE OF THE APPLE SOFTWARE IS ASSUMED BY YOU. THE EXCLUSION<br />
OF IMPLIED WARRANTIES IS NOT PERMITTED BY SOME STATES. THE ABOVE<br />
EXCLUSION MAY NOT APPLY TO YOU.<br />
IN NO EVENT WILL APPLE, ITS DIRECTORS, OFFICERS, EMPLOYEES OR AGENTS BE<br />
LIABLE TO YOU FOR ANY CONSEQUENTIAL, INCIDENTAL, OR INDIRECT DAMAGES<br />
(INCLUDING DAMAGES FOR LOSS OF BUSINESS PROFITS, BUSINESS INTERRUPTION,<br />
LOSS OF BUSINESS INFORMATION, AND THE LIKE) ARISING OUT OF THE USE OR<br />
INABILITY TO USE THE APPLE SOFTWARE, EVEN IF APPLE HAS BEEN ADVISED OF<br />
THE POSSIBILITY OF SUCH DAMAGES. BECAUSE SOME STATES DO NOT ALLOW THE<br />
EXCLUSION OR LIMITATION OF LIABILITY FOR CONSEQUENTIAL OR INCIDENTAL<br />
DAMAGES, THE ABOVE LIMITATIONS MAY NOT APPLY TO YOU. Apple’s liability to you<br />
for actual damages from any cause whatsoever, and regardless of the form of the action (whether in<br />
contract, tort [including negligence], product liability, or otherwise), will be limited to $50.<br />
PANTONE ® Colors displayed in the Software or in the documentation may not match PANTONEidentified<br />
standards. Consult current PANTONE Color Publications for accurate color. PANTONE ®<br />
and other Pantone, Inc. trademarks are the property of Pantone, Inc. © Pantone, Inc., 2001. Pantone,<br />
Inc. is the copyright owner of PANTONE color data and/or software.<br />
This product includes software developed by the Apache Software Foundation (www.apache.org).<br />
WARNING: FCC Regulations state that any unauthorized changes or modifications to this equipment<br />
not expressly approved by the manufacturer could void the user’s authority to operate this equipment.<br />
Refer to the Class Compliance sticker affixed to the back of your Fiery (or, in the case of embedded<br />
systems, to the sticker affixed to the print engine) to identify the appropriate classification (A or B,<br />
below) for this product.<br />
Class A Compliance<br />
This equipment has been tested and found to comply with the limits for a Class A digital device,<br />
pursuant to Part 15 of the FCC Rules. These limits are designed to provide reasonable protection<br />
against harmful interference when the equipment is operated in a commercial environment. This<br />
equipment generates, uses, and can radiate radio frequency energy and, if not installed and used<br />
in accordance with the instruction manual, may cause harmful interference to radio communications.<br />
Operation of this equipment in a residential area is likely to cause interference, in which case the user<br />
will be required to correct the interference at his own expense.<br />
Industry Canada Class A Notice<br />
This Class A digital apparatus complies with Canadian ICES-003.<br />
Avis de Conformation Classe A de l’Industrie Canada<br />
Cet appareil numérique de la Classe A est conforme à la norme NMB-003 du Canada.
5<br />
Class B Declaration of Conformity<br />
This equipment has been tested and found to comply with the limits for a Class B digital device,<br />
pursuant to Part 15 of the FCC rules. These limits are designed to provide reasonable protection against<br />
harmful interference in a residential installation. This equipment generates, uses, and can radiate radio<br />
frequency energy and, if not installed and used in accordance with the instructions, may cause harmful<br />
interference to radio communications. However, there is no guarantee that interference will not occur in<br />
a particular installation.<br />
If this equipment does cause harmful interference to radio or television reception, which can be<br />
determined by turning the equipment off and on, the user is encouraged to try to correct the<br />
interference by one or more of the following measures:<br />
Reorient or relocate the receiving antenna.<br />
Increase the separation between the equipment and receiver.<br />
Connect the equipment into an outlet on a circuit different from that to which the receiver is connected.<br />
Consult the dealer or an experienced radio/TV technician for help.<br />
In order to maintain compliance with FCC regulations, shielded cables must be used with this<br />
equipment. Operation with non-approved equipment or unshielded cables is likely to result in<br />
interference to radio and TV reception. The user is cautioned that changes and modifications made<br />
to the equipment without the approval of the manufacturer could void the user’s authority to operate<br />
this equipment.<br />
Industry Canada Class B Notice<br />
This Class B digital apparatus complies with Canadian ICES-003.<br />
Avis de Conformation Classe B de l’Industrie Canada<br />
Cet appareil numérique de la Classe B est conforme à la norme NMB-003 du Canada.<br />
RFI Compliance Notice<br />
This equipment has been tested concerning compliance with the relevant RFI protection requirements<br />
both individually and on a system level (to simulate normal operation conditions). However, it is<br />
possible that these RFI Requirements are not met under certain unfavorable conditions in other<br />
installations. It is the user who is responsible for compliance of his particular installation.<br />
Dieses Gerät wurde sowohl einzeln als auch in einer Anlage, die einen normalen Anwendungsfall<br />
nachbildet, auf die Einhaltung der Funkentstörbestimmungen geprüft. Es ist jedoch möglich, dass die<br />
Funkentstörbestimmungen unter ungünstigen Umständen bei anderen Gerätekombinationen nicht<br />
eingehalten werden. Für die Einhaltung der Funkentstörbestimmungen einer gesamten Anlage, in<br />
der dieses Gerät betrieben wird, ist der Betreiber verantwortlich.<br />
Compliance with applicable regulations depends on the use of shielded cables. It is the user who is<br />
responsible for procuring the appropriate cables.<br />
Die Einhaltung zutreffender Bestimmungen hängt davon ab, dass geschirmte Ausführungen benützt<br />
werden. Für die Beschaffung richtiger Ausführungen ist der Betreiber verantwortlich.<br />
CE Marking (Declaration of Conformity)<br />
This product complies with the following EU directives: 89/336/EEC, 73/23/EEC, and 93/68/EEC<br />
directives. This declaration is valid for the area of the European Union.
6<br />
SOFTWARE LICENSE AGREEMENT<br />
PLEASE READ THIS SOFTWARE LICENSE AGREEMENT (“LICENSE AGREEMENT”)<br />
CAREFULLY. THIS LICENSE AGREEMENT IS A LEGAL AGREEMENT BETWEEN YOU<br />
AND ELECTRONICS FOR IMAGING, INC. (“<strong>EFI</strong>”) REGARDING THE <strong>EFI</strong> SOFTWARE<br />
(“SOFTWARE”). BY INSTALLING, COPYING OR OTHERWISE USING THE SOFTWARE,<br />
YOU AGREE TO BE BOUND BY THIS LICENSE AGREEMENT. IF YOU DO NOT AGREE,<br />
DO NOT INSTALL, COPY, OR OTHERWISE USE THE SOFTWARE AND YOU MAY<br />
RETURN THE UNUSED SOFTWARE, WITH PROOF OF PAYMENT, FOR A FULL REFUND<br />
TO THE PLACE OF PURCHASE WITHIN THIRTY (30) DAYS OF THE PURCHASE DATE.<br />
License<br />
<strong>EFI</strong> grants you a limited, non-exclusive license to use the Software solely in accordance with the terms<br />
and conditions of this License Agreement, solely as specified in the <strong>EFI</strong> product documentation,<br />
and solely with the product(s) specified in the <strong>EFI</strong> product documentation (“Product(s)”).<br />
The term “Software” as used in this License Agreement shall mean the <strong>EFI</strong> software and all<br />
documentation, downloads, on-line materials, bug fixes, patches, releases, release notes, updates,<br />
upgrades, technical support materials, and information regarding the <strong>EFI</strong> software. The terms and<br />
conditions of this License Agreement shall apply to and govern your use of any such item to the extent<br />
that <strong>EFI</strong> does not provide a separate or additional written license agreement for such item.<br />
The Software is licensed, not sold. You may use the Software solely for the purposes described in the <strong>EFI</strong><br />
product documentation. You may not rent, lease, sublicense, lend, or otherwise distribute the Software<br />
or use the Software in any time sharing, service bureau, or similar arrangement.<br />
You may not make or have made, or permit to be made, any copies of the Software or portions thereof,<br />
except one (1) backup or archive copy for the purposes permitted in this License Agreement; provided,<br />
however, that under no circumstances may you make or have made, or permit to be made, any copies of<br />
any portion of the Software that is included on any portion of the controller board or hardware of a<br />
product. You agree not to localize, translate, disassemble, decompile, decrypt, reverse engineer, discover<br />
the source code of, modify, create derivative works of, or in any way change any part of the Software.<br />
Intellectual Property Rights<br />
You acknowledge and agree that all rights, title, and interest, including all intellectual property rights, in<br />
and relating to the Software, all <strong>EFI</strong> Products, and all copies, modifications, and derivative works<br />
thereof, are solely owned by and shall remain with <strong>EFI</strong> and its suppliers. Except for the express limited<br />
license granted in this License Agreement, no right or license of any kind is granted. You receive<br />
no rights or license under any patents, copyrights, trade secrets, trademarks (whether registered or<br />
unregistered), or other intellectual property. You agree not to adopt, register, or attempt to register any<br />
<strong>EFI</strong> trademark or trade name or any confusingly similar mark, URL, internet domain name, or symbol<br />
as your own name or the name of your affiliates or products, and agree not to take any other action<br />
which impairs or reduces the trademark rights of <strong>EFI</strong> or its suppliers.<br />
Confidentiality<br />
The Software is confidential, proprietary information of <strong>EFI</strong> and you may not distribute or disclose the<br />
Software. You may, however, permanently transfer all of your rights under this License Agreement to<br />
another person or legal entity provided that: (1) such a transfer is authorized under all applicable export<br />
laws and regulations, including the laws and regulations of the United States, including the United<br />
States Export Administration Regulations; (2) you transfer to the person or entity all of the Software<br />
(including all copies, updates, upgrades, media, printed documentation, and this License Agreement);<br />
(3) you retain no copies of the Software, including no backup, archival, or other copies, however stored;<br />
and (4) the recipient agrees to all of the terms and conditions of this License Agreement.
7<br />
Termination<br />
Unauthorized use, copying, or disclosure of the Software, or any breach of this License Agreement will<br />
result in automatic termination of this license and will make available to <strong>EFI</strong> other legal remedies. In the<br />
event of termination, you must destroy all copies of the Software and all component parts thereof.<br />
All provisions of this License Agreement relating to confidentiality of the Software, disclaimers of<br />
warranties, limitation of liability, remedies, damages, governing law, jurisdiction, venue, and <strong>EFI</strong>’s<br />
intellectual property rights shall survive any termination of this license.<br />
Limited Warranty and Disclaimer<br />
<strong>EFI</strong> warrants that the Software, if used as specified in the <strong>EFI</strong> product documentation, will perform<br />
substantially in accordance with the <strong>EFI</strong> product documentation for a period of ninety (90) days from<br />
the date of receipt. <strong>EFI</strong> makes no warranty or representation that the Software will meet your specific<br />
requirements, that the operation of the Software will be uninterrupted, secure, fault-tolerant, or error<br />
free, or that all defects in the Software will be corrected. <strong>EFI</strong> makes no warranty, implied or otherwise,<br />
regarding the performance or reliability of any other Products or services or any third party products<br />
(software or hardware) or services. THE INSTALLATION OF ANY THIRD PARTY PRODUCTS<br />
OTHER THAN AS AUTHORIZED BY <strong>EFI</strong> WILL VOID THIS WARRANTY. USE,<br />
MODIFICATION, AND/OR REPAIR OF THE SOFTWARE OR AN <strong>EFI</strong> PRODUCT OTHER<br />
THAN AS AUTHORIZED BY <strong>EFI</strong> WILL VOID THIS WARRANTY. FURTHER, THIS<br />
LIMITED WARRANTY IS VOID IF A PROBLEM WITH THE SOFTWARE ARISES FROM<br />
ACCIDENT, ABUSE, MISAPPLICATION, ABNORMAL USE, VIRUS, WORM, OR SIMILAR<br />
CIRCUMSTANCE.<br />
TO THE MAXIMUM EXTENT PERMITTED BY APPLICABLE LAW, EXCEPT FOR THE<br />
EXPRESS LIMITED WARRANTY SET FORTH ABOVE (“LIMITED WARRANTY”), <strong>EFI</strong><br />
MAKES AND YOU RECEIVE NO REPRESENTATIONS OR WARRANTIES RELATING TO<br />
THE SOFTWARE, ANY PRODUCT AND/OR ANY SERVICES, WHETHER EXPRESS,<br />
IMPLIED, STATUTORY, OR IN ANY OTHER PROVISION OF THIS AGREEMENT OR ANY<br />
OTHER COMMUNICATION. <strong>EFI</strong> SPECIFICALLY DISCLAIMS ALL IMPLIED WARRANTIES,<br />
REPRESENTATIONS, AND CONDITIONS, INCLUDING THOSE OF SECURITY,<br />
MERCHANTABILITY, FITNESS FOR A PARTICULAR PURPOSE AND<br />
NONINFRINGEMENT OF THIRD PARTY RIGHTS. THERE IS NO WARRANTY OR<br />
REPRESENTATION THAT THE OPERATION OF THE SOFTWARE AND/OR ANY<br />
PRODUCT WILL BE UNINTERRUPTED, FAULT-TOLERANT, SECURE, OR ERROR-FREE.<br />
TO THE MAXIMUM EXTENT PERMITTED BY APPLICABLE LAW, YOUR SOLE AND<br />
EXCLUSIVE REMEDY, AND THE ENTIRE LIABILITY OF <strong>EFI</strong> AND ITS SUPPLIERS,<br />
RELATING TO ANY AND ALL SOFTWARE, PRODUCTS, SERVICES, AND/OR APPLICABLE<br />
WARRANTIES SHALL BE, AT <strong>EFI</strong>’S OPTION, (1) TO REPAIR OR REPLACE THE<br />
SOFTWARE THAT DOES NOT MEET THE LIMITED WARRANTY; OR (2) PROVIDE A<br />
REFUND OF THE PRICE PAID (IF ANY) FOR THE SOFTWARE THAT DOES NOT MEET<br />
THE LIMITED WARRANTY. EXCEPT AS PROVIDED IN THIS SECTION, <strong>EFI</strong> AND ITS<br />
SUPPLIERS SHALL PROVIDE NO REFUNDS, RETURNS, EXCHANGES, OR<br />
REPLACEMENTS.
8<br />
Limitation of Liability<br />
TO THE MAXIMUM EXTENT PERMITTED BY APPLICABLE LAW, YOU AGREE THAT<br />
THE ENTIRE LIABILITY OF <strong>EFI</strong> AND ITS SUPPLIERS FOR ALL CLAIMS RELATED TO ANY<br />
SOFTWARE, PRODUCT, SERVICES, AND/OR THIS LICENSE AGREEMENT, REGARDLESS<br />
OF THE FORM OF ACTION (WHETHER IN CONTRACT, TORT, UNDER STATUTE, OR<br />
OTHERWISE), SHALL BE LIMITED TO THE AMOUNT PAID BY YOU, IF ANY, FOR THE<br />
<strong>EFI</strong> SOFTWARE. YOU AGREE THAT SUCH AMOUNT IS SUFFICIENT TO SATISFY THE<br />
ESSENTIAL PURPOSE OF THIS LICENSE AGREEMENT AND THAT SUCH A LIABILITY IS<br />
A FAIR AND REASONABLE ESTIMATE OF ANY LOSS AND DAMAGE LIKELY TO BE<br />
SUFFERED IN THE EVENT OF ANY WRONGFUL ACT OR OMISSION BY <strong>EFI</strong> AND/OR ITS<br />
SUPPLIERS. TO THE MAXIMUM EXTENT PERMITTED BY APPLICABLE LAW, IN NO<br />
EVENT SHALL <strong>EFI</strong> AND ITS SUPPLIERS BE LIABLE FOR COST OF PROCUREMENT OF<br />
SUBSTITUTE SOFTWARE, PRODUCTS OR SERVICES, LOST PROFITS OR DATA, THIRD<br />
PARTY CLAIMS, OR ANY SPECIAL INDIRECT, RELIANCE, CONSEQUENTIAL,<br />
EXEMPLARY, PUNITIVE, OR INCIDENTAL DAMAGES, HOWEVER CAUSED AND ON<br />
ANY THEORY OF LIABILITY, RELATED TO ANY SOFTWARE, PRODUCT, SERVICES AND/<br />
OR THIS LICENSE AGREEMENT. THIS LIMITATION SHALL APPLY EVEN IF <strong>EFI</strong> AND ITS<br />
SUPPLIERS HAVE BEEN ADVISED OF THE POSSIBILITY OF SUCH DAMAGES. YOU<br />
AGREE THAT THE PRICE OF THE <strong>EFI</strong> SOFTWARE REFLECTS THIS ALLOCATION OF<br />
RISK. YOU ACKNOWLEDGE AND AGREE THAT THE FOREGOING LIMITATIONS OF<br />
LIABILITY AND DISCLAIMERS FORM AN ESSENTIAL ELEMENT OF THIS LICENSE<br />
AGREEMENT, WITHOUT WHICH <strong>EFI</strong> WOULD NOT HAVE LICENSED THE <strong>EFI</strong><br />
SOFTWARE TO YOU.<br />
BECAUSE SOME JURISDICTIONS DO NOT ALLOW SOME OR ALL OF THE EXCLUSIONS<br />
AND/OR LIMITATIONS OF LIABILITY HEREIN, SOME OR ALL OF THE ABOVE<br />
EXCLUSIONS AND LIMITATIONS MAY NOT APPLY TO YOU.<br />
You are hereby notified that Adobe Systems Incorporated, a Delaware corporation located at 345 Park<br />
Avenue, San Jose, CA 95110-2704 (“Adobe”) is a third-party beneficiary to this License Agreement to<br />
the extent that this License Agreement contains provisions which relate to your use of any software, font<br />
programs, typefaces, and/or trademarks licensed or supplied by Adobe. Such provisions are made<br />
expressly for the benefit of Adobe and are enforceable by Adobe in addition to <strong>EFI</strong>. ADOBE<br />
WILL HAVE NO LIABILITY WHATSOEVER TO YOU FOR ANY ADOBE SOFTWARE OR<br />
TECHNOLOGY LICENSED HEREUNDER.<br />
Export Restrictions<br />
The Software and <strong>EFI</strong> Products are subject to the export laws and regulations of the United States,<br />
including the United States Export Administration Regulations. The license granted to you herein is<br />
conditioned upon your compliance with all applicable export laws and regulations, including the export<br />
laws and regulations of the United States. You represent and agree that you will not use, disclose,<br />
distribute, transfer, export, or re-export any portion of the Software or any <strong>EFI</strong> Product in any form in<br />
violation of any applicable export laws and regulations, including the export laws and regulations of the<br />
United States.
9<br />
U.S. Government Restricted Rights<br />
Use, duplication, or disclosure of the Software by the United States Government is subject to<br />
restrictions as set forth in FAR 12.212 or DFARS 227.7202-3 - 227.7202-4 and, to the extent required<br />
under U.S. federal law, the minimum restricted rights as set out in FAR 52.227-14, Restricted Rights<br />
Notice (June 1987) Alternate III(g)(3) (June 1987) or FAR 52.227-19 (June 1987). To the extent any<br />
technical data is provided pursuant to the Agreement, such data is protected per FAR 12.211 and<br />
DFARS 227.7102-2 and to the extent explicitly required by the U.S. Government, is subject to limited<br />
rights as set out in DFARS 252.227.7015 (November 1995) and DFARS 252.227-7037 (September<br />
1999). In the event that any of the above referenced agency regulations are modified or superseded, the<br />
subsequent equivalent regulation shall apply. The name of the Contractor is Electronics for Imaging,<br />
Inc.<br />
Governing Law and Jurisdiction<br />
The rights and obligations of the parties related to this License Agreement will be governed in all<br />
respects by the laws of the State of California exclusively, as such laws apply to contracts between<br />
California residents performed entirely within California. The United Nations Convention on<br />
Contracts for the International Sale of Goods and any other similar convention does not apply to this<br />
License Agreement. For all disputes related to the Software, Products, Services, and/or this License<br />
Agreement, you consent to the exclusive personal jurisdiction and venue of the state courts in San Mateo<br />
County, California and the federal court for the Northern District of California.<br />
General<br />
This Agreement is the entire agreement held between us and supersedes any other communications or<br />
advertising with respect to the Software, Products, Services, and any other subject matter covered by this<br />
License Agreement. If any provision of the License Agreement is held invalid, such provision shall be<br />
deemed modified to the extent necessary to be enforceable and the other provisions in this License<br />
Agreement shall continue in full force and effect.<br />
If you have any questions, see the <strong>EFI</strong> web site at www.efi.com.<br />
Electronics for Imaging, Inc.<br />
303 Velocity Way<br />
Foster City, CA 94404<br />
USA<br />
Copyright © 2004 Electronics for Imaging, Inc. All rights reserved.<br />
Part Number: 45047815<br />
17 December 2004
CONTENTS 11<br />
CONTENTS<br />
INTRODUCTION 17<br />
About <strong>EFI</strong> Balance 17<br />
About this manual 19<br />
<strong>EFI</strong> Balance Online Help 20<br />
<strong>EFI</strong> Balance package 21<br />
<strong>EFI</strong> Balance workflow software modules 21<br />
Terminology 22<br />
INSTALLING THE <strong>EFI</strong> BALANCE SERVER 23<br />
System requirements 23<br />
Uninstalling previous versions 25<br />
Install the hardware security key 26<br />
Installing server software 27<br />
Entering license information 30<br />
Configuring the <strong>EFI</strong> Balance server 32<br />
Using Paper Catalog 34<br />
Specifying tab media 36<br />
INSTALLING <strong>EFI</strong> BALANCE UTILITIES AND PRINTER DRIVERS 38<br />
System requirements 38<br />
Windows client requirements 38<br />
Mac OS client requirements 39
CONTENTS 12<br />
Installing printer drivers and <strong>EFI</strong> Balance PPD files 39<br />
Installing Windows printer drivers 39<br />
Installing Mac OS printer files 42<br />
Configuring Mac OS printer groups 43<br />
Updating printer groups and drivers 46<br />
Installing <strong>EFI</strong> Balance utilities 46<br />
Installation configurations 47<br />
Installing Job Monitor 48<br />
PRINTER GROUPS AND LOAD-BALANCING 49<br />
<strong>EFI</strong> Balance printer groups workflow 49<br />
Before creating a printer group 50<br />
Composition 52<br />
Color output requirements 53<br />
Mixed media requirements 53<br />
One-way server communication 53<br />
Creating printer groups 54<br />
Creating or editing a printer group 54<br />
Viewing and deleting printer groups 57<br />
Adding and removing print devices 58<br />
Printer group options 60<br />
Group name 60<br />
Group Media Selection 60<br />
Reroute on Error 61<br />
Group Balance settings 62<br />
Color Match 66<br />
Printer installable options 66<br />
Pages per Minute (PPM) 66<br />
Scripting 67
CONTENTS 13<br />
SERVER OPERATION 69<br />
Using <strong>EFI</strong> Balance Bar 70<br />
Using Tray Association 71<br />
Using Command WorkStation 73<br />
Connecting to <strong>EFI</strong> Balance 73<br />
Using WebTools 75<br />
Using <strong>EFI</strong> Impose 77<br />
Using <strong>EFI</strong> Compose 77<br />
Print editing workflow 78<br />
Starting and shutting down the <strong>EFI</strong> Balance server 79<br />
PRINTING 81<br />
About <strong>EFI</strong> Balance printer driver and PPD files 82<br />
Printing to an <strong>EFI</strong> Balance printer group 82<br />
About print options 85<br />
Printer’s Default setting 85<br />
Setting print options 86<br />
Using <strong>EFI</strong> Hot Folders 87<br />
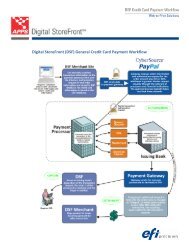
DIGITAL STOREFRONT (DSF) CONNECTIVITY AND JOB TICKET SUPPORT 88<br />
DSF setup 88<br />
Paper Catalog synchronization 88<br />
Job submission 89<br />
DSF installation on an <strong>EFI</strong> Balance server 90<br />
DSF job ticket options 91
CONTENTS 14<br />
TROUBLESHOOTING 94<br />
Before calling for service 94<br />
Pre-call checklist 94<br />
Maintenance 95<br />
Clear the server 96<br />
Error messages 96<br />
Troubleshooting 96<br />
Setup troubleshooting 96<br />
Runtime error messages 98<br />
Print troubleshooting 99<br />
Jobs print without specified finishing options 99<br />
Printer group does not display all available options 100<br />
Mixed media option or Compose does not appear 100<br />
Long Job Split or Color Split option does not work 101<br />
Documents take a long time to print 101<br />
Reroute notification issues 101<br />
Preferred Printer errors 102<br />
Errors during load-balancing 102<br />
WINDOWS XP CONNECTION 105<br />
Enabling Point and Print (PNP) for Windows XP computers 105<br />
Enabling Point and Print access for Windows XP computers 105<br />
Connecting Windows XP Service Pack 2 106<br />
Connecting to a server from a client computer outside the <strong>EFI</strong> Balance subnet 106<br />
Enabling the remote Windows XP Service pack 2 computer to access utilities 106<br />
Disabling the Pop-up Blocker from Internet Explorer 107
CONTENTS 15<br />
DIGIMASTER FAMILY ENABLER 108<br />
Setup and supported features 108<br />
XEROX DOCUTECH/NUVERA ENABLER 109<br />
Setup and supported features 109<br />
DIGIPATH 110<br />
DigiPath 3.0 and 4.0 print support 110<br />
INDEX 111
INTRODUCTION 17<br />
INTRODUCTION<br />
<strong>EFI</strong> Balance workflow software provides efficient, load-balanced network printing to<br />
high-volume print environments. Clients on remote computers send print jobs to a Balance<br />
server, which determines how the jobs are routed or split among print devices for optimal load<br />
and cost efficiency.<br />
About <strong>EFI</strong> Balance<br />
Balance is the production-stage backbone of the <strong>EFI</strong> workflow system, accepting jobs from<br />
any user on the system, providing productive editing tools to system users, and intelligently<br />
managing jobs to a wide range of digital devices. The burden of expertise is in the Balance<br />
system, so your choice of job creation applications and eventual production devices can be<br />
easily integrated with the system, therefore producing immediate results.<br />
Balance includes a comprehensive suite of PDF-based applications that leverage the <strong>EFI</strong><br />
Command WorkStation ® interface, industry-standard PDF technologies, and a wide base of<br />
<strong>EFI</strong> Fiery servers, making workflow easy to use and implement. It brings powerful <strong>EFI</strong><br />
workflow to all digital print environments and supports most <strong>EFI</strong> controlled devices (as well<br />
as non-<strong>EFI</strong> controlled black-and-white devices) with an identical look and feel for maximum<br />
user efficiency.<br />
Balance includes the following:<br />
<strong>EFI</strong> Compose : Dramatically increases productivity and ease of composition for complex jobs,<br />
allowing users to visually assign page-level attributes and tabs to communicate them to any<br />
printer on the system.<br />
<strong>EFI</strong> Impose : Reduces production time and errors by allowing WYSIWYG display for nearly<br />
any imposition scheme.<br />
Integrated Enfocus Pitstop and Adobe Acrobat: Deliver seamless workflow by enabling<br />
late-stage PDF editing for on-the-fly changes and corrections.<br />
<strong>EFI</strong> Hot Folders: Provides additional productivity, customizing the power of Balance for a<br />
custom-defined workflow.<br />
<strong>EFI</strong> Scan : Incorporates hard copy input, providing production scanning of black-and-white<br />
or color documents into the Balance PDF workflow.
INTRODUCTION 18<br />
Non <strong>EFI</strong>-systems enablers: Extends automation by integrating many existing workflows into<br />
the Balance system, including Xerox DigiPath, DocuTech/Nuvera, WorkCenter and<br />
Digimaster Family Enabler.<br />
<strong>EFI</strong> seamless system integration: Protects user investment by ensuring compatibility with<br />
current and future <strong>EFI</strong> workflow system components, including Digital StoreFront (DSF)<br />
and OneFlow.<br />
With Balance, you can perform the following tasks:<br />
• Load-balance and route to improve automation and productivity and reduce errors and<br />
costs<br />
• Send jobs to the fastest printer in a printer group based on concurrent loads or divide a job<br />
between two or more printers for faster completion<br />
• Split color content to color printers and enable in-line merge at black-and-white printers,<br />
reducing manual intervention and costs<br />
• Route print jobs to based finishing options, streamlining process and reducing manual<br />
finishing tasks<br />
• Automatically redirect print jobs to other available printers on busy or error, enabling<br />
mission critical and unattended printing<br />
• Script API for customized scripting to printers and printer groups
INTRODUCTION 19<br />
About this manual<br />
This manual is intended for administrators and operators of the Balance server and for users<br />
who send print jobs to the Balance server from networked client computers. The manual is<br />
divided into the following chapters:<br />
Installing the <strong>EFI</strong> Balance Server explains how to install Balance software and utility<br />
applications on the Balance server computer.<br />
Installing <strong>EFI</strong> Balance Utilities and Printer Drivers explains how to install Balance<br />
management, monitoring, and printing software on client computers.<br />
Printer Groups and Load-Balancing provides an overview of the Balance load-balancing<br />
features and describes how to plan, set up, and configure printer groups.<br />
Server Operation describes additional software available for operating the server, managing the<br />
print environment, and editing print jobs.<br />
Printing explains how to print jobs to the Balance server using different printing applications.<br />
Digital StoreFront (DSF) Connectivity and Job Ticket Support explains how to connect to DSF,<br />
how to submit jobs, and Balance supported job ticket options.<br />
Troubleshooting provides troubleshooting tips and solutions to common problems that may<br />
occur.<br />
Windows XP Connection provides information about connecting Balance servers and remote<br />
client computers using Windows XP Service Pack 2.<br />
Digimaster Family Enabler provides information about Balance printing specific to the<br />
Digimaster Family Enabler.<br />
Xerox DocuTech/Nuvera Enabler provides information about Balance printing specific to the<br />
Xerox DocuTech/Nuvera Enabler.<br />
DigiPath provides information on Balance printing specific about the Xerox DigiPath.
INTRODUCTION 20<br />
<strong>EFI</strong> Balance Online Help<br />
In addition to this manual, online help documentation is available as a reference for users of<br />
different Balance products.<br />
Balance Help describes procedures for configuring a Balance server and ongoing operational<br />
management using the <strong>EFI</strong> Balance Bar.<br />
Command WorkStation Help describes operational procedures used to monitor Balance server<br />
queues, hold and release jobs, and edit print jobs from Command WorkStation.<br />
Balance Printer Driver Help describes procedures used to print to a Balance server from<br />
applications through the Balance printer driver. Driver Help also includes extensive<br />
information about print options available when printing to a Balance server.<br />
Hot Folders Help describes how to set up and print to a Balance server using Hot Folders.<br />
Compose Help describes procedures for merging and editing jobs using Compose.<br />
NOTE: The icon to the left indicates that more information can be found in the online help<br />
documentation.<br />
TO ACCESS ONLINE HELP<br />
• Right-click the Balance Bar and choose Help from the menu that appears to run<br />
Balance Help.<br />
• In Windows applications, choose Help > in the toolbar, or click<br />
Help in a dialog box to launch the help application.
INTRODUCTION 21<br />
<strong>EFI</strong> Balance package<br />
The Balance package consists of the following hardware and software components:<br />
• Balance software, pre-installed on a server computer, or ready to install on the Windows<br />
XP/2000/Server 2003 computer that will function as a Balance server. Balance is the key<br />
component in the Balance workflow software suite, which is described in the next section.<br />
• A hardware security key (also called a dongle), to connect to the parallel or USB port of the<br />
Balance server.<br />
The Balance package also includes software utilities to help monitor and manage print jobs on<br />
a Balance server:<br />
• Command WorkStation, to install on a Balance server or any Windows computer that is<br />
networked to a Balance server. Command WorkStation monitors and manages all print<br />
jobs sent to a Balance server.<br />
• Hot Folders software, to install on any client computer that is networked to a Balance<br />
server. Hot Folders allow you to store your favorite print options in special shortcut<br />
folders. You can drag and drop a job onto a shortcut folder to quickly send the job to a<br />
Balance server with the associated batch of print options.<br />
• Job Monitor, to install on any client computer that is networked to a Balance server.<br />
Job Monitor allows you to monitor the status of print jobs on a Balance server, and<br />
identifies which printers in a printer group have been used to print a job.<br />
• Fiery WebTools , included automatically with Balance server. With WebTools, you use<br />
your Internet browser to install printer driver and PPD files for any Balance server printer<br />
group.<br />
<strong>EFI</strong> Balance workflow software modules<br />
Balance workflow software is a suite of software modules that gives you extensive capabilities<br />
for preparing and printing jobs to a Balance server. The suite includes the following software<br />
components, which are bundled with the server or sold as individual modules:<br />
• Impose, a document-building application that allows you to apply imposition schemes to<br />
jobs held at the Balance server, prior to printing.<br />
• Compose, an application that allows you to merge jobs, and set up mixed media and tab<br />
printing for jobs held at the Balance server, prior to printing.<br />
• Scan, an application for capturing documents from a TWAIN scanner connected to a<br />
client computer or from a scanner at a Fiery ® -enabled copier. <strong>User</strong>s can make edits on the<br />
scanned document and then save the file to PDF or send it as a job to the Balance server.
INTRODUCTION 22<br />
Terminology<br />
Specific terms are explained as they are introduced; however, the following general terms are<br />
used throughout:<br />
PostScript (PS): A page-description language. The Balance server uses this language for<br />
communicating to print devices.<br />
Portable Document Format (PDF): A structured form of PostScript that provides the ability to<br />
preview, scale, and re-order pages.<br />
Job: A file consisting of PostScript or PDF commands and comments that describe the<br />
graphics, sampled images, and text that should appear on each page of a document, and the<br />
print options that should be used in printing, such as media.<br />
Spool: Write to a disk in preparation for processing and printing.<br />
Process: Route a job, or portions of a job, to the appropriate print devices based on the job<br />
options for load balancing.The Balance server processes jobs prior to distributing them to<br />
printer group devices for RIP and print.<br />
Load-balancing: The process of analyzing and distributing print jobs in order to route them to<br />
the best available print device or distribute them as efficiently as possible among print devices,<br />
based on the characteristics of each device and the requirements of the job.<br />
Printer group: One or more print devices linked to and defined as a unit by a Balance server.<br />
To a user printing from a client computer, a printer group behaves as a ‘virtual printer’, and<br />
looks like any other printer on the network. Jobs sent to the printer group are load balanced<br />
among devices belonging to the group.<br />
Virtual printer: A printer group queue. A virtual printer combines the printing capabilities of<br />
all printer group devices, but appears as a single printer on the network.
INSTALLING THE <strong>EFI</strong> BALANCE SERVER 23<br />
INSTALLING THE <strong>EFI</strong> BALANCE SERVER<br />
This chapter describes the system requirements for the Balance server and explains how to<br />
install Balance software on the server. This chapter also describes how to access Balance Setup<br />
options.<br />
System requirements<br />
The Balance server requires the following system components:<br />
• Operating System: Windows Server 2003, Windows 2000 Professional with Service Pack 4<br />
or later, or Windows XP Professional with Service Pack 1 or later<br />
• CPU: 1.7MHz Pentium 4 minimum, 2MHz or above dual CPU recommended<br />
• RAM: 512MB minimum, 1GB recommended<br />
• Drive Space: 1GB minimum for installation and processing, with overall requirements<br />
dependent on print traffic and storage requirements<br />
• CD-ROM drive<br />
• Network: 10/100 BaseT auto-switching Ethernet card, TCP/IP, and/or AppleTalk enabled,<br />
with minimum 1 free USB or parallel port<br />
NOTE: For optimal performance, use a dedicated server computer to run Balance workflow<br />
software and utilities exclusively, and without the following installed:<br />
• TCP/IP print server services<br />
• UNIX print services<br />
• Microsoft Internet Information Server (IIS)
INSTALLING THE <strong>EFI</strong> BALANCE SERVER 24<br />
TO INSTALL BALANCE (OVERVIEW)<br />
1 If you have not purchased the software pre-installed on a server computer, prepare the server<br />
computer for installation:<br />
Review the System Requirements on page 23 to ensure the computer meets specifications.<br />
Install Windows 2000, Windows Server 2003, or Windows XP, if necessary.<br />
Install Windows 2000 or Windows Server 2003 if you plan to support clients over AppleTalk.<br />
Install the latest Windows service packs for the selected operating system.<br />
For Windows 2000 Professional, Service Pack 4 or later must be installed.<br />
For Windows XP, Service Pack 1 or later must be installed.<br />
Uninstall any previous version of Balance, if necessary (page 25).<br />
Uninstall any software that may conflict with Balance.<br />
We strongly recommend removing any PGP (Pretty Good Privacy) encryption applications<br />
from the computer because they may conflict with network configuration.<br />
If Acrobat 6.0 files are supported, you must install Adobe Acrobat 6.0 and related plug-ins on<br />
the Balance server and client computers before running Balance or Balance Print Drivers.<br />
Balance supports Acrobat 5.0, Acrobat 6.x (PDF 1.5 version), and compatible plug-ins,<br />
including Enfocus PitStop 6.x. If you are installing Acrobat 6.0, make sure that you uninstall<br />
Acrobat 5.0 first.<br />
2 Install the hardware security key (see page 26).<br />
If you are upgrading a previous version of Balance, use your existing hardware security key.<br />
3 Install the Balance server software (see page 27).
INSTALLING THE <strong>EFI</strong> BALANCE SERVER 25<br />
Uninstalling previous versions<br />
Prior to installing Balance, you must uninstall previous versions. You can use the Balance CD<br />
to upgrade a previous version of Balance or to remove the Balance server software before<br />
performing a clean installation.<br />
NOTE: If you plan to reinstall Balance or upgrade to a new version, you must re-enter your<br />
license information. License information can be found in your Balance package. If you cannot<br />
locate your license information, contact your <strong>EFI</strong> representative.<br />
TO UNINSTALL BALANCE<br />
1 In Command WorkStation, choose Server > Print Pages, and print a Configuration page before<br />
exiting Command WorkStation.<br />
The Configuration page provides information on printer groups, devices, and installable<br />
options to assist in recreating printer groups.<br />
2 Right-click on the Balance Bar and choose Exit Balance to stop the Balance server.<br />
3 Disable all Hot Folders monitored by the Balance server.<br />
4 Uninstall <strong>EFI</strong> Estimate.<br />
NOTE: Estimate is not supported for Balance version 3.0 and later.<br />
5 Insert the Balance Workflow software CD.<br />
The Balance master installer should start automatically.<br />
6 Use the installation CD’s Remove option to uninstall Balance and related utilities, if<br />
necessary.<br />
Choose the components you want to remove from the list of installed components. When<br />
removal is complete, you are prompted to reboot the computer.<br />
If you have problems using the installer’s Remove option to uninstall, choose<br />
Start > Settings > Control Panel to display the Windows Control Panel, double-click Add/<br />
Remove Programs, and then remove each application individually.
INSTALLING THE <strong>EFI</strong> BALANCE SERVER 26<br />
Install the hardware security key<br />
A hardware security key must be installed on the server computer prior to installation. The<br />
hardware security key maintains your serial number and license information. If you have more<br />
than one copy of Balance, each hardware security key has a separate serial number.<br />
If you own a previous version of Balance, you can continue to use the parallel port-style key<br />
with the latest version of Balance server. If you are a new owner, you may have a USB-style<br />
key.<br />
TO INSTALL THE HARDWARE SECURITY KEY<br />
1 Shut down the Balance server.<br />
2 Connect the hardware security key to the Balance server USB or parallel port.<br />
Parallel port-style<br />
hardware security key<br />
To parallel port<br />
USB-style<br />
hardware security key<br />
To available USB port<br />
Balance server<br />
NOTE: USB ports are located on the bottom front panel of some computers.<br />
3 Turn on the Balance server.
INSTALLING THE <strong>EFI</strong> BALANCE SERVER 27<br />
Installing server software<br />
Before installing Balance server software, carefully review the installation overview on<br />
page 24.<br />
TO INSTALL BALANCE SERVER SOFTWARE<br />
1 Log on to the dedicated server computer with an administrator account.<br />
2 Close all open applications before beginning installation.<br />
3 Insert the Balance CD into the CD-ROM drive of the computer.<br />
The CD contains both Balance system software and client software utilities, along with user<br />
manuals in PDF format.<br />
4 Click OK to confirm all applications have been closed and virus-protection software disabled.<br />
The Welcome screen appears.<br />
NOTE: If the installer welcome screen does not appear automatically, use Windows Explorer to<br />
display the contents of the CD, and double-click autoplay.exe to launch the installer.<br />
If you have previously installed Balance components on your system, the Welcome screen<br />
displays Modify and Remove options:<br />
Select Modify to modify the existing installation (skip to step 8).<br />
Select Remove to uninstall selected applications (page 25).<br />
5 Click Next.<br />
NOTE: Click Cancel from any screen to cancel the installation. Click Back to return to a<br />
previous screen to change your selections.<br />
The Software License Agreement screen appears.
INSTALLING THE <strong>EFI</strong> BALANCE SERVER 28<br />
6 Read the Software License Agreement and click Yes.<br />
The Choose Destination Location screen appears.<br />
7 Click Next to install the software in the default destination folder.<br />
The default installation folder is C:\Program Files\<strong>EFI</strong>. If you want to install the software on a<br />
different drive or in another folder, click Browse, navigate to the desired location, and then<br />
click Next. You can also create a new folder for the software, if desired.<br />
The Select Components screen appears.<br />
To find out more about a component, select it in the list. A description appears in the area to<br />
the right of the component list.<br />
8 Select <strong>EFI</strong> Balance Server and any other desired utilities, and click Next.<br />
You may want to install selected utilities on the server computer (see page 38) if you intend to<br />
use it as an operational station:<br />
• Select applications you want to install. The installer program upgrades applications that<br />
already run on the server computer.<br />
• Deselect applications you do not want to install. The installer program removes<br />
applications that already run on the server computer.<br />
NOTE: Impose and Compose require Adobe Acrobat software and Command WorkStation<br />
software.<br />
The Setup Type screen appears.<br />
9 Select the network protocols you want to use with the Balance server and click Next.<br />
The installer automatically configures the operating system with the required network<br />
services. If a selected protocol is not found on the computer, the installer displays a warning<br />
message.
INSTALLING THE <strong>EFI</strong> BALANCE SERVER 29<br />
NOTE: At this point, the installer program notifies you if the required Windows service packs<br />
are not installed (see page 23). You must quit the installation and install the service packs<br />
before continuing with the installation.<br />
The installer prompts you to install Balance wallpaper on the server desktop. The wallpaper<br />
helps to indicate clearly that the computer is a Balance server.<br />
10 Click Yes to install the wallpaper, or No to continue without installing the wallpaper.<br />
The Select Program Folder screen appears.<br />
11 Click Next to accept the default location for Balance program icons.<br />
The default folder for Balance program icons is <strong>EFI</strong>. If you want to specify a different<br />
Program Folder location, enter a new folder name or select one from the list of existing<br />
folders, and click Next.<br />
If you are upgrading software from previous versions, the <strong>EFI</strong> Balance Master Installer screen<br />
appears. Use this screen to confirm upgrade of components on your system.<br />
12 Select the applications to be upgraded and click Next.<br />
The Information screen appears so that you can verify the installation specifications and<br />
amount of disk space required.<br />
13 Click Next to confirm and continue the installation.<br />
The Setup Status Screen appears as files are copied to the computer.<br />
NOTE: A message may appear reminding you to install the hardware security key.<br />
For instructions on connecting the hardware security key, see page 26.<br />
When all files are copied to the computer, the Balance License Manager (see page 30) appears.<br />
14 Enter the activation key code exactly as displayed on the Balance License Form (included in<br />
your Balance workflow software package), and click OK.<br />
When you enter the correct activation key code, the installer confirms your key with the<br />
message “Balance License Installed” and updates the current Balance license information.<br />
15 Click OK to continue the installation.<br />
The Registration Reminder window appears. You can register your Balance product online or<br />
by fax.<br />
16 Choose a registration option and click OK.<br />
The Install Complete screen appears. You are prompted to restart the server computer.
INSTALLING THE <strong>EFI</strong> BALANCE SERVER 30<br />
17 Click Yes to restart the server computer.<br />
You can also click No to exit the installation program and continue after you restart the<br />
computer at a later time.<br />
18 When the computer restarts, log on with the same administrator account.<br />
Installation is now complete. Balance starts automatically. The Balance Bar appears at the top<br />
of the screen, and the Balance Setup dialog box prompts you to complete configuration of the<br />
Balance server (see Balance Help).<br />
Entering license information<br />
The Balance License Manager displays the terms of your Balance license. If you have licensed<br />
additional Balance applications or features, you can enter updated license information<br />
without running the installation program. Before you can use new features, you must update<br />
your license information in the Balance License Manager.<br />
Consider the following with regard to licensing for your Balance server:<br />
• A maximum of 10 printer groups may be created for each Balance server.<br />
• Xerox DocuTech/Nuvera Enabler and Digimaster Family Enabler licenses are transferable<br />
to Standard printer licenses. For example, a shop with licenses for three Standard printers<br />
and one Digimaster Family Enabler can connect up to four concurrent Standard printers,<br />
without a Digimaster connected.
INSTALLING THE <strong>EFI</strong> BALANCE SERVER 31<br />
System Serial Number (at the top of the license screen): the number of your hardware<br />
security key.<br />
Expiration Date (at the bottom of the license screen): indicates when license terms expire. If<br />
your license is perpetual, ‘PERMANENT’ appears as the expiration date.<br />
Under the Features heading, the features and Balance modules that can be activated for your<br />
Balance installation are listed, including:<br />
Standard printers: the number of devices that may be connected to a Balance server at any<br />
time. Standard printers are classified as any device except those driven by the<br />
Digimaster Family Enabler and Xerox DocuTech/Nuvera Enabler. A maximum of 16 printers<br />
may be connected.<br />
Digimaster Family Enabler: the number of Digimaster Family Enablers licensed for use with a<br />
Balance server. The maximum number per server is seven, and is not restricted by OEM<br />
version. Fiery DPS Family solutions are treated as <strong>EFI</strong> printers.<br />
Xerox DocuTech/Nuvera Enabler: the number of Xerox DocuTech/Nuvera Enablers licensed<br />
for use with a Balance server. The maximum number per server is seven, and is not restricted<br />
by model.<br />
Xerox DigiPath Enabler: indicates support for DigiPath is enabled.<br />
Script: indicates support for printer group and printer device scripting is enabled.<br />
Impose: indicates support for Impose is enabled. The value indicates the number of licensed<br />
copies for use with the Balance server and client workstation.<br />
Compose: indicates support for Compose is enabled. The value indicates the number of<br />
licensed copies for use with the Balance server and client workstation.<br />
TO ENTER LICENSING INFORMATION<br />
1 Locate the Balance License Form packaged with the Balance hardware security key.<br />
This form contains the hardware security key serial number and licensing information.<br />
2 If necessary, choose Start > Programs > <strong>EFI</strong> > Balance License Manager in the Windows taskbar<br />
to display the Balance License Manager.<br />
If you installed the Balance server software to a folder other than the default location, find the<br />
Balance program folder to start the license manager.<br />
3 Enter the activation key code exactly as displayed on the Balance License Form included in<br />
your Balance workflow software package, and click OK.<br />
When you enter the correct activation key, the installer confirms with the message “Balance<br />
License Installed” and updates the current Balance license information.<br />
4 Click OK to close the Balance License Manager.<br />
5 Restart the server computer before continuing to configure or run Balance.
INSTALLING THE <strong>EFI</strong> BALANCE SERVER 32<br />
Configuring the <strong>EFI</strong> Balance server<br />
The Balance Setup dialog box allows you to configure the Balance server for operation. Some<br />
options in the Balance Setup dialog box are automatically configured when you install Balance<br />
and do not need to be changed.<br />
If you have just completed installation, the Balance Setup dialog box may already be open on<br />
the screen. The Balance Bar (see page 70) appears at the top of the screen, indicating that<br />
Balance is running.<br />
TO ACCESS BALANCE SETUP<br />
1 Right-click the Balance Bar and choose <strong>EFI</strong> Balance Setup, or choose Start > Programs > <strong>EFI</strong> ><br />
Balance Setup from the Windows taskbar.<br />
2 Click a tab to configure General, Network or Printer Setup options.<br />
Each panel contains a list of configuration items that can be edited. Balance Help discusses<br />
each setup panel, item, and procedure. “Printer Groups and Load-Balancing” on page 49,<br />
describes Printer Groups in detail.<br />
General Setup: Configure date and time, character set, user account passwords, Job Log<br />
preferences, Digital StoreFront (DSF) Connection, and printer groups (see “Printer Groups<br />
and Load-Balancing” on page 49).<br />
Network Setup: Specify network protocols and network printing services (see Balance Help).<br />
Printer Setup: Specify which printing queues to publish on the network (see Balance Help).
INSTALLING THE <strong>EFI</strong> BALANCE SERVER 33<br />
3 Click an item in the panel list, using the + signs to expand items to access different<br />
configuration options, if necessary.<br />
4 Specify configuration options for the selected item.<br />
5 When you have completed configuration for each item, click OK to close the Balance Setup<br />
dialog box.<br />
6 When prompted, restart the Balance server.<br />
Configuration changes take effect upon restarting the server.<br />
NOTE: To configure Balance Setup options, see Balance Help.
INSTALLING THE <strong>EFI</strong> BALANCE SERVER 34<br />
Using Paper Catalog<br />
The system paper catalog provides a uniform inventory of media for use by Balance printer<br />
groups. Printer groups using the system paper catalog (see page 49) allow you to specify the<br />
exact media you want for a job from your inventory. Jobs printed with catalog media print<br />
directly to devices stocked with that media, or hold until the media is supplied to the most<br />
appropriate device.<br />
NOTE: To operate correctly, the system paper catalog and associated device trays (see page 71)<br />
must be set up prior to printing. Ongoing stocking changes in the content of your printer<br />
trays must be updated using the Tray Association feature.<br />
TO UPDATE THE PAPER CATALOG<br />
1 Click Paper Catalog on the General Setup tab.<br />
2 Click Paper Catalog.<br />
The system paper catalog appears.<br />
NOTE: If a device that supports a native paper catalog belongs to a printer group, there may<br />
already be entries in the system paper catalog. Balance attempts to import each device paper<br />
catalog into the Balance system paper catalog.<br />
3 Click Add, or select an existing entry and click Edit.<br />
The Add or Edit Paper Entry dialog box appears.
INSTALLING THE <strong>EFI</strong> BALANCE SERVER 35<br />
4 Enter a Paper Label as a descriptor for the media.<br />
Use a concise, descriptive name for each type of media, up to a limit of 31 characters. The<br />
Paper Label appears as the name of the paper media in the Paper Catalog, and is used to select<br />
media when printing from Balance printer drivers.<br />
You can also delete selected entries, or copy them and then edit the copies to create new<br />
entries.<br />
5 Enter Size, Type, Color, Weight and Hole Punch specifications, and click OK.<br />
You can add custom paper sizes by choosing “Custom” from the Size menu. Enter dimensions<br />
for the custom paper stock, or tab template information (see page 36).<br />
NOTE: Dimensions entered in inches or millimeters appear as points when the custom label is<br />
added to the paper catalog.<br />
The new or updated entry appears in the Paper Catalog window.<br />
6 When you have finished updating paper catalog media, click OK to close the Paper Catalog<br />
window.<br />
Balance printer drivers must also be updated to enable users to see new paper media<br />
availability. Be sure to notify users to download new drivers when published.<br />
7 Following any remaining configuration steps, and before printing to the server, map your<br />
paper catalog entries to printer trays using the Tray Association manager (see page 71).
INSTALLING THE <strong>EFI</strong> BALANCE SERVER 36<br />
Importing and exporting Paper Catalog contents<br />
You can easily add new entries to the paper catalog when you Import. Existing entries are<br />
updated with the attributes of imported entries if the names match.<br />
The Paper Catalog Import/Export format is XML-based and JDF 1.2 (Job Definition<br />
Format) compatible. For more information about file formats, contact <strong>EFI</strong> technical support.<br />
TO IMPORT OR EXPORT THE CONTENTS OF THE PAPER CATALOG<br />
1 Select File and then Import Paper Catalog or Export Paper Catalog.<br />
2 Browse to the folder where you want to import or export the Balance Paper Catalog files.<br />
3 Click Open.<br />
Specifying tab media<br />
Tab media template specifications can be configured for devices that support tab printing.<br />
NOTE: To print tab jobs with Balance, you must have a licensed copy of Compose.<br />
TO ENTER SPECIFICATIONS FOR TAB PRINTING<br />
1 Add a paper catalog entry for the tab media stock using the Add Paper Entry dialog box.<br />
2 Set paper size.<br />
Tab media must be sized appropriately for corresponding media sizes (for example, tab size<br />
9x11 for Letter size media). If the correct size specifications for your tab media do not appear<br />
in the Size menu, define a custom size for the tab media.<br />
3 Choose tab as the media type, and set other paper attributes as desired.
INSTALLING THE <strong>EFI</strong> BALANCE SERVER 37<br />
4 Click OK to add the tab media entry.<br />
The Tab Template dialog box appears.<br />
5 Enter tab template information:<br />
Under Tab Settings, enter:<br />
Number of positions on the tab stock, from one to twelve<br />
Document reading order<br />
Reading order is the order of the tab text, from right to left or left to right.<br />
Under Text Attributes, enter the following, if desired:<br />
Font type (selected from all fonts installed on the system) and font size (from 10 to 12 pts.)<br />
Text offset, to offset the text from the center using x- and y- coordinate values<br />
Text is vertically and horizontally centered on the tab by default. All values from -400 to 400<br />
can be entered, both for X and Y offset.<br />
Text Rotation, In or Out<br />
Use In if the tabs appear across the top of the document, Out if tabs appear across the bottom<br />
of the document.<br />
On the right-hand side of the dialog box, enter offset (distance from the top of the page to the<br />
first tab edge), page height and width, and tab width information.<br />
6 Click OK to save the tab media template.<br />
The tab template information is saved in the paper catalog with the tab media entry.
INSTALLING <strong>EFI</strong> BALANCE UTILITIES AND PRINTER DRIVERS 38<br />
INSTALLING <strong>EFI</strong> BALANCE UTILITIES AND PRINTER DRIVERS<br />
This chapter describes the system requirements for Balance client computers, and explains<br />
how to install Balance software utilities on client computers.<br />
System requirements<br />
To install Balance user software and utilities, you must have a computer equipped with a<br />
built-in or external CD-ROM drive.<br />
Windows client requirements<br />
To print to a Balance server from a Windows computer, the following system components are<br />
required:<br />
• OS: Windows 98, Me, 2000 Professional, Server 2003, or XP<br />
• CPU: AMD or Pentium processor<br />
• RAM: 64MB minimum, 128 or higher recommended, with 256 or higher recommended<br />
for computers running Command WorkStation<br />
• Drive Space: 1GB minimum for installation and operation<br />
• CD-ROM drive<br />
• Network: 10/100 BaseT auto-switching Ethernet card, TCP/IP, and/or AppleTalk enabled<br />
• Monitor/Video Memory: 16-bit color at a minimum resolution of 800 x 600<br />
• Software: Microsoft Internet Explorer 6.0 or later with Java enabled, or Netscape<br />
Communicator 6.0 or later with Java enabled
INSTALLING <strong>EFI</strong> BALANCE UTILITIES AND PRINTER DRIVERS 39<br />
Mac OS client requirements<br />
To print to a Balance server from a Mac OS computer, the following system components are<br />
required:<br />
OS: Apple System software 9, or Mac OS X running in native mode<br />
RAM: 64MB minimum, 128 or higher recommended<br />
Network: 10/100 BaseT auto-switching Ethernet card, TCP/IP and AppleTalk enabled<br />
Monitor/Video Memory: 16-bit color at a minimum resolution of 800 x 600<br />
Software: Netscape Communicator 4.5 or later with Java enabled, or Microsoft Internet<br />
Explorer 6.0 or later with Java enabled, and StuffIt Expander from Aladdin Software or other<br />
software to expand binhex files (.hqx)<br />
Installing printer drivers and <strong>EFI</strong> Balance PPD files<br />
Clients must have an installed printer driver and Balance PPD file corresponding to a Balance<br />
printer group in order to send print jobs to a Balance server. The PPD file describes the<br />
capabilities of the printer group and allows the printer driver to present the printer group as a<br />
single ‘virtual’ printer on the network.<br />
Each printer group has a unique PPD file specific to your printer and can accept jobs sent to<br />
Print or Hold queues. You can also specify a Balance printer group as the default printer.<br />
NOTE: Printer drivers and PPD files for all printer groups are automatically installed on the<br />
Balance server. Only client computers require manual installation of driver and PPD files.<br />
Balance supports Adobe 5.x and Adobe 6.x (PDF 1.5 version).<br />
Installing Windows printer drivers<br />
To send print jobs from a Windows computer to a Balance server, you must install the<br />
Balance printer driver corresponding to the printer group you want to use. You can download<br />
and install the files using the Windows Point-and-Print feature (PNP), or from WebTools (see<br />
page 41).<br />
NOTE: You must know the IP address or DNS name of the Balance server in order to<br />
download drivers. If you do not have this information, contact your administrator.
INSTALLING <strong>EFI</strong> BALANCE UTILITIES AND PRINTER DRIVERS 40<br />
TO INSTALL WINDOWS DRIVERS USING PNP<br />
1 Locate the Balance server on the network:<br />
Windows 98: Choose Start > Find Computer, enter the DNS name or IP address of the Balance<br />
server, and click Search.<br />
You can also double-click Network Neighborhood on the desktop and navigate to the server,<br />
if you know where it is located on the network.<br />
Windows 2000/Me/Server 2003: Choose Start > Search > On the Internet, and click Computers<br />
in the dialog box that appears. Enter the DNS name or IP address of the Balance server and<br />
click Search Now.<br />
You can also double-click My Network Places on the desktop and navigate to the server, if you<br />
know where it is located on the network.<br />
Windows XP: Choose Start > Search > Printers, computers or people, and click a Computer on<br />
the Network in the dialog box that appears. Enter the DNS name or IP address of the Balance<br />
server and click Search.<br />
You can also double-click My Network Places on the desktop and navigate to the server, if you<br />
know where it is located on the network.<br />
2 Double-click the icon for the Balance server in the network list.<br />
A list of Balance ‘virtual printers’ appears. Each is a printer group queue. Up to two queues<br />
may be published on the network per printer group, in this format:<br />
__<br />
• The Print queue is for immediate printing to a printer group.<br />
• The Hold queue is for placing print jobs on the server for pre-print processing, or to be<br />
printed at a later time.<br />
3 Double-click the icon for each ‘virtual printer’ you want to install.<br />
NOTE: For Windows XP, installation completes automatically. Skip the remaining steps of this<br />
procedure.<br />
Windows prompts you to confirm installation of the printer on your computer.<br />
4 Click Yes to install the driver and PPD file for the printer group.<br />
NOTE: For Windows 2000/Server 2003, installation completes automatically. Skip the<br />
remaining steps of this procedure.<br />
Windows 98/Me: The Add Printer Wizard appears. Continue with the remaining steps of this<br />
procedure.<br />
5 Specify whether or not you print from MS-DOS-based programs, and click Next.<br />
6 If a message appears asking whether to keep or override an existing driver, choose Replace<br />
Existing Driver, and click Next.
INSTALLING <strong>EFI</strong> BALANCE UTILITIES AND PRINTER DRIVERS 41<br />
7 Specify a name for the Balance print queue, and whether to use this printer as the default for<br />
printing files from applications. Click Next.<br />
If you want all applications to print to the Balance print queue unless otherwise specified,<br />
make the printer the default. The name appears next to the printer icon in the Printers control<br />
panel.<br />
8 Specify whether to print a test page and click Finish.<br />
The printer is installed and can be specified as a print destination from applications when you<br />
choose File > Print.<br />
TO INSTALL WINDOWS DRIVERS USING WEBTOOLS<br />
1 Start your Internet browser application.<br />
2 Enter the IP address or DNS name of a Balance server.<br />
If prompted, select the Guest login level, and click OK.<br />
The WebTools home page for the server appears.<br />
3 Click Installers to show the ‘virtual printer’ drivers available.<br />
4 Click the link for each ‘virtual printer’ you want to install.<br />
NOTE: Print and Hold queues are not published separately for WebTools; you must install all<br />
available drivers for each ‘virtual printer” you want to install.<br />
Windows prompts you to download an executable file archive.
INSTALLING <strong>EFI</strong> BALANCE UTILITIES AND PRINTER DRIVERS 42<br />
5 Click Open to install directly, or click Save to save the archive on your computer to be<br />
installed later.<br />
If you chose to save the file, an executable archive (.exe) file with the name of the printer<br />
group is saved on your computer.<br />
If you chose to install directly, skip the remaining steps.<br />
6 Double-click the archive file.<br />
You are prompted to extract the printer driver files to a default folder. You can also browse to<br />
and select, or create a different installation folder.<br />
7 Click Extract, and confirm to overwrite previous driver files if necessary.<br />
8 Click Done, and exit WebTools.<br />
Installing Mac OS printer files<br />
To send print jobs from a Mac OS computer to a Balance server, you must install the Balance<br />
PPD file that corresponds to the printer group you want to use by downloading the file from<br />
WebTools and setting up the Balance printer group in the Chooser, Print Center, or Printer<br />
Setup Utility.<br />
TO INSTALL THE BALANCE PPD FILE ON MAC OS 9<br />
1 Start your Internet browser application.<br />
2 Enter the IP address or DNS name of a Balance server.<br />
If prompted, select the Guest login level, and click OK.<br />
The WebTools home page for the server appears.
INSTALLING <strong>EFI</strong> BALANCE UTILITIES AND PRINTER DRIVERS 43<br />
3 Click Installers to show the ‘virtual printer’ drivers available.<br />
4 Click the link for each ‘virtual printer’ you want to install.<br />
Be sure to download the correct PPD file for your Mac OS.<br />
An executable archive (.sea.hqx) file containing a PPD and driver installer is downloaded to<br />
your desktop. If your browser is equipped with an expander utility, the archive files are<br />
expanded automatically on download. Skip to step 6.<br />
5 Double-click the driver archive, or use an expander utility, such as StuffIt Expander, to extract<br />
the contents of the driver_.sea.hqx file.<br />
The files are extracted to a default folder named Mac on your desktop. If other drivers have<br />
been downloaded, the folder may be named sequentially as Mac1, Mac2, etc.<br />
6 Open the Mac folder.<br />
The folder contains a printer group PPD file.<br />
Mac OS 9 folders also include an Adobe PostScript driver folder. If your existing AdobePS<br />
driver is older, install the new PostScript driver:<br />
Double-click the archive file to extract the PostScript installer files, if necessary.<br />
Open the US and Adobe PS folders.<br />
Install the Adobe PostScript driver.<br />
Restart your computer after installation.<br />
7 Open the System > Extensions > Printer Descriptions folder.<br />
8 Drag the PPD file from the Mac folder to the Printer Descriptions folder.<br />
NOTE: Note the exact name of this PPD file to use when you configure the printer group in<br />
the Chooser.<br />
9 Drag the Mac folder to the Trash.<br />
Configuring Mac OS printer groups<br />
Once PPD files are downloaded to the desktop, you must set up printer groups using the<br />
Chooser (Mac 0S 9) or Print Center (Mac OS X 10.2 and above).<br />
You can use AppleTalk to connect to printer groups for a Balance server running on<br />
Windows 2000 or Windows Server 2003. If the Balance server runs on Windows XP<br />
Professional, use IP printing to connect.<br />
TO SET UP A PRINTER GROUP IN THE MAC OS 9 CHOOSER<br />
1 Open the Chooser from the Apple menu.<br />
Make sure AppleTalk is set to Active.<br />
2 Click the AdobePS icon.
INSTALLING <strong>EFI</strong> BALANCE UTILITIES AND PRINTER DRIVERS 44<br />
3 Select a different AppleTalk Zone, if necessary, to find Balance server queues.<br />
A list of Balance ‘virtual printers’ appears. Each is a printer group queue. Up to two queues<br />
may be published on the network per printer group, in this format:<br />
__<br />
• The Print queue is for immediate printing to a printer group.<br />
• The Hold queue is for placing print jobs on the server for pre-print processing, or to be<br />
printed at a later time.<br />
NOTE: If the Balance server is running on Windows XP, use Desktop Printing Utilities to<br />
connect with an IP address.<br />
4 Double-click a “virtual printer” queue from the Select a PostScript Printer list.<br />
The PPD file for the print connection should be configured automatically. If you are<br />
prompted to select a PPD file, select the file downloaded from WebTools from your System ><br />
Extensions > Printer Descriptions folder.<br />
Set up each print connection separately and repeat this step for all connections.<br />
5 Close the Chooser.<br />
TO SET UP A PRINTER GROUP USING THE MAC OS X PRINT CENTER<br />
1 Open Print Center.<br />
2 Click Add.<br />
The Printer List window appears.
INSTALLING <strong>EFI</strong> BALANCE UTILITIES AND PRINTER DRIVERS 45<br />
3 Locate the Balance server queue you want to connect to.<br />
For Appletalk connections to Windows 2000 or Windows Server 2003 servers, choose<br />
AppleTalk, and select the printer queue you want to configure.<br />
If you cannot find the correct queue, select a different AppleTalk zone.<br />
For IP connections to Windows XP servers, choose IP Printing.<br />
Enter the IP address of the Balance server.<br />
Do not use the default queue; instead, enter a queue name with this syntax:<br />
_<br />
4 Choose “Other” as the Printer Model.<br />
A dialog box appears, prompting you to select a PPD file for the “virtual” printer.<br />
5 Locate the correct PPD file in your Printer Descriptions folder and click Add.
INSTALLING <strong>EFI</strong> BALANCE UTILITIES AND PRINTER DRIVERS 46<br />
Updating printer groups and drivers<br />
When a printer group is modified through Balance setup, the Balance server dynamically<br />
generates an updated driver and PPD file for the group. If driver and PPD files are not<br />
updated on client computers, users may experience unexpected print results.<br />
The administrator should notify users when printer group configurations change and assist<br />
users in upgrading to new drivers and PPDs.<br />
• For Windows clients, delete the existing printer from the Printers control panel and install<br />
a new printer group driver.<br />
• For Mac OS clients, use WebTools to download the new PPD file for the printer group<br />
and update the printer with the new PPD.<br />
Installing <strong>EFI</strong> Balance utilities<br />
Balance includes software utilities that enable users on remote client computers to print,<br />
monitor, and manage jobs sent to the Balance server.<br />
<strong>EFI</strong> Impose: Install Impose if you plan to use the server or another computer as an operational<br />
station. If you plan to run Impose from a computer other than the server, an additional license<br />
is required.<br />
<strong>EFI</strong> Compose: Install Compose if you plan to use the server or another computer as an<br />
operational station. A separate license is required for each computer running Compose.<br />
<strong>EFI</strong> Hot Folders: Install Hot Folders management software if you want to create and manage<br />
hot folders on the computer. Hot Folders can be shared over a network, so the Hot Folders<br />
software need not be installed on each user’s computer to print from that computer using<br />
Hot Folders.<br />
Command WorkStation: Install Command WorkStation on a computer you plan to use as an<br />
operational station for monitoring job flow and editing jobs held at the server. If your server<br />
computer meets only minimum system requirements, carries a very heavy printing load, or if<br />
jobs are routinely held at the server for imposition, tab and mixed media printing, or other<br />
operational processes, we recommend installing Command WorkStation on a separate<br />
machine than the main operational station.<br />
Documentation: Install user documentation to include online help and PDF copies of this<br />
manual with the installation. To receive online help for downloaded drivers and client<br />
utilities, you must install documentation.<br />
NOTE: Balance utilities are available only for Windows operating system platforms.
INSTALLING <strong>EFI</strong> BALANCE UTILITIES AND PRINTER DRIVERS 47<br />
Installation configurations<br />
Depending on your print environment and goals, install Balance utilities in client-server or<br />
client-operator-server configurations, roughly parallel to the password permission levels<br />
provided by Balance. For more information about password permission levels, see Balance<br />
Help.<br />
Server: The Balance server can run server management utilities if the print load is not so<br />
extensive that performance suffers. In high-volume print environments, we recommend<br />
running utilities from a separate operational station.<br />
Client: Client computers are end-user workstations that run applications. Clients print to a<br />
Balance server using Balance printer drivers and Hot Folders.<br />
Operator: Operational stations are computers used by print operators with access to print<br />
devices and a Balance server. Operators edit and release jobs held at the server, override user<br />
print settings, and monitor server print load and operations.<br />
Use the following general guidelines for installing Balance utilities in your print environment:<br />
Utility Server Client Operator<br />
Balance<br />
x<br />
Command WorkStation x x<br />
Compose x x<br />
Impose x x<br />
Balance printer driver x x<br />
Hot Folders x x x<br />
Job Monitor<br />
x<br />
Scan x x x<br />
NOTE: If software components are installed and the server computer has adequate resources,<br />
operational functions can be completed from the server or client computers. There is no<br />
architectural requirement for a dedicated operational workstation.
INSTALLING <strong>EFI</strong> BALANCE UTILITIES AND PRINTER DRIVERS 48<br />
TO INSTALL BALANCE UTILITIES<br />
1 Follow the installation procedures on page 27 to install Balance utilities:<br />
For installations on the server, select the Balance server component to ensure that Balance is<br />
not removed.<br />
For client or operator installations, clear the Balance server component to ensure that<br />
Balance is not installed.<br />
NOTE: If you are installing Impose or Compose, a message may appear reminding you to<br />
install the hardware security key (see page 26). The Balance License Manager appears when all<br />
files are copied to the computer.<br />
2 In the Balance License Manager window, type the activation key code exactly as shown on the<br />
Balance License Form, and click OK.<br />
The installer confirms your key with the message “Balance License Installed” and updates the<br />
current Balance license information (see page 30).<br />
3 Complete the installation and click Yes to restart the computer.<br />
When the computer restarts, installation is complete.<br />
Installing Job Monitor<br />
Job Monitor allows Windows client users to track and monitor print jobs sent through a<br />
Balance server. Job Monitor is installed automatically, but turned off by default, with Balance<br />
printer driver files when downloaded and installed on client computers.<br />
For more information about Job Monitor, see Job Monitor Help.<br />
TO RUN JOB MONITOR<br />
1 In the Balance printer driver interface, click the Printing tab.<br />
2 Click the Balance print option bar to display load Balance options, and scroll to the bottom of<br />
the display.<br />
3 Click Launch Job Monitor.<br />
The Job Monitor application appears on the desktop.
PRINTER GROUPS AND LOAD-BALANCING 49<br />
PRINTER GROUPS AND LOAD-BALANCING<br />
This chapter describes how you can use the features of Balance to maximize the printed<br />
output while minimizing printing times and costs.<br />
<strong>EFI</strong> Balance printer groups workflow<br />
Balance manages jobs by communicating with a printer group—a group of multiple print<br />
devices that behaves like a single “virtual” printer on the network. <strong>User</strong>s on client computers<br />
send print jobs to a Balance server, which in turn uses load-balancing criteria to route the jobs<br />
to suitable print devices within printer groups.<br />
The following diagram illustrates the flow of data between client computers and print devices<br />
using a Balance server on the network to load balance print jobs.<br />
Client workstations<br />
All print jobs<br />
Supported color device<br />
<strong>EFI</strong> Balance Server<br />
Supported black-andwhite<br />
devices<br />
In addition to enabling the load-balancing capabilities of a Balance server, printer groups help<br />
to centralize your printing environment. Instead of having to oversee the job flow through<br />
multiple print servers, the operator can monitor and manage all print devices in a printer<br />
group from a single Balance server.
PRINTER GROUPS AND LOAD-BALANCING 50<br />
Before creating a printer group<br />
The process of clustering multiple print devices together in a printer group lies at the center of<br />
the Balance workflow.<br />
• A printer group can contain from 1 to 16 print devices, including devices specially licensed<br />
for use with your Balance license (see page 30).<br />
• A printer group can include any combination of black-and-white and color print devices<br />
of any make and model.<br />
• A given print device can belong to more than one printer group.<br />
When you send a print job to a printer group, Balance routes the job to one or more devices<br />
in the group, depending on the composition of the group, the print options specified for the<br />
job, and the current load on each print device.<br />
The following diagram illustrates the step-by-step selection process that Balance uses to<br />
determine which print devices in a group should receive a job. Consider the selection process<br />
as you plan your printer groups and which printers each should contain. Printer groups<br />
should be designed to handle efficiently jobs that typically make up a substantial portion of<br />
your print load.
PRINTER GROUPS AND LOAD-BALANCING 51<br />
NOTE: When determining the fastest available print device in a printer group, Balance only<br />
recognizes the print load attributable to jobs sent to the device through the same instance of<br />
Balance server. If the device is busy processing jobs sent to it directly or performing a copier<br />
function, Balance may still consider the device idle and route jobs to it accordingly.<br />
Load-balance process for jobs that are not Color Split<br />
All devices in<br />
printer group<br />
Check to see if a Preferred Printer is specified.<br />
If a Preferred Printer is specified, the job is sent to<br />
the preferred printer and printed.<br />
If the device is in an error state, reroute settings are<br />
ignored, and the job prints when the error clears.<br />
If a Preferred Printer is not specified:<br />
1) Eliminate devices that do not offer the print options or<br />
media specified with the job.<br />
2) Eliminate disabled devices that Balance cannot<br />
connect to.<br />
Remaining devices<br />
If multiple devices remain, but all<br />
are in an error state (out of paper,<br />
offline), the job is sent to one device<br />
at random.<br />
Reroute settings are ignored, and the<br />
job prints when the error at the<br />
destination device clears.<br />
If multiple devices remain and only<br />
some are in error, the devices in an<br />
error state are eliminated.<br />
Remaining devices<br />
If one device remains, the job is sent<br />
to that device and printed.<br />
If the device is in an error state,<br />
reroute settings are ignored, and the<br />
job prints when the error clears.<br />
If the job is exclusively black-and-white and at least<br />
one black-and-white device remains available, the<br />
remaining color devices are eliminated.<br />
If the job contains at least one color page and at least<br />
one color device remains available, the remaining blackand-white<br />
devices are eliminated.<br />
Remaining devices<br />
If Fastest Single Engine is specified,<br />
the job is sent to the device that will<br />
print the job the fastest.<br />
If the job is Copy Split or Long Job Split, the devices that can most<br />
quickly complete the job are selected, up to the specified Max.<br />
Number of Printers. All other devices are eliminated.<br />
Remaining devices<br />
Copies of a Copy Split job are distributed among the<br />
remaining devices according to PPM rate, to<br />
complete the job in the shortest time.<br />
Pages of a Long Job Split job are distributed among<br />
the remaining devices according to PPM rate, to<br />
complete the job in the shortest time.
PRINTER GROUPS AND LOAD-BALANCING 52<br />
Load-balance process for Color Split jobs<br />
All devices in<br />
printer group<br />
Eliminate any disabled devices that Balance<br />
cannot connect to.<br />
Remaining devices<br />
If one or more devices of each type are<br />
operational, check the mixed media and<br />
finishing requirements for the job.<br />
Verify that at least one black-and-white and one color device are operational<br />
in the printer group. If either type of device is unavailable, the job is<br />
cancelled.<br />
If one or more of the remaining black-and-white devices meets<br />
finishing and mixed media specifications, the black-and-white portion<br />
of the job is sent to the fastest black-and-white device.<br />
If none of the remaining black-and-white devices meet<br />
finishing and mixed media specifications, the job is<br />
cancelled.<br />
If none of the remaining color devices meet<br />
finishing and mixed media specifications, the<br />
job is cancelled.<br />
If one or more of the remaining color devices meet finishing and mixed<br />
media specifications, the color portion of the job is sent to the fastest color<br />
device. Color pages can be merged inline or after printing.<br />
Composition<br />
To optimize Include Benefits<br />
The administrator can create a variety of printer group combinations for different<br />
load-balancing workflows. The following are some examples of printer group scenarios.<br />
Color Split<br />
Copy Split<br />
Efficiency of print jobs<br />
Long Job Split<br />
At least one black-and-white and<br />
one color print device<br />
At least two black-and-white or<br />
two color devices<br />
A higher-speed print device paired<br />
with lower-speed print devices<br />
Several devices with identical<br />
capabilities<br />
Balance splits jobs into pages containing color content and pages containing<br />
only black-and-white content, and routes each set of pages to a<br />
corresponding print device in the group. Color Split (see page 63) helps to<br />
speed the printing of mixed-content jobs and reduce costs by reserving color<br />
print devices for printing color-only pages.<br />
Balance splits a multiple-copy job among several print devices, routing a full<br />
copy set to each device. Since the devices have comparable capabilities, each<br />
Copy Split (see page 63) copy set should print with similar output quality.<br />
Balance routes most jobs to the higher-speed print device for faster printing,<br />
particularly if the device is designated the preferred printer. If that device is<br />
unavailable or busy, the server routes new jobs to lower-speed devices,<br />
without waiting for the fastest device to become available.<br />
Balance splits pages of long jobs among devices to complete printing in the<br />
shortest time, provided they can meet job specifications.
PRINTER GROUPS AND LOAD-BALANCING 53<br />
Color output requirements<br />
Color print devices may reproduce color differently, based on their color printing technologies<br />
and unique characteristics. When a job is split between multiple devices, colors may vary in<br />
appearance depending on the device used to print each page.<br />
Balance can apply Color Match (page 66) technology to ensure that colors remain consistent<br />
across printer group devices. If consistent color is of prime importance for a given job, test<br />
color output from different devices prior to color splitting large jobs.<br />
Mixed media requirements<br />
Mixed media is a general term used to describe printing and finishing processes such as page<br />
ranges printed on alternate media, blank media insertion, tab printing, and chapter finishing.<br />
Balance provides access to mixed media printing features in supported devices with the<br />
following restrictions:<br />
• Mixed media features of color devices are not supported if a black-and-white, mixed<br />
media-capable device is present in the printer group.<br />
• Balance prioritizes mixed media specifications over color print specifications when a job is<br />
color split. Color pages belonging to a mixed media page range are printed by the blackand-white<br />
device on specified media only if the black-and-white device is capable of mixed<br />
media.<br />
• Mixed media jobs cannot be long job split.<br />
One-way server communication<br />
Bi-directional communication is not supported for certain devices. One-way server<br />
communication limits features that require feedback from the print engine:<br />
• The Reroute on Error print option (page 61) is not supported.<br />
• The printer cannot report errors and does not support job status inquiries, reporting print<br />
status as “successful” once the estimated print time has elapsed. Balance computes print<br />
time at the published PPM rate.<br />
• Jobs sent to the printer cannot be cancelled from Command WorkStation. Jobs print until<br />
completion unless cancelled from the printer console.<br />
• Auto Discovery is not supported.<br />
• Automated installed option fetch is not supported.
PRINTER GROUPS AND LOAD-BALANCING 54<br />
Creating printer groups<br />
A printer group consists of one or more print devices. Although the printers in a group may<br />
have different capabilities, the group behaves like a single “virtual” printer on the network,<br />
accessible to all computers on the network. Jobs sent through Balance server to the printer<br />
group are load balanced among the printers in the group.<br />
Before you begin, verify the following for each print device you plan to add to a group:<br />
• IP address or DNS server name<br />
• All accessories and installable options available for the device<br />
• Print queues are published for all Fiery printers<br />
• HDD/PS options are installed for Fiery printers with optional hard disk drives<br />
Before creating a printer group, we recommend printing configuration pages for Fiery family<br />
servers in Command WorkStation to list each device’s capabilities.<br />
Creating or editing a printer group<br />
When you create or edit a printer group, new PPD files are created and drivers published. The<br />
Balance server must stop to complete this update process and cannot accept or process jobs<br />
while printer groups are created or edited.<br />
Be sure to notify users when a printer group has been added or updated. Balance creates a new<br />
PPD file and printer drivers each time a printer group is edited. To take advantage of the<br />
updated driver, users must download and install the new drivers.
PRINTER GROUPS AND LOAD-BALANCING 55<br />
TO CREATE OR EDIT A PRINTER GROUP (OVERVIEW)<br />
1 If the Balance Setup dialog box is not already open, right click the Balance Bar and choose<br />
Balance Setup.<br />
2 Click the General Setup tab and select Printer Groups.<br />
3 Click Add (or Edit, if creating your initial “group0” printer group) to create a new printer<br />
group.<br />
NOTE: When you first install Balance, a default printer group named group0 is created. Edit<br />
this group and add print devices to it to create your first printer group. You can rename this<br />
group, edit its properties, or add new groups later.<br />
4 Enter a Group Name (see page 60) to identify the printer group.<br />
5 Add or remove print devices using the Search function and Printer panels (see page 58).
PRINTER GROUPS AND LOAD-BALANCING 56<br />
6 Specify printer group options, including Group Balance Settings (see page 62).<br />
1 Specify print media selection<br />
from the paper catalog, or<br />
accept paper tray contents<br />
2 Reroute jobs to an available<br />
device in case of printer<br />
failure or error<br />
3 Specify an IP address and<br />
server family type to locate<br />
printers manually<br />
Some print engines require<br />
specific model and queue<br />
names or a port number<br />
specification before they are<br />
added to a printer group<br />
4 Automatically search for and<br />
display all networked Fiery<br />
printers<br />
5 Specify device-specific<br />
information for selected<br />
printers<br />
6 Specify load-balancing<br />
options for the printer group<br />
1<br />
2<br />
3<br />
6<br />
4 5<br />
7 Click OK to save printer group selections and return to the General Setup tab.<br />
You are prompted to specify a script for the printer group. For more information about<br />
scripting, see page 67.<br />
8 Attach a script to the printer group if desired, and click OK.<br />
You are returned to the General Setup tab.<br />
9 If desired, clear the Make Printer Group drivers available through WebTools option.<br />
Clearing the option reduces the amount of time required for Balance to perform final printer<br />
group configurations. However, drivers and PPD files published through WebTools allow<br />
users on Mac OS computers to download PPD files. If the Balance server may support Mac<br />
OS clients, as well as Windows clients, on your network, keep this option enabled.<br />
10 Click the Printer Setup tab and make sure the desired queues are published for each printer<br />
group created (see Balance Help).<br />
11 Click OK to close the Balance Setup dialog box.<br />
Balance automatically restarts.
PRINTER GROUPS AND LOAD-BALANCING 57<br />
Viewing and deleting printer groups<br />
In addition to editing, you can view and delete printer groups as needed. The View Printer<br />
Dialog box displays a summary of printer group attributes, including member print engines<br />
and printer group features. You can view installable options available and installed for each<br />
engine. You can also see the finishing options enforced by Balance for a job sent to the printer<br />
group.<br />
1 Balance default options for<br />
the printer group<br />
2 Dynamic list of printers in<br />
the printer group<br />
3 Display installable options<br />
for the selected printer<br />
4 View options for the printer<br />
group<br />
1<br />
2<br />
3<br />
4<br />
Use the View feature if you want to quickly view printer group or device options for<br />
comparison without stopping the server or waiting for Balance to save the updated printer<br />
group configuration. During viewing, jobs continue to be accepted and processed by the<br />
server.<br />
The View feature is not available until at least one printer group has been set up. While using<br />
the View feature, you cannot make changes to printer groups.<br />
TO VIEW OR DELETE PRINTER GROUPS<br />
1 Right-click the Balance Bar and choose Balance Setup.<br />
The Balance Setup dialog box appears.<br />
2 Click the Printer Groups item on the General Setup options panel.<br />
3 Select the Printer Group you want from the Printer Groups menu.<br />
4 Click View to view the group’s properties.<br />
The View Printer Dialog box appears. You can view selected options for the group and<br />
constituent printers. Click OK when you are finished viewing.<br />
You can also click Edit to stop the server and make changes to printer groups based on viewed<br />
information.
PRINTER GROUPS AND LOAD-BALANCING 58<br />
5 Click Delete to remove the printer group.<br />
Click Yes to confirm the deletion.<br />
You cannot add a printer group back to the server after you remove it. You can add a new<br />
group with the same properties. When deleting printer groups, exit setup and allow the<br />
Balance server to restart before adding another group.<br />
When you delete a group, print jobs sent to the group are moved to a Balance group for<br />
printing. You can view the jobs in Command WorkStation and send them to another Balance<br />
printer group as desired.<br />
6 Click OK to close the Balance Setup dialog box.<br />
If you have deleted a printer, restart the Balance server when prompted.<br />
Adding and removing print devices<br />
Adding and removing print devices changes the nature and properties of a printer group.<br />
Review the default printer group options (see page 66) before exiting the Add/Edit Printer<br />
Group dialog box to verify that the options are set correctly for the printers in the group.<br />
TO ADD AND REMOVE PRINT DEVICES FOR A PRINTER GROUP<br />
1 Locate print devices you want to include in the printer group.<br />
Click Auto Discovery to search for available Fiery print devices on the network.<br />
Auto Discovery searches only the Balance server’s local TCP/IP subnet.<br />
Choose <strong>EFI</strong>-FIERY from the Server-Family menu, enter the IP address or DNS name of a<br />
particular Fiery in the IP/Server Name field, and click Search.<br />
Choose <strong>EFI</strong>-EDOX or <strong>EFI</strong>-Docstream from the Server-Family menu, enter the IP address or<br />
device name and the Port Number, and click Search.<br />
If you cannot find an EDOX server, choose another port number and search again. For<br />
guidelines on which port number to choose, see your EDOX documentation.<br />
When you locate an EDOX server, you are prompted to choose a specific print device from<br />
the Device Type menu.<br />
For other devices, choose the vendor from the Server-Family menu, enter the IP address or<br />
device name in the IP/Server Name field, and click Search.<br />
You can narrow your search by selecting the device Model. For devices that maintain multiple<br />
queues and treat each as a print device, enter a Queue Name to locate the device for selection.<br />
Found devices appear in the Available Printers list.
PRINTER GROUPS AND LOAD-BALANCING 59<br />
2 Select a device in the Available Printers panel, and click the arrow buttons (>>) to move it<br />
into the Selected Printers panel.<br />
If a device includes installable options, you are prompted to specify which options are<br />
currently installed (see page 66).<br />
If the message “ is not an authorized device” appears during selection, the<br />
device is not supported by your license agreement. Your Balance license indicates the number<br />
and type of devices allowed in a printer group. To update your license agreement (if<br />
necessary), contact your Balance sales representative.<br />
Repeat this step to add additional print devices to the group. Print devices currently in the<br />
group appear in the Selected Printers list.<br />
NOTE: Any print device can belong to a maximum of 10 Balance printer groups.<br />
3 To remove a print device from the group, select the device and click the arrow buttons (
PRINTER GROUPS AND LOAD-BALANCING 60<br />
Printer group options<br />
Printer group options include general preferences and default load-balancing specifications.<br />
Unless specific load-balancing instructions are sent with a print job, printer group default<br />
options dictate load-balancing criteria applied to the job.<br />
Group name<br />
Each printer group associated with a Balance server must have a unique group name. The<br />
group name appears in the Balance Setup dialog box, and on your network, as a single<br />
“virtual” printer. Queues published for the printer group include the group name and queue<br />
type (see Balance Help).<br />
Group names can be up to 16 alpha-numeric characters long and can include hyphens (0-9,<br />
A-Z, a-z). Spaces and underscores cannot be used in group names.<br />
NOTE: Printer group names are truncated after the first six characters when viewing from<br />
Windows 9.x platforms.<br />
Group Media Selection<br />
Group Media Selection indicates the manner in which users select from available media when<br />
printing to the printer group. We recommend using the default setting based on the devices<br />
included in the group.<br />
Paper Catalog: Groups using the Balance system paper catalog (see Balance Help) include the<br />
catalog contents in the printer driver. <strong>User</strong>s specify paper media for the print job from the<br />
paper catalog. When the job is sent to the Balance server, it is directed to the printer group<br />
device carrying the specified media or held until the specified media is supplied to a printer<br />
group device.<br />
Input Tray/Media Type: If job media selection is not driven by the paper catalog, users choose<br />
from media currently supplied in printer group trays. This option bypasses the tray<br />
association table.<br />
NOTE: Mixed media and tab printing are supported only when the system paper catalog is<br />
used for media selection.
PRINTER GROUPS AND LOAD-BALANCING 61<br />
Reroute on Error<br />
Reroute on Error directs Balance to send the remaining portion of a job to the Fastest Single<br />
Engine when an error (paper jam, out of paper) occurs at the destination printer. When<br />
disabled, jobs wait in the destination printer’s Print queue until the error is cleared.<br />
Reroute on Error settings are ignored for the following:<br />
• Color Split jobs<br />
• Printers that do not support bi-directional communication<br />
• Printer groups with only one print device<br />
• Printers with print device scripts attached<br />
Job Timeout: The interval of time a job must wait in the destination printer’s Print queue<br />
when an error occurs, providing time for the error to be resolved. The Total Reroutes setting<br />
limits the number of times a job may bounce from printer to printer.<br />
Max. Number of Reroutes: The number of reroutes allowable for a single job. On reaching the<br />
maximum, the job waits in the Print queue of the last device until the error is cleared. We<br />
recommend a maximum value to avoid situations in which a job may enter an irresolvable<br />
loop.<br />
Reroute a job<br />
When a reroute occurs, a notification of the error and job status is displayed in Command<br />
WorkStation.<br />
NOTE: Depending on the device, some devices may not report the actual number of copies<br />
and pages.
PRINTER GROUPS AND LOAD-BALANCING 62<br />
The operator can issue or update rerouting instructions from the Reroute dialog box and send<br />
the job on to the next available device. In Command WorkStation and Job Monitor, the<br />
rerouted job appears with the characters “RR_” appended.<br />
TO SPECIFY REROUTE INSTRUCTIONS FOR A JOB<br />
• Enter a value for Extended Time Out and click Apply to extend the current job timeout.<br />
The job will be rerouted with the new instructions when the job timeout expires.<br />
• Click Redirect Job Now to reroute the job immediately, without waiting for the job timeout.<br />
• Click Cancel Job to remove the job from the print queue.<br />
• Click the close box at the upper-right corner of the window to close the notification window<br />
without changing reroute instructions.<br />
The job is rerouted according to the original rerouting instructions and job timeout.<br />
Group Balance settings<br />
Group Balance settings are per-printer group settings that specify how a group splits and<br />
distributes jobs among print devices.
PRINTER GROUPS AND LOAD-BALANCING 63<br />
Load Balance<br />
Load Balance refers to the process of dividing individual print jobs among one or more print<br />
devices. Select a default load-balance method for the group. Jobs sent to the group will be<br />
load-balanced according to the default method if no specific method is specified when the job<br />
is sent to the Balance server.<br />
The default load-balance selection should reflect the most logical and efficient option given<br />
the printers in the printer group. For example:<br />
• If the printer group includes a powerful production black-and-white device and several<br />
color devices, set the default to Color Split, so that the color devices handle only the color<br />
portion of jobs.<br />
• If the group contains only black-and-white engines of different capabilities, set the default<br />
to Fastest Single Engine, so that the printer of choice matches the job requirements exactly,<br />
or Preferred Printer, to route the bulk of jobs to the most productive device.<br />
You can use the following methods to balance print loads for the most efficient use of print<br />
devices in the printer group:<br />
Fastest Single Engine prints the entire job using the most suitable print device in the group,<br />
based on print specifications sent to the server as part of the job ticket.<br />
For example, when a job with specific color options and instructions to be stapled is sent to a<br />
group where more than one print device fits the specifications, Fastest Single Engine will<br />
assign the job to the fastest device, dependent on the current print load on each device. If the<br />
job contains only black-and-white content, only black-and-white print devices are considered<br />
for the Fastest Single Engine selection.<br />
Color Split splits all copies across two devices, with color content sent to the fastest color print<br />
device in the group, and black-and-white content to the fastest black-and-white device in the<br />
group, based on print specifications and the current print load on each device. Some<br />
specifications, such as stapling and Mixed Media, cannot be specified and are ignored for<br />
color devices, because finishing is assumed to take place on merged output.<br />
Color split jobs can save time and money by minimizing the number of pages printed on<br />
slower and more expensive color print devices.<br />
Copy Split sends multiple copies of a single document to different devices, based on print<br />
specifications and the current print load on each device. Copy Split requires that the printer<br />
group contain a minimum of two black-and-white or two color devices.<br />
Long Job Split splits a single copy of a document across different devices, based on print<br />
specifications and the current print load on each device. Some specifications, such as stapling,<br />
are ignored. Long Job Split requires that the printer group contain a minimum of two blackand-white<br />
or two color devices.
PRINTER GROUPS AND LOAD-BALANCING 64<br />
Preferred Printer<br />
When you specify a device as a Preferred Printer, the Balance server attempts to send the<br />
entire job to that particular device.<br />
When Preferred Printer is selected as the default load-balance option, you must select a device<br />
from the printer group in the Preferred Printer menu. <strong>User</strong>s may override the default and<br />
specify a different preferred printer for a particular job.<br />
NOTE: Preferred Printer may not print the job as specified due to certain constraints. If this<br />
happens, a constraint dialog box will appear.<br />
Use Printer Type<br />
Use Printer Type determines whether black-and-white or color print devices should be used<br />
exclusively for jobs sent to the group. This option is most commonly used by users. <strong>User</strong>s can<br />
specify in the driver that a black-and-white job sent to a mixed group be printed only on<br />
black-and-white devices, for speed and minimal cost.<br />
As a default setting, you, as the administrator, can use this option to restrict the group to<br />
performing certain types of jobs. For example, if you have a single color print device in the<br />
group that you want held on standby for color jobs only and not used for black-and-white<br />
jobs, set Use Printer Type to Color.<br />
Cover Sheet/Merge<br />
Cover sheet and inline merge options help to simplify the task of collating jobs load-balanced<br />
across multiple print devices:<br />
• Cover sheets are instructional pages containing information about the job. For split jobs,<br />
cover sheets are generated with each portion of a job copy completed by a different print<br />
device. Once all portions are printed, cover sheet information allows the collator to<br />
reassemble each copy, maintaining the integrity of the print job.<br />
• Inline merge features are available on some print devices, allowing portions of a document<br />
printed on one device to be automatically collated into a portions printed on another<br />
device to create a complete copy. Inline merging requires a device with an inline merge or<br />
post-fuser tray.<br />
The following options may be available, based on printers in the printer group:<br />
None Does not generate cover sheets or insert inline pages.<br />
Cover Sheet–Manual Merge Automatically generates cover sheets with information about each<br />
portion of the job, to aid in manual merging (by hand).<br />
Bar Code–Offline Merge Automatically generates cover sheets containing bar codes for<br />
collation by an offline merge finisher (Duplo 1060 and others).
PRINTER GROUPS AND LOAD-BALANCING 65<br />
No Cover Sheet–Inline Merge Inserts preprinted pages from an inline insertion tray. This<br />
option is available only when a job is color split and the printer group contains a black-andwhite<br />
device that supports inline merging.<br />
Inline Merge workflow<br />
You must configure a hybrid printer group for your Balance server to support inline merging.<br />
The group must include at least one color print device and one black-and-white print device<br />
with an inline post-fuser (“inserter” or “interposer”) tray installed.<br />
TO MERGE JOBS USING AN INLINE POST-FUSER TRAY<br />
1 Set Color Split job options:<br />
Send the job to a default Color Split group, or set Load Balance to “Color Split” (see<br />
page 63).<br />
Set Cover Sheet and Merge Options to “No Cover Sheet - Inline Merge.”<br />
Set special printing options for the black-and-white device, if necessary.<br />
Set options for the color device to Face-up, reverse N-1 printing OR Face-down, forward 1-N<br />
printing.<br />
Face-down, forward 1-N printing settings are required for some non-Fiery devices. If you are<br />
uncertain how color media should be placed in the inline inserter tray, run a test job to verify<br />
the correct settings for your merging device.<br />
2 Process the job.<br />
Color pages are sent to a color device and printed. The remainder are sent to the black-andwhite<br />
device, and a message is sent to the copier control panel to load paper, or replace the<br />
paper with Balance-labelled stock, in the post-fuser tray.<br />
3 Place the color pages printed on the color engine in the post-fuser tray.<br />
If you are unsure which way the pages should be facing, consult your printer documentation<br />
or run a small color split job to verify that output is merged properly.<br />
4 Release the job at the black-and-white engine’s control panel.<br />
The black-and-white pages are printed, with color pages interposed in the correct locations.
PRINTER GROUPS AND LOAD-BALANCING 66<br />
Max. No. of Printers<br />
The maximum number of printers is the number of print devices in the printer group over<br />
which a job may be load-balanced. You can limit this number to a one or more print devices,<br />
up to all print devices in the group.<br />
• A larger number of printers generally provides faster throughput by increasing the<br />
likelihood that a device matching print specifications is available at any given time.<br />
• Conversely, by limiting the number of printers available, you can minimize output<br />
variation among the pages of a distributed job, and limit the number of different printers<br />
from which you have to collect output from the same job.<br />
Color Match<br />
Color Match optimizes color consistency when a job is split among more than one color print<br />
device. Balance includes a standard color profile with each portion of a job sent to a separate<br />
color device. The standard color profile overrides default device settings to ensure that each<br />
portion of a job is printed with the same color profile. The Color Match profile system<br />
enables each destination device to map, adjust, and print colors using a consistent standard,<br />
resulting in more even color output. For more information, see “Color output requirements”<br />
on page 53.<br />
Printer installable options<br />
Balance requests verification of device-specific options installed on print devices to gain<br />
complete information about the capabilities of each device.<br />
Once an option is verified as “Installed,” Balance associates the option with the group and<br />
adds corresponding print options to the PPD; for example, a High Capacity Stapler adds to<br />
the stapling options that appear in the printer group’s printer driver. Options marked “Not<br />
Installed” are not used, even if the option is physically installed on the print device.<br />
For more information about specifying printer installable options, see Balance Help.<br />
Pages per Minute (PPM)<br />
You can override the default Pages Per Minute (PPM) for a printer. This option is used for<br />
load-balancing and will split jobs accordingly.
PRINTER GROUPS AND LOAD-BALANCING 67<br />
Scripting<br />
Printer group and print device scripts allow the administrator to customize job processing or<br />
print output by the Balance server. Scripts run for every job sent to the printer group or print<br />
device to which the script is attached.<br />
For detailed information about scripting, including a list of supported script commands,<br />
sample scripts, and debugging information, contact your <strong>EFI</strong> sales representative.<br />
NOTE: When a script file is attached, Balance searches for a script interpreter based on the file<br />
name extension. If an interpreter is not found, Balance notifies the administrator of the error.<br />
Printer group scripting<br />
Printer group scripts are run when Balance begins processing a job sent to the associated<br />
printer group. Printer group scripts can be used to customize load-balancing options based on<br />
job parameters, such as the number of pages, ratio of color to black-and-white pages, number<br />
of copies, or group properties such as the type or number of printers, or the printer PPM<br />
rates.<br />
For example, after checking job parameters, a script may direct Balance to use Long Job Split<br />
for jobs with 500 or more pages, or use Copy Split for jobs with 10 or more copies.<br />
Print device scripting<br />
Print device scripts are run when the Balance server finishes processing a job and sends<br />
load-balanced portions of the job to printer group devices. Print device scripting can be used<br />
to alter postscript data and change printer output, or to manage the downloading of the job to<br />
the device in place of the Balance server.<br />
Each printer in a printer group can have a separate script attached. If a printer is present in<br />
more than one group, each instance of the printer can have a separate script attached.
PRINTER GROUPS AND LOAD-BALANCING 68<br />
Scripting exceptions<br />
The following exceptions occur with scripting.<br />
• Scripts cannot be used to perform the following:<br />
º Change the actual print data of a job, only the job’s load-balancing specifications.<br />
º Change username and job name properties.<br />
º Change the finishing options, such as stapling or duplexing.<br />
• Progress information is not displayed on the Balance Bar or in Command WorkStation<br />
while a script is running.<br />
• Reroute on Error is disabled for groups when at least one device in the group has a script<br />
attached.
SERVER OPERATION 69<br />
SERVER OPERATION<br />
This chapter describes tools available to the administrator and print operators to manage the<br />
Balance server, monitor job flow status, and edit jobs held at the server. These tools include:<br />
Balance Bar provides a direct administrative interface to the Balance server. You can use the<br />
Balance Bar to start and stop the server, configure the server setup (see page 32), and monitor<br />
job status.<br />
Command WorkStation is a comprehensive print workflow management application designed<br />
for monitoring jobs and print queues. If your print workflow frequently requires operator<br />
intervention, Command WorkStation will likely be your primary management tool for the<br />
Balance server.<br />
WebTools are client installation and server monitoring utilities accessible over a local network<br />
or intranet from a variety of computing platforms.<br />
Impose is a print imposition tool.<br />
Compose is a print editing tool used for mixed media and tab printing.
SERVER OPERATION 70<br />
Using <strong>EFI</strong> Balance Bar<br />
The Balance Bar provides access to all administrative server functions. The Balance Bar<br />
appears at the top of the screen when Balance is running, and shows the status of jobs<br />
currently processing and printing on the Balance server.<br />
The Balance Bar also provides convenient access to some of the same operational functions<br />
available in Command WorkStation (see page 73). If the Balance server is accepting jobs<br />
directly from clients without help from an operator, you can use the Balance Bar to view job<br />
status information and perform simple server management tasks, such as canceling active jobs<br />
and launching helper utilities.<br />
The following illustration identifies the components of the Balance Bar:<br />
1 2 3 4 5 6<br />
1 Click to expand or collapse the Balance Bar<br />
2 Name of job currently balanced<br />
3 Amount balanced<br />
4 Name of job currently RIPping/printing<br />
5 Errors and other server information<br />
6 Activity light<br />
To toggle between compact and expanded views of the Balance Bar, click the button at the far<br />
left of the bar.<br />
For more information about using Balance Bar, see Balance Help. For detailed information<br />
about Tray Association, see the next section.
SERVER OPERATION 71<br />
Using Tray Association<br />
The Tray Association window maintains a record of the paper media in printer input trays.<br />
Balance uses tray associations to correlate jobs with print devices, based on the media specified<br />
for the job. This mapping system is used for printer groups supporting the system paper<br />
catalog (see page 34), based on the Group Media Selection (see page 60) for the printer group.<br />
If the selected media is not currently loaded in a printer tray, the job is held for operator<br />
intervention until the correct media is supplied. We recommend keeping tray associations<br />
updated to reflect the contents of printer trays and decrease the amount of operator<br />
intervention required to complete print jobs in your Balance environment.<br />
NOTE: Trays may not be mapped for custom PS devices or devices that maintain a native<br />
paper catalog.<br />
TO ASSOCIATE PRINT DEVICE TRAYS WITH MEDIA<br />
1 Right-click the Balance Bar and choose Tray Association.<br />
The Tray Association dialog box appears.<br />
Each print device in Balance printer groups appears. Devices are listed by the Device Name<br />
and IP address, and by printer names assigned during setup.<br />
2 Click the entry next to a tray in the Paper Catalog column.<br />
The paper catalog entry becomes a menu. The menu lists Paper Labels in the system paper<br />
catalog.
SERVER OPERATION 72<br />
3 Use the menu to choose the paper medium from the system paper catalog that currently<br />
resides in the tray.<br />
4 Specify additional information about the media in the tray, if required by the print device.<br />
Some devices require Media Type or other specifications. Click the entry to display the menu,<br />
and choose the item that best describes the media from the list.<br />
5 After configuring each available tray, click Save and Exit.<br />
Tray chaining<br />
You can use the “Auto Select” tray option for tray chaining. For example, if you have a very<br />
large job that uses a single paper medium and includes more sheets than can fit in a single tray,<br />
map the paper catalog media name to the “Auto Select” tray for the selected output device.<br />
When printing the job, the device selects media based on the PPD properties, and can draw<br />
the same media from any available tray.<br />
For devices that are not paper catalog native and do not support tray selection through<br />
PPD-based options, the Tray Association feature provides an instance of ‘Auto Select’ per<br />
physical device tray (except for the manual and special feeder trays). Tray selection options are<br />
ignored by the Balance server and only PPD-based media selections are forwarded to the<br />
device.
SERVER OPERATION 73<br />
Using Command WorkStation<br />
You may already use Command WorkStation to manage print workflow on your Fiery or<br />
EDOX print devices. You can also use Command WorkStation to monitor print queues for<br />
these devices and the Balance server queues.<br />
For information about installing Command WorkStation on satellite workstations, see<br />
page 46. For information about using Command WorkStation to perform more complex<br />
management tasks, such as managing individual print jobs in the queue or monitoring the<br />
Balance server from a remote computer, see Command WorkStation Help.<br />
TO START COMMAND WORKSTATION<br />
• To start Command WorkStation, do one of the following:<br />
Right click the Balance Bar and choose Command WorkStation.<br />
Choose Command WorkStation from the Start > Programs menu in the Windows taskbar.<br />
If you have created a separate shortcut to the Command WorkStation application,<br />
double-click the Command WorkStation icon.<br />
If you chose during installation to start Command WorkStation automatically on server<br />
startup, Command WorkStation may already be running on the server computer.<br />
If you already use Command WorkStation to connect to print devices, the Login Server dialog<br />
box appears, prompting you to choose an existing connection or add a new one.<br />
If you are running Command WorkStation for the first time, the Available Servers dialog box<br />
appears, prompting you to establish a server connection.<br />
Connecting to <strong>EFI</strong> Balance<br />
You can maintain multiple, simultaneous printer connections in Command WorkStation to<br />
monitor different print queues. Upon starting Command WorkStation, you are prompted to<br />
specify one or more connections, or add a new connection.
SERVER OPERATION 74<br />
TO CONNECT TO A BALANCE SERVER<br />
1 If you have existing Command WorkStation connections and the Login Server dialog box is<br />
displayed, click Add.<br />
The Available Servers dialog box appears. If you are running Command WorkStation for the<br />
first time, this dialog box appears automatically.<br />
Command WorkStation searches for available connections and displays them in the Auto<br />
Search tab.<br />
2 Select the Balance server in the Auto Search tab and click Add.<br />
You can also click the Manual tab to search for the Balance server’s specific DNS name or IP<br />
address, or click Advanced to search specific IP ranges or subnets for the Balance server.<br />
When you add the new connection, the Login Server dialog box appears.<br />
3 Double-click the Balance server connection.<br />
If the server is password protected, you are prompted to enter your administrator or operator<br />
password.<br />
Command WorkStation connects to the Balance server. The server name appears on the<br />
Active Jobs bar, and jobs in Balance server queues appear in the Active and Printed Jobs<br />
windows.
SERVER OPERATION 75<br />
Using WebTools<br />
WebTools are client installation and server monitoring utilities accessible over a local network<br />
or intranet from a variety of computing platforms. Operators and client users can access the<br />
WebTools home page for a Balance server using an Internet browser, connect to the <strong>EFI</strong> web<br />
site, and download printer group drivers for printing to the Balance server.<br />
If you are running WebTools on Windows Server 2003, you must deselect Internet Explorer<br />
Enhanced Security to enable WebTools to work properly. To do this, use the following<br />
procedure.<br />
TO DESELECT INTERNET EXPLORER ENHANCED SECURITY ON WINDOWS SERVER 2003<br />
1 Select Start, choose Settings, and then choose Control Panel.<br />
2 Select Add/Remove Programs, and then Add/Remove Windows components.<br />
3 Deselect “Internet Explorer Enhanced Security” and click Next.<br />
4 Follow the Windows Components Wizard instructions.<br />
TO ACCESS WEBTOOLS FROM WINDOWS<br />
1 Start your Internet browser application.<br />
2 Enter the IP address or DNS name of a Balance server.<br />
The WebTools home page for the server appears.
SERVER OPERATION 76<br />
3 Select a login level, enter the correct password if needed, and then click OK.<br />
No password is needed to log in as a guest. The Administrator and Operator passwords are<br />
specified in Balance Setup.<br />
4 Click one of the buttons at the left to select one of the WebTools.<br />
Move the pointer over the buttons to display information about the tools. The tools are<br />
described in the sections that follow.<br />
WebTools Security<br />
A user with Balance administrator privileges can enable or disable access to WebTools for<br />
remote users on the network.<br />
TO ENABLE OR DISABLE ACCESS TO WEBTOOLS<br />
1 In your Internet browser, enter the IP address or the DNS name of the Balance server to<br />
display the WebTools home page.<br />
2 Select the Administrator login level, enter the appropriate password, and click OK.<br />
Only users with administrator privileges can control access to WebTools.<br />
3 Click Configure.<br />
4 Select or clear the checkbox next to the name of each tool to enable or disable access to that<br />
tool for remote users.<br />
5 Click OK to apply the changes.<br />
WebLink tool<br />
WebLink tool provides a link to the <strong>EFI</strong> home page, where you can learn more about<br />
products, services, and support related to Balance workflow software.
SERVER OPERATION 77<br />
Installer<br />
Use the WebTools Installer page to download printer drivers and PPD files for Windows and<br />
Mac OS client platforms. Printer driver and PPD files are available for each platform/printer<br />
group combination.<br />
NOTE: WebTools installers are published only if specified in setup (see page 56).<br />
For detailed information about installing client printer drivers and PPD files, see “Installing<br />
printer drivers and <strong>EFI</strong> Balance PPD files” on page 39.<br />
Using <strong>EFI</strong> Impose<br />
Impose is a print imposition tool designed for use with Command WorkStation. Impose<br />
allows the operator to edit, merge, and assemble print jobs as they are being held in Balance<br />
server queues, and arrange pages in layouts for folding, binding, or cutting after printing.<br />
One server-based copy of Impose is provided free with Balance. Additional copies are licensed<br />
separately. For more information about Impose, see Command WorkStation Help.<br />
Using <strong>EFI</strong> Compose<br />
Compose is a print composition tool designed for use with Command WorkStation.<br />
Compose allows the operator to view and repaginate print jobs, and provides mixed media<br />
features used to specify alternative media for printing or insertion, and tab printing<br />
specifications.<br />
For more information about Compose, see Compose Help.
SERVER OPERATION 78<br />
Print editing workflow<br />
Print operators using Impose and Compose in conjunction with Command WorkStation for<br />
print editing, imposition, mixed media setup and tab printing should consider the following<br />
workflow steps. Due to the different functionality provided by each application, the workflow<br />
order should be followed when more than one of these applications is used in editing a single<br />
job.<br />
NOTE: You must follow the steps in the following order.<br />
TO EDIT A PRINT DOCUMENT USING IMPOSE AND COMPOSE<br />
1 Send the job to the Balance server’s Hold queue.<br />
2 Access the queue using Command WorkStation.<br />
3 Change job properties in Command WorkStation.<br />
4 Decide if you want to impose your job. If so, open the job in Impose in Command<br />
WorkStation.<br />
For more information about Impose, see Command WorkStation Help.<br />
5 Decide if you need to perform the following tasks and open the job in Compose:<br />
• View or repaginate your job<br />
• Specify inserts<br />
• Add and define tabs<br />
• Add or delete pages<br />
NOTE: Compose options are group dependent. For example, if the printer group does not<br />
support tabs, then tab options will not appear.<br />
6 Print the job.
SERVER OPERATION 79<br />
Starting and shutting down the <strong>EFI</strong> Balance server<br />
Balance starts automatically when you start the server computer. You can run the Balance<br />
server continuously. If you must exit Balance, restart, or shut down the server for any reason,<br />
use the procedures in this section. Do not use the power switch to turn off the Balance server.<br />
When the Processing or Printing areas are active, Balance is receiving, balancing, or printing a<br />
job. Jobs in the Print queue at shutdown balance and print after the server is restarted. Jobs<br />
waiting to split or print at shutdown are moved to the Hold queue. To print held jobs after<br />
the server is restarted, select the held jobs in the Spool area of Command WorkStation and<br />
choose Job > Process.<br />
TO START THE BALANCE SERVER<br />
1 Make sure that server computers connected to the Balance server are turned on and<br />
connected to the network.<br />
2 Turn on the Balance server power switch.<br />
3 Log on using the system’s administrator log-in name and password used to install Balance.<br />
Balance starts automatically when you log in to the operating system.<br />
TO SHUT DOWN THE BALANCE SERVER<br />
1 Make sure that the Processing and Printing areas on the Balance Bar are in Idle mode.<br />
If a job has just finished balancing or printing, wait at least five seconds after the Processing<br />
and Printing areas (viewed through Command WorkStation) become idle, and then proceed<br />
to step 2.<br />
2 From the Windows taskbar, choose Start > Shut Down.<br />
3 Select Shut Down to turn off the server computer, and click OK.<br />
A message appears stating that it is safe to shut down the server. Use the power switch to turn<br />
off the Balance server.<br />
TO EXIT AND RESTART THE BALANCE SERVER<br />
1 Make sure that the Processing and Printing areas on the Balance Bar are in Idle mode.<br />
If a job has just finished balancing or printing, wait at least five seconds after the Processing<br />
and Printing areas (viewed through Command WorkStation) become idle, and then proceed<br />
to step 2.<br />
2 Right-click the Balance Bar and choose Exit Balance from the menu that appears.<br />
3 Click OK at the prompt to exit Balance.<br />
The Balance Bar updates to indicate that you have exited. At this point you can make<br />
modifications to the system configuration or apply a Service Pack to the operating system.
SERVER OPERATION 80<br />
4 To restart Balance, choose Start > Shut Down from the Windows taskbar.<br />
5 Select Restart and click OK.<br />
6 Log on using the system’s administrator log-in name and password used to install Balance.<br />
Balance starts automatically when you log in to the operating system.
PRINTING 81<br />
PRINTING<br />
This chapter describes different methods of printing to a Balance server and monitoring<br />
printed jobs, including:<br />
• Printing from Balance printer drivers<br />
• Printing from Hot Folders<br />
• Using WebTools<br />
Print to Balance printer groups the same way you would print to a stand-alone printer<br />
accessible to your computer: by sending your job to the print device as it is defined on your<br />
computer.<br />
• Balance printer group queues appear on the network as ‘virtual printers,’ even though each<br />
printer group may represent more than one actual print device.<br />
• Each printer group is represented by Print and Hold queues that determine whether the<br />
job is printed directly or held for printing later. The administrator may choose to publish<br />
one or both of these queues.<br />
• After printer driver and PPD files are published, users can download and install them, and<br />
use them to specify print options and to route jobs to the printer group queues.
PRINTING 82<br />
About <strong>EFI</strong> Balance printer driver and PPD files<br />
A printer driver is a software utility that enables communication between an application and a<br />
print device. A PostScript printer description (PPD) file contains PostScript language<br />
extensions that describe features of a particular print device. Printer drivers and PPD files<br />
work together to ensure that jobs are printed correctly on a specified print device.<br />
Printing to an <strong>EFI</strong> Balance printer group<br />
When the administrator sets up a printer group, the Balance server generates a group PPD file<br />
that gathers information from the PPD files of individual print devices in the group. Just as<br />
the printer group acts as a single virtual printer, the group PPD acts as the description file for<br />
that virtual printer.<br />
Whenever the administrator adds a print device or removes a print device from a group, the<br />
Balance server dynamically generates a new driver and PPD file based on the new group<br />
configuration.<br />
NOTE: To specify print options and send jobs to a printer group that has been modified, users<br />
must reinstall newly-generated driver and PPD files each time modifications are made to the<br />
printer group.<br />
TO PRINT TO A PRINTER GROUP<br />
1 In your application, choose File > Print.<br />
The Print dialog box appears.<br />
2 Choose the printer group queue you want to print to in the menu showing the list of available<br />
printers (often named Printers).<br />
You can bypass this step by specifying the printer group as your default printer, as described in<br />
the next section.
PRINTING 83<br />
3 Specify print options.<br />
Windows: Click the button (usually named Properties) that displays printer properties.<br />
The Balance printer driver appears.<br />
1 Save Current Settings<br />
2 Save and Manage List of<br />
Settings<br />
3 Click to expand/collapse a<br />
single pane<br />
4 Click or right-click shortcut<br />
to set option<br />
5 Previews page and finishing<br />
options<br />
6 Click to expand/collapse all<br />
7 Click to display Balance<br />
printer driver online help<br />
3<br />
1 2<br />
4<br />
5<br />
6<br />
7<br />
Mac OS: Choose Balance from the menu directly below the Printer menu.<br />
Print options are listed in a menu for applications on Mac OS 9.<br />
1 Choose Balance<br />
2 Click to save current set of<br />
options<br />
3 Scroll to display additional<br />
options<br />
1<br />
3<br />
2
PRINTING 84<br />
Mac OS 10.2 and later versions create extra Balance tabs.<br />
4 Specify print options as desired.<br />
For descriptions and instructions on how to select print options, see Balance Printer Driver<br />
Help.<br />
5 In the Print dialog box, click the button that sends the print job to the printer (usually Print<br />
or OK).<br />
NOTE: Mac OS 10.x does not disable print features constrained by other feature selections.
PRINTING 85<br />
About print options<br />
When a job is sent to a printer group, a variety of different print options may be specified<br />
along with the job. Print options indicate how to process a job and the type of results<br />
expected. Print options fall generally into two categories:<br />
• Balance options specify the load-balancing criteria used to distribute print jobs among<br />
devices in the printer group. Balance options are available across all printer groups. These<br />
options are standard, although the choices available may vary due to the device<br />
composition of the printer group and the default settings of the options.<br />
• Custom options (such as Stapling, Face-down Printing, or Duplex) depend on the<br />
capabilities or current setup of individual print devices in the printer group. These options<br />
may or may not be available, and will usually offer different choices, depending on the<br />
printer group. The group PPD file indexes the capabilities of all devices in the group and<br />
determines the aggregate options available for the group as a whole.<br />
For a detailed description of the Balance options, see “Group Balance settings” on page 62 or<br />
the Balance Printer Driver Help. General descriptions of custom options available for many<br />
print devices can be found in Balance Printer Driver Help. For specific information on<br />
custom print options, see your printer documentation.<br />
NOTE: Some Fiery/EDOX print features are not compatible with Balance and do not appear<br />
in printer drivers. These features include RIP and Hold, manual duplexing, first page source,<br />
and password and security printing features.<br />
Printer’s Default setting<br />
Printer’s Default allows users to accept the default setting for a job option when printing<br />
through Balance. Printer default settings are considered unspecified by Balance until the job<br />
reaches the destination print device. The job then prints using the destination printer’s default<br />
setting.<br />
Printer default options reduce bottlenecks at the Balance server by increasing the options for<br />
load-balanced printing. Encourage users to use printer default values, when possible, if<br />
throughput is slow or jobs are not finding matching printers quickly enough.<br />
For some jobs, specific finishing options may be required. Since default options vary between<br />
print devices, and jobs may be load-balanced across several different devices, we recommend<br />
you specify each print option, rather than accepting the printer default when an option is<br />
specifically required.<br />
For information about the default options for a particular print device, see your printer<br />
documentation.
PRINTING 86<br />
Setting print options<br />
Print options for Balance jobs may be set by an administrator, operator or user in several<br />
locations:<br />
• Administrators set default Balance print options for each printer group during setup.<br />
These options may be overridden for specific jobs by operators or users.<br />
• Windows users may set default Balance or custom print options for printing through a<br />
Balance printer driver or Hot Folders. These defaults override printer group defaults, and<br />
are applied whenever printing through these means unless overridden for a specific job.<br />
• Windows or Mac OS users may specify Balance or custom print options when printing a<br />
job from an application, using the Balance printer driver interface. These settings override<br />
any default settings for the current job only.<br />
• Operators may override user print options by changing Balance or custom print options<br />
from within Command WorkStation.<br />
Similar interfaces are used for specifying print options across applications.<br />
TO SPECIFY DEFAULT PRINT OPTIONS FOR A PRINTER GROUP (WINDOWS ONLY)<br />
1 Choose Start > Settings > Printers from the Windows taskbar to open the Printers control<br />
panel.<br />
2 Right-click the printer icon for the Balance printer group, and choose Properties (Windows<br />
98/Me) or Printing Preferences (Windows XP/2000/Server 2003).<br />
3 Specify default print options as desired and click OK.<br />
NOTE: You can display the exact name of the PPD file for a printer group by clicking the<br />
About tab in the Printers control panel.
PRINTING 87<br />
Using <strong>EFI</strong> Hot Folders<br />
A hot folder is a Windows directory folder that is linked to a print server using the<br />
Hot Folders application. The Hot Folders application monitors the folder and routes any<br />
documents dropped into the folder to the print server for printing.<br />
Default print settings can also be attached to the hot folder to customize printing. When you<br />
create a hot folder and attach it to a Balance printer group queue, you can use the hot folder<br />
to print with Balance load-balancing, custom print options, or imposition settings. You can<br />
create as many hot folders as you want on your computer, and share them with other users<br />
over a network, including Mac OS users, by creating shortcuts to the folders from remote<br />
computers.<br />
To print a job using a hot folder, simply drag and drop the job document file onto the hot<br />
folder. The Hot Folders software automatically routes the job to the Balance server queue with<br />
the print settings associated with that hot folder.<br />
For information about installing Hot Folders software, see page 46. For more information<br />
about configuring and printing with hot folders, see Hot Folders Help.
DIGITAL STOREFRONT (DSF) CONNECTIVITY AND JOB TICKET SUPPORT 88<br />
DIGITAL STOREFRONT (DSF) CONNECTIVITY AND JOB<br />
TICKET SUPPORT<br />
Digital StoreFront (DSF) is a licensed web site and transaction server that manages print<br />
procurement. It streamlines and automates print ordering and production processes. You can<br />
use DSF to submit jobs to the Balance printer group queues.<br />
DSF setup<br />
When connected to the DSF server, you can submitprint jobs to Balance. When you create<br />
paper catalog driven printer groups in Balance, the printer groups appear in the DSF server as<br />
output devices.<br />
Balance can only work with one DSF Facility at a time. Ask your DSF administrator for the<br />
correct DSF web address, Site-key, and Facility name.<br />
TO SET UP DSF FOR BALANCE<br />
1 From Balance Setup, select DSF Connection.<br />
2 Enter the DSF web address, verify the Site-key, and click Connect.<br />
A list of DSF facilities appears.<br />
3 Select the Facility Name.<br />
Paper Catalog synchronization<br />
When you launch Balance Setup, Balance imports the DSF paper catalog and merges the DSF<br />
new entries into its own paper catalog. If there is a name conflict, the DSF imported entry will<br />
override the Balance paper catalog entry.<br />
DSF Paper Catalog entries that have a “\” or “:” will be ignored by Balance. Imported DSF<br />
paper catalog entries that are longer than 31 characters or with 0 as the paper size are also<br />
ignored.<br />
Paper Catalog based media selection from DSF is recognized by Balance and therefore by<br />
target devices.
DIGITAL STOREFRONT (DSF) CONNECTIVITY AND JOB TICKET SUPPORT 89<br />
Job submission<br />
When you create a Balance group with Group Media Selection set to Paper Catalog, a mirror<br />
output device is created on the DSF server to the shared Facility. Printing a job from DSF to<br />
this new output device sends the job and its job ticket directly from DSF to the Balance group<br />
print or hold queue.<br />
You can also monitor the job status and cancel a job if needed. For more information about<br />
using DSF, see the DSF documentation.<br />
If you are connected to a DSF version 2.0SR2 or earlier, you can submit jobs using Hot<br />
Folders to submit DSF jobs to Balance queues. For more information about submitting jobs<br />
using DSF version 2.0SR2 or earlier, contact <strong>EFI</strong> Technical Support.<br />
NOTE: You must have groups set to Paper Catalog in order to submit jobs using DSF to<br />
Balance.<br />
TO SUBMIT JOBS TO BALANCE<br />
1 Submit the job you want to print and select the job ticket options by accessing the Print<br />
Services tab.<br />
NOTE: If you need more information about how to submit jobs using DSF, see the DSF<br />
documentation.<br />
2 When you are finished submitting the job, you can select to approve and print your job using<br />
the Admin tab.<br />
NOTE: If you need more information about how to approve and print jobs using DSF, see the<br />
DSF documentation.<br />
In order to print to Balance, under Output, you must choose the desired Balance group name<br />
for which you want to print the job.<br />
The job is sent from DSF to the Balance printer group queue.
DIGITAL STOREFRONT (DSF) CONNECTIVITY AND JOB TICKET SUPPORT 90<br />
DSF installation on an <strong>EFI</strong> Balance server<br />
Although it is not recommended for performance reasons, you can run DSF and Balance on<br />
the same server computer.<br />
NOTE: Dual installation requires disabling the Apache web server, which prevents users from<br />
accessing Balance WebTools and downloading Mac OS printer drivers. To use the Mac OS<br />
printer drivers, you must install DSF and Balance on two different computers, or enable<br />
Apache only for periodic downloading of updated printer drivers.<br />
The following system requirements are required to support both server applications:<br />
• Dual processor<br />
• 1 GB of RAM<br />
TO INSTALL DSF AND BALANCE ON THE SAME COMPUTER<br />
1 Install Balance.<br />
2 Install DSF.<br />
3 In the Windows Control Panel, choose Administrative Tools > Services.<br />
You can also select Start > Run, type “services.msc”, and then click Enter.<br />
The Windows Services Control Panel appears.<br />
4 Right-click the Apache service and choose Disabled.<br />
5 Right-click the ASP.NET state service and choose Start.<br />
If the ASP.NET service is already running, skip this step.<br />
6 From the Windows Control Panel, choose Administrative Tools > Internet Information<br />
Services.<br />
7 Use the panel to the left of the window to expand the Local Computer and Web Sites folders.<br />
8 Right-click Default Web Site and choose Start.<br />
If Default Web Site is already running, skip this step.
DIGITAL STOREFRONT (DSF) CONNECTIVITY AND JOB TICKET SUPPORT 91<br />
DSF job ticket options<br />
The following table shows DSF job ticket options supported by Balance, provided that the<br />
target devices in the printer groups also support them.<br />
NOTE: Target devices may only support a subset of the overall Balance capability.<br />
DSF Naming Balance Naming Comments<br />
Option Value Option Value<br />
Job name “string” Job name “string”<br />
Number of copies “integer” Number of copies “integer” Balance allows up to 9999 copies for one<br />
job. If you are using a Fiery, refer to the<br />
Fiery specifications for the maximum<br />
number of copies.<br />
Printed Sides Simplex Duplex Off<br />
Duplex Top-top Some target devices may specify edge feed<br />
direction instead.<br />
Duplex with<br />
tumble<br />
Top-bottom<br />
Proof<br />
Yes/no<br />
(checkbox)<br />
Proof Print<br />
On/Off<br />
Media “string” Paper Catalog name “string” DSF and Balance paper catalogs are<br />
synchronized when you perform Balance<br />
Setup.<br />
Special<br />
instructions<br />
“string” Instructions “string”
DIGITAL STOREFRONT (DSF) CONNECTIVITY AND JOB TICKET SUPPORT 92<br />
DSF Naming Balance Naming Comments<br />
Option Value Option Value<br />
Stapling Bottom Left Stapler Mode Single (Upper Left-L) Maps to Single Bottom (Left-P) for<br />
Portrait Jobs.<br />
Bottom left slant<br />
Bottom right<br />
slant<br />
Upper left<br />
horizontal<br />
Bottom Left Slanted<br />
Bottom Right Slanted<br />
Single (Upper Right-L)<br />
Maps to Single (Vertical Right-L) for<br />
Landscape jobs.<br />
Upper left slant Corner (Upper Left-P) If job is landscape, maps to Corner<br />
(Upper Right-L).<br />
Upper left vertical Single (Upper Left-P) If job is landscape, maps to Single (Upper<br />
Right-L).<br />
2 left edge Double (Left-P) Maps to Double (Top-L) for landscape<br />
jobs.<br />
2 top edge Double (Top-P) Maps to Double (Right-L) for landscape<br />
jobs.<br />
Upper left Corner (Upper Left-P) Maps to Corner (Upper Right - L) for<br />
landscape jobs.<br />
Punching Left 2 Punch Left Portrait<br />
Left 4<br />
Left (3 holes)<br />
Four hole left<br />
Three hole left<br />
Folding Z Fold Folding Z fold<br />
Half<br />
Half<br />
Tri (in) Tri Does not differentiate between in or out.<br />
Refer to your output device<br />
Tri (out)<br />
specifications.<br />
Collation Yes/no Sorter mode Collate/off<br />
Slipsheets Yes Slip Sheet Mode On<br />
Trimming Default Trim On Maps all DSF trimming options to “On”.<br />
Height<br />
Offset<br />
Width<br />
On<br />
On<br />
On
DIGITAL STOREFRONT (DSF) CONNECTIVITY AND JOB TICKET SUPPORT 93<br />
DSF Naming Balance Naming Comments<br />
Option Value Option Value<br />
Binding Saddle stitch Saddle stitch<br />
Saddle stitch - 2<br />
staples<br />
Saddle stitch - 3<br />
staples<br />
Stapler mode Saddle Stitch Exact number of staples may not be<br />
matched. Please refer to your output<br />
device specifications.<br />
Saddle-stitched 4<br />
staples<br />
Tape Tape binding Xerox DocuTech only
TROUBLESHOOTING 94<br />
TROUBLESHOOTING<br />
This chapter provides troubleshooting guidelines for problems that might arise when<br />
managing or printing to a Balance server.<br />
Before calling for service<br />
Check the guidelines in this section before you call for service or support. If you cannot<br />
resolve the problem using the guidelines below, make a note of the error condition and<br />
contact your authorized service/support center.<br />
Pre-call checklist<br />
Before contacting <strong>EFI</strong> for service or support, please collect the following information:<br />
• Balance version number<br />
In Command WorkStation, in the General Info section in the lower-right corner, the<br />
Balance version number is listed as “System.” You can also find the version number in your<br />
Balance package.<br />
• Balance license serial number<br />
Choose Start>Programs ><strong>EFI</strong>>Balance License Manager to verify your license number<br />
(see page 26), or check your hardware security key.<br />
• Printer group information, if there is a load-balancing or printing problem<br />
View printer group information in Balance Setup (see page 57) or choose Server > Print<br />
Pages in Command WorkStation to print a Configuration page for a selected printer<br />
group.<br />
• Print settings for a failed job, if there is a printing problem<br />
Double-click a job in Command WorkStation to see print settings associated with the job.<br />
If the job fails to print to the Balance printer group, print a PDF copy of the job using<br />
Adobe Acrobat.<br />
• Make sure you do not have more than eight live connections<br />
Balance allows eight live connections to Command WorkStation, Job Monitor, Scan, or<br />
Hot Folders. If you have more than eight live connections, the server may stall or will not<br />
communicate.<br />
• Print Error Message<br />
If a job fails to print and is at the bottom of the Printed Jobs section (shaded in pink),<br />
double-click the job to view the error message. Next, click View Properties and select Print<br />
Properties for a printout of the job ticket options.
TROUBLESHOOTING 95<br />
Maintenance<br />
In addition to routine service and maintenance of printers, and replenishment of<br />
consumables, there are a few things you can do to improve the overall performance of your<br />
system:<br />
• Make the best use of network connections by publishing only queues that are used.<br />
Balance constantly monitors all published queues, even if they are inactive. Review<br />
published queues and eliminate those that are infrequently used (they are easy to<br />
re-establish when needed).<br />
• Delete unused printer groups to speed performance.<br />
• Hold recurring or less urgent print jobs and print them at times when network traffic or<br />
printing requirements are light.<br />
When traffic is low, an administrator or operator can move (or copy) Hold queue jobs to<br />
the Print queue for printing.<br />
• Reduce unnecessary server connections from Command WorkStation.<br />
• Reduce other unnecessary two-way communication.<br />
Large numbers of users running Balance utilities may have a significant effect on server<br />
performance. If you use a second or third Balance server on an occasional basis,<br />
performance will improve if you log off when you are not using it.<br />
• Clear inactive jobs from queues.<br />
Periodically review the contents of the Hold queue, and jobs retained in the Printed queue.<br />
Consider printing or offloading inactive jobs to preserve disk space.<br />
• Use job management tools to move or remove queued jobs. When you free up disk space<br />
by removing inactive jobs, new jobs are spooled and printed more quickly.<br />
• Disable queues that collect inactive jobs.<br />
You can also disable the Printed queue or leave Hold queues unpublished to keep jobs<br />
from accumulating.
TROUBLESHOOTING 96<br />
Clear the server<br />
As a last resort, an administrator can clear the server if a job persists in the system and prevents<br />
printing despite attempts to cancel or delete it. If possible, notify users that you will clear their<br />
jobs from the server so they can back them up and resend them when the server is back in<br />
operation.<br />
Error messages<br />
Your problem may originate with the destination printer and not at the Balance server. If the<br />
problem occurs at the destination printer, the Balance Bar and Command WorkStation both<br />
display error messages generated by printers in each printer group.<br />
For more information about printer error messages, see your documentation for the<br />
destination printer sending the error message.<br />
Troubleshooting<br />
If you see any startup error messages or if the Balance server does not reach Idle status, contact<br />
your authorized service/support center.<br />
Setup troubleshooting<br />
The following section explains some of the error and alert messages you may see during<br />
Balance Setup that might not be self-explanatory.<br />
Balance Setup messages<br />
After this Setup item This message Means<br />
Balance Setup<br />
(opening Balance Setup)<br />
You should be an administrator to<br />
run Balance Setup.<br />
An administrator password has been set for the Balance server.<br />
Enter the correct administrator password to access Balance Setup<br />
(see Balance Help).
TROUBLESHOOTING 97<br />
Printer Group Setup messages<br />
The following messages may appear when you are setting up printer groups (General<br />
Setup>Printer Groups>Add or Edit/View).<br />
This message<br />
The printer type at this IP address<br />
is not supported. Please visit our<br />
website, http://services.efi.com/<br />
efibalance.<br />
This printer/device already exists<br />
in this group.<br />
Please try again.<br />
Problem getting the printer file<br />
from remote location.<br />
You’ve exceeded the maximum<br />
number of printers allowed for<br />
this group.<br />
You’ve entered an invalid character<br />
in the group/printer name.<br />
Your changes will affect these<br />
groups: <br />
Please select the device type.<br />
is not an<br />
authorized OEM.<br />
Please add one or more printers to<br />
this group or press CANCEL.<br />
Means<br />
Balance does not yet support the selected print device. For more information, visit the listed website.<br />
The selected print device has already been added to the printer group.<br />
The last performed action was not recognized by Balance. Try repeating the action.<br />
Balance is having trouble obtaining the print device’s PPD file over<br />
the network.<br />
Each printer group is allowed a maximum number of print devices, specified by your license<br />
agreement.<br />
The specified name contains an invalid character. Enter a new name consisting of valid characters, as<br />
described on page 57.<br />
You have modified the installable options settings for a print device. The changes will be applied to all<br />
printer groups that contain the print device.<br />
You must specify an option from the Server Family menu.<br />
You have selected a print device that is not supported by your license agreement.<br />
The printer group does not contain any print devices. Each printer group must contain at least one<br />
print device.
TROUBLESHOOTING 98<br />
Network Setup messages<br />
After this Setup item This message Means<br />
Enable AppleTalk<br />
(Network Setup >Protocol<br />
Setup>AppleTalk Setup)<br />
Protocol Setup or Service Setup<br />
(Network Setup)<br />
No AppleTalk zone found.<br />
You must first enable<br />
a network port.<br />
The Ethernet network cable is not attached to the connector on the<br />
Balance server, or the network cable is not plugged into the hub or<br />
network. If your AppleTalk network has zones, and you want to specify<br />
a zone for the Balance server, you must connect the network cable to<br />
the Balance server before performing AppleTalk Setup.<br />
This message could also mean that the AppleTalk network does not<br />
have zones. Zones are not required for printing to the Balance server.<br />
Press OK to continue.<br />
Runtime error messages<br />
Error messages related to job cancellation and printing, including Disk Full and alerts to load<br />
media, are reported by job management utilities. For more information about these messages,<br />
see your printer documentation.<br />
You can turn on PostScript error reporting as a print option from Mac OS applications.<br />
Check power and cable: The interface cable between the Balance server and the device is not<br />
connected, or the print device is not turned on.<br />
Printer not found: Most failures to find a print device on the network are due to conflicting or<br />
missing name or address settings for the Balance server:<br />
• TCP/IP host name (also known as the DNS name), is defined by your organization. The<br />
Balance server picks up this name during setup.<br />
• Remote print device (internal machine) name, either print or hold.<br />
You must reconfigure Balance utilities on each computer if you change the DNS name<br />
(TCP/IP host name) of the Balance server. Check the table below for the appropriate name.<br />
In this location For this item TCP/IP networks<br />
Server Setup Server Name option Administrator-defined<br />
Hosts file host name DNS name (TCP/IP host name)<br />
Setup for TCP/IP lpd host name DNS name (TCP/IP host name)<br />
Name of printer on lpd host machine<br />
print or hold<br />
Cannot connect to Balance server with Balance utilities: Check to ensure that the appropriate<br />
network protocol is enabled, and that corresponding parameters (for example, for TCP/IP, the<br />
IP address, etc.) are set (see Balance Help). Verify also that Print or Hold queues are<br />
published. You can check these settings quickly by printing a Configuration page.
TROUBLESHOOTING 99<br />
On the client computer, the appropriate network protocol(s) must be loaded, and the<br />
Windows directory should contain a configured Efinl.ini file.<br />
Cannot connect to a Balance server with Command WorkStation: If there is a problem<br />
connecting to a Balance server, an error message is displayed. The problem can occur:<br />
• When the Balance server is first turned on<br />
• When the Balance server restarts<br />
• When you changed settings affecting the server address and did not reconfigure the<br />
connection to the server<br />
If you see this problem, try the following possible solutions in sequence:<br />
• A remote computer running the Balance utilities may be interfering by obtaining status<br />
information. If possible, close the remote application, and try again to connect.<br />
• Restart Command WorkStation and try again to connect.<br />
• Modify the connection configuration if necessary, or delete the Efinl.ini file and<br />
reconfigure the connection.<br />
• Restart the Balance server.<br />
Print troubleshooting<br />
When the Reroute on Error option (see page 61) is enabled and there is a print device error or<br />
a similar print device problem, a notification message appears describing the problem and<br />
prompting you for further reroute instructions. Other issues may be addressed by changing<br />
print options selected for your job.<br />
As preparation for troubleshooting printing problems, you can print out the Balance<br />
Configuration page by choosing Print Pages in Command WorkStation from the Server<br />
menu. The Configuration page lists server information, and all print devices in printer groups<br />
configured on the server.<br />
Jobs print without specified finishing options<br />
Print devices may support different finishing options. Even if these options are available in<br />
your print environment, you may not always be able to guarantee your job will include the<br />
specified options. There are several related reasons for this:<br />
• The finishing options you want may be concentrated on one or two machines which are<br />
frequently busy.<br />
• Finishing options may not be available on a print device which has unique capability to<br />
complete your job (such as, a color print device with the right size of paper).
TROUBLESHOOTING 100<br />
• Your Balance environment may be set up such that jobs are redirected to print at machines<br />
without matching finishing options if the correct machine is not immediately available.<br />
This is common in high-traffic print environments.<br />
Besides removing specified finishing settings, you can increase your chances of having the job<br />
print as specified by doing the following:<br />
• Specify “Both” for the Use Printer Type setting.<br />
• Wait until print device traffic decreases, or print during off hours.<br />
Printer group does not display all available options<br />
Sometimes print options provided by printer group devices may appear to be unavailable.<br />
This may happen because the missing options:<br />
• are installable options that were not specified during setup (see page 66), or that have<br />
changed since printer group setup.<br />
• may be incompatible with or irrelevant to the Balance printing workflow.<br />
• may appear under similar, but different names, because Balance uses only one name for<br />
common options provided by multiple devices in the same printer group.<br />
• are ColorWise options. Unless all included devices are identical, only three ColorWise<br />
options are displayed for each printer group.<br />
NOTE: Options may appear, but may not be available for selection in the Balance printer<br />
driver if their use is constrained by other print specifications.<br />
Mixed media option or Compose does not appear<br />
Mixed media options may fail to appear in the print options display for a printer group. This<br />
may happen because:<br />
• The Group Media Selection (see page 60) is not set for use of the system paper catalog,<br />
which is required for mixed media printing.<br />
• The printer group may not contain a device with mixed media capabilities. Verify that<br />
your mixed media device is supported by Balance and added to a printer group that can<br />
support its mixed media capabilities (see page 53).<br />
• A particular mixed media option is only supported by a color mixed media device in the<br />
printer group. If a black-and-white mixed media device is present in the same group, the<br />
color device is not treated as a mixed media device.
TROUBLESHOOTING 101<br />
Long Job Split or Color Split option does not work<br />
If you use Command WorkStation to specify mixed media settings for a job, along with the<br />
Long Job Split load-balancing option, the job will print using the Fastest Single Engine option<br />
instead. A similar result may occur if Color Split is specified for a mixed media job. Such<br />
results are the expected behavior, due to inherent conflicts between the Mixed Media feature<br />
and load-balancing options.<br />
Documents take a long time to print<br />
There are several reasons a job may take a long time to print:<br />
• Selected finishing options may be concentrated on one or two machines that are currently<br />
busy with other jobs.<br />
• The job was sent to destination print devices which are offline or in an error state.<br />
• The job is not shared among enough potential print devices in the printer group to<br />
improve speed of completion.<br />
You can speed up printing by doing the following:<br />
• Increase the Max. Number of Printers (see page 66), and set Use Printer Type (see page 64)<br />
to “Both” if jobs can be completed by any type of device.<br />
• Select Reroute on Error (see page 61) so that jobs do not wait for stalled print devices.<br />
• Increase the Max. Number Reroutes (see page 61).<br />
• Clear unnecessary print specifications sent with the job, and use printer defaults instead.<br />
The more options selected for a job, the more likely the job can only be completed by a<br />
single print device, which may be busy.<br />
Reroute notification issues<br />
Reroute window appears and disappears repeatedly<br />
If the reroute notification window (see page 61) appears and disappears repeatedly in<br />
Command WorkStation, the destination print device may be in the process of warming up.<br />
The reroute notification window appears because Balance treats print device warm-up periods<br />
as errors. However, actual rerouting of jobs will only occur after the print device has finished<br />
warming up. If the warm-up period is long, the notification window may disappear and<br />
reappear a number of times, while the job timeout interval expires and resets repeatedly.<br />
Reroute window takes awhile to appear<br />
If there are many devices attached to Balance, the Reroute window may take awhile to appear.
TROUBLESHOOTING 102<br />
Preferred Printer errors<br />
When a Preferred Printer is about to be selected, you may receive a warning message that<br />
indicates the selected Preferred Printer is missing some finishing capability to complete the<br />
job. You should then modify the job ticket, or pick a different preferred printer.<br />
After a Preferred Printer is picked, when you are assigning new job properties, a conflict<br />
window may appear, reminding you that the currently selected preferred printer cannot allow<br />
the selection.<br />
Errors during load-balancing<br />
Balance reports errors in two formats:<br />
Processing errors: general errors that occur when the Balance server processes a job in order to<br />
load-balance the job between devices.<br />
Device errors: errors that occur when the Balance server cannot find a device to print the job.<br />
Device errors use the following format:<br />
:: <br />
where is the user-provided device name, and is the description<br />
of the error condition on the device.<br />
For example,<br />
MyDevice :: Duplex=Top :: not available<br />
indicates the job cannot be sent to MyDevice in the printer group because MyDevice does not<br />
support the Duplex Top feature.<br />
Processing errors<br />
This Message<br />
Error processing the job<br />
No devices configured into the cluster<br />
Requested cluster was not found<br />
No healthy device found in requested cluster<br />
No valid B&W device found in cluster<br />
No valid Color device found in cluster<br />
No valid device found in cluster<br />
Means<br />
Balance failed to generate an output PostScript file.<br />
No devices are present in the group.<br />
The printer group no longer exists.<br />
All devices in the group are either not responding or in an error state.<br />
The job requires a black-and-white printer (color split or explicit user selection of blackand-white-only<br />
printers) but none are available.<br />
The job requires a color printer (color split or explicit user selection of color only printers)<br />
but none are available.<br />
Balance cannot find a valid printer to print the job. The License may not be configured<br />
properly.
TROUBLESHOOTING 103<br />
This Message<br />
General error while selecting devices<br />
Did not find both a Color device and a B&W<br />
device<br />
Could not select any device that matches the<br />
PPD selections<br />
Error in Long Job Split<br />
Error in Color Splitting Job<br />
Error in Copy Split<br />
Error in parsing file<br />
No license available for Load Balancing<br />
No license available for devices in cluster<br />
Error in downloading Job<br />
Could not find suitable printers<br />
Could not connect to one of the printers<br />
Failed to reroute - maximum count reached<br />
Rerouted<br />
Lost connection to remote printer<br />
Unsupported job attribute combination<br />
This printer group does not support tab<br />
printing<br />
The current Balance License is invalid<br />
Please modify your cluster(s) according to<br />
the new license<br />
Unable to apply requested imposition<br />
template<br />
Long Job Split with Special Features not<br />
supported<br />
Means<br />
Balance cannot find a device for the requested split type.<br />
The job is Color Split, but Balance cannot find both black-and-white and color devices.<br />
The job is mixed page size and one of the requested finishing options does not work with<br />
mixed page sizes.<br />
Balance cannot Long Job Split the job.<br />
Balance cannot Color Split the job.<br />
Balance cannot Copy Split the job.<br />
Balance cannot extract pages and language information from the job.<br />
The license does not permit load-balancing.<br />
The printers in the group are not licensed.<br />
The connection established with a Fiery device was broken while downloading the job.<br />
Balance cannot find a printer in the group that can print the job.<br />
Balance cannot connect to one of the printers in the group.<br />
Reroutes have reached the maximum, with no more reroutes possible for the job.<br />
The job or one of its portions has been rerouted.<br />
The printer reset the connection with Balance.<br />
Two or more user-selected options cannot be honored for the job.<br />
The job requests tab media insertion, but none of the printers in the group support tab<br />
insertion.<br />
The license is not set or is invalid.<br />
The license has been changed since last time setup was run.<br />
The selected imposition template cannot be applied to the job. Some of the imposition<br />
templates require a certain number of pages in the job.<br />
The user selected Long Job Split, and the job has Mixed Media/Inline Merge/Tabs<br />
Insertion/FC/BC settings, which are not supported with Long Job Split.
TROUBLESHOOTING 104<br />
Device Errors<br />
This Message<br />
= :: not available<br />
Does not support Mixed Media<br />
Does not support Tab media insertion<br />
Device is in error state<br />
Device is not healthy<br />
Requested Tab Media can not be used in this<br />
job<br />
Mixed Media with Tab Insertion not<br />
supported<br />
Tab Insertion with FC/BC not supported<br />
Mixed Media with Inline Merge not<br />
supported<br />
Inline Merge with FC/BC not supported<br />
Tab Insertion with Media Insertions not<br />
supported<br />
Inline Merge with Media Insertions not<br />
supported<br />
Inline Merge with Mixed Page Size not<br />
supported<br />
Booklet with Mixed Page Size not supported<br />
Tab Insertion with Mixed Page Size not<br />
supported<br />
Mixed Media with Booklet not supported<br />
Inline Merge with Booklet not supported<br />
Tab Insertion with Booklet not supported<br />
Media Insertions with Booklet not<br />
supported<br />
FC/BC with Booklet not supported<br />
Requested finishing option(s) only available<br />
with Inline Merge<br />
Means<br />
The device is removed because user-selected for is not available on the<br />
device. For example, Duplex=Top :: not available<br />
The job requests mixed media, but the device does not support it.<br />
The job requests tab insertions, but the device does not support it.<br />
The device is in error state and the job cannot print.<br />
The device is not accepting jobs, possibly because maximum connections have been<br />
reached, or the device is not responding. Try sending a job directly to the device through<br />
Command WorkStation to see if it can still print.<br />
The device is removed because the size of the tab is either not available or not supportedby<br />
the device.<br />
The device is removed because it does not support mixed media with tab insertion.<br />
The device is removed because it does not support covers with tab insertions.<br />
The device is removed because it does not support mixed media with inline merge.<br />
The device is removed because it does not support covers with inline merge.<br />
The device is removed because it does not support tab insertion and media insertion.<br />
The device is removed because it does not support media insertion with inline merge.<br />
The device is removed because it does not support mixed page sizes with inline merge.<br />
The device is removed because it does not support mixed page sizes with booklet printing.<br />
The device is removed because it does not support tab insertion with mixed page size<br />
printing.<br />
The device is removed because it does not support mixed media with booklet printing.<br />
The device is removed because it does not support inline merge with booklet printing.<br />
The device is removed because it does not support tab insertion with booklet printing.<br />
The device is removed because it does not support media insertion with booklet printing.<br />
The device is removed because it does not support covers with booklet printing.<br />
The device is removed because it does not support one of the selected finishing options with<br />
inline merge.
WINDOWS XP CONNECTION 105<br />
WINDOWS XP CONNECTION<br />
This chapter explains connection procedures for Windows XP computers. It describes how to<br />
enable Point and Print for Windows XP and also describes specific connection procedures for<br />
Windows XP with Service Pack 2.<br />
Enabling Point and Print (PNP) for Windows XP computers<br />
Use the next procedure to enable PNP from any Windows XP machine. If you want to enable<br />
PNP driver access, use the following procedure, Enabling Point and Print access for Windows<br />
XP computers.<br />
TO ENABLE PNP ON WINDOWS XP COMPUTERS (BALANCE SERVER OPERATION)<br />
1 Right-click My Computer and select Manage.<br />
2 Expand Local <strong>User</strong>s and Groups.<br />
3 Select <strong>User</strong>s.<br />
4 Select Guest in the right column.<br />
5 Verify that Account is disabled and is not selected.<br />
6 Click OK.<br />
Enabling Point and Print access for Windows XP computers<br />
To access the PNP drivers, enable file sharing on your system’s hard disk, and then disable it.<br />
TO ENABLE PNP ACCESS FOR WINDOWS XP COMPUTERS<br />
1 Follow the previous procedure, Enabling Point and Print (PNP) for Windows XP computers.<br />
2 Right-click on your system’s hard disk icon.<br />
3 Access the Sharing and Security/Sharing tab.<br />
4 Under Network Sharing and Security, select Share this Folder on the Network.<br />
5 Enter your system’s hard disk under the share name.<br />
6 Click OK.<br />
7 Access the Sharing and Security/Sharing tab.<br />
8 Deselect Share this Folder on the Network.<br />
9 Click OK.
WINDOWS XP CONNECTION 106<br />
Connecting Windows XP Service Pack 2<br />
The following procedures are specific to Windows XP Service Pack 2. This section describes<br />
how to properly connect computers outside of the Balance subnet, and how to enable using<br />
Windows XP Service Pack 2 computers.<br />
Connecting to a server from a client computer outside the<br />
<strong>EFI</strong> Balance subnet<br />
If you need to connect to the Balance server using other subnets, contact your network<br />
administrator to find out which subnets to add to the custom list.<br />
TO CONNECT TO A SERVER FROM A CLIENT COMPUTER (BALANCE SERVER OPERATION)<br />
1 Access the Control Panel and then Windows Firewall.<br />
2 Click the Exceptions tab.<br />
3 Double-click File and then Printer Sharing.<br />
4 Click Change Scope.<br />
5 Select Custom list.<br />
6 Contact your network administrator to find out which subnets to add to the Custom list.<br />
7 Click OK.<br />
Enabling the remote Windows XP Service pack 2 computer to<br />
access utilities<br />
Windows XP Service Pack 2 includes a Windows Firewall which blocks Command<br />
WorkStation, Hot Folders, Scan and WebTools by default. The following procedure describes<br />
how to allow these connections.<br />
TO ENABLE REMOTE CLIENT ACCESS FROM COMMAND WORKSTATION, HOT FOLDERS AND SCAN FROM A<br />
BALANCE SERVER<br />
1 Access the Control Panel and then Windows Firewall.<br />
2 Click the Exceptions tab.<br />
3 Click Add Port.
WINDOWS XP CONNECTION 107<br />
4 Name the port and use the following port numbers to allow these connections:<br />
Connecting to<br />
Port Number (s)<br />
Command WorkStation 515<br />
Hot Folders 515<br />
Scan 515<br />
WebTools 80<br />
Scan 1.7 8021, 8022<br />
Command WorkStation<br />
(using Auto Discovery)<br />
Hot Folders<br />
(using Auto Discovery)<br />
Scan (using Auto Discovery)<br />
161 (UDP)<br />
161 (UDP)<br />
161 (UDP)<br />
Port 9100 9100<br />
5 Click OK.<br />
Disabling the Pop-up Blocker from Internet Explorer<br />
You may have to change the Pop-up Blocker settings in Internet Explorer if you cannot<br />
connect to WebTools.<br />
TO DISABLE THE POP-UP BLOCKER SETTINGS FROM A CLIENT COMPUTER<br />
1 From Internet Explorer, in the Tools menu, select Pop-up Blocker and then Pop-up Blocker<br />
Settings.<br />
2 Add the WebTools IP address to the list of sites to connect to outside the server.
DIGIMASTER FAMILY ENABLER 108<br />
DIGIMASTER FAMILY ENABLER<br />
The Digimaster Family Enabler connects directly to Digimaster 9110 and 9150i printers. If<br />
you license the Digimaster Family Enabler, read the following sections carefully.<br />
For information about the supported printers and versions, see<br />
http://www.efi.com/products/velocity_balance.fhtml<br />
Setup and supported features<br />
Devices connected through the Digimaster Family Enabler support most Balance<br />
load-balancing features, standard print options, and some native features. When including<br />
these devices in printer groups, consider the following:<br />
• Only one print queue per physical device may be added to any printer group.<br />
• Devices do not respond to “Auto Discovery” in the Setup dialog box and must be specified<br />
manually by model, IP address, and specific queue name.<br />
• Bi-directional communication is not supported.<br />
• Balance assumes corresponding features (such as printing speed) in a trusted mode. No<br />
verification of the engine type is made in Setup.<br />
• A native paper catalog is supported and imported when the device is added to a Balance<br />
printer group.<br />
• Jobs are downloaded using the LPR protocol.<br />
• Mixed media and tab printing capabilities are supported.<br />
• Inline merging of color split jobs is supported if the optional inline post-fuser inserter tray<br />
is installed.<br />
• Slip sheets are supported<br />
• Automatic tab kickout
XEROX DOCUTECH/NUVERA ENABLER 109<br />
XEROX DOCUTECH/NUVERA ENABLER<br />
The Xerox DocuTech/Nuvera Enabler connects directly to Xerox DocuTech/Nuvera<br />
Production Publisher printers. If you license the Xerox DocuTech/Nuvera Enabler for use<br />
with Balance or Nuvera server, read the following sections carefully.<br />
For information about the supported printers and versions, see<br />
http://www.efi.com/products/velocity_balance.fhtml<br />
Setup and supported features<br />
Devices connected through the Xerox DocuTech/Nuvera Enabler support most Balance<br />
load-balancing features, standard print options, and some native features. When including<br />
these devices in printer groups, consider the following:<br />
• Only one print queue per physical device may be added to any printer group.<br />
• Devices do not respond to “Auto Discovery” in the Setup dialog and must be specified<br />
manually by model, IP address, and specific queue name.<br />
• Balance assumes corresponding features (such as printing speed) in a trusted mode. No<br />
verification of the engine type is made in Setup.<br />
• Bi-directional communication is not supported.<br />
• Mixed media and tab printing capabilities are supported.<br />
• Inline merging of color split jobs is supported if the optional inline post-fuser inserter tray<br />
is installed.<br />
• No finishing subset support
DIGIPATH 110<br />
DIGIPATH<br />
If you license DigiPath for use with the Balance server, read the following sections carefully.<br />
For information about the supported printers and versions, see<br />
http://www.efi.com/products/velocity_balance.fhtml<br />
DigiPath 3.0 and 4.0 print support<br />
The DigiPath Document Scan and Makeready application (DSM) can submit print jobs to<br />
any printer group containing Xerox DocuSP powered DocuTech/Nuvera devices, Fiery<br />
powered machines, or any other black-and-white production digital engine that the Balance<br />
server supports. The server will honor ticketing information submitted from the DigiPath<br />
server to the extent of printer group device capabilities, with the exception of tabs, which are<br />
honored only when the target device is either a DocuTech/Nuvera or belongs to the<br />
Digimaster family.<br />
TO CONNECT DIGIPATH TO A PRINTER GROUP<br />
1 Start DSM and select File > Production Print.<br />
2 In the Servers and Connections dialog box, click Add Printer.<br />
The Edit Printer dialog box appears.<br />
3 Enter information to describe the print connection:<br />
Enter a name for the connection to the Balance printer group (for example: myGroupHold) as<br />
the Printer name.<br />
Enter the DNS name or IP address of the Balance server as the Printer server.<br />
Enter a printer group queue name as the Print queue with the following syntax:<br />
_<br />
where is the name of the queue to which outgoing jobs are sent (hold or print),<br />
and is the name of the printer group (for example: hold_myGroupHold).<br />
Choose the DigiPath server type as the Printer model.<br />
For DigiPath 3.0, choose “DocuTech 6180: DocuSP Server 3.1.”<br />
For DigiPath 4.0, choose “DocuTech 6180: DocuSP Server 3.8.”<br />
Choose “Extended connectivity print job manager” as the Print manager.<br />
Choose TCP/IP as the Network Type.<br />
For DigiPath 4.0, select Support legacy DocuSP under Job Handling.<br />
4 Click OK.
INDEX 111<br />
INDEX<br />
B<br />
Balance Bar<br />
Tray Association 71<br />
bi-directional communication 53<br />
booklet printing 77<br />
C<br />
Chooser, Mac OS 43<br />
Clear Server 96<br />
Color Match 53, 66<br />
Color Split 53, 63, 65<br />
Command WorkStation<br />
about 21<br />
connect to <strong>EFI</strong> Balance server 74<br />
install 46<br />
print workflow 78<br />
start 73<br />
configuration, see setup<br />
Copy Split 63<br />
Cover Sheet and Merge Options 64<br />
covers 77<br />
D<br />
definitions 22<br />
Digimaster Family Enabler 108<br />
DigiPath, Xerox 91, 106, 110<br />
Docstream printers 58<br />
Docutech, Xerox 109<br />
dongle, see hardware security key<br />
driver, printer 82<br />
DSF<br />
connect 88<br />
job ticket 91<br />
Paper Catalog 88<br />
setup 88<br />
submit jobs 89<br />
E<br />
EDOX printers 58<br />
<strong>EFI</strong> Balance Bar 70<br />
<strong>EFI</strong> Balance Setup 32<br />
Exit <strong>EFI</strong> Balance 79<br />
status display 79<br />
<strong>EFI</strong> Balance License Manager 30<br />
<strong>EFI</strong> Balance Workflow Software modules 21<br />
<strong>EFI</strong> Compose 21<br />
install 46<br />
<strong>EFI</strong> home page 76<br />
<strong>EFI</strong> Impose 21, 77, 78<br />
install 46<br />
<strong>EFI</strong> printer driver, see printer driver files<br />
<strong>EFI</strong> Scan for <strong>EFI</strong> Balance 21<br />
<strong>EFI</strong> Balance<br />
install 27<br />
licensing terms 30<br />
package contents 21<br />
shut down 79<br />
start 79<br />
uninstall 25<br />
workflow 49<br />
<strong>EFI</strong> Balance server, see server<br />
<strong>EFI</strong> Compose 77, 78<br />
<strong>EFI</strong> Scan 21<br />
error messages 96, 97, 98, 102<br />
Exit <strong>EFI</strong> Balance 79<br />
F<br />
Fastest Single Engine 63<br />
Fiery printers 58<br />
G<br />
General setup options 32<br />
H<br />
hardware security key 21, 26<br />
hold queue 79<br />
Hot Folders 87<br />
about 21<br />
install 46<br />
print with 87<br />
I<br />
imposition 77<br />
inline insertion tray 65<br />
Input Tray/Media Type 60
INDEX 112<br />
install<br />
configurations 47<br />
<strong>EFI</strong> Balance server 27<br />
hardware security key 26<br />
Job Monitor 48<br />
printer driver files<br />
Mac OS 42, 43, 44<br />
Windows 40<br />
printer files from WebTools 77<br />
update printer driver files 46<br />
utilities 46<br />
J<br />
job<br />
defined 22<br />
edit 73<br />
hold 73<br />
load balance decision process 49<br />
override 73<br />
print 82<br />
status 73, 79<br />
Job Monitor 21, 48<br />
Job Timeout 61<br />
L<br />
load balance 53<br />
defined 22<br />
printer group considerations for 52<br />
process 52<br />
specifications 63<br />
workflow diagram for 50<br />
Long Job Split 53, 63<br />
M<br />
Max. Number of Printers 66<br />
Max. Number of Reroutes 61<br />
media insertion 77<br />
Media Type 60<br />
merge, inline 65<br />
mixed media 53, 77<br />
O<br />
one-way server communication 53<br />
operational station 47<br />
operator 47<br />
P<br />
Paper Catalog 34, 60<br />
associate media with printer trays 71<br />
tab specifications 36<br />
parallel port 26<br />
PostScript 22<br />
PPD (PostScript printer description), see printer<br />
driver files<br />
Print Center, Mac OS 44<br />
print devices, see printers<br />
print options 85<br />
default 86<br />
printer’s default settings 85<br />
specify 86<br />
print queues 79<br />
printer driver files 82<br />
download 77<br />
install<br />
Mac OS 42<br />
Windows 40<br />
Mac OS 9 driver interface 83<br />
Mac OS X driver interface 84<br />
set up<br />
Mac OS 9 43<br />
Mac OS X 44<br />
update 46<br />
Windows driver interface 83<br />
printer groups<br />
add printers 58<br />
color requirements 53<br />
composition 52<br />
default print options 60<br />
defined 22<br />
delete 57<br />
installable options 66<br />
load balance selection process 50<br />
mixed media requirements 53<br />
one-way server communication 53<br />
print to 82<br />
printer driver files 82<br />
scripting 67<br />
setup 54 to 68<br />
view properties 57<br />
printers<br />
add to printer groups 58<br />
finishing modules 66<br />
installable options 66<br />
load balance selection process 52<br />
virtual 22<br />
Q<br />
queues 79<br />
monitor 73
INDEX 113<br />
R<br />
Reroute on Error 53, 61<br />
S<br />
Scan for <strong>EFI</strong> Balance 21<br />
scripting, printer and printer group 67<br />
server<br />
exit 79<br />
maintenance 95<br />
monitor job status 79<br />
print to 82<br />
restart 79<br />
setup see setup<br />
shut down 79<br />
start 79<br />
system requirements 23<br />
setup 32<br />
access 32<br />
license information 30<br />
Paper Catalog 34<br />
Printer Groups 54 to 68<br />
tab printing 36<br />
shut down <strong>EFI</strong> Balance server 79<br />
start <strong>EFI</strong> Balance server 79<br />
system requirements<br />
<strong>EFI</strong> Balance server 23<br />
Mac OS workstation 39<br />
Windows workstation 38<br />
V<br />
virtual printer 22<br />
W<br />
WebTools<br />
about 21<br />
access 75<br />
download<br />
Mac OS printer files 42<br />
Windows printer files 41<br />
home page 41, 75<br />
overview 75<br />
privileges 76<br />
security 76<br />
WebLink 76<br />
workflow<br />
<strong>EFI</strong> Balance 49<br />
inline merge 65<br />
print editing 78<br />
X<br />
Xerox DigiPath 91, 106, 110<br />
Xerox Docutech 109<br />
T<br />
tab printing 36, 77<br />
terminology 22<br />
Tray Association 71<br />
troubleshooting 94<br />
cannot connect to <strong>EFI</strong> Balance 98<br />
checklist 94<br />
Command WorkStation 99<br />
load balancing 102<br />
network setup 98<br />
printer group setup 97<br />
printing 99, 102<br />
runtime 98<br />
setup 96<br />
U<br />
uninstall<br />
<strong>EFI</strong> Balance 25<br />
USB port 26<br />
Use Printer Type 64