Teacher Information Bottle Rocket Launcher
Teacher Information Bottle Rocket Launcher
Teacher Information Bottle Rocket Launcher
- No tags were found...

Create successful ePaper yourself
Turn your PDF publications into a flip-book with our unique Google optimized e-Paper software.
<strong>Teacher</strong> <strong>Information</strong><br />
<strong>Bottle</strong> <strong>Rocket</strong><br />
<strong>Launcher</strong><br />
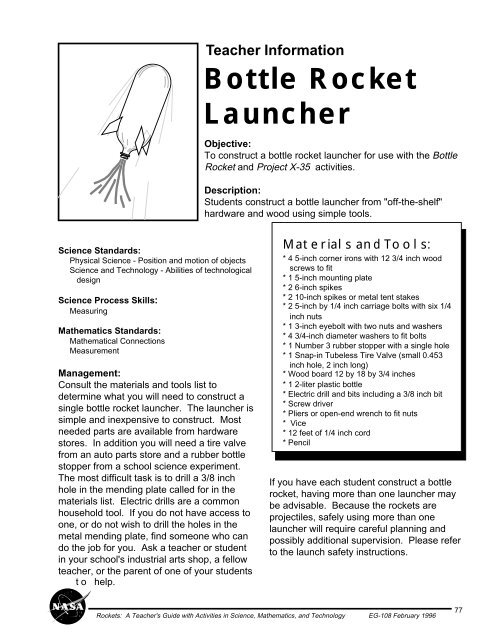
Objective:<br />
To construct a bottle rocket launcher for use with the <strong>Bottle</strong><br />
<strong>Rocket</strong> and Project X-35 activities.<br />
Description:<br />
Students construct a bottle launcher from "off-the-shelf"<br />
hardware and wood using simple tools.<br />
Science Standards:<br />
Physical Science - Position and motion of objects<br />
Science and Technology - Abilities of technological<br />
design<br />
Science Process Skills:<br />
Measuring<br />
Mathematics Standards:<br />
Mathematical Connections<br />
Measurement<br />
Management:<br />
Consult the materials and tools list to<br />
determine what you will need to construct a<br />
single bottle rocket launcher. The launcher is<br />
simple and inexpensive to construct. Most<br />
needed parts are available from hardware<br />
stores. In addition you will need a tire valve<br />
from an auto parts store and a rubber bottle<br />
stopper from a school science experiment.<br />
The most difficult task is to drill a 3/8 inch<br />
hole in the mending plate called for in the<br />
materials list. Electric drills are a common<br />
household tool. If you do not have access to<br />
one, or do not wish to drill the holes in the<br />
metal mending plate, find someone who can<br />
do the job for you. Ask a teacher or student<br />
in your school's industrial arts shop, a fellow<br />
teacher, or the parent of one of your students<br />
t o help.<br />
Materials and Tools:<br />
* 4 5-inch corner irons with 12 3/4 inch wood<br />
screws to fit<br />
* 1 5-inch mounting plate<br />
* 2 6-inch spikes<br />
* 2 10-inch spikes or metal tent stakes<br />
* 2 5-inch by 1/4 inch carriage bolts with six 1/4<br />
inch nuts<br />
* 1 3-inch eyebolt with two nuts and washers<br />
* 4 3/4-inch diameter washers to fit bolts<br />
* 1 Number 3 rubber stopper with a single hole<br />
* 1 Snap-in Tubeless Tire Valve (small 0.453<br />
inch hole, 2 inch long)<br />
* Wood board 12 by 18 by 3/4 inches<br />
* 1 2-liter plastic bottle<br />
* Electric drill and bits including a 3/8 inch bit<br />
* Screw driver<br />
* Pliers or open-end wrench to fit nuts<br />
* Vice<br />
* 12 feet of 1/4 inch cord<br />
* Pencil<br />
If you have each student construct a bottle<br />
rocket, having more than one launcher may<br />
be advisable. Because the rockets are<br />
projectiles, safely using more than one<br />
launcher will require careful planning and<br />
possibly additional supervision. Please refer<br />
to the launch safety instructions.<br />
<strong>Rocket</strong>s: A <strong>Teacher</strong>'s Guide with Activities in Science, Mathematics, and Technology EG-108 February 1996<br />
77
Background <strong>Information</strong>:<br />
Like a balloon, air pressurizes the bottle<br />
rocket. When released from the launch<br />
platform, air escapes the bottle, providing an<br />
action force accompanied by an equal and<br />
opposite reaction force (Newton's Third Law<br />
of Motion). Increasing the pressure inside<br />
the bottle rocket produces greater thrust<br />
since a large quantity of air inside the bottle<br />
escapes with a higher acceleration (Newton's<br />
Second Law of Motion). Adding a small<br />
amount of water to the bottle increases the<br />
action force. The water expels from the<br />
bottle before the air does, turning the bottle<br />
rocket into a bigger version of a water rocket<br />
toy available in toy stores.<br />
Construction Instructions:<br />
1. Prepare the rubber stopper by enlarging<br />
the hole with a drill. Grip the stopper<br />
lightly with a vice and gently enlarge the<br />
hole with a 3/8 inch bit and electric drill.<br />
The rubber will stretch during cutting,<br />
making the finished hole somewhat less<br />
than 3/8 inches.<br />
2. Remove the stopper from the vice and<br />
push the needle valve end of the tire stem<br />
through the stopper from the narrow end<br />
to the wide end.<br />
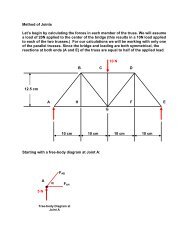
3. Prepare the mounting plate by drilling a<br />
|3/8 inch hole through the center of the<br />
plate. Hold the plate with a vice during<br />
Mending<br />
Plate<br />
Tire Stem<br />
Attach Bicycle<br />
Pump Here<br />
Wood Base<br />
Rubber<br />
Stopper<br />
Attachment of Mending Plate and Stopper<br />
Carrige Bolt<br />
Nut<br />
Nut<br />
Washer<br />
drilling and put on eye protection.<br />
Enlarge the holes at the opposite ends of<br />
the plates, using a drill bit slightly larger<br />
than the holes to do this. The holes must<br />
be large enough to pass the carriage bolts<br />
through them. (See Attachment of<br />
Mending Plate and Stopper diagram<br />
below.)<br />
4. Lay the mending plate in the center of the<br />
wood base and mark the centers of the<br />
two outside holes that you enlarged. Drill<br />
holes through the wood big enough to<br />
pass the carriage bolts through.<br />
5. Push and twist the tire stem into the hole<br />
you drilled in the center of the mounting<br />
plate. The fat end of the stopper<br />
<strong>Bottle</strong><br />
Neck<br />
Mending<br />
Plate<br />
Wood Base<br />
Carrige<br />
Bolt<br />
Positioning Corner Irons<br />
Hold Down<br />
Bar<br />
Corner Iron<br />
should rest on the plate.<br />
6. Insert the carriage bolts through the wood<br />
base from the bottom up. Place a hex nut<br />
over each bolt and tighten the nut so that<br />
the bolt head pulls into the wood.<br />
7. Screw a second nut over each bolt and<br />
spin it about half way down the bolt.<br />
Place a washer over each nut and then<br />
slip the mounting plate over the two bolts.<br />
8. Press the neck of a 2-liter plastic bottle<br />
over the stopper. You will be using the<br />
bottle's wide neck lip for measuring in the<br />
next step.<br />
78<br />
<strong>Rocket</strong>s: A <strong>Teacher</strong>'s Guide with Activities in Science, Mathematics, and Technology EG-108 February 1996
9. Set up two corner irons so they look like<br />
book ends. Insert a spike through the top<br />
hole of each iron. Slide the irons near the<br />
bottle neck so that the spike rests<br />
immediately above the wide neck lip. The<br />
spike will hold the bottle in place while<br />
you pump up the rocket. If the bottle is<br />
too low, adjust the nuts beneath the<br />
mounting plate on both sides to raise it.<br />
10. Set up the other two corner irons as you<br />
did in the previous step. Place them on<br />
the opposite side of the bottle. When you<br />
have the irons aligned so that the spikes<br />
rest above and hold the bottle lip, mark<br />
the centers of the holes on the wood<br />
base. For more precise screwing, drill<br />
small pilot holes for each screw and then<br />
screw the corner irons tightly to the base.<br />
11. Install an eyebolt to the edge of the<br />
opposite holes for the hold down spikes.<br />
Drill a hole and hold the bolt in place with<br />
washers and nuts on top and bottom.<br />
12. Attach the launch "pull cord" to the head<br />
end of each spike. Run the cord through<br />
the eyebolt.<br />
13. Make final adjustments to the launcher by<br />
attaching the pump to the tire stem and<br />
pumping up the bottle. Refer to the<br />
launching instructions for safety notes. If<br />
the air seeps out around the stopper, the<br />
stopper is too loose. Use a pair of pliers<br />
or a wrench to raise each side of the<br />
mounting plate in turn to press the<br />
stopper with slightly more force to the<br />
bottle neck. When satisfied with the<br />
position, thread the remaining hex nuts<br />
over the mounting plate and tighten them<br />
to hold the plate in position.<br />
14. Drill two holes through the wood base<br />
along one side. The holes should be<br />
large enough to pass large spikes of<br />
metal tent stakes. When the launch pad<br />
is set up on a grassy field, the stakes will<br />
hold the launcher in place when you yank<br />
the pull cord. The launcher is now<br />
complete.<br />
Launch Safety Instructions:<br />
1. Select a grassy field that measures<br />
approximately 30 meters across. Place<br />
the launcher in the center of the field and<br />
anchor it in place with the spikes or tent<br />
stakes. (If it is a windy day, place the<br />
launcher closer to the side of the field<br />
from which the wind is coming so that the<br />
rocket will drift on to the field as it comes<br />
down.)<br />
2. Have each student or student group set<br />
up their rocket on the launch pad. Other<br />
students should stand back several<br />
meters. It will be easier to keep observers<br />
away by roping off the launch site.<br />
3. After the rocket is attached to the<br />
launcher, the student pumping the rocket<br />
should put on eye protection. The rocket<br />
should be pumped no higher than about<br />
50 pounds of pressure per square inch.<br />
4. When pressurization is complete, all<br />
students should stand in back of the rope<br />
for the countdown.<br />
5. Before conducting the countdown, be sure<br />
the place where the rocket is expected to<br />
come down is clear of people. Launch the<br />
rocket when the recovery range is clear.<br />
6. Only permit the students launching the<br />
rocket to retrieve it.<br />
Extensions:<br />
Look up the following references for<br />
additional bottle rocket plans and other<br />
teaching strategies:<br />
Hawthorne, M. & Saunders, G. (1993), "Its<br />
Launchtime!," Science and Children,<br />
v30n5, pp.17-19, 39.<br />
Rogis, J. (1991), "Soaring with Aviation<br />
Activities," Science Scope, v15n2,<br />
pp.14-17.<br />
Winemiller, J., Pedersen, J., & Bonnstetter,<br />
R. (1991), "The <strong>Rocket</strong> Project,"<br />
Science Scope, v15n2, pp.18-22.<br />
<strong>Rocket</strong>s: A <strong>Teacher</strong>'s Guide with Activities in Science, Mathematics, and Technology EG-108 February 1996<br />
79
Hold Down<br />
Spike<br />
Launch Release<br />
Cord<br />
To Pump<br />
Completed <strong>Launcher</strong> Ready for Firing.<br />
80<br />
<strong>Rocket</strong>s: A <strong>Teacher</strong>'s Guide with Activities in Science, Mathematics, and Technology EG-108 February 1996