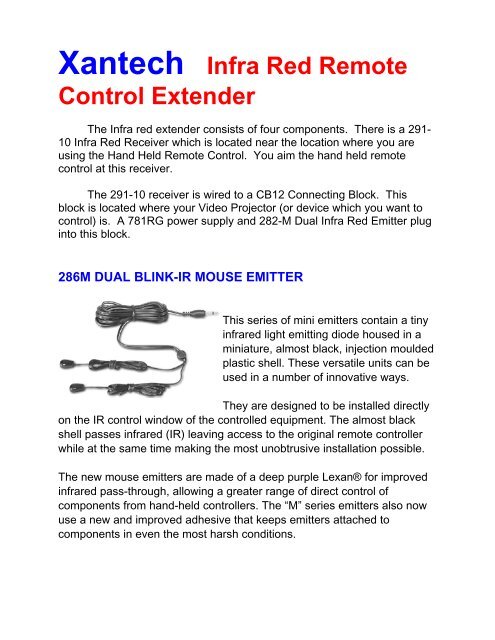
Xantech Infra Red Remote Control Extender - Alectro Systems Inc.
Xantech Infra Red Remote Control Extender - Alectro Systems Inc.
Xantech Infra Red Remote Control Extender - Alectro Systems Inc.
- No tags were found...

Create successful ePaper yourself
Turn your PDF publications into a flip-book with our unique Google optimized e-Paper software.
<strong>Xantech</strong> <strong>Infra</strong> <strong>Red</strong> <strong>Remote</strong><br />
<strong>Control</strong> <strong>Extender</strong><br />
The <strong>Infra</strong> red extender consists of four components. There is a 291-<br />
10 <strong>Infra</strong> <strong>Red</strong> Receiver which is located near the location where you are<br />
using the Hand Held <strong>Remote</strong> <strong>Control</strong>. You aim the hand held remote<br />
control at this receiver.<br />
The 291-10 receiver is wired to a CB12 Connecting Block. This<br />
block is located where your Video Projector (or device which you want to<br />
control) is. A 781RG power supply and 282-M Dual <strong>Infra</strong> <strong>Red</strong> Emitter plug<br />
into this block.<br />
286M DUAL BLINK-IR MOUSE EMITTER<br />
This series of mini emitters contain a tiny<br />
infrared light emitting diode housed in a<br />
miniature, almost black, injection moulded<br />
plastic shell. These versatile units can be<br />
used in a number of innovative ways.<br />
They are designed to be installed directly<br />
on the IR control window of the controlled equipment. The almost black<br />
shell passes infrared (IR) leaving access to the original remote controller<br />
while at the same time making the most unobtrusive installation possible.<br />
The new mouse emitters are made of a deep purple Lexan® for improved<br />
infrared pass-through, allowing a greater range of direct control of<br />
components from hand-held controllers. The “M” series emitters also now<br />
use a new and improved adhesive that keeps emitters attached to<br />
components in even the most harsh conditions.
291-10 HIDDEN LINK IR RECEIVER<br />
The 291 series are small, shelftop<br />
IR receivers with a multitude<br />
of applications. Use them as an<br />
inexpensive method of repeating<br />
IR commands when wallmounting<br />
an IR receiver is not<br />
practical. As with all <strong>Xantech</strong> IR<br />
receivers, the 291 can tie into<br />
multi-room IR extension systems.<br />
FEATURES<br />
· Attractive case for shelf-top locations.<br />
· <strong>Red</strong> talkback LED tests system for correct wiring as well as indicating<br />
infrared reception.<br />
· Nominal reception angle: 45 degrees off axis.<br />
· Attached 7' cable and 3.5 mm stereo mini plug permits direct plug-in<br />
to <strong>Xantech</strong> Connecting Blocks that have an "IR RCVR" or "AUX"<br />
jack, such as the CB12, CB20, CB60, 789-44, 791-44, etc.<br />
· Cable requirements for long lengths: Three-conductor/24 gauge up to<br />
200', 22 gauge up to 600', 20 gauge up to 2000' and 18 gauge up to<br />
5000' (unshielded OK).<br />
· Maximum cable length: One mile with 18 gauge.<br />
· Maximum current output: 100 milliamps.<br />
· Maximum number of directly driven IR emitters:<br />
Up to four connected in series. (Use <strong>Xantech</strong> Connecting Blocks for<br />
emitter expansion).<br />
· Power: 12 volts DC @ 10 milliamps.<br />
781RG Power Supply required.<br />
· Dimensions: 3 1/4" x 1" x 2" (83mm x 26mm x 51mm)<br />
· <strong>Inc</strong>ludes a CB12 Connecting Block.
CB12 ONE ZONE CONNECTING BLOCK<br />
Connects one emitter port and power supply to <strong>Xantech</strong> IR Receivers that<br />
use a stereo mini plug.<br />
· Also includes a 3-terminal block for wired connection of <strong>Xantech</strong> IR<br />
Receivers and Smart Pads.<br />
· 3.5 mm stereo mini jack for quick-connect IR receivers.<br />
· 3.5 mm mono mini jack for 1 single or 1 dual emitter.<br />
· 2.1 mm coaxial power jack<br />
· Uses either the 781RG or 782-00 power supply.<br />
· Dimensions: 2 1/8" x 1 1/4" x 3/4" (54mm x 32mm x 19mm)<br />
781RG POWER SUPPLY<br />
Regulated 12V DC for most <strong>Xantech</strong> remote control devices (marked rating<br />
is 12 Volts, 200 mA).<br />
· Powers basic <strong>Xantech</strong> IR systems.<br />
· Uses 2.1mm coaxial plug.
<strong>Xantech</strong> 291-10 Installation<br />
781RG<br />
White - Signal<br />
283M<br />
CB 12<br />
Black +12v<br />
Shield - Ground<br />
<strong>Red</strong> +12v<br />
Black - Ground<br />
T2740 Cable<br />
Projector<br />
291-10<br />
Hand Held<br />
<strong>Remote</strong><br />
CONNECTIONS<br />
291-10 RED to T2740 BLACK<br />
291-10 BLACK to T2740 SHIELD<br />
291-10 WHITE to T2740 WHITE<br />
Peel off the tape covering and attach the 283M IR emitter to the video projector IR sensor (or attach it<br />
near the projector so that it shines on the sensor). You can use either the front or the rear sensor on the<br />
projector. Plug the 283M into the “OUT” jack in the CB12 connection block. Also plug the 781RG power<br />
supply into the “PWR” jack in the CB12. Do not apply power until everything is connected.<br />
The 291-10 IR receiver needs to be located in the remote location where you want to use the your<br />
projector hand held remote control. Be sure to remove the protective soft plastic on the front of the<br />
291-10 sensor if it is present. Cut the existing mini phone connector off the wire on the 291-10 and<br />
strip the wires on it as well as on both ends of the T2740 cable. Connect the BLACK wire from the 291-<br />
10 to the SHIELD of the T2740 cable which will be used to connect the 291-10 to the CB12. Connect the<br />
White wire of the 291-10 to the White T2740 wire. Connect the <strong>Red</strong> wire from the 291-10 to the Black<br />
wire of the T2740.<br />
At the CB12 end connect the T2740 White to the “S” terminal, the Shield to the “G” terminal and the Black<br />
to the “V” terminal.<br />
Double check your wiring to make sure it is correct. If it is wrong you can damage the unit. Once<br />
you are ready, plug in the power supply and you are ready to go. Point your remote control at the front<br />
of the 291-10 and it will send the signal to the projector