RC Series Wireless Wall Clock - Lathem Time Corporation
RC Series Wireless Wall Clock - Lathem Time Corporation
RC Series Wireless Wall Clock - Lathem Time Corporation
- No tags were found...

You also want an ePaper? Increase the reach of your titles
YUMPU automatically turns print PDFs into web optimized ePapers that Google loves.
<strong>Lathem</strong> <strong>Time</strong> <strong>Corporation</strong><br />
<strong>RC</strong> <strong>Series</strong> <strong>Wireless</strong> <strong>Wall</strong> <strong>Clock</strong><br />
Installation Instructions<br />
1. Ensure that the <strong>RC</strong> Master GPS <strong>Time</strong> Controller<br />
& Transmitter are installed and fully operational.<br />
2. Follow the Pre-Installation Testing procedures<br />
found in the <strong>RC</strong> Master Installation Guide to<br />
ensure proper signal coverage in all areas where<br />
clocks are to be installed.<br />
3. Initialize all clocks in the same room or close<br />
proximity to the <strong>RC</strong> Master. <strong>Clock</strong>s should<br />
remain in this area following initial synchronization<br />
for 24 hours prior to permanent installation. This<br />
will isolate any clock correction issues NOT related<br />
to signal reception in final installation location.<br />
4. To power on clocks and begin initial synchronization,<br />
remove the lid to the Battery Case and install the (2)<br />
AA batteries included with the clock. The<br />
INDICATOR light will flash after the switch is<br />
released indicating clock is waiting for signal.<br />
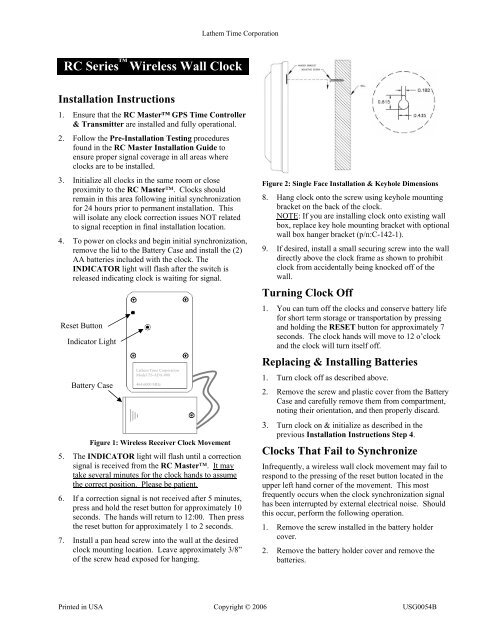
Reset Button<br />
Indicator Light<br />
Battery Case<br />
<strong>Lathem</strong> <strong>Time</strong> <strong>Corporation</strong><br />
Model TS-ADA-008<br />
464.6000 MHz<br />
Figure 1: <strong>Wireless</strong> Receiver <strong>Clock</strong> Movement<br />
5. The INDICATOR light will flash until a correction<br />
signal is received from the <strong>RC</strong> Master. It may<br />
take several minutes for the clock hands to assume<br />
the correct position. Please be patient.<br />
6. If a correction signal is not received after 5 minutes,<br />
press and hold the reset button for approximately 10<br />
seconds. The hands will return to 12:00. Then press<br />
the reset button for approximately 1 to 2 seconds.<br />
7. Install a pan head screw into the wall at the desired<br />
clock mounting location. Leave approximately 3/8”<br />
of the screw head exposed for hanging.<br />
Figure 2: Single Face Installation & Keyhole Dimensions<br />
8. Hang clock onto the screw using keyhole mounting<br />
bracket on the back of the clock.<br />
NOTE: If you are installing clock onto existing wall<br />
box, replace key hole mounting bracket with optional<br />
wall box hanger bracket (p/n:C-142-1).<br />
9. If desired, install a small securing screw into the wall<br />
directly above the clock frame as shown to prohibit<br />
clock from accidentally being knocked off of the<br />
wall.<br />
Turning <strong>Clock</strong> Off<br />
1. You can turn off the clocks and conserve battery life<br />
for short term storage or transportation by pressing<br />
and holding the RESET button for approximately 7<br />
seconds. The clock hands will move to 12 o’clock<br />
and the clock will turn itself off.<br />
Replacing & Installing Batteries<br />
1. Turn clock off as described above.<br />
2. Remove the screw and plastic cover from the Battery<br />
Case and carefully remove them from compartment,<br />
noting their orientation, and then properly discard.<br />
3. Turn clock on & initialize as described in the<br />
previous Installation Instructions Step 4.<br />
<strong>Clock</strong>s That Fail to Synchronize<br />
Infrequently, a wireless wall clock movement may fail to<br />
respond to the pressing of the reset button located in the<br />
upper left hand corner of the movement. This most<br />
frequently occurs when the clock synchronization signal<br />
has been interrupted by external electrical noise. Should<br />
this occur, perform the following operation.<br />
1. Remove the screw installed in the battery holder<br />
cover.<br />
2. Remove the battery holder cover and remove the<br />
batteries.<br />
Printed in USA Copyright © 2006 USG0054B
<strong>Lathem</strong> <strong>Time</strong> <strong>Corporation</strong><br />
3. Press and hold the reset button for a minimum of 5<br />
seconds.<br />
4. Reinstall the batteries (noting proper orientation) and<br />
battery cover using the screw removed it step 1.<br />
5. The hands on the clock should now be rapid<br />
advancing. The clock should synchronize to the<br />
correct time within 2 minutes.<br />
Double-Face Mounting Instructions<br />
1. The illustrations shown below apply to wall mount<br />
applications. For ceiling mount applications, install<br />
spring clips at 6 o’clock position and screws at 12<br />
o’clock position.<br />
2. Attach wall box adaptor plate to wall box with (4)<br />
#8-32 x 1” screws.<br />
3. Attach case assembly to couplings with recessed<br />
flanged washers and chase nipples.<br />
4. Hang each clock face on the screw located at 12<br />
o’clock position and snap clock into place.<br />
5. Install a #4 x ¼” screw in each clock at 3 o’clock or 9<br />
o’clock position in outside case for additional<br />
security.<br />
Figure 4: Double Face Installation<br />
NOTE: To remove clock from assembly, remove<br />
screw at 3 or 9 o’clock position. Insert a straightened<br />
paper clip in hole at 6 o’clock position. Depress<br />
spring to release clock for removal.<br />
One-Year Limited Warranty<br />
<strong>Lathem</strong> warrants the hardware products described in this guide<br />
against defects in material and workmanship for a period of one<br />
year from date of original purchase from <strong>Lathem</strong> or from an<br />
authorized <strong>Lathem</strong> reseller. The conditions of this warranty and the<br />
extent of the responsibility of <strong>Lathem</strong> <strong>Time</strong> <strong>Corporation</strong><br />
(“<strong>Lathem</strong>”) under this warranty are listed below.<br />
1. This warranty will become void when service performed by<br />
anyone other than an approved <strong>Lathem</strong> warranty service<br />
dealer results in damage to the product.<br />
2. This warranty does not apply to any product which has<br />
been subject to abuse, neglect, or accident, or which has<br />
had the serial number altered or removed, or which has<br />
been connected, installed, adjusted, or repaired other than<br />
in accordance with instructions furnished by <strong>Lathem</strong>.<br />
3. This warranty does not cover dealer labor cost for<br />
removing and reinstalling the machine for repair, or any<br />
expendable parts that are readily replaced due to normal<br />
use.<br />
4. The sole responsibility of <strong>Lathem</strong> under this warranty shall<br />
be limited to repair of this product, or replacement thereof,<br />
at the sole discretion of <strong>Lathem</strong>.<br />
5. If it becomes necessary to send the product or any defective<br />
part to <strong>Lathem</strong> or any authorized service dealer, the product<br />
must be shipped in its original carton or equivalent, fully<br />
insured with shipping charges prepaid. <strong>Lathem</strong> will not<br />
assume any responsibility for any loss or damage incurred<br />
in shipping.<br />
6. WARRANTY DISCLAIMER AND LIMITATION OF<br />
LIABILITY: Except only the limited express warranty set<br />
forth above, the products are sold with no expressed or<br />
implied warranties of any kind, and the implied warranties<br />
of merchantability and fitness for a particular purpose are<br />
hereby expressly disclaimed. No warranties are given with<br />
respect to products purchased other than from <strong>Lathem</strong> or an<br />
authorized <strong>Lathem</strong> reseller and any such products are<br />
purchased "as is, with all faults." In no event will <strong>Lathem</strong><br />
be liable for any direct, indirect, special, incidental or<br />
consequential damages arising out of or in connection with<br />
the delivery, use or inability to use, or performance of this<br />
product. In the event any limited remedy given herein shall<br />
be deemed to have failed of its essential purpose, <strong>Lathem</strong>'s<br />
maximum liability shall be to refund the purchase price<br />
upon return of the product.<br />
7. Proof of date of purchase from <strong>Lathem</strong> or an authorized<br />
<strong>Lathem</strong> reseller is required for warranty service on this<br />
product.<br />
8. This Warranty grants specific legal rights. Additional legal<br />
rights, which may vary by locale, may also apply.<br />
9. Should any difficulties arise with the performance of this<br />
product during warranty, or with any <strong>Lathem</strong> authorized<br />
service centers, contact <strong>Lathem</strong> <strong>Time</strong> at the address below:<br />
<strong>Lathem</strong> <strong>Time</strong> <strong>Corporation</strong><br />
200 Selig Drive, SW,<br />
Atlanta, Georgia, USA 30336<br />
(800) 241-4990 or (404)-691-0405<br />
www.lathem.com<br />
Printed in USA Copyright © 2006 USG0054B