RGB ColorPlus LinkUp LED Controller (Wifi ... - LED Lighting
RGB ColorPlus LinkUp LED Controller (Wifi ... - LED Lighting
RGB ColorPlus LinkUp LED Controller (Wifi ... - LED Lighting
- No tags were found...

Create successful ePaper yourself
Turn your PDF publications into a flip-book with our unique Google optimized e-Paper software.
11235 West Bernardo Court, Suite 102<br />
San Diego, CA 92127<br />
888-880-1880<br />
Fax: 707-281-0567<br />
EnvironmentalLights.com<br />
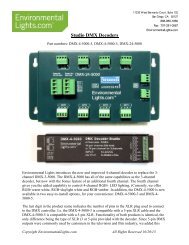
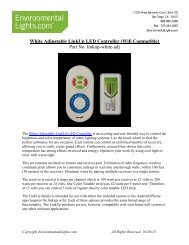
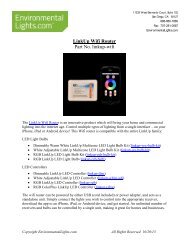
<strong>RGB</strong> <strong>ColorPlus</strong> <strong>LinkUp</strong> <strong>LED</strong> <strong>Controller</strong> (<strong>Wifi</strong> Compatible)<br />
Part No. linkup-rgbw<br />
The <strong>RGB</strong> <strong>ColorPlus</strong> <strong>LinkUp</strong> <strong>LED</strong> <strong>Controller</strong> is an exciting and user friendly way to control<br />
<strong>ColorPlus</strong> lighting systems. Select any static color from the color wheel or utilize any of the preprogrammed<br />
modes for a unique effect. Each remote can control an unlimited number of<br />
receivers, allowing you to easily create grand effects.<br />
This set contains a wifi-compatible receiver which works with <strong>ColorPlus</strong> <strong>LED</strong> lighting systems<br />
to create extraordinary effects. The battery powered remote controller allows all settings to be<br />
customized in real time and through walls, within 30m (100 feet) of the receiver.<br />
The receiver is rated at 6 amps per individual channel, but 15A maximum total, which is 180<br />
watts per receiver at 12 volts or 360 watts per receiver at 24 volts. Our <strong>ColorPlus</strong> strip uses 50<br />
watts per 5 meter reel at 12 volts. Therefore, you can control 3.5 reels of this strip per receiver<br />
without the use of amplifiers.<br />
The <strong>LinkUp</strong> family is intended for use with either the included remote or the Android/iPhone<br />
app (requires the linkup-wifi). Each of these options provides the same broad range of<br />
functionality. The <strong>LinkUp</strong> products are not, however, compatible with your home wifi system or<br />
any other software applications.<br />
Copyright EnvironmentalLights.com All Rights Reserved 10/20/13
Features<br />
<br />
<br />
<br />
<br />
<br />
<br />
<br />
<br />
<br />
Compatible with the <strong>LinkUp</strong> <strong>Wifi</strong> Router – use your smartphone to control all of your<br />
<strong>LinkUp</strong> lighting systems.<br />
Touch sensitive wheel can be used to specify 50 hues of color.<br />
Take full advantage of the versatile <strong>RGB</strong> <strong>ColorPlus</strong> lights by mixing <strong>RGB</strong> and white.<br />
14 pre-programmed modes, with adjustable speed and brightness.<br />
Each remote control device can direct an unlimited number of receivers simultaneously.<br />
Each receiver or group of receivers can be controlled by up to four remotes.<br />
RF hand-held remote controller – adjust lights through walls from 30m (100 feet) away in<br />
a benign electromagnetic field.<br />
Power off memory function.<br />
Capability of up to 6 amps per channel at 12 or 24 VDC.<br />
Applications<br />
<br />
<br />
<br />
<br />
Easily adjustable and energy efficient lighting with <strong>RGB</strong> Color Plus.<br />
Create the perfect ambiance for any home or business.<br />
Eliminate wires by pairing an unlimited number of receivers with a single wireless<br />
remote.<br />
Hotels, restaurants, office buildings, homes and casinos, wine cellars, bars, home<br />
entertainment centers.<br />
Video Links<br />
<br />
<br />
<br />
<strong>RGB</strong> <strong>ColorPlus</strong> <strong>LinkUp</strong> <strong>LED</strong> <strong>Controller</strong><br />
<strong>LinkUp</strong> <strong>Wifi</strong> Router<br />
<strong>RGB</strong> <strong>ColorPlus</strong> <strong>LED</strong> Strip Light<br />
Copyright EnvironmentalLights.com 2 All Rights Reserved 10/20/13
Specifications<br />
Remote <strong>Controller</strong><br />
Dimensions: 4.33” x 2.04” x 0.79”<br />
110 mm x 52 mm x 20 mm<br />
Power:<br />
2 AAA batteries<br />
Working Frequency: 2.4 GHz<br />
RF Remote Distance: 100 feet (30 m)<br />
Receiver<br />
Dimensions: 3.35” x 1.77” x 0.91”<br />
85 mm x 45 mm x 23 mm<br />
Output Frequency: 130 Hertz<br />
Input Voltage:<br />
12-24 VDC<br />
Maximum Load:<br />
15A total maximum, 6A maximum per channel<br />
Maximum Power: 180W/360W (12VDC/24VDC)<br />
Number of Channels: 4<br />
Remote <strong>Controller</strong> Functions:<br />
Copyright EnvironmentalLights.com 3 All Rights Reserved 10/20/13
Operation<br />
Powering Up<br />
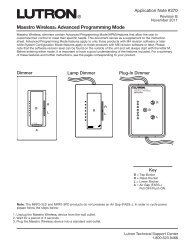
Remove the back cover of the remote and insert two AAA batteries. Connect the <strong>LED</strong> load to the<br />
controller using either the terminal blocks (as shown below, Power 1) or the barrel connector<br />
(Power 2). Do not apply voltage to both Power 1 and Power 2 at the same time. Apply 12 or 24<br />
VDC depending on the <strong>LED</strong> load being powered.<br />
Do not press the touch wheel while loading the batteries. This will affect the sensitivity of the<br />
touch wheel. Loss of sensitivity in the touch wheel is also an indicator of low battery charge.<br />
Wire Name<br />
W<br />
B<br />
G<br />
R<br />
Connection<br />
White<br />
Blue<br />
Green<br />
Red<br />
+ Power<br />
Pairing Receivers to Remote<br />
Each receiver must be uniquely paired to the remote. Turn the power to the receiver off, wait 10<br />
seconds, and return power. Tap the S+ (speed) button on the remote once as soon as the lights<br />
come on. The <strong>LED</strong> will blink to confirm the match. Repeat this, pairing an unlimited number of<br />
receivers within working distance to your remote controller. Each receiver may be paired with up<br />
to four remotes. To delete the pairing, turn off power to the receiver. Restore power, and when<br />
the lights come back on hold down the S+ button for five seconds. Lights will blink to confirm.<br />
Setting and Adjusting Lights<br />
To select a color, simply touch a point on the color wheel. From there, the B+/- (brightness)<br />
buttons can be used to further adjust the light.<br />
By pressing the M+/- (mode) buttons you may scroll through the pre-programmed modes listed<br />
below. When you reach mode 20 you will have to use the M- button to return to other modes on<br />
the list. Brightness can be increased or decreased in modes as with a static color.<br />
For non-static modes, the speed of the function can be adjusted using the S+/- buttons. The speed<br />
is associated with each mode individually; when you come back to the mode it will remember<br />
the speed it was left at the last time. Press the color wheel at any time to return to mode 1, in<br />
which lights are a static color of your choice.<br />
Please note: Dynamic modes (4-14) can become out of sync when multiple receivers are<br />
controlled by the same remote controller, due to the inherent characteristics of each receiver.<br />
Copyright EnvironmentalLights.com 4 All Rights Reserved 10/20/13
Pre-Programmed Modes<br />
Mode<br />
Description<br />
Number <strong>RGB</strong> Mode White Mode Brightness Control<br />
1 Adjustable using color<br />
Off<br />
<strong>RGB</strong><br />
wheel<br />
2 Off On White<br />
3 Adjustable using color On at brightness level selected<br />
<strong>RGB</strong><br />
wheel<br />
in mode 2<br />
4 All colors gradual change Off <strong>RGB</strong><br />
5 4 color gradual change - 4th color in fade series,<br />
<strong>RGB</strong>W<br />
<strong>RGB</strong>W with fade between otherwise off<br />
6 4 color step change - 4th color in step series,<br />
<strong>RGB</strong>W<br />
<strong>RGB</strong>W<br />
otherwise off<br />
7 7 color step change - 7th color in step series, also<br />
<strong>RGB</strong>W<br />
<strong>RGB</strong>YMCW<br />
on with each color<br />
8 Red/white step change 2nd color in step series,<br />
Red/White<br />
otherwise off<br />
9 Blue/white step change 2nd color in step series,<br />
Blue/White<br />
otherwise off<br />
10 Green/white step change 2nd color in step series,<br />
Green/White<br />
otherwise off<br />
11 Red blinks on and off Off Red<br />
12 Blue blinks on and off Off Blue<br />
13 Green blinks on and off Off Green<br />
14 Combination mode -<br />
cycles through all modes<br />
As stated in previous modes<br />
Brightness/speed same as<br />
previous modes. Not adjustable.<br />
Copyright EnvironmentalLights.com 5 All Rights Reserved 10/20/13
Instructions<br />
Please take the following precautions:<br />
1. This equipment, like all electrical equipment, should be installed by a qualified person.<br />
2. Do not expose these <strong>LED</strong>s, dimmers or power supplies to intense electro-magnetic fields,<br />
including lightning.<br />
3. The controllers and power supplies are not waterproof. Keep them dry.<br />
4. Always observe proper polarity.<br />
When installing <strong>LED</strong> lighting, it is a good idea to follow this “dry-run” procedure:<br />
1. Be sure you have everything you need before you start.<br />
2. Lay out your lights and power supply on the floor or table.<br />
3. There is some resistance in the <strong>LED</strong> lighting. If you see any color fading or dimming at<br />
the end of a long run, you may have too many <strong>LED</strong>s for your power supply and you<br />
might need a bigger supply or shorter runs. Use a bus structure as described in<br />
rgb_manual.pdf. Call if you need assistance with larger projects.<br />
4. Connect everything and test it to be sure it works and you have it connected properly. It is<br />
unlikely, but possible, that some part of your system is defective or was damaged during<br />
shipment. If that is the case, it will be very helpful to you to know that before you do all<br />
the work involved in installing custom <strong>LED</strong> lighting systems. You will also know if you<br />
damage anything during installation, which is really helpful in trouble-shooting because<br />
manufacturing defects and installation damage typically have very different solutions.<br />
Once you have tested the system successfully, you are ready to install it. We recommend you<br />
install <strong>LED</strong>s, electronic controls and dimmers in such a way that you have access to them in case<br />
they fail. All electrical components can fail.<br />
Copyright EnvironmentalLights.com 6 All Rights Reserved 10/20/13