ISO-BLOCK LOW - Metaloterm
ISO-BLOCK LOW - Metaloterm
ISO-BLOCK LOW - Metaloterm

Create successful ePaper yourself
Turn your PDF publications into a flip-book with our unique Google optimized e-Paper software.
Total Solutions in Flue Systems | www.metaloterm.com<br />
Ontop B.V.<br />
Postbus 135, 4330 AC Middelburg<br />
Oude Veerseweg 23, 4332 SH Middelburg<br />
Nederland<br />
T: +31 (0)118 689 900<br />
F: +31 (0)118 689 999<br />
E: info.nl@metaloterm.com<br />
Ontop Abgastechnik GmbH<br />
Postfach 1340, 51657 Wiehl<br />
Albert-Einstein-Straße 8, 51674 Wiehl<br />
Deutschland<br />
T: +49 (0)22 61 7 08 –0<br />
F: +49 (0)22 61 7 08 90<br />
E: info.de@metaloterm.com<br />
<strong>Metaloterm</strong> France S.A.R.L.<br />
18, rue des Campanules<br />
77185 Lognes<br />
France<br />
T: +33 (0)1 64 62 12 30<br />
F: +33 (0)1 64 62 11 08<br />
E: info.fr@metaloterm.com<br />
<strong>Metaloterm</strong> Ontop Abgastechnik<br />
Erlenstraße 11a<br />
3612 Steffisburg<br />
Schweiz<br />
T: +41 (0)33 437 07 23<br />
F: +41 (0)33 437 07 26<br />
E: info.ch@metaloterm.com<br />
Ontop Polska Sp. z o.o.<br />
ul. Hallera 75<br />
98 - 100 Wiewiórczyn<br />
Polska<br />
T: +48 (0)43 676 33 66<br />
F: +48 (0)42 209 10 57<br />
E: info.pl@metaloterm.com<br />
<strong>ISO</strong>-<strong>BLOCK</strong>montage_<strong>LOW</strong>_A15_20_EN_2011_08<br />
5<br />
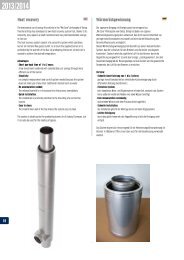
<strong>ISO</strong>-<strong>BLOCK</strong> <strong>LOW</strong><br />
Mounting instructions<br />
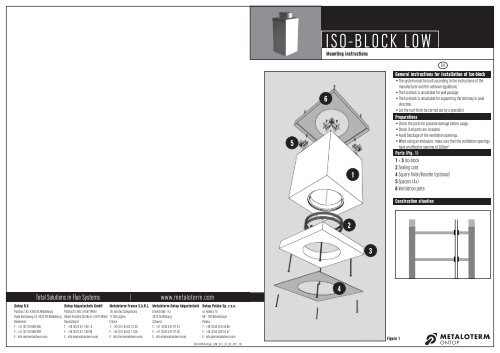
6<br />
4<br />
2<br />
1<br />
3<br />
Figure 1<br />
EN<br />
General instructions for installation of Iso-block<br />
•The system must be built according to the instructions of the<br />
manufacturer and the national regulations.<br />
•The Iso-block is unsuitable for wall passage.<br />
•The Iso-block is unsuitable for supporting the chimney in axial<br />
direction.<br />
•Let the roof finish be carried out by a specialist<br />
Preparations<br />
•Check the parts for possible damage before usage.<br />
•Check if all parts are included.<br />
•Avoid blockage of the ventilation openings.<br />
•When using an enclosure, make sure that the ventilation openings<br />
have an effective opening of 200cm²<br />
Parts (Fig. 1)<br />
1 + 3 Iso-block<br />
2 Sealing cord<br />
4 Square finish/Rosette (optional)<br />
5 Spacers (4x)<br />
6 Ventilation plate<br />
Construction situation<br />
<strong>ISO</strong>-<strong>BLOCK</strong>montage_<strong>LOW</strong>_A15_20_EN.indd 1 24-8-2011 10:26:43
Iso-block Low<br />
Make a square hole in the construction<br />
Slide part 4 (optional) and part 3 over the chimney<br />
Connect the chimney under the Iso-block, place<br />
the locking band after installation of the Iso-block<br />
Optional Optional<br />
4<br />
3<br />
4<br />
Place a square finish plate (part 4)<br />
L1 L2 L3<br />
Place the Iso-Block (part 1)<br />
Extend the chimney through the Iso-block (part 1) To prevent coupling problems, a possible<br />
connection inside the Iso-Block must be made in<br />
advance<br />
Wrap part 2 around the chimney two times and<br />
press it in the chamber<br />
Place a rosette / the Iso-Block must be mounted<br />
flush with the ceiling<br />
Fix the Iso-Block in the construction and seal it Place spacers, part 5 (4x)<br />
L4 L5 L6<br />
L7 L8 L9<br />
L10<br />
1<br />
2<br />
L11<br />
3<br />
Place part 3 to hold the seal in its place<br />
5<br />
Encasing<br />
L12<br />
Cut casing material and make ventilation openings<br />
Fix the casing material sheets to the blocks and to<br />
each other<br />
6<br />
Place ventilation plate, part 6<br />
C1 C2<br />
Do not use the ventilation plate of the lower<br />
Iso-block<br />
C3 C4<br />
Place and fix the openings with grills (effective<br />
opening 200 cm²)<br />
L13 L14<br />
Fix part 6 with the bolts (4x)<br />
C5 C6<br />
Make sure the ventilation openings stay free and<br />
are not blocked<br />
<strong>ISO</strong>-<strong>BLOCK</strong>montage_<strong>LOW</strong>_A15_20_EN.indd 2 24-8-2011 10:27:19