
Create successful ePaper yourself
Turn your PDF publications into a flip-book with our unique Google optimized e-Paper software.
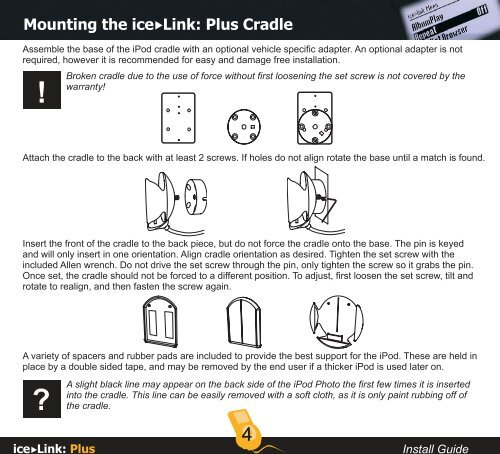
Mounting the ice Link: Plus Cradle<br />
Assemble the base of the iPod cradle with an optional vehicle specific adapter. An optional adapter is not<br />
required, however it is recommended for easy and damage free installation.<br />
!<br />
ice Link: Plus<br />
Broken cradle due to the use of force without first loosening the set screw is not covered by the<br />
warranty!<br />
Attach the cradle to the back with at least 2 screws. If holes do not align rotate the base until a match is found.<br />
Insert the front of the cradle to the back piece, but do not force the cradle onto the base. The pin is keyed<br />
and will only insert in one orientation. Align cradle orientation as desired. Tighten the set screw with the<br />
included Allen wrench. Do not drive the set screw through the pin, only tighten the screw so it grabs the pin.<br />
Once set, the cradle should not be forced to a different position. To adjust, first loosen the set screw, tilt and<br />
rotate to realign, and then fasten the screw again.<br />
A variety of spacers and rubber pads are included to provide the best support for the iPod. These are held in<br />
place by a double sided tape, and may be removed by the end user if a thicker iPod is used later on.<br />
? A<br />
slight black line may appear on the back side of the iPod Photo the first few times it is inserted<br />
into the cradle. This line can be easily removed with a soft cloth, as it is only paint rubbing off of<br />
the cradle.<br />
4<br />
<strong>Install</strong> <strong>Guide</strong>