Door Knob Hanger - Embroidery Library
Door Knob Hanger - Embroidery Library
Door Knob Hanger - Embroidery Library

Create successful ePaper yourself
Turn your PDF publications into a flip-book with our unique Google optimized e-Paper software.
<strong>Door</strong> <strong>Knob</strong> <strong>Hanger</strong><br />
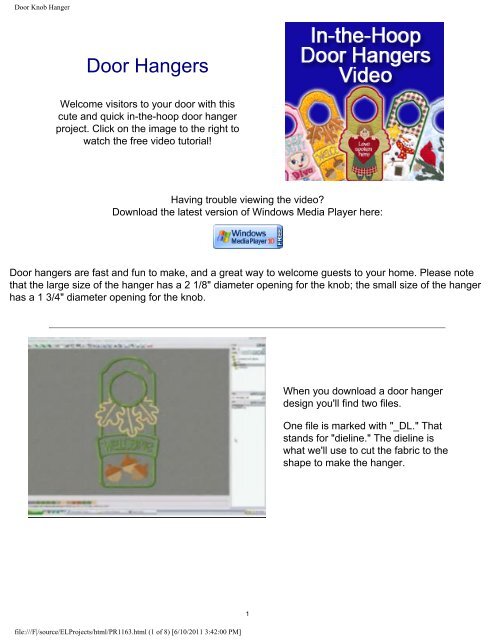
<strong>Door</strong> <strong>Hanger</strong>s<br />
Welcome visitors to your door with this<br />
cute and quick in-the-hoop door hanger<br />
project. Click on the image to the right to<br />
watch the free video tutorial!<br />
Having trouble viewing the video<br />
Download the latest version of Windows Media Player here:<br />
<strong>Door</strong> hangers are fast and fun to make, and a great way to welcome guests to your home. Please note<br />
that the large size of the hanger has a 2 1/8" diameter opening for the knob; the small size of the hanger<br />
has a 1 3/4" diameter opening for the knob.<br />
When you download a door hanger<br />
design you'll find two files.<br />
One file is marked with "_DL." That<br />
stands for "dieline." The dieline is<br />
what we'll use to cut the fabric to the<br />
shape to make the hanger.<br />
file:///F|/source/ELProjects/html/PR1163.html (1 of 8) [6/10/2011 3:42:00 PM]<br />
1
<strong>Door</strong> <strong>Knob</strong> <strong>Hanger</strong><br />
Print the "DL" file from your<br />
embroidery software. This is a<br />
"template" that we'll use to cut the<br />
fabric to the shape to make the<br />
hanger.<br />
If you don't have embroidery<br />
software to print a template, then<br />
you can make a template by<br />
embroidering the dieline file onto a<br />
piece of paper.<br />
Hoop two pieces of paper.<br />
Load the "_DL" file to your machine,<br />
and embroider right onto the paper.<br />
Then, unhoop the paper and cut on<br />
the sewn line. You'll have two<br />
templates.<br />
2<br />
file:///F|/source/ELProjects/html/PR1163.html (2 of 8) [6/10/2011 3:42:00 PM]
<strong>Door</strong> <strong>Knob</strong> <strong>Hanger</strong><br />
Spray a piece of medium-weight<br />
cutaway stabilizer with a bit of<br />
temporary adhesive.<br />
Place the fabric for the front of your<br />
hanger on top of the stabilizer, and<br />
smooth it flat.<br />
Place the paper template on top of<br />
the fabric and stabilizer.<br />
3<br />
file:///F|/source/ELProjects/html/PR1163.html (3 of 8) [6/10/2011 3:42:00 PM]
<strong>Door</strong> <strong>Knob</strong> <strong>Hanger</strong><br />
Cut out the shapes -- cut directly on<br />
the dieline.<br />
Repeat this with a piece of fabric for<br />
the back side of the hanger.<br />
Also, if your hanger uses multiple<br />
pieces of applique fabric, make a<br />
fabric and stabilizer piece for each<br />
fabric piece, too.<br />
Remove the paper template and set<br />
it aside. Save it for the next time that<br />
you'll make this hanger!<br />
Now that the fabric pieces are cut to<br />
the right shape, it's time to make the<br />
hanger.<br />
Hoop a piece of tearaway stabilizer.<br />
4<br />
file:///F|/source/ELProjects/html/PR1163.html (4 of 8) [6/10/2011 3:42:00 PM]
<strong>Door</strong> <strong>Knob</strong> <strong>Hanger</strong><br />
Load the full embroidery file into<br />
your machine -- that's the file that is<br />
named only with an "X" followed by 4<br />
numbers.<br />
Embroider the design. The first thing<br />
to sew will be another dieline. This<br />
traces the area on the stabilizer for<br />
the front of the hanger.<br />
Place the fabric for the front of the<br />
hanger on the stabilizer, right in the<br />
shape from the dieline.<br />
Continue embroidering the design.<br />
The next thing to sew will be a tack<br />
down stitch. This will bind the fabric<br />
piece to the stabilizer so that it's nice<br />
and stable during the rest of the<br />
embroidery.<br />
5<br />
file:///F|/source/ELProjects/html/PR1163.html (5 of 8) [6/10/2011 3:42:00 PM]
<strong>Door</strong> <strong>Knob</strong> <strong>Hanger</strong><br />
Your hanger might use multiple<br />
fabric pieces. Add them along the<br />
way as indicated by the color<br />
change sheet.<br />
On the color change sheet you'll see<br />
a note that says "back piece tack<br />
down." When you get to this step,<br />
stop the machine and remove the<br />
hoop.<br />
Spray the back side of the back<br />
fabric piece with a bit of temporary<br />
adhesive.<br />
Place that fabric piece on the back<br />
of the embroidery, right in the shape<br />
from the dieline.<br />
6<br />
file:///F|/source/ELProjects/html/PR1163.html (6 of 8) [6/10/2011 3:42:00 PM]
<strong>Door</strong> <strong>Knob</strong> <strong>Hanger</strong><br />
Attach the hoop to the machine and<br />
continue embroidering the design.<br />
The next thing to sew will be a tack<br />
down stitch which binds the back<br />
fabric to the stabilizer and front<br />
fabric. And finally, a satin stitch<br />
border.<br />
Remove the hoop from the machine,<br />
and unhoop the stabilizer. Gently<br />
tear the excess away.<br />
Then, slip onto a doorknob for a<br />
lovely greeting!<br />
7<br />
file:///F|/source/ELProjects/html/PR1163.html (7 of 8) [6/10/2011 3:42:00 PM]
<strong>Door</strong> <strong>Knob</strong> <strong>Hanger</strong><br />
Click here to find the door<br />
hanger designs<br />
at the <strong>Embroidery</strong> <strong>Library</strong>!<br />
Click here for a printable version of these project instructions.<br />
You'll need to have Adobe Acrobat Reader installed on your computer. If you don't<br />
have it, you can download a free copy by clicking on the icon below.<br />
file:///F|/source/ELProjects/html/PR1163.html (8 of 8) [6/10/2011 3:42:00 PM]<br />
8