Using the Endless Hoop - Embroidery Library
Using the Endless Hoop - Embroidery Library
Using the Endless Hoop - Embroidery Library

You also want an ePaper? Increase the reach of your titles
YUMPU automatically turns print PDFs into web optimized ePapers that Google loves.
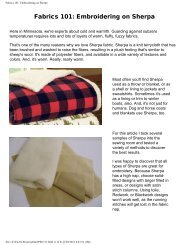
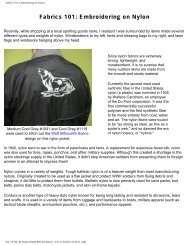
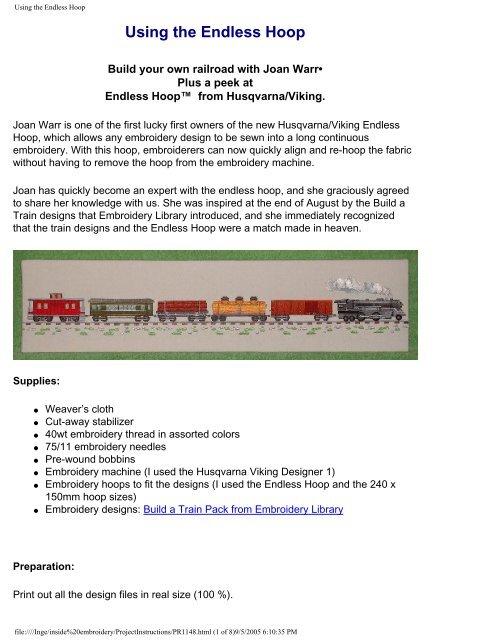
<strong>Using</strong> <strong>the</strong> <strong>Endless</strong> <strong>Hoop</strong><strong>Using</strong> <strong>the</strong> <strong>Endless</strong> <strong>Hoop</strong>Build your own railroad with Joan Warr•Plus a peek at<strong>Endless</strong> <strong>Hoop</strong> from Husqvarna/Viking.Joan Warr is one of <strong>the</strong> first lucky first owners of <strong>the</strong> new Husqvarna/Viking <strong>Endless</strong><strong>Hoop</strong>, which allows any embroidery design to be sewn into a long continuousembroidery. With this hoop, embroiderers can now quickly align and re-hoop <strong>the</strong> fabricwithout having to remove <strong>the</strong> hoop from <strong>the</strong> embroidery machine.Joan has quickly become an expert with <strong>the</strong> endless hoop, and she graciously agreedto share her knowledge with us. She was inspired at <strong>the</strong> end of August by <strong>the</strong> Build aTrain designs that <strong>Embroidery</strong> <strong>Library</strong> introduced, and she immediately recognizedthat <strong>the</strong> train designs and <strong>the</strong> <strong>Endless</strong> <strong>Hoop</strong> were a match made in heaven.Supplies:● Weaver’s cloth● Cut-away stabilizer● 40wt embroidery thread in assorted colors● 75/11 embroidery needles● Pre-wound bobbins● <strong>Embroidery</strong> machine (I used <strong>the</strong> Husqvarna Viking Designer 1)● <strong>Embroidery</strong> hoops to fit <strong>the</strong> designs (I used <strong>the</strong> <strong>Endless</strong> <strong>Hoop</strong> and <strong>the</strong> 240 x150mm hoop sizes)● <strong>Embroidery</strong> designs: Build a Train Pack from <strong>Embroidery</strong> <strong>Library</strong>Preparation:Print out all <strong>the</strong> design files in real size (100 %).file:////Inge/inside%20embroidery/ProjectInstructions/PR1148.html (1 of 8)9/5/2005 6:10:35 PM
<strong>Using</strong> <strong>the</strong> <strong>Endless</strong> <strong>Hoop</strong>Heavily starch <strong>the</strong> weavers cloth or fabric you use; I also basted in <strong>the</strong> hoop.For this project, I used <strong>the</strong> large hoop for <strong>the</strong> combined designs “Engine and Smoke”and reduced <strong>the</strong> length of <strong>the</strong> “track” by 3 percent for <strong>the</strong> <strong>Endless</strong> <strong>Hoop</strong>, because Iwas using <strong>the</strong> large designs. Engine, Smoke, and Track in <strong>the</strong> smaller size will all fit in<strong>the</strong> <strong>Endless</strong> <strong>Hoop</strong>.Instructions:First, I printed out all my designs and placed <strong>the</strong>m in <strong>the</strong> order I wanted to stitch.Second, I set up where Iwanted <strong>the</strong> track because itneeded to be stitched first.file:////Inge/inside%20embroidery/ProjectInstructions/PR1148.html (2 of 8)9/5/2005 6:10:35 PM
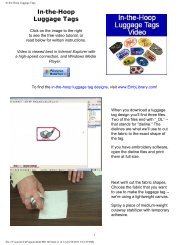
<strong>Using</strong> <strong>the</strong> <strong>Endless</strong> <strong>Hoop</strong>This is <strong>the</strong> hooping on <strong>the</strong><strong>Endless</strong> <strong>Hoop</strong> for first part of<strong>the</strong> track.Notice my placement linesextend beyond <strong>the</strong> edge of<strong>the</strong> hoop, so that I couldmake sure that <strong>the</strong> designwould be perfectly straight.Use your printed template to line up <strong>the</strong> second track. Line up your horizontal linesand mark your middle vertical line.file:////Inge/inside%20embroidery/ProjectInstructions/PR1148.html (3 of 8)9/5/2005 6:10:35 PM
<strong>Using</strong> <strong>the</strong> <strong>Endless</strong> <strong>Hoop</strong>When using <strong>the</strong> design in <strong>the</strong>vertical position, line yourneedle up to <strong>the</strong> far left of <strong>the</strong>design. For those who have<strong>the</strong> Designer 1, you can use<strong>the</strong> scooter buttons to get <strong>the</strong>needle in just <strong>the</strong> right place.Here is a view of 2 out of 6tracks stitched.Here’s an up-close look at <strong>the</strong>joined track.file:////Inge/inside%20embroidery/ProjectInstructions/PR1148.html (4 of 8)9/5/2005 6:10:35 PM
<strong>Using</strong> <strong>the</strong> <strong>Endless</strong> <strong>Hoop</strong>Keep repeating this process until you have <strong>the</strong> length of track that you need.Now is <strong>the</strong> time to add our engine and cars. This takes a bit longer and is mucheasier if you have some editing software. I used Viking's Stitch Editor and AnneCampbell’s book Stitch Editor: <strong>the</strong> Final Frontier to add some extra stitch points to<strong>the</strong> wheels. You can also use <strong>the</strong> Edit Page in 3D <strong>Embroidery</strong>. At this point, Iwanted to make sure <strong>the</strong> wheels of all <strong>the</strong> cars and engine fit right on top of <strong>the</strong>track. First, I added an extra stitch point to <strong>the</strong> hitch of <strong>the</strong> car, <strong>the</strong>n I added 3stitch points along <strong>the</strong> bottom of <strong>the</strong> wheels. With <strong>the</strong> scooter buttons on <strong>the</strong>Designer 1 touch screen, I was able to line everything up.For <strong>the</strong> engine stitch-out, Icombined <strong>the</strong> engine andsmoke and used my largehoop for this.You can see how you can mix<strong>the</strong> two hoops if needbe. With <strong>the</strong> engine stitchedout first, <strong>the</strong> rest becamequite easy. I did add stitchpoints to <strong>the</strong> bottom of <strong>the</strong>wheels to line up against <strong>the</strong>track. This is how <strong>the</strong> engineshould look once it is stitchedout.Again I added stitch points to<strong>the</strong> Box Car wheels to matchup with <strong>the</strong> track and madesure <strong>the</strong> stitch point that iswithin <strong>the</strong> hitch of <strong>the</strong> Box Carmatched up with <strong>the</strong> Engine.file:////Inge/inside%20embroidery/ProjectInstructions/PR1148.html (5 of 8)9/5/2005 6:10:35 PM
<strong>Using</strong> <strong>the</strong> <strong>Endless</strong> <strong>Hoop</strong>Above: Completed log and tank cars.Continue on with o<strong>the</strong>r cars, like <strong>the</strong>passenger car and caboose, until you havecompleted <strong>the</strong> train.file:////Inge/inside%20embroidery/ProjectInstructions/PR1148.html (7 of 8)9/5/2005 6:10:35 PM
<strong>Using</strong> <strong>the</strong> <strong>Endless</strong> <strong>Hoop</strong>I hope you will give this project a try -- it was so much fun! Thanks, <strong>Embroidery</strong> <strong>Library</strong>for sharing your wonderful design inspirations with all of us.Click here for a printable version of this page.You’ll need to have Adobe Acrobat Reader installed on your computer.If you don't have it, you can download a free copy by clicking on <strong>the</strong> icon below.file:////Inge/inside%20embroidery/ProjectInstructions/PR1148.html (8 of 8)9/5/2005 6:10:35 PM