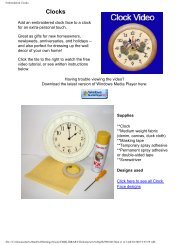
In-the-Hoop Luggage Tags - Embroidery Library
In-the-Hoop Luggage Tags - Embroidery Library
In-the-Hoop Luggage Tags - Embroidery Library
- No tags were found...

Create successful ePaper yourself
Turn your PDF publications into a flip-book with our unique Google optimized e-Paper software.
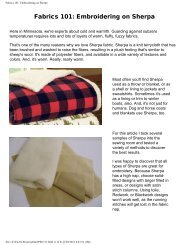
<strong>In</strong>-<strong>the</strong>-<strong>Hoop</strong> <strong>Luggage</strong> <strong>Tags</strong>Place that fabric-and-stabilizerpiece on <strong>the</strong> back of <strong>the</strong>embroidery, right inside <strong>the</strong>dieline.The next steps will be seen fromboth sides of <strong>the</strong> luggage tag, sowe want our bobbin thread tomatch <strong>the</strong> top thread. Wind abobbin with <strong>the</strong> thread thatyou're using in <strong>the</strong> top.file:///F|/source/ELProjects/html/PR1365.html (7 of 12) [6/10/2011 3:16:39 PM]7
<strong>In</strong>-<strong>the</strong>-<strong>Hoop</strong> <strong>Luggage</strong> <strong>Tags</strong>Attach <strong>the</strong> hoop to <strong>the</strong> machineagain, and continueembroidering <strong>the</strong> design.The next thing to sew will be asatin stitch border that will finish<strong>the</strong> side of <strong>the</strong> tag.If you would like to add an IDtag, watch for <strong>the</strong> note on <strong>the</strong>color change sheet that says"back piece tack down." Beforethis tack down stitch sews, stop<strong>the</strong> machine and remove <strong>the</strong>hoop.file:///F|/source/ELProjects/html/PR1365.html (8 of 12) [6/10/2011 3:16:39 PM]8
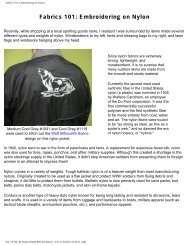
<strong>In</strong>-<strong>the</strong>-<strong>Hoop</strong> <strong>Luggage</strong> <strong>Tags</strong>Cut a piece of clear tableclothvinyl using <strong>the</strong> back dieline file.Lay <strong>the</strong> shape on top of <strong>the</strong> vinyland cut it out. We'll add this to<strong>the</strong> back of <strong>the</strong> embroidery tomake a clear pocket for <strong>the</strong> IDtag.Spray <strong>the</strong> edges of <strong>the</strong> vinyl withadhesive, and add it to <strong>the</strong> backof <strong>the</strong> embroidery.Attach <strong>the</strong> hoop back to <strong>the</strong>machine and continueembroidering <strong>the</strong> design. Azigzag or tack down stitch willsew next, and <strong>the</strong>n a satin stitchborder.If you don't want to add an IDtag, just leave <strong>the</strong> vinyl piece off.This will result in a finished fabricback without a pocket.file:///F|/source/ELProjects/html/PR1365.html (9 of 12) [6/10/2011 3:16:39 PM]9
<strong>In</strong>-<strong>the</strong>-<strong>Hoop</strong> <strong>Luggage</strong> <strong>Tags</strong>Remove <strong>the</strong> stabilizer from <strong>the</strong>hoop, and gently tear <strong>the</strong> excessaway.Add a 3/16 inch eyelet to <strong>the</strong>outer edge of <strong>the</strong> luggage tag,right next to <strong>the</strong> satin stitchborder. Cut a small "x" through<strong>the</strong> layers of fabric and vinyl witha craft knife. Cut on <strong>the</strong> closedend of <strong>the</strong> pocket so that <strong>the</strong> IDtag can be inserted later. Becareful not to cut through any of<strong>the</strong> stitches.We've made a blank ID tag foryou to download and use -- clickhere for that file. Print onto paperor cardstock. Cut around <strong>the</strong>shape, fill in <strong>the</strong> blanks, and slipit right inside <strong>the</strong> tag, in between<strong>the</strong> vinyl and <strong>the</strong> back fabric.file:///F|/source/ELProjects/html/PR1365.html (10 of 12) [6/10/2011 3:16:39 PM]10
<strong>In</strong>-<strong>the</strong>-<strong>Hoop</strong> <strong>Luggage</strong> <strong>Tags</strong>If you're working with an ovalluggage tag, slightly bend <strong>the</strong> topand bottom edge of <strong>the</strong> printedID form. <strong>In</strong>sert it inside <strong>the</strong>pocket. Then, use your finger or<strong>the</strong> end of a pen to unfold <strong>the</strong> tagin <strong>the</strong> pocket.Thread lea<strong>the</strong>r lace through <strong>the</strong>eyelet and tie <strong>the</strong> tag to yourbag. Off you go on a greatadventure, and it'll be nice andeasy to pick your bag out from<strong>the</strong> o<strong>the</strong>rs on <strong>the</strong> luggagecarousel.Here's ano<strong>the</strong>r easy way to add<strong>the</strong> tag: thread a metal showercurtain ring through <strong>the</strong> eyelet,and attach it to <strong>the</strong> bag!file:///F|/source/ELProjects/html/PR1365.html (11 of 12) [6/10/2011 3:16:39 PM]11
<strong>In</strong>-<strong>the</strong>-<strong>Hoop</strong> <strong>Luggage</strong> <strong>Tags</strong>Enjoy this fun and fast project!To find in <strong>the</strong> in-<strong>the</strong>-hoopluggage tag designs to use withthis project, click here.Click here for a printable version of <strong>the</strong>se project instructions.You'll need to have Adobe Acrobat Reader installed on your computer. If you don't have it, you candownload a free copy by clicking on <strong>the</strong> icon below.file:///F|/source/ELProjects/html/PR1365.html (12 of 12) [6/10/2011 3:16:39 PM]12