Elk M1XSLZW M1 to Leviton Z-Wave Interface Installation Manual
Elk M1XSLZW M1 to Leviton Z-Wave Interface Installation Manual
Elk M1XSLZW M1 to Leviton Z-Wave Interface Installation Manual

Create successful ePaper yourself
Turn your PDF publications into a flip-book with our unique Google optimized e-Paper software.
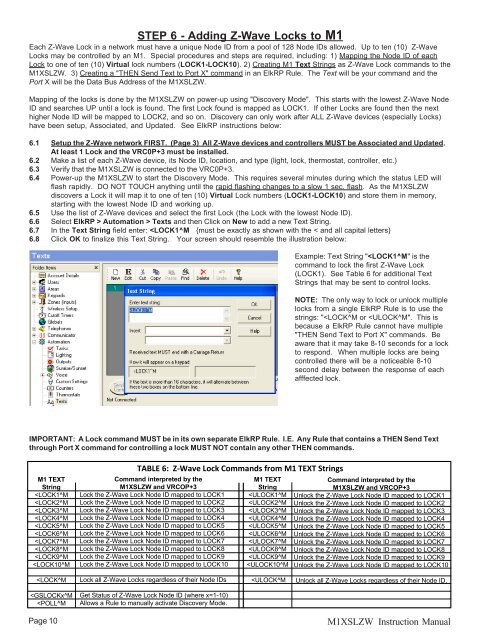
STEP 6 - Adding Z-<strong>Wave</strong> Locks <strong>to</strong> <strong>M1</strong><br />
Each Z-<strong>Wave</strong> Lock in a network must have a unique Node ID from a pool of 128 Node IDs allowed. Up <strong>to</strong> ten (10) Z-<strong>Wave</strong><br />
Locks may be controlled by an <strong>M1</strong>. Special procedures and steps are required, including: 1) Mapping the Node ID of each<br />
Lock <strong>to</strong> one of ten (10) Virtual lock numbers (LOCK1-LOCK10). 2) Creating <strong>M1</strong> Text Strings as Z-<strong>Wave</strong> Lock commands <strong>to</strong> the<br />
<strong><strong>M1</strong>XSLZW</strong>. 3) Creating a "THEN Send Text <strong>to</strong> Port X" command in an <strong>Elk</strong>RP Rule. The Text will be your command and the<br />
Port X will be the Data Bus Address of the <strong><strong>M1</strong>XSLZW</strong>.<br />
Mapping of the locks is done by the <strong><strong>M1</strong>XSLZW</strong> on power-up using "Discovery Mode". This starts with the lowest Z-<strong>Wave</strong> Node<br />
ID and searches UP until a lock is found. The first Lock found is mapped as LOCK1. If other Locks are found then the next<br />
higher Node ID will be mapped <strong>to</strong> LOCK2, and so on. Discovery can only work after ALL Z-<strong>Wave</strong> devices (especially Locks)<br />
have been setup, Associated, and Updated. See <strong>Elk</strong>RP instructions below:<br />
6.1 Setup the Z-<strong>Wave</strong> network FIRST. (Page 3) All Z-<strong>Wave</strong> devices and controllers MUST be Associated and Updated.<br />
At least 1 Lock and the VRC0P+3 must be installed.<br />
6.2 Make a list of each Z-<strong>Wave</strong> device, its Node ID, location, and type (light, lock, thermostat, controller, etc.)<br />
6.3 Verify that the <strong><strong>M1</strong>XSLZW</strong> is connected <strong>to</strong> the VRC0P+3.<br />
6.4 Power-up the <strong><strong>M1</strong>XSLZW</strong> <strong>to</strong> start the Discovery Mode. This requires several minutes during which the status LED will<br />
flash rapidly. DO NOT TOUCH anything until the rapid flashing changes <strong>to</strong> a slow 1 sec. flash. As the <strong><strong>M1</strong>XSLZW</strong><br />
discovers a Lock it will map it <strong>to</strong> one of ten (10) Virtual Lock numbers (LOCK1-LOCK10) and s<strong>to</strong>re them in memory,<br />
starting with the lowest Node ID and working up.<br />
6.5 Use the list of Z-<strong>Wave</strong> devices and select the first Lock (the Lock with the lowest Node ID).<br />
6.6 Select <strong>Elk</strong>RP > Au<strong>to</strong>mation > Texts and then Click on New <strong>to</strong> add a new Text String.<br />
6.7 In the Text String field enter: