
You also want an ePaper? Increase the reach of your titles
YUMPU automatically turns print PDFs into web optimized ePapers that Google loves.
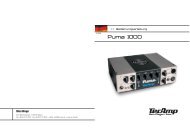
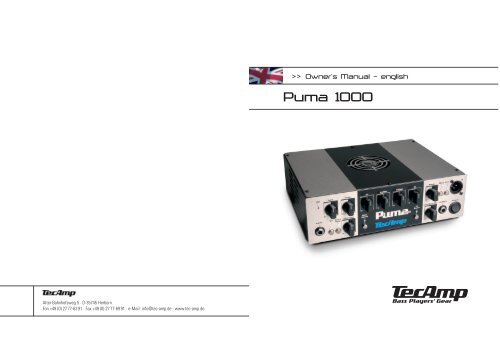
Owner’s Manual – english<br />
<strong>Puma</strong> <strong>1000</strong><br />
Alter Bahnhofsweg 5 · D-35745 Herborn<br />
Fon +49 (0) 27 77-63 91 · Fax +49 (0) 27 77-69 91 · e-Mail: info@tec-amp.de · www.tec-amp.de
Introduction<br />
IMPORTANT SAFETY INSTRUCTIONS<br />
The apparatus shall not be exposed to dripping or splashing and that<br />
no objects with liquids, such as vases, shall be placed on the apparatus.<br />
The MAINS plug is used as the disconnect device, the disconnect<br />
device shall remain readily operable.<br />
Warning: the user shall not place this apparatus in the area during<br />
the operation so that the mains switch can be easily accessible.<br />
1. Read these instructions before operating this apparatus.<br />
2. Keep these instructions for future reference.<br />
3. Heed all warnings to ensure safe operation.<br />
4. Follow all instructions provided in this document.<br />
5. Do not use this apparatus near water or in locations where condensation<br />
may occur.<br />
6. Clean only with dry cloth. Do not use aerosol or liquid cleaners.<br />
Unplug this apparatus before cleaning.<br />
7. Do not block any of the ventilation openings. Install in accordance<br />
with the manufacturer’s instructions.<br />
8. Do not install near any heat sources such as radiators, heat registers,<br />
stoves, or other apparatus (including amplifiers) that produce<br />
heat.<br />
9. Do not defeat the safety purpose of the polarized or grounding-type<br />
plug. A polarized plug has two blades with one wider than the<br />
other. A grounding type plug has two blades and a third grounding<br />
prong. The wide blade or the third prong is provided for your safety.<br />
If the provided plug does not into your outlet, consult an electrician<br />
for replacement of the obsolete outlet.<br />
10.Protect the power cord from being walked on or pinched particularly<br />
at plug, convenience receptacles, and the point where they<br />
exit from the apparatus.<br />
11.Only use attachments/accessories specified by the manufacturer.<br />
12.Use only with a cart, stand, tripod, bracket, or table specified by<br />
the manufacturer, or sold with the apparatus. When a cart is<br />
used, use caution when moving the cart/apparatus combination<br />
to avoid injury from tipover.<br />
13.When a cart is used, use caution when moving the cart/apparatus<br />
combination to avoid injury from tipover.<br />
14.Unplug this apparatus during lighting storms or when unused for<br />
long periods of time.<br />
15.Refer all servicing to qualified service personnel. Servicing is<br />
required when the apparatus has been damaged in any way, such<br />
as power-supply cord or plug is damaged, liquid has been spilled<br />
or objects have fallen into the apparatus, the apparatus has been<br />
exposed to rain or moisture, does not operate normally, or has<br />
been dropped.<br />
CAUTION: USE OF CONTROLS OR ADJUSTMENTS OR PERFOR-<br />
MANCE OF PROCEDURES OTHER THAN THOSE MAY RESULT IN<br />
HAZARDOUS RADIATION EXPOSURE.<br />
WARNING: TO REDUCE THE RISK OF FIRE OR ELECTRIC SHOCK, DO<br />
NOT EXPOSE THIS APPARATUS TO RAIN OR MOISTURE.<br />
CAUTION: RISK OF ELECTRIC SHOCK DO NOT OPEN<br />
CAUTION: TO REDUCE THE RISK OF ELECTRIC SHOCK, DO NOT<br />
REMOVE COVER (OR BACK) NO USER SERVICEABLE PARTS INSIDE<br />
REFER SERVICING TO QUALIFIED PERSONNEL<br />
The lightning flash with arrowhead symbol, within<br />
an equilateral triangle, is intended to alert the user<br />
to the presence of uninsulated “dangerous voltage”<br />
within the product’ s enclosure that may be of suficient<br />
magnitude to constitute a risk of electric shock<br />
to persons.<br />
The exclamation point within an equilateral triangle<br />
is intended to alert the user to the presence of<br />
important operating and maintenance (servicing)<br />
instructions in the literature accompanying the !<br />
appliance.<br />
Congratulations! You are now the proud owner of a<br />
TECAMP PUMA <strong>1000</strong> bass amplifier. This manual will<br />
help you get to learn all the useful and exciting features<br />
of one of the best amplifiers in the world.<br />
The new TecAmp PUMA is extremely small in size but<br />
very big in sound. Being a real TecAmp throughout only<br />
the finest materials and components were chosen in<br />
order to evenly reproduce the whole frequency range<br />
and deliver a solid bass sound.<br />
Exclusive features and our new ultra-flat premium input<br />
stage set new standards in this amplifier class. The very<br />
effective tone controls suit all musical styles. The amps<br />
of the PUMA series boast a four-band tone control section<br />
which lets you easily dial any sound you want. The<br />
TASTE control emphasizes the tonal characteristics of<br />
the individual instrument. Set to the centre, the control<br />
has no effect on the signal. Turn it counter-clockwise to<br />
filter out some ultra-low frequencies and at the same<br />
time enhance a pronounced mid range. This is the ultimate<br />
fretless tone. Turn it clockwise to soften the high<br />
end which leads to a pumping bass sound.<br />
EG-Konformitätserklärung für das Produkt/Type<br />
<strong>Puma</strong> Bassamp<br />
Wir erklären in alleiniger Verantwortung als Hersteller, dass<br />
dieses Produkt unter Beachtung der Betriebsbedingungen und<br />
Einsatzumgebung laut Bedienungsanleitung mit den folgenden<br />
Normen oder normativen Dokumenten übereinstimmt:<br />
EN 6<strong>1000</strong>-3-2, EN 6<strong>1000</strong>-3-3, EN 55013,<br />
EN 55020, EN 55022, EN 60065<br />
gemäß den Bestimmungen der Richtlinien 89/336/EWG und<br />
73/23/EWG.<br />
Additional features like an effects loop, Tuner Out, Line<br />
Out, Line In, two Speakon ® outputs and a DI out with<br />
Pre/Post switch prove that the PUMA amps are extremely<br />
versatile machines. PUMA amps are ideal for travelling<br />
around the world due to their voltage switch which<br />
allows them to be operated at 230 and 115 volts.<br />
PUMA <strong>1000</strong> as the top of the line features our newly<br />
developed compressor which allows for subtle dynamic<br />
alterations without any level changes. You can also<br />
choose between a long and a short attack time which<br />
gives you even more breathtaking sound variations. The<br />
controls EFFECTS MIX and LINE IN are located on the<br />
front panel and thus easily accessible. There is a footswitch<br />
jack for the MUTE function. The equalizer section<br />
is further expanded by switchable bass and treble<br />
boosts.<br />
The result is an impressive live performance with an<br />
unbeatable power-to-weight ratio. With its two individually<br />
controllable digital power amps delivering 500<br />
watts each (<strong>1000</strong> watts in bridge mode) the PUMA <strong>1000</strong><br />
will rumble any stage in the world.<br />
The meticulous quality control during all stages of production<br />
guarantees failsafe performance. Using only the<br />
best components available the unique circuit design and<br />
the professional workmanship make the PUMA <strong>1000</strong><br />
today’s state-of-the-art in top-of-the-line bass amp<br />
manufacturing.<br />
2<br />
3
Front Panel<br />
3 4 5 9 10 11 12 15 16 17 18<br />
Clip<br />
Input<br />
1<br />
Gain Taste Lo LoMid HiMid Hi Master<br />
0 10 Dry Rich 0 10 0 10 0 10 0 10 0<br />
10<br />
-10<br />
Attack<br />
Time<br />
Compressor<br />
Bass<br />
Boost<br />
1 INPUT<br />
Plug in your shielded instrument cable into this jack. We<br />
advise you to always turn down the volume control on<br />
your instrument before plugging it into this jack.<br />
2 -10<br />
When using a bass guitar with active pickups or basically<br />
delivering relatively high output levels we advise you to<br />
use this function. When this switch is engaged the signal<br />
will be attenuated by 10 dB before it reaches the GAIN<br />
and TONE controls. This mode is accompanied by an illuminated<br />
blue LED above the switch. Attenuation allows<br />
the “GAIN” control (#4) to be used in a more subtle way<br />
by somehow altering the taper of the pot – the “GAIN”<br />
control can be brought up to a higher position now.<br />
If, on the other hand, the GAIN control must be turned all<br />
the way up without reaching a satisfying gain range, you<br />
better deactivate the “-10 dB” switch.<br />
3 CLIP<br />
The red CLIP LED helps you adjust the input sensitivity of<br />
the PUMA <strong>1000</strong> preamp so that the signal from your<br />
Hi<br />
Boost<br />
Mute Post<br />
Line/EffectMix FS/Mute<br />
0 10<br />
0<br />
10<br />
2 6 7 8 21 13 14 20 19<br />
<strong>1000</strong><br />
Power<br />
instrument best matches the preamp’s internal operating<br />
level. Turn up the GAIN control (#4) while you hit the<br />
strings of your bass hard until the CLIP LED starts flashing.<br />
Now back up the GAIN control a bit until the LED<br />
goes off. The flashing CLIP LED tells you that the input<br />
stage of the preamp is clipping somewhere and that you<br />
should either turn down the GAIN control (#4) or engage<br />
the –10 dB function (#2). Keep in mind that excessive<br />
use of the LO control (#9) and BASS BOOST (#8) will<br />
raise the internal level and thus make the CLIP LED come<br />
on much earlier.<br />
4 GAIN<br />
This control adjusts the basic signal level in the preamp<br />
and thus determines it’s sensitivity and overall dynamic<br />
characteristics. In order to best adjust your instrument’s<br />
signal level to the internal operating level of PUMA <strong>1000</strong><br />
watch the CLIP LED (#3). Set the GAIN and/or the –10 dB<br />
function (#2) such that the CLIP LED just doesn’t come up.<br />
NTIPS & TRICKS FROM DR. BASS<br />
Do not leave the volume control on your instru-<br />
DI<br />
ment set too low, otherwise noise picked up along the<br />
cable will become more prominent and thus lower the<br />
signal-to noise ratio of the amp.<br />
5 TASTE<br />
This unique feature adds to the superiority of the PUMA<br />
<strong>1000</strong>’s tonal qualities. Leave the control in the centre<br />
position if you seek a more “natural” sound. When turned<br />
to the right (clockwise) towards “RICH” the sound<br />
gets increasingly fatter with lots of low-end punch,<br />
ending in a warm, vintage-like tone. When turned to the<br />
left (counter clockwise) towards “DRY” this control adds<br />
urgent attack and midrange growl.<br />
TIPS & TRICKS FROM DR. BASS<br />
N The “TASTE” control allows you to quickly and<br />
effectively soften those instruments which sound a little<br />
harsh and scathing. At the same time bass guitars<br />
with a muddy, booming neck pickup gain definition by<br />
turning the “TASTE” control towards the “DRY” position.<br />
6 ATTACK TIME<br />
This switch allows you to alter the attack time of the<br />
included high-end “COMPRESSOR” (#7). When the<br />
switch is not engaged the attack time is short which<br />
means that the signal is compressed immediately –<br />
great for fretless sounds. When you depress the switch,<br />
which is accompanied by an illuminated LED above it,<br />
the attack time is longer. Now the transients of the<br />
signal (the very first moments of a note) pass the circuit<br />
unprocessed resulting in a hot, lively bass sound – great<br />
for rock and funk sounds.<br />
7 COMPRESSOR<br />
The “COMPRESSOR” of the PUMA <strong>1000</strong> gently pulls up<br />
low notes, thus providing a great, even sustain. The<br />
more you turn up the “COMPRESSOR” (to the right, i.e.<br />
clockwise), the more audible is the compression effect.<br />
The level reduction usually associated with compression<br />
is made up by an internal automatic gain control. No<br />
matter how much compression you apply the signal level<br />
will always stay the same. In order to use the compressor<br />
conveniently and effectively adjusting the input sensitivity<br />
(refer to #1 through #4)is of crucial importance.<br />
8 BASS BOOST<br />
This switch, when engaged (the associated LED above<br />
illuminates), boosts the very low frequencies around 30 Hz<br />
by 12 dB. This adds a solid ground to the sound similar to<br />
a valve amp.<br />
9 LO<br />
This is the primary low frequency control. It allows for cutting<br />
or boosting the frequency range around 70 Hz by 15 dB<br />
each. This frequency range represents the bottom end and<br />
massive yet distinguished punch in a bass guitar. Start<br />
from the 12 o’clock position and dial in the sound you like.<br />
10 LO MID<br />
The “LoMID” control is centred at 250 Hz and offers a cut<br />
or boost of 12 dB. The slope of this control is not as<br />
steep as the one of the “LO” control (#9). This frequency<br />
range, when turned up, determines the body of the bass<br />
guitar signal and lets the bass be heard in a mix. Turn it<br />
counter clockwise to reduce unwanted room resonance.<br />
11 HI MID<br />
The “HiMID” control is centred at 800 Hz and offers a cut<br />
or boost of 12 dB, again with a more gentle slope just<br />
like the “LoMID” control (#10). Due to the broader ranges<br />
which are covered by these controls the sound never<br />
gets booming or honky when you turn them all the way<br />
up. Turning up the “HiMID” control gives you a great fretless<br />
sound. On the other hand, when you cut the HiMID<br />
range you end up with a funky slap sound of extremely<br />
high quality.<br />
4<br />
5
Front Panel<br />
12 HI<br />
The “HI” control is centred at 5 kHz and offers a cut or<br />
boost of 15 dB. Turn it up for a biting, crystal clear rock<br />
or funk bass. Turn it counter clockwise to reduce hiss or<br />
generally dampen the sound for a muted reggae feel.<br />
13 HI BOOST<br />
Depress this switch and engage a boost of 12 dB at 10<br />
kHz. The LED above will illuminate. This is your switch if<br />
your strings are dead or if you are into a more HiFi-like<br />
bass sound with silky top end.<br />
14 LINE/EFFECT MIX<br />
Signals connected to the “LINE IN / EFFECTS LOOP<br />
RETURN” jack (#26a) can be added to the dry bass guitar<br />
signal according to your likings with this “LINE/EFFECTS<br />
MIX” control. The parallel “EFFECTS LOOP” (#26) is designed<br />
for the connection of one or more effects devices.<br />
The “RETURN/LINE IN” jack (#26a) can also be used to<br />
connect various external audio sources to the PUMA<br />
<strong>1000</strong> such as an MP3 player, a second bass guitar, or in<br />
order to just use the power amp of the PUMA <strong>1000</strong>.<br />
The “LINE / EFFECTS MIX” is a balance control adjusting<br />
the level of the effects sound as compared to the dry<br />
sound of the PUMA <strong>1000</strong> preamp. With the “EFFECTS<br />
MIX” control all the way to the left the signal of the<br />
external device, i.e. of the “RETURN” jack (#26a), is off.<br />
All you hear is the dry bass signal. Turning it up a little<br />
will add some effects to your sound. In this position (to<br />
the left of the knob’s centre position) the effects sound is<br />
processed in parallel with the unaffected or dry signal<br />
which enables you to preserve the integrity of the premium<br />
tone and feel the PUMA <strong>1000</strong> is capable of delivering.<br />
The more you turn the control clockwise, the more prominent<br />
will the “RETURN” signal become (i.e. the effect)<br />
while at the same time the dry signal will decrease.<br />
When the “MIX” control is turned all the way up to the<br />
“WET” position the EFFECTS loop effectively becomes a<br />
serial loop. Now the internal signal path is interrupted<br />
(rather than just tapped), sent out to the external device(s)<br />
where it gets processed (added with effects, modulated,<br />
modified, whatever) and returned to the amplifier<br />
as a whole.<br />
15 MASTER<br />
This is the overall volume control of the PUMA <strong>1000</strong> and<br />
works on the two internal power amp sections. It determines<br />
the level at the “SPEAKER OUTPUTS” (#27 - #29)<br />
as well as the “LINE OUT” jack (#25).<br />
Note: Each power amp features its individual “VOLUME”<br />
control on the back panel (#28a and #29a). Do make sure<br />
that they are turned up accordingly.<br />
16 MUTE<br />
The “MUTE” switch should be depressed when you<br />
power up or down your PUMA <strong>1000</strong> – the LED above the<br />
switch illuminates when the function is engaged. In this<br />
mode no audio signal will be processed and heard at any<br />
output except the “TUNER” jack (#24). That way you<br />
don’t have to turn down the volume for silent tuning or<br />
when changing instruments, thus you do without the<br />
nasty cling which you usually hear when you unplug the<br />
jack.<br />
The “MUTE” switch also interrupts the signal path at the<br />
balanced “DI OUT” (#18), no matter which position the<br />
switch “POST” (#17) is in (that way your silent tuning or<br />
changing instruments won’t be heard in the PA, either).<br />
During breaks the amp should be set to “MUTE” rather<br />
than switched off completely. That way the internal fan<br />
stays on and cools down the power amp circuitry if<br />
necessary. Disengage the “MUTE” function and start to<br />
rumble – now there is signal at all outputs again.<br />
17 POST<br />
With this switch the balanced “DI OUT” (#18) can be<br />
selected to be a “PRE” or “POST” preamp signal. In the<br />
“PRE” position (switch is not depressed) the “DI OUT”<br />
signal is tapped directly after the input stage including<br />
the “-10 dB” function (#2), if activated, as well as the<br />
“GAIN” control (#4).<br />
In the “POST” position (switch depressed) the “DI OUT”<br />
signal is taken after it has been processed by the complete<br />
preamp, i.e. including the “GAIN” control (#4), the<br />
tone control section (#8 through #13), and the “EFFECTS<br />
LOOP” (#14, #26). It is not affected by the “MASTER”<br />
control (#15). As a reference the LED above the “POST”<br />
switch illuminates when the “DI OUT” is set to “POST”.<br />
18 DI<br />
PUMA <strong>1000</strong> supplies a balanced line output signal for<br />
connecting to a house mixing board, recording console or<br />
external amplifier(s) with balanced inputs. Connect a<br />
shielded 3-core microphone cable with XLR plugs to this<br />
male XLR output.<br />
The need for an additional active DI box, which can be<br />
pretty expensive, is obsolete. Due to the advanced circuit<br />
design using only the best components available the<br />
high sound quality of the “DI OUT” makes it the amp of<br />
choice in any recording studio (you can use the PUMA<br />
<strong>1000</strong>’s pre amp on its own without driving any speakers).<br />
The DI signal can be tapped either before or after the<br />
preamp, as determined by the switch “POST” (#17).<br />
There is no need to be afraid of nasty ground loops as<br />
the DI output is soft-grounded.<br />
19 POWER<br />
At the risk of stating the obvious, this stylish yet heavyduty<br />
rocker switch is used to turn the PUMA <strong>1000</strong> on and<br />
off. Before you turn on the amp do make sure that the<br />
“MUTE” switch (#16) is depressed. Activating the<br />
POWER SWITCH (the top of the switch must be depressed<br />
towards the amp chassis) will make the TECAMP<br />
logo on the front panel (#21) illuminate. The amp is OFF<br />
when the bottom of the POWER SWITCH is depressed –<br />
the logo will no longer illuminate.<br />
20 FS/MUTE<br />
Connect the optional footswitch FSP1 to this 6.3 mm<br />
mono jack with cable which comes included with the<br />
switch. This will allow you to remotely switch the<br />
“MUTE” function (#16). When the function is engaged<br />
the eye of the puma on the footswitch will illuminate<br />
red.<br />
For the footswitch to work effectively do make sure that<br />
the “MUTE” switch on the front panel of the amp (#16)<br />
is not engaged.<br />
21 TecAmp Logo<br />
The TECAMP logo in the centre of the front panel will<br />
illuminate blue when the PUMA <strong>1000</strong> is switched on,<br />
provided the included power strip is plugged into the<br />
“POWER RECEPTACLE” on the back panel (#22) and the<br />
“POWER” switch (#19) is turned on.<br />
6 7
Back Panel<br />
23 29a 28a 27a<br />
VOLTAGE<br />
230 V 115 V<br />
230<br />
USE ONLY WITH A 250V FUSE<br />
CHANNEL A CHANNEL B BRIDGED MODE<br />
VOLUME<br />
-10 0<br />
VOLUME<br />
-10 0<br />
22 POWER RECEPTACLE<br />
Connect the supplied AC power cord to the power receptacle.<br />
Make sure the Euro plug is firmly inserted in the<br />
socket. The other end of the cable should be connected<br />
to any standard grounded AC outlet or into a power strip<br />
of proper voltage. Before you plug in do make sure that<br />
the voltage is correct (see #23)!<br />
Just in case you lose the cord provided, the jack accepts<br />
a standard 3-prong IEC cord like those found on most<br />
professional gear and computers – you can get it at any<br />
electronics, music or computer store.<br />
Never (!) remove or otherwise attempt to defeat<br />
the ground pin of the power cord in order to get rid<br />
of a hum induced by a ground loop.<br />
22a POWER FUSE<br />
The PUMA <strong>1000</strong> is fused for your and its own protection.<br />
If you suspect a blown fuse, disconnect the cord, pull out<br />
the FUSE DRAWER (#22a, located just below the cord<br />
receptacle) and replace the fuse with another suitable<br />
fuse. There should be a spare fuse in the fuse drawer.<br />
For 230 V units the fuse for the PUMA <strong>1000</strong> must be a 4<br />
INEUTR K<br />
INEUTR K<br />
SUB<br />
ON<br />
OFF<br />
ON<br />
OFF<br />
MIN. 4 Ω MIN. 4 Ω MIN. 8 Ω<br />
28b<br />
22 22a 29 28<br />
INEUTR K<br />
EFFECTS LOOP<br />
SEND<br />
RETURN<br />
LINE IN<br />
HIGH VOLTAGE! CAUTION: TO PREVENT<br />
THE RISK OF FIRE AND SHOCK HAZARD<br />
DON’T EXPOSE THIS APPLIANCE TO<br />
MOISTURE OR RAIN. DO NOT OPEN CASE.<br />
NO USER SERVICEABLE PARTS INSIDE.<br />
REFER SERVICING TO QUALIFIED<br />
SERVICE PERSONNEL.<br />
LINE OUT<br />
Made in Germany<br />
TUNER<br />
27 26b 26a 25 24<br />
A (amps) SLO BLO 5 x 20 mm. When you’re in a country<br />
with a standard of 115 volts set the “VOLTAGE SELEC-<br />
TOR” (#23) accordingly and don’t forget to change the<br />
fuse to 6.3 A SLO BLO.<br />
If two fuses blow in a row, something is very wrong. Do<br />
not open the unit. Refer service to qualified service personnel.<br />
23 VOLTAGE SELECTOR<br />
The PUMA <strong>1000</strong> features a “VOLTAGE SELECTOR” allowing<br />
you to use your amplifier anywhere in the world<br />
just by the flick of a switch. The unit is set to 230 V when<br />
we ship to a country in Europe.<br />
Should you wish to use your PUMA <strong>1000</strong> in the USA set<br />
the “VOLTAGE SELECTOR” to “115 V” and replace the<br />
fuse in the fuse drawer (#22a) by a 6.3 A SLO BLO.<br />
ATTENTION: Don’t forget to set it back to “230 V”<br />
and change the fuse when you return home!<br />
TecAmp cannot be made responsible for damages<br />
to the unit caused by improper voltage selection.<br />
Therefore it is a good idea to always check the<br />
“VOLTAGE SELECTOR” before powering up the unit.<br />
!<br />
24 TUNER<br />
This jack is provided for connection to an electronic<br />
tuner and is always “live” even when the PUMA <strong>1000</strong> is<br />
in “MUTE” mode (#16). This allows for silent tuning as<br />
well as providing a monitor feed which stays hot even<br />
when the house mix is muted.<br />
25 LINE OUT<br />
This jack provides a line level signal for connection to a<br />
separate power amp, PA mixing console or recording<br />
equipment. The volume of the signal is controlled by the<br />
“MASTER” control (#15). Note that the output is muted<br />
when the “MUTE” function (#16) is engaged.<br />
26 EFFECTS LOOP<br />
SEND, RETURN / LINE IN<br />
These two 1/4” jacks are the patch points for external<br />
signal processing effects. This loop can be both serial<br />
and parallel depending on the position of the “EFFECTS<br />
MIX” control on the front panel (#14).<br />
26b SEND<br />
Connect the “SEND” jack to the input of the (first) external<br />
device.<br />
26a RETURN / LINE IN<br />
Connect the output of the (last) external device to the<br />
“RETURN” jack. The “EFFECTS MIX” control (#14) allows<br />
you to variably balance the level of your dry instrument<br />
signal with the wet effects signal.<br />
Whether you hook up an effects device in parallel or<br />
serial depends on the effect itself. Time related effects<br />
such as reverb, delay and modulation effects are usually<br />
hooked up in parallel, while volume related effects such<br />
as an equalizer, compressor etc. should be hooked up in<br />
serial.<br />
Always use high quality shielded instrument cables for<br />
connecting to and from external devices. Keep the<br />
cables as short as possible. If you notice crackling distortion<br />
when using external effects, either the batteries<br />
of the stomp box have run out, or the send level of the<br />
amplifier is too high for the processor’s input stage. In<br />
this case you better connect the device between bass<br />
guitar and amplifier.<br />
The “RETURN / LINE IN” jack (#26a) can also be used to<br />
connect various external audio sources to the PUMA<br />
<strong>1000</strong> such as an MP3 player, a second bass guitar, or in<br />
order to just use the power amp of the PUMA <strong>1000</strong>. You<br />
are now able to mix this external audio signal with your<br />
instrument signal. The “MASTER” control (#15) determines<br />
the final output level (watch the “VOLUME” controls<br />
of the individual power amps as well, see #28a and<br />
#29a). As the “RETURN / LINE IN” jack (#26a) is placed<br />
after the tone controls (#8 through #13) you can adjust<br />
the sound of your instrument connected to the “INPUT”<br />
(#1) to your likings without affecting the sound of the<br />
external audio source. This way you can jam along your<br />
favourite playbacks.<br />
27 SPEAKER BRIDGED MODE<br />
PUMA <strong>1000</strong> sports three Neutrik Speakon ® NL4 MP<br />
speaker outputs. The wiring of the pins is as follows: 1+<br />
= hot, 1- = ground. The one on the right (looked from<br />
behind) is reserved for mono bridged operation. When<br />
operating the amp in MONO BRIDGE MODE care should<br />
be taken that the minimum load is no less than 8<br />
ohms.<br />
27a BRIDGE ON / OFF<br />
Press the switch “BRIDGE ON/OFF” just above this Speakon<br />
® output until it rests in the “ON” position. In this<br />
mode neither the two “VOLUME” controls for “CHAN-<br />
NEL A” (#29a) and “CHANNEL B” (#28a) nor the “SUB-<br />
BOOST” filter (#28b) are active. The overall output level<br />
is controlled by the “MASTER” volume control (#15) on<br />
the front panel only. Make sure that the speaker outputs<br />
8 9
Back Panel<br />
23 29a 28a 27a<br />
VOLTAGE<br />
230 V 115 V<br />
230<br />
USE ONLY WITH A 250V FUSE<br />
CHANNEL A CHANNEL B BRIDGED MODE<br />
VOLUME<br />
-10 0<br />
of “CHANNEL A” (#29) and “CHANNEL B” (#28) are not<br />
being used.<br />
In MONO BRIDGE MODE the two internal power amps<br />
are combined to produce <strong>1000</strong> watts of continuous output<br />
power at a minimum load of 8 ohms. Be absolutely<br />
certain that the speaker cabinet(s) connected is (are)<br />
able to handle the extremely high output power of the<br />
amp. All TECAMP cabinets featuring at least 4 speakers<br />
will do the job easily (e.g. L410-8, XL412-8, L610-8, etc.).<br />
When you use a speaker cabinet with a lower power<br />
handling capacity do make sure that you operate the<br />
amp at moderate levels only, i.e. don’t turn up the<br />
“MASTER” control (#15) too far.<br />
NTIPS & TRICKS FROM DR. BASS<br />
Whatever your setup is, always make sure that<br />
the speaker cables are as long as necessary but as short<br />
as possible, using heavy gauge cable (we recommend at<br />
least 2 x 2.5 mm2). Do stick to speaker cables with<br />
Speakon ® connectors only, either NL2FC (two pin connector)<br />
or NL4FC (four pin connector). The wiring of the<br />
pins is as follows: 1+ = hot, 1- = ground.<br />
INEUTR K<br />
VOLUME<br />
-10 0<br />
INEUTR K<br />
SUB<br />
ON<br />
OFF<br />
OFF<br />
MIN. 4 Ω MIN. 4 Ω MIN. 8 Ω<br />
28b<br />
22 22a 29 28<br />
ON<br />
INEUTR K<br />
EFFECTS LOOP<br />
SEND<br />
RETURN<br />
LINE IN<br />
HIGH VOLTAGE! CAUTION: TO PREVENT<br />
THE RISK OF FIRE AND SHOCK HAZARD<br />
DON’T EXPOSE THIS APPLIANCE TO<br />
MOISTURE OR RAIN. DO NOT OPEN CASE.<br />
NO USER SERVICEABLE PARTS INSIDE.<br />
REFER SERVICING TO QUALIFIED<br />
SERVICE PERSONNEL.<br />
LINE OUT<br />
Made in Germany<br />
TUNER<br />
27 26b 26a 25 24<br />
High quality TECAMP speaker cables can be obtained as<br />
an option.<br />
28 Speaker – CHANNEL B<br />
PUMA <strong>1000</strong> is equipped with two power amps, CHAN-<br />
NEL A and CHANNEL B, which can be used simultaneously,<br />
each of them delivering 500 watts continuous output<br />
power at a minimum load of 4 ohms. Each power<br />
amp features one Neutrik Speakon ® connector. If you<br />
want to connect more than one speaker cabinet to the<br />
SPEAKON ® outputs you have to daisy chain one cabinet<br />
with the next. Just make sure that the minimum load<br />
of each power amp is no less than 4 ohms.<br />
CHANNEL A works exactly the same way as CHANNEL B.<br />
Thus, in total, you could connect two cabinets with an<br />
impedance of 4 ohms each or four cabinets with an impedance<br />
of 8 ohms each to the PUMA <strong>1000</strong> simultaneously.<br />
28a VOLUME<br />
Both power amp channels have got their own “VOLUME”<br />
control (#28a and #29a). They allow you to set individual<br />
output levels for the cabinets connected thus leaving you<br />
with a couple of interesting options. Do make sure that<br />
!<br />
the “BRIDGE ON / OFF” switch (#27a) is in the “OFF” position<br />
– otherwise these “VOLUME” controls are not active.<br />
28b SUB ON / OFF<br />
“CHANNEL B” features a unique “SUB BOOST” filter doing<br />
two different things simultaneously: When this switch is<br />
depressed a low pass filter cuts all frequencies above 200<br />
Hz. At the same time there is a level boost of 12 dB.<br />
This switch makes your PUMA <strong>1000</strong> the ideal amp for the<br />
use with a TECAMP PLEASURE BOARD together with a<br />
“normal” cabinet. Connect the Pleasure Board to “CHAN-<br />
NEL B” (#28) with the “SUB BOOST” function depressed<br />
and a “normal” speaker cabinet to “CHANNEL A” (#29)<br />
while balancing the output levels accordingly.<br />
29 Speaker – CHANNEL A<br />
CHANNEL A works exactly the same way as CHANNEL<br />
B with the exception of not offering the “SUB” filter.<br />
Thus you can connect one or two speakers (by daisy<br />
chaining them) with a total impedance of 4 ohms. The<br />
output power rating is 500 watts. CHANNEL A and<br />
CHANNEL B can be operated simultaneously.<br />
29a VOLUME<br />
“CHANNEL A”, just like CHANNEL B, features its own<br />
“VOLUME” control. It allows you to adjust individual output<br />
levels for both channels and thus the cabinets connected.<br />
Do make sure that the “BRIDGE ON / OFF”<br />
switch (#27a) is in the “OFF” position – otherwise this<br />
“VOLUME” control is not active.<br />
30 RACK MOUNTING<br />
The two included rack ears allow you to install your<br />
PUMA <strong>1000</strong> in a standard 19” rack, if desired. It will<br />
occupy two rack units. Each rack ear (there is a left and<br />
a right version) is fixed to the chassis using the three<br />
screws on either side which come included with the unit<br />
(when shipped the screws are fixed to the amp). Unscrew<br />
them, hold the rack ears in place and fix them tightly<br />
with the three screws respectively.<br />
Technical Specifications <strong>Puma</strong> <strong>1000</strong><br />
input impedance<br />
sensitivity<br />
effects loop impedance:<br />
effect send<br />
effect return / line in<br />
nominal input level<br />
line out impedance<br />
nominal output level line out<br />
impedance balanced DI output<br />
nominal output level DI out<br />
compressor attack time:<br />
short<br />
long<br />
tone control section:<br />
bass boost<br />
lo<br />
lo mid<br />
hi mid<br />
hi<br />
hi boost<br />
output power rating:<br />
channel A<br />
channel B<br />
mono brigde mode<br />
fuse:<br />
230V/AC<br />
115V/AC<br />
dimensions (W x H x D):<br />
27 x 8 x 25 cm; 10,6” x 3,1” x 10”<br />
weight: 2,8 kg; 6,2 lbs<br />
1 meg ohms<br />
-26 dBu max.<br />
600 ohms<br />
10 k ohms<br />
0 dBu<br />
600 Ohm<br />
+6 db<br />
600 ohms<br />
+6 dBu<br />
5 ms<br />
25 ms<br />
+12 dB @ 30 Hz<br />
+-15 dB @ 70 Hz<br />
+-12 dB @ 250 Hz<br />
+-12 dB @ 800 Hz<br />
+-15 dB @ 5 kHz<br />
+12 dB @ 10 kHz<br />
500 watts @ 4 ohms<br />
500 watts @ 4 ohms<br />
<strong>1000</strong> watts @ 8 ohms<br />
4 A/T (slow blow)<br />
6,3 A/T (slow blow)<br />
10 11