Create successful ePaper yourself
Turn your PDF publications into a flip-book with our unique Google optimized e-Paper software.
<strong>Blue</strong> <strong>Reef</strong> <strong>2000</strong><br />
Operation Manual<br />
GB<br />
With the purchase of this filtration system you have selected a top quality product. It has been<br />
specifically designed for aquaristic purposes and has been tested by professionals. With this unit -<br />
if used correctly - you are able to reduce organic substances and other pollutants of your aquarium<br />
water to non-toxic levels. The filtration system consists of mechanical prefilter, motor driven<br />
protein skimmers with post-switched trickling filters. The filtration system <strong>Blue</strong> <strong>Reef</strong> <strong>2000</strong><br />
convinces by its compact and functional design and its clear arrangement.<br />
GmbH<br />
Gewerbepark 24, D- 49143 Bissendorf, Germany<br />
______________________________________________________________________________
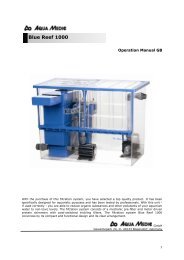
1. Product description<br />
The outside filtration system <strong>Blue</strong> <strong>Reef</strong> 1000 is placed in a separate Acrylic tank. The system<br />
consists of the following components:<br />
- Acrylic filter sump with lids and sliding doors<br />
- 2 Patented prefilter modules with drawer<br />
- Wet dry filter with trickle plate, filled with AB <strong>Aqua</strong> <strong>Medic</strong> Bactoballs.<br />
- Protein skimmer, Turboflotor Shorty with foam cup and lid<br />
- Venturi pump Ocean Runner OR 3500, with Needle wheel<br />
- Circulation pump Ocean Runner 6500<br />
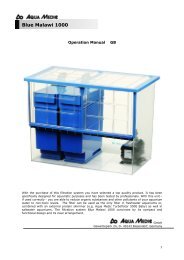
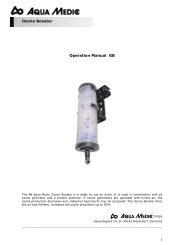
Fig. 1: <strong>Blue</strong> <strong>Reef</strong> <strong>2000</strong><br />
1. Filter sump<br />
2. Slidung doors<br />
3. lids<br />
4. drawer (2 pcs)<br />
5. wet dry Filter (bottom)<br />
6. Filter sponge<br />
7. Filter Fleece<br />
8. Wet dry filter (Top)<br />
9. prop<br />
10. tank union for circulation pump<br />
11. piping for suction side, circulation pump<br />
12. ball valve<br />
13. OR 6500<br />
14. inlet filter sump<br />
15. inlet wet dry filter<br />
16. inlet protein skimmer<br />
17. air injection nozzle<br />
18. pressure fitting for venturi pump<br />
19. venturi pump OR 3500<br />
20. protein skimmer<br />
21. foam cup<br />
22. lid<br />
23. Bactoballs<br />
24. inlet to Filter and skimmer<br />
25. 8 mm air hose
2. General description of the system<br />
The water flows out of the aquarium via the overflow chamber - or another overflow device (e.g. an<br />
AB <strong>Aqua</strong> <strong>Medic</strong> Overflow Box) into the protein skimmer and partly to the prefilter with the drawer.<br />
There, the water is cleaned mechanically. The drawer is filled with a blue filter sponge, covered by<br />
white filter floss. Below the drawer, 2 containers, filled with Bactoballs work as wet dry bio filter.<br />
The circulation pump OR 6500 is placed outside the filter sump, next to the skimmer. It is<br />
connected to the bulkhead in the filter sump. This bulkhead has 2 special washers, that<br />
compensate the bevel of the filter sump. During the installation of the pumps and the plumbing it<br />
has to be ensured that no resonance bodies are created because these may cause nasty noises.<br />
Besides the skimmer enough room is left for the installation of a Nitratrreductor NR 1000 or a<br />
Calcium reactor KA 1000.<br />
3. Set-up of the filter<br />
The under counter filtration system <strong>Blue</strong> <strong>Reef</strong> 1000 is delivered ready to use in a filter sump made<br />
from Acrylic glass. The dimensions are 82 x 47,5 x 59,5 cm (l x w x h). It can be placed inside of<br />
the cabinet of most standard aquariums. The lids on the sump and the sliding doors close the filter<br />
sump, so the evaporation is reduced.<br />
Tank union:<br />
To connect the circulation pump with the<br />
filter sump, the tank union has to be<br />
installed. The part with the male thread is<br />
pushed through the hole from the outside.<br />
Attention: Do not forget the washer.<br />
Description of the union:<br />
Begore you push in the union, you have to<br />
mount the washer with the flag. Then the<br />
union is pushed into the sump from the<br />
outside. From the inside a second waser<br />
with the flag is mounted, followed by the<br />
sliding washer of hard plastic.<br />
Now, the nut is mounted. Both washer<br />
have to be directed in a way, that the flag<br />
of the inside washer is directed upwards,<br />
the flag of the outer washer is directed<br />
downwards. Now the nut can be screwed<br />
tight. At the inside of the union a 90°<br />
elbow is mounted.
Wet dry filter towers.:<br />
Both filter towers are placed into the filter<br />
sump. They have to be exactly placed to<br />
the marks at the bottom.<br />
Inside both towers, the black grid is<br />
placed. Now they can be filled with<br />
Bactoballs.<br />
On the left wet dry filter, the prefilter<br />
drawer can be placed. Take care, that the<br />
draer will not touch the sump, when you<br />
open it. Inside the drawer are the prefilter<br />
media, blue sponge and white floss and<br />
mechanical filter media.<br />
On the right filter tower, the second wet<br />
dry tank is mounted. Its bottom is already<br />
a trickle plate and is used as support for<br />
the Bactoballs. So, it can be filles with<br />
Bactoballs. On top of this tower the second<br />
prefilter drawer is mounted.<br />
At the inlet side, the rubber inlet fittings<br />
are mounted at both drawers.<br />
.<br />
Piping:<br />
Both wet dry filter towers have separate<br />
inlets.<br />
The inlet of the left filter tower is<br />
connected to the outlet of the protein<br />
skimmer.<br />
.
The inlet of the right wet dry tower is<br />
connected to the water pipe at the side<br />
coming from the aquarium. This back flow<br />
is divided into 2 parts. One part is flowing<br />
directly into the protein skimmer, the<br />
second part into the right filter tower.<br />
Protein skimmer Turboflotor 5000<br />
Shorty.<br />
First the pump (OR 3500) is mounted to<br />
the protein skimmer. Now, air injection<br />
nozzle is connected to the suction side of<br />
the pump. Both are connected to the lower<br />
union of the protein skimmer.<br />
The PVC hose (6 mm diameter) is pushed<br />
on the air intake and fixed through the<br />
hole between the 2 outlet tubes of the<br />
skimmer.<br />
This ensures that the end of the hose is<br />
always above the water level. If the end of<br />
the hose lies on the bottom, the skimmer<br />
may be drained empty, in case of power<br />
failure or pump shut off.<br />
Next the pressure side of the pump is<br />
connected to the protein skimmer. The<br />
skimmer pump is now ready to use.<br />
The foam cup of the skimmer is mounted<br />
via a bayonet. To remove it for cleaning, it<br />
is turned fot 45° and then moved upwards.
The protein skimmer is placed besides the<br />
filter sump. The water pipe coming from<br />
the aquarium is connected to the upper<br />
inlet union of the skimmer.<br />
The free union of is connected to the pipe<br />
coming from the overflow of the aquarium.<br />
The percentage of the back flowing water<br />
passing the protein skimmer and the<br />
trickle tower can be adjusted with the ball<br />
valves. We recommend directing as much<br />
water directly to the skimmer as it can<br />
take.<br />
Circulation pump:<br />
The circulation pump (Ocean Runner<br />
6500) is connected to the filter sump. The<br />
pressure side of the pump is connected to<br />
the aquarium by a flexible hose or hard<br />
PVC piping ( not included)<br />
As soon as the connections to the<br />
aquarium are ready, the filter can be<br />
started.<br />
Sind die Verbindungen zum <strong>Aqua</strong>rium<br />
hergestellt, kann der Filter gestartet<br />
werden.<br />
Besides the skimmer enough room is left<br />
for the installation of a Nitratrreductor NR<br />
1000 or a Calcium reactor KA 1000. (not<br />
included)
Sliding doors and lids.<br />
To reduce evaporation we recommend to<br />
mount both sliding doors and top lids.<br />
Piping<br />
The piping from the aquarium to the filter and back is not included.<br />
Backflow, from the aquarium to the filter:<br />
The aquarium should be connected to the inlet bulkhead of the filter sump with a PVC pipe or a<br />
flexible hose (not included) of 40 mm diameter. The connection is a bulkhead of 40 mm diameter.<br />
With this bulkhead, the piping can easily be separated, if necessary. We recommend mounting a<br />
ball valve between the filter and the aquarium to prevent dripping water, when the filter is<br />
disconnected.<br />
Turboflotor 5000 Shorty<br />
Protei skimmer for aquariums up to 1500 litres ( 400 Gallons)<br />
1. Basics<br />
During the protein skimming process organic pollutants in the aquarium water, i.e. protein<br />
compounds formed by the excretions of animals, are attached to fine air bubbles as a monomolecular<br />
film. These air bubbles are pushed against the inflowing water in the reaction pipe so<br />
that there is a long contact time. Enriched with organic substances, they rise to the top and form<br />
strong foam which is dehydrated in the reaction pipe and then passes into the collection cup.<br />
Using this method, removal of organic pollutants from the aquarium water takes place, whereas<br />
during bacterial processes they are merely transformed and not removed.<br />
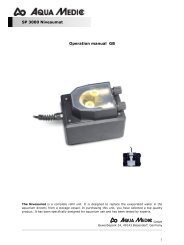
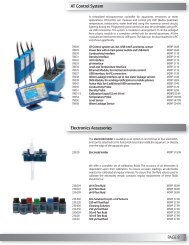
2. Product description<br />
The Turboflotor 5000 consists of:<br />
• reaction pipe, 200 mm (8 inch) diameter and bayonet socket<br />
• conical collection cup<br />
• venturi pump OCEAN RUNNER 3500 with AB <strong>Aqua</strong> <strong>Medic</strong> needle wheel<br />
• two large outlet ports (40 mm)<br />
• inlet with hose tail connection (20 mm)
• drain ball valve at the base of the skimmer with hose tail connection (25 mm)<br />
• air tube for the venturi pump.<br />
1. Top lid<br />
2. Foam cup<br />
3. O-ring<br />
4. Reaction pipe<br />
5. Water inlet<br />
6. Outlet fittings<br />
7. Adrustion valves<br />
8. Needle wheel pump<br />
9. Needle wheel impeller<br />
10. air injection nozzle with<br />
connection for air tube<br />
1<br />
2<br />
3<br />
7<br />
4<br />
10<br />
9<br />
5<br />
6<br />
8<br />
Turboflotor 5000 Shorty
Type Outlet height Total<br />
height<br />
Venturi pump<br />
Power<br />
consumption<br />
Capacity<br />
Turboflotor<br />
5000<br />
SHORTY<br />
30.5 cm<br />
(12“)<br />
62 cm<br />
(25“)<br />
OCEAN RUNNER<br />
3500<br />
with needle wheel<br />
65 Watts up to<br />
1,500 l<br />
400<br />
Gallons<br />
3. Principle of Operation<br />
The aquarium water is pumped to the skimmer using a separate pump (not supplied) which should<br />
have a capacity of approx. 2,000-4,000 litres/hour. The relative positions of the inlet and outlet<br />
ports ensure the maximum contact time of the air bubbles in the counter current. If the SHORTY<br />
COMPACT is mounted in the cabinet, it can be supplied with water directly from the overflow of the<br />
aquarium. In this case a bypass should be installed, so the volume of water can be adjusted<br />
The venturi pump draws the water from the skimmer and mixes it with air. Within the pump<br />
housing the bubbles are cut into very fine pieces by the AB <strong>Aqua</strong> <strong>Medic</strong> needle wheel. The air/water<br />
mixture is pumped back into the skimmer.<br />
The treated water flows out of the bottom of the skimmer and is pumped through the two<br />
transparent pipes positioned outside the skimmer back into the aquarium or filter sump.<br />
4. Installation<br />
• Check that the sealing rings for the unions are in place.<br />
• Slot the holding plate for the venturi pump to one side of the skimmer. Push the pump on to the<br />
holding plate and connect the pump to its union.<br />
The PVC air tube should be fed so, that the end is higher, than the water level in the skimmer .This<br />
air tube must not hang down. It should only jut out 5 cm at the top.<br />
Connect the bottom end of the tube to the air intake of the pump.<br />
• The water inlet is located at the same side as the outlet pipes. Attach the union and the hose<br />
tail (20mm).<br />
• We recommend a pump with a capacity of 2,000 to 4,000 litres/hour for the water supply or<br />
direct connection to the aquarium overflow.<br />
• Fit the rubber sealing ring for the bayonet socket of the reaction pipe.<br />
Push the foam cup into its seating and turn it to lock.<br />
The drain from the skimmer has to run freely into the aquarium. A PVC pipe (40 mm dia) can be<br />
glued into the drain ports. It is possible to let both drains flow into one pipe, but the diameter of<br />
the pipe must not be reduced. If the drains are left separate, a reduction in pipe size to 32mm is<br />
possible.<br />
The skimmer can now be filled by pumping directly from the aquarium. Ensure that the<br />
water level of the aquarium is not lowered too much. As soon as the water level in the<br />
skimmer reaches the height of the venturi pumps, these pumps should be started.<br />
Top up with sea water as necessary.<br />
After first use or after cleaning of the skimmer it takes some time for the initial foam to build up in<br />
the reaction pipe of the collection cup. This is because the cleaned acrylic initially reacts with the<br />
water until a build up of fatty acids naturally takes place.
After approx. 24 hours, the foam should be pushed slowly and evenly into the collection cup. The<br />
quantity of liquid and organic substances depends on the pollution of the aquarium.<br />
5. Maintenance<br />
• Collection cup: Depending on the organic load the cup should be cleaned daily to weekly.<br />
• Reaction pipe: This needs to only occasional cleaning; we recommend intervals from 6 to 12<br />
months.<br />
• Venturi pump: The maintenance of the pump should be done at the same time as that of the<br />
reaction pipe:<br />
Drain the water out and dismantle the pump. Flush the pump housing and the<br />
needle wheel with clean water.<br />
The same should be done with the air injection nozzle.<br />
6. Failures<br />
Failures may arise if:<br />
- The ratio between supplied air and the water volume is not correct.<br />
Cause: The air injection nozzle is clogged or the pump chamber containing the needle wheel is<br />
dirty.<br />
Action: Dismantle the venturi pump, clean it thoroughly, carefully clean the air injection nozzle<br />
with a thin brush or blunt instrument and re-assemble the pump again.<br />
- The venturi pump does not re-start after an interruption of the power supply.<br />
Cause: The water pressure is too high.<br />
Action: Let the water out up to the height of the pump to lower the water pressure. Restart the<br />
pump.<br />
7. Warranty<br />
Should any defect in material or workmanship be found within twelve months of the date of<br />
purchase AB <strong>Aqua</strong> <strong>Medic</strong> GmbH undertakes to repair or, at our option, replace the defective part<br />
free of charge – always provided the product has been installed correctly, is used for the purpose<br />
that was intended by us, is used in accordance with the operating instructions and is returned to us<br />
carriage paid. The warranty term is not applicable on the all consumable products.<br />
Proof of Purchase is required by presentation of an original invoice or receipt indicating the dealer’s<br />
name, the model number and date of purchase, or a Guarantee Card if appropriate. This warranty<br />
may not apply if any model or production number has been altered, deleted or removed,<br />
unauthorised persons or organisations have executed repairs, modifications or alterations, or<br />
damage is caused by accident, misuse or neglect.<br />
We regret we are unable to accept any liability for any consequential loss.<br />
Please note that the product is not defective under the terms of this warranty where the product,<br />
or any of its component parts, was not originally designed and / or manufactured for the market in<br />
which it is used.<br />
These statements do not affect your statutory rights as a customer.<br />
If your AB <strong>Aqua</strong> <strong>Medic</strong> GmbH product does not appear to be working correctly or appears to be<br />
defective please contact your dealer in the first instance.<br />
Before calling your dealer please ensure you have read and understood the operating instructions.<br />
If you have any questions your dealer cannot answer please contact us.<br />
Our policy is one of continual technical improvement and we reserve the right to modify and adjust<br />
the specification of our products without prior notification.<br />
AB AQUA MEDIC GmbH - Gewerbepark 24 49143 Bissendorf/Germany<br />
- Technical changes reserved -