Lab 4 â Sensors: Force Sensitive Resistors and Photocells - Courses
Lab 4 â Sensors: Force Sensitive Resistors and Photocells - Courses
Lab 4 â Sensors: Force Sensitive Resistors and Photocells - Courses

You also want an ePaper? Increase the reach of your titles
YUMPU automatically turns print PDFs into web optimized ePapers that Google loves.
<strong>Lab</strong> 4 – <strong>Sensors</strong>: <strong>Force</strong> <strong>Sensitive</strong><br />
<strong>Resistors</strong> <strong>and</strong> <strong>Photocells</strong><br />
INFOSYS 29013/ CNM 2901: Design <strong>and</strong> Theory of Tangible User Interfaces<br />
Date: Thursday, Sept 13, 2007<br />
Before the <strong>Lab</strong><br />
You should have already completed your color mixer <strong>and</strong> come up with some way to control the LEDs<br />
with 2 or 3 pots.<br />
In <strong>Lab</strong> Exercise<br />
Objective<br />
In the past lab, we explored potentiometers (or “pot” for short) which are analog sensors that measure<br />
rotation. In this week’s lab, we’ll be exploring two other analog sensors. The first sensor measures light<br />
brightness <strong>and</strong> is called a photocell (or a “phot” for short. Okay, that was a lie). The second sensor<br />
measures force <strong>and</strong> is called <strong>Force</strong> <strong>Sensitive</strong> Resistor (or “FSR” for short). Thus far, the pot, phot, <strong>and</strong><br />
FSR sensors convert some physical action into an electrical characteristic, namely resistance.<br />
In addition to new sensors, this lab will introduce “Processing” which is a programming language for<br />
creating more interesting UIs than the text based one’s you’ve been using.<br />
Activities<br />
Part 1 – <strong>Photocells</strong><br />
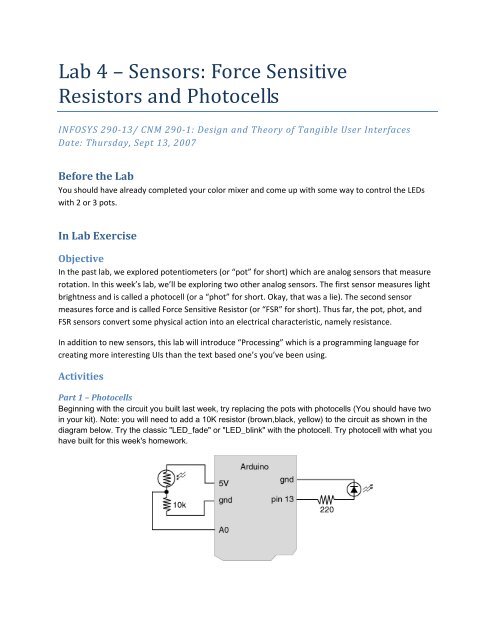
Beginning with the circuit you built last week, try replacing the pots with photocells (You should have two<br />
in your kit). Note: you will need to add a 10K resistor (brown,black, yellow) to the circuit as shown in the<br />
diagram below. Try the classic "LED_fade" or "LED_blink" with the photocell. Try photocell with what you<br />
have built for this week's homework.
Part 2 – <strong>Force</strong> <strong>Sensitive</strong> <strong>Resistors</strong><br />
Replace the photocells in your current circuit with the FSRs (distributed in class). This should simply<br />
involve swapping out the photocells with the FSRs (still using the 10K resistors). Again, try the classic<br />
"LED_fade" or "LED_blink" with the photocell. Try photocell with what you have built for this week's<br />
homework.<br />
Part 3 – Processing<br />
In this section, we begin exploring Processing<br />
1) Download <strong>and</strong> install Processing if you have not done so yet (www.processing.org)<br />
2) Load “Sketchbook ‐> Examples ‐> Motion ‐> Bounce”<br />
3) Press “Run”<br />
Congrats! You just made a java applet.<br />
Part 4 – More Processing<br />
Influence a Processing program running on your computer with the input from your Arduino board<br />
example code:<br />
http://todbot.com/processing/arduino_ball/arduino_ball.pde<br />
Try it with pot, photocell, <strong>and</strong> FSR.<br />
Homework for next week:<br />
Programming<br />
Create an interesting visualization on your computer that could be influenced by the input from the<br />
sensors you have (pot, photocell, FSR, or combination of them). You can use Processing (or any other<br />
language you like) in writing the program. Post your results on the course website.<br />
Mechanical<br />
Create a mechanical construction for your FSR that distributes or focuses physical force that is applied.<br />
Think about everyday objects (toothpaste tube, entrance mat, paintbrush, pipette, etc.) <strong>and</strong> how you<br />
measure the pressure or force applied to them