Chlamydia trachomatis IgG
Chlamydia trachomatis IgG
Chlamydia trachomatis IgG

You also want an ePaper? Increase the reach of your titles
YUMPU automatically turns print PDFs into web optimized ePapers that Google loves.
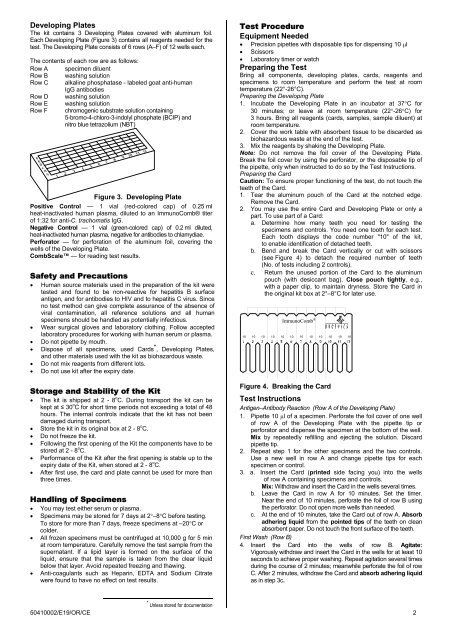
Developing Plates<br />
The kit contains 3 Developing Plates covered with aluminum foil.<br />
Each Developing Plate (Figure 3) contains all reagents needed for the<br />
test. The Developing Plate consists of 6 rows (A–F) of 12 wells each.<br />
The contents of each row are as follows:<br />
Row A specimen diluent<br />
Row B washing solution<br />
Row C alkaline phosphatase - labeled goat anti-human<br />
<strong>IgG</strong> antibodies<br />
Row D washing solution<br />
Row E washing solution<br />
Row F chromogenic substrate solution containing<br />
5-bromo-4-chloro-3-indolyl phosphate (BCIP) and<br />
nitro blue tetrazolium (NBT)<br />
Figure 3. Developing Plate<br />
Positive Control — 1 vial (red-colored cap) of 0.25 ml<br />
heat-inactivated human plasma, diluted to an ImmunoComb® titer<br />
of 1:32 for anti-C. <strong>trachomatis</strong> <strong>IgG</strong>.<br />
Negative Control — 1 vial (green-colored cap) of 0.2 ml diluted,<br />
heat-inactivated human plasma, negative for antibodies to chlamydiae.<br />
Perforator — for perforation of the aluminum foil, covering the<br />
wells of the Developing Plate.<br />
CombScale — for reading test results.<br />
Safety and Precautions<br />
• Human source materials used in the preparation of the kit were<br />
tested and found to be non-reactive for hepatitis B surface<br />
antigen, and for antibodies to HIV and to hepatitis C virus. Since<br />
no test method can give complete assurance of the absence of<br />
viral contamination, all reference solutions and all human<br />
specimens should be handled as potentially infectious.<br />
• Wear surgical gloves and laboratory clothing. Follow accepted<br />
laboratory procedures for working with human serum or plasma.<br />
• Do not pipette by mouth.<br />
• Dispose of all specimens, used Cards * , Developing Plates,<br />
and other materials used with the kit as biohazardous waste.<br />
• Do not mix reagents from different lots.<br />
• Do not use kit after the expiry date.<br />
Storage and Stability of the Kit<br />
• The kit is shipped at 2 - 8 o C. During transport the kit can be<br />
kept at ≤ 30 o C for short time periods not exceeding a total of 48<br />
hours. The internal controls indicate that the kit has not been<br />
damaged during transport.<br />
• Store the kit in its original box at 2 - 8 o C.<br />
• Do not freeze the kit.<br />
• Following the first opening of the Kit the components have to be<br />
stored at 2 - 8 o C.<br />
• Performance of the Kit after the first opening is stable up to the<br />
expiry date of the Kit, when stored at 2 - 8 o C.<br />
• After first use, the card and plate cannot be used for more than<br />
three times.<br />
Handling of Specimens<br />
• You may test either serum or plasma.<br />
• Specimens may be stored for 7 days at 2°–8°C before testing.<br />
To store for more than 7 days, freeze specimens at –20°C or<br />
colder.<br />
• All frozen specimens must be centrifuged at 10,000 g for 5 min<br />
at room temperature. Carefully remove the test sample from the<br />
supernatant. If a lipid layer is formed on the surface of the<br />
liquid, ensure that the sample is taken from the clear liquid<br />
below that layer. Avoid repeated freezing and thawing.<br />
• Anti-coagulants such as Heparin, EDTA and Sodium Citrate<br />
were found to have no effect on test results.<br />
* Unless stored for documentation<br />
Test Procedure<br />
Equipment Needed<br />
• Precision pipettes with disposable tips for dispensing 10 μl<br />
• Scissors<br />
• Laboratory timer or watch<br />
Preparing the Test<br />
Bring all components, developing plates, cards, reagents and<br />
specimens to room temperature and perform the test at room<br />
temperature (22°-26°C).<br />
Preparing the Developing Plate<br />
1. Incubate the Developing Plate in an incubator at 37°C for<br />
30 minutes; or leave at room temperature (22°-26°C) for<br />
3 hours. Bring all reagents (cards, samples, sample diluent) at<br />
room temperature.<br />
2. Cover the work table with absorbent tissue to be discarded as<br />
biohazardous waste at the end of the test.<br />
3. Mix the reagents by shaking the Developing Plate.<br />
Note: Do not remove the foil cover of the Developing Plate.<br />
Break the foil cover by using the perforator, or the disposable tip of<br />
the pipette, only when instructed to do so by the Test Instructions.<br />
Preparing the Card<br />
Caution: To ensure proper functioning of the test, do not touch the<br />
teeth of the Card.<br />
1. Tear the aluminum pouch of the Card at the notched edge.<br />
Remove the Card.<br />
2. You may use the entire Card and Developing Plate or only a<br />
part. To use part of a Card:<br />
a. Determine how many teeth you need for testing the<br />
specimens and controls. You need one tooth for each test.<br />
Each tooth displays the code number "10" of the kit,<br />
to enable identification of detached teeth.<br />
b. Bend and break the Card vertically or cut with scissors<br />
(see Figure 4) to detach the required number of teeth<br />
(No. of tests including 2 controls).<br />
c. Return the unused portion of the Card to the aluminum<br />
pouch (with desiccant bag). Close pouch tightly, e.g.,<br />
with a paper clip, to maintain dryness. Store the Card in<br />
the original kit box at 2°–8°C for later use.<br />
ImmunoComb ®<br />
10 10 10 10 10 10 10 10 10 10 10 10<br />
Figure 4. Breaking the Card<br />
Test Instructions<br />
Antigen–Antibody Reaction (Row A of the Developing Plate)<br />
1. Pipette 10 μl of a specimen. Perforate the foil cover of one well<br />
of row A of the Developing Plate with the pipette tip or<br />
perforator and dispense the specimen at the bottom of the well.<br />
Mix by repeatedly refilling and ejecting the solution. Discard<br />
pipette tip.<br />
2. Repeat step 1 for the other specimens and the two controls.<br />
Use a new well in row A and change pipette tips for each<br />
specimen or control.<br />
3. a. Insert the Card (printed side facing you) into the wells<br />
of row A containing specimens and controls.<br />
Mix: Withdraw and insert the Card in the wells several times.<br />
b. Leave the Card in row A for 10 minutes. Set the timer.<br />
Near the end of 10 minutes, perforate the foil of row B using<br />
the perforator. Do not open more wells than needed.<br />
c. At the end of 10 minutes, take the Card out of row A. Absorb<br />
adhering liquid from the pointed tips of the teeth on clean<br />
absorbent paper. Do not touch the front surface of the teeth.<br />
First Wash (Row B)<br />
4. Insert the Card into the wells of row B. Agitate:<br />
Vigorously withdraw and insert the Card in the wells for at least 10<br />
seconds to achieve proper washing. Repeat agitation several times<br />
during the course of 2 minutes; meanwhile perforate the foil of row<br />
C. After 2 minutes, withdraw the Card and absorb adhering liquid<br />
as in step 3c.<br />
50410002/E19/OR/CE 2