HP HX4700 Series Back Up Battery ... - iPAQ Repair and Parts
HP HX4700 Series Back Up Battery ... - iPAQ Repair and Parts
HP HX4700 Series Back Up Battery ... - iPAQ Repair and Parts

Create successful ePaper yourself
Turn your PDF publications into a flip-book with our unique Google optimized e-Paper software.
<strong>HP</strong> <strong>HX4700</strong> / HX4705 <strong>Series</strong> <strong>Back</strong> <strong>Up</strong> <strong>Battery</strong> Replacement Guide<br />
Introduction<br />
http://www.ipaqrepair.co.uk<br />
This guide aims to provide some assistance <strong>and</strong> tips for a DIY replacement of<br />
the back up battery for the hx4700 series <strong>iPAQ</strong> (hx4700 / hx4705)<br />
A faulty back up battery is often to blame for a wide range of <strong>iPAQ</strong> memory<br />
issues such as the loss of all data <strong>and</strong> custom settings when the units main<br />
battery power is completely depleted, a replacement back up battery will cure<br />
your unit of its temporary amnesia.<br />
Required Tools<br />
• A Torx size 6 (T6) Screwdriver (available here in the tools section of<br />
the website, suitable for all models).<br />
• A new back up battery for the hx4700 (available here).<br />
Stage One – Unit Disassembly<br />
It is advisable to back up any important data currently held on your <strong>iPAQ</strong> unit,<br />
once you are ready to begin prepare a clean <strong>and</strong> safe work surface in order to<br />
protect your hx4700 screen when the <strong>iPAQ</strong> unit is face down. The first step is<br />
to remove your stylus, memory cards (SD <strong>and</strong> CF) <strong>and</strong> the main battery.<br />
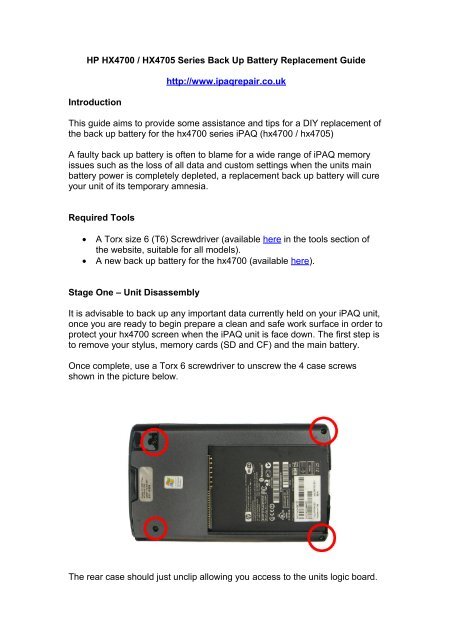
Once complete, use a Torx 6 screwdriver to unscrew the 4 case screws<br />
shown in the picture below.<br />
The rear case should just unclip allowing you access to the units logic board.
Stage Two – Replacing the <strong>Back</strong>up <strong>Battery</strong><br />
The backup battery is located on the right side of the unit above the screen<br />
ribbon cable.<br />
Use a small tool such as a jewellers flathead screwdriver or a credit card<br />
corner to pop out the backup battery from its holder on the logic board.<br />
Once complete you should be able to install your new backup battery <strong>and</strong> reattach<br />
the rear case of your unit. Re-install the main battery <strong>and</strong> power the<br />
unit on.<br />
Remember to leave the unit on charge for 24 hours allowing the backup<br />
battery to fully charge <strong>and</strong> calibrate.<br />
The text <strong>and</strong> images are © iTech <strong>Repair</strong> Ltd if you wish to distribute or<br />
use this document in any way please contact me via the website located<br />
at:<br />
http://www.ipaqrepair.co.uk/contact_us.php