MYOB Manual - Time Billing
MYOB Manual - Time Billing
MYOB Manual - Time Billing
Create successful ePaper yourself
Turn your PDF publications into a flip-book with our unique Google optimized e-Paper software.
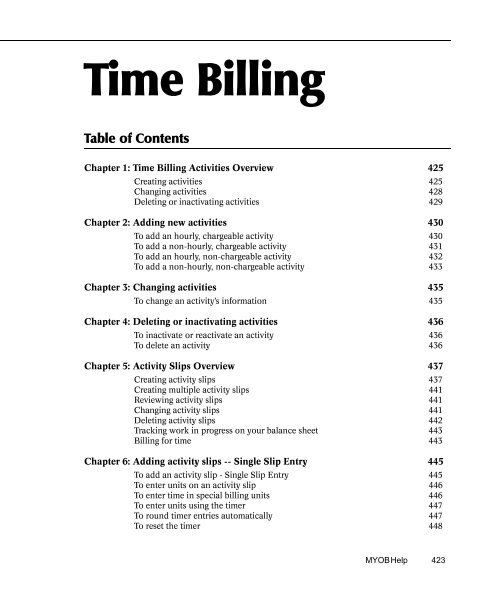
<strong>Time</strong> <strong>Billing</strong><br />
Table of Contents<br />
Chapter 1: <strong>Time</strong> <strong>Billing</strong> Activities Overview 425<br />
Creating activities 425<br />
Changing activities 428<br />
Deleting or inactivating activities 429<br />
Chapter 2: Adding new activities 430<br />
To add an hourly, chargeable activity 430<br />
To add a non-hourly, chargeable activity 431<br />
To add an hourly, non-chargeable activity 432<br />
To add a non-hourly, non-chargeable activity 433<br />
Chapter 3: Changing activities 435<br />
To change an activity’s information 435<br />
Chapter 4: Deleting or inactivating activities 436<br />
To inactivate or reactivate an activity 436<br />
To delete an activity 436<br />
Chapter 5: Activity Slips Overview 437<br />
Creating activity slips 437<br />
Creating multiple activity slips 441<br />
Reviewing activity slips 441<br />
Changing activity slips 441<br />
Deleting activity slips 442<br />
Tracking work in progress on your balance sheet 443<br />
<strong>Billing</strong> for time 443<br />
Chapter 6: Adding activity slips -- Single Slip Entry 445<br />
To add an activity slip - Single Slip Entry 445<br />
To enter units on an activity slip 446<br />
To enter time in special billing units 446<br />
To enter units using the timer 447<br />
To round timer entries automatically 447<br />
To reset the timer 448<br />
<strong>MYOB</strong> Help 423
Chapter 7: Adding multiple activity slips 449<br />
To add activity slips - Multiple Slip Entry 449<br />
Chapter 8: Reviewing activity slips 451<br />
To review activity slip information 451<br />
Chapter 9: Changing activity slips 452<br />
To change a single activity slip 452<br />
To change multiple activity slips 452<br />
Chapter 10: Deleting activity slips 454<br />
To delete an activity slip 454<br />
Chapter 11: Tracking work in progress on your balance sheet 455<br />
To adjust your books for work in progress 455<br />
Chapter 12: <strong>Billing</strong> for time 457<br />
To bill for time 457<br />
To enter time billing payment details 459<br />
To store a recurring time billing template 460<br />
Chapter 13: Activity slips notes and warnings 461<br />
424 www.myob.com.au
Chapter 1 <strong>Time</strong> <strong>Billing</strong> Activities Overview<br />
Chapter 1<br />
<strong>Time</strong> <strong>Billing</strong> Activities<br />
Overview<br />
<strong>Time</strong> <strong>Billing</strong> Activities Overview;overview:<strong>Time</strong> <strong>Billing</strong> Activities<br />
In <strong>MYOB</strong> Premier terms, the word activity is used to describe a task or<br />
service provided by your company for which you can track costs and bill<br />
customers on time billing invoices. An example of an activity might be tax<br />
consulting or traveling to a client’s office. You also can create activities for<br />
tasks your company tracks time for, but doesn’t include on time billing<br />
invoices, such as employee lunch breaks.<br />
You’ll use activities to create activity slips. Activity slips are the records of<br />
the activities performed by your company and are the basic record keeping<br />
unit of the <strong>Time</strong> <strong>Billing</strong> Command Centre. Then, you can bill your<br />
customers for that time on time billing invoices.<br />
Creating activities<br />
activities:creating;creating:activities;time billing:activities, See activities<br />
When you create an activity in the Activity Information window, you must<br />
choose the Type (hourly or non-hourly) and Status (chargeable or nonchargeable)<br />
that is appropriate for the way you want to use the activity in<br />
<strong>MYOB</strong> Premier. Read the information about the four possible combinations<br />
carefully so you can make the correct selections when you create an activity.<br />
• Hourly/Chargeable <strong>Time</strong> <strong>Billing</strong> activities<br />
• Non-hourly/Chargeable <strong>Time</strong> <strong>Billing</strong> activities<br />
• Hourly/Non-chargeable <strong>Time</strong> <strong>Billing</strong> activities<br />
• Non-hourly/Non-chargeable <strong>Time</strong> <strong>Billing</strong> activities<br />
<strong>MYOB</strong> Help 425
Hourly/Chargeable <strong>Time</strong> <strong>Billing</strong> activities<br />
activities:creating:hourly/chargeable<br />
Many, if not all, of your activities will be set up so you can charge your<br />
customers a set price for a certain number of hours spent performing the<br />
activity. Even if you track the time you spend in units of 6 minutes, you’ll<br />
still track time on an hourly basis.<br />
For hourly activities, you can use the timer in the Enter Activity Slip<br />
window. If an activity is chargeable, you can include it on time billing<br />
invoices.<br />
When you create activity slips, you can enter billing units for hourly<br />
activities in units other than whole hours. The “For <strong>Time</strong> <strong>Billing</strong>, Enter<br />
<strong>Time</strong> In Special __ Minute <strong>Billing</strong> Units” selection in the Preferences<br />
window allows you to enter time billing units in smaller blocks of time.<br />
For example, if your company bills for time in 12-minute units, mark this<br />
selection and choose 12 Minute <strong>Billing</strong> Units from the list. This makes one<br />
time billing unit equal to 12 minutes. If one time billing unit equals 12<br />
minutes, you’d enter 1.5 units on an activity slip to create a record for 18<br />
minutes of time.<br />
Step by step<br />
“To add an hourly, chargeable activity” on page 430<br />
Non-hourly/Chargeable <strong>Time</strong> <strong>Billing</strong> activities<br />
activities:creating:non-hourly/chargeable<br />
You may have activities that you measure in some other unit besides<br />
“hours". For example, you may charge by the day or the kilometre for some<br />
activities. You wouldn’t use the timer in the Enter Activity Slip window for<br />
non-hourly activities, but you’d still charge a set price for every unit on time<br />
billing invoices.<br />
Step by step<br />
“To add a non-hourly, chargeable activity” on page 431<br />
Hourly/Non-chargeable <strong>Time</strong> <strong>Billing</strong> activities<br />
activities:creating:hourly/non-chargeable<br />
Activities also help you to track the time your company spends performing<br />
tasks or services you don’t include on time billing invoices. For example,<br />
even if you don’t charge your customers for traveling to their offices, you<br />
may still want to track how much time your employees spend on the road.<br />
You can keep track of those expenses using hourly, non-chargeable<br />
activities.<br />
Step by step<br />
“To add an hourly, non-chargeable activity” on page 432<br />
426 www.myob.com.au
Chapter 1 <strong>Time</strong> <strong>Billing</strong> Activities Overview<br />
Non-hourly/Non-chargeable <strong>Time</strong> <strong>Billing</strong> activities<br />
activities:creating:non-hourly/non-chargeable<br />
There may be still other tasks or services performed by your company that<br />
you don’t include on invoices for your customers and don’t track on an<br />
hourly basis. For example, if you take a particular job to expand your<br />
expertise, you might not want to charge the customer for the day of extra<br />
research the job requires. You can make a record of that day using an<br />
activity slip for a non-hourly, non-chargeable activity.<br />
Step by step<br />
“To add a non-hourly, non-chargeable activity” on page 433<br />
Choosing the rate for a chargeable activity<br />
activities:choosing a rate<br />
If you select Chargeable in the Status field in the Activity Information<br />
window, you will choose a rate for the activity. The rate is the price you<br />
charge for one unit of the activity.<br />
• To use the rate you entered for each employee or supplier, choose the Use<br />
Employee <strong>Billing</strong> Rate selection. The rate that will appear for this activity<br />
on activity slips will be the rate you entered in the <strong>Time</strong> <strong>Billing</strong> Employee<br />
Setup window for the employee or supplier card you choose for each<br />
activity slip.<br />
• To use the rate you entered for each customer, choose the Use Customer<br />
<strong>Billing</strong> Rate selection. The rate that will appear for this activity on activity<br />
slips will be the rate you entered in the Selling Details view of the Card<br />
Information window for the customer card you choose for each activity<br />
slip.<br />
• To assign a rate to the activity itself, choose the Use Activity Rate selection<br />
and then enter a rate in the Activity Rate field. The rate that will appear for<br />
this activity on activity slips will be the rate you entered in the Activity Rate<br />
field for this activity. This rate will be a tax exclusive amount.<br />
Step by step<br />
“To add an hourly, chargeable activity” on page 430<br />
Entering an activity’s history<br />
activities:entering:history<br />
If you selected Chargeable in the Status field of the Activity Information<br />
window, you can enter the sales amounts of your activity before you began<br />
using <strong>MYOB</strong> Premier; this step is optional.<br />
<strong>MYOB</strong> Help 427
Once you add the activity to your records, Premier automatically tracks<br />
sales figures for an activity on a monthly basis. Premier tracks the units sold,<br />
the total sales and the total cost of sales for an activity. Sales history is kept<br />
for the current financial year, the next financial year and the five previous<br />
financial years.<br />
If you change the Premier-generated history in the History view of the<br />
Activity Information window, keep in mind that the change you make may<br />
not accurately reflect your actual sales totals. If you make a change and then<br />
want to use the previous amount, Premier cannot automatically reconstruct<br />
the monthly totals.<br />
Related topics<br />
“Creating activities” on page 425<br />
“To add an hourly, chargeable activity” on page 430<br />
“To add a non-hourly, chargeable activity” on page 431<br />
Changing activities<br />
activities:changing<br />
Occasionally, you might need to make a change to an activity in your<br />
<strong>MYOB</strong> Premier records. You can make your changes easily using the<br />
Activity Information window.<br />
Premier automatically tracks sales figures for the activity on a monthly<br />
basis. If you change the Premier-generated history amounts, keep in mind<br />
that the change you make may not accurately reflect your actual sales totals.<br />
If you make a change and then want to use the previous amount, Premier<br />
cannot automatically reconstruct the monthly totals.<br />
Please note that you might not be able to change some of a particular<br />
activity’s basic information. For example, if you’ve recorded activity slips for<br />
an activity, you won’t be able to change the status of the activity. If you want<br />
to change this selection, you’ll first need to remove the activity slips for the<br />
activity.<br />
Depending upon whether you’ve used an activity on an activity slip or<br />
invoice, you can change most of the information you originally set up for<br />
the activity. When you change an activity’s number or name, all the activity<br />
slips and invoices that were recorded using the activity’s previous number or<br />
name will change to reflect the new information you entered.<br />
Step by step<br />
“To change an activity’s information” on page 435<br />
428 www.myob.com.au
Chapter 1 <strong>Time</strong> <strong>Billing</strong> Activities Overview<br />
Deleting or inactivating activities<br />
activities:deleting;activities:inactivating<br />
If you have activities that you no longer use, inactivating them will remove<br />
them from the selection windows. Your list of activities will be shorter, and<br />
selecting the activity you need will be easier.<br />
If an activity is marked inactive, however, you may still use the activity in<br />
transactions by manually entering the activity. Inactive activities will still<br />
appear in the Activities List window. You can also return the status of the<br />
activity to active so that it will appear again in the selection windows. No<br />
matter what the status of an activity -- active or inactive, transactions<br />
recorded using the activity will still affect all of your financial records.<br />
The Activities List report will be displayed and will print activity<br />
information with or without inactive activities. Use the Report<br />
Customisation window to unmark or mark the selection Include Inactive<br />
Activities.<br />
If you have an activity for which you haven’t entered any activity slips, you<br />
can quickly remove its record from the <strong>MYOB</strong> Premier system. You can’t<br />
delete an activity until all the activity slips you’ve recorded for it have been<br />
purged. Once the activity slips are purged, you can delete the activity.<br />
Step by step<br />
“To inactivate or reactivate an activity” on page 436<br />
“To delete an activity” on page 436<br />
“To purge activity slips” on page 1062<br />
<strong>MYOB</strong> Help 429
Chapter 2<br />
Adding new activities<br />
4<br />
creating:activities;activities:creating<br />
To add an hourly, chargeable activity<br />
activities:creating:hourly/chargeable;chargeable activities;hourly activities<br />
The Activities List window should be displayed.<br />
1. Click the New button.<br />
2. Enter a unique number for the new activity in the Activity ID field.<br />
3. Enter the name of the new activity in the Activity Name field.<br />
4. Choose the Hourly selection in the Type field.<br />
5. Choose the Chargeable selection in the Status field.<br />
6. Choose the rate you want to use for this activity on activity slips in the Rate<br />
field. The rate is the price you charge for one unit of this activity.<br />
7. Enter a description for the activity in the Description field. If you want the<br />
description to appear on time billing invoices instead of the activity name,<br />
mark the Use Description On Sales selection.<br />
8. Enter the number of the account you want to use for tracking the income<br />
you receive from this activity in the Income Account field.<br />
9. Enter the tax code you want to use for this activity in Tax Code when Sold<br />
field.<br />
10. The default entry in the Unit of Measurement field is Hour. You can track<br />
time for this activity in fractions of an hour if you wish, but the unit of<br />
measure will remain Hour.<br />
11. If you chose Use Activity Rate in step 6, the Activity Rate field appears.<br />
Enter a rate for this activity in this field. The rate is the price you charge for<br />
one unit of this activity. The rate you enter will appear for this activity on<br />
activity slips.<br />
430 www.myob.com.au
Chapter 2 Adding new activities<br />
12. At this point, you’ve entered the activity’s profile. If you want to enter sales<br />
history for this activity, continue to Step 13.<br />
Otherwise, click the OK button to add the activity to your records and<br />
close the Activity Information window. The Activities List window will<br />
appear; the new activity will be displayed in the list.<br />
13. In the list that appears in the middle of the window, click the zoom arrow<br />
next to the activity whose history you want to add.<br />
14. Click the History tab.<br />
15. Enter the number of units, sales amounts, and cost of sales amounts for the<br />
months that occurred before you began using <strong>MYOB</strong> Premier in the table<br />
for the appropriate financial year. Use the zoom arrows in the upper right<br />
corner of the window to display the table for the correct financial year.<br />
When you’ve entered the activity’s history, click the OK button to add the<br />
activity to your records and close the Activity Information window. The<br />
Activities List window will appear; the new activity will be displayed in the<br />
list.<br />
Related topics<br />
“Creating activities” on page 425<br />
4<br />
To add a non-hourly, chargeable activity<br />
activities:creating:non-hourly/chargeable;non-hourly activities;chargeable activities<br />
The Activities List window should be displayed.<br />
1. Click the New button at the bottom of the window to open the Activity<br />
Information window.<br />
2. Enter a unique number for the new activity in the Activity ID field.<br />
3. Enter the name of the new activity in the Activity Name field.<br />
4. Choose the Non-hourly selection in the Type field.<br />
5. Choose the Chargeable selection in the Status field.<br />
6. Enter a description for the activity in the Description field. If you want the<br />
description to appear on time billing invoices instead of the activity name,<br />
mark the Use Description On Sales selection.<br />
<strong>MYOB</strong> Help 431
7. Enter the number of the account you want to use for tracking the income<br />
you receive from billing for this activity in the Income Account field.<br />
8. Enter the tax code you want to use for this activity in Tax Code when Sold<br />
field.<br />
9. Enter the unit by which you measure this activity. Some examples of nonhourly<br />
units of measure are week and kilometre.<br />
10. Enter a rate for this activity in the Activity Rate field. The rate is the price<br />
you charge for one unit of this activity. The rate you enter will appear for<br />
this activity on activity slips.<br />
11. At this point, you’ve entered the activity’s profile. If you want to enter sales<br />
history for this activity, continue to Step 12.<br />
Otherwise, click the OK button to add the activity to your records and<br />
close the Activity Information window. The Activities List window will<br />
appear; the new activity will be displayed in the list.<br />
12. In the list that appears in the middle of the window, click the zoom arrow<br />
next to the activity whose history you want to add.<br />
13. Click the History tab.<br />
14. Enter the number of units, sales amounts, and cost of sales amounts for the<br />
months that occurred before you began using <strong>MYOB</strong> Premier in the table<br />
for the appropriate financial year. Use the zoom arrows in the upper right<br />
corner of the window to display the table for the correct financial year.<br />
When you’ve entered the activity’s history, click the OK button to add the<br />
activity to your records and close the Activity Information window. The<br />
Activities List window will appear; the new activity will be displayed in the<br />
list.<br />
Related topics<br />
“Creating activities” on page 425<br />
4<br />
To add an hourly, non-chargeable activity<br />
activities:creating:hourly/non-chargeable;hourly activities;non-chargeable activities<br />
The Activities List window should be displayed.<br />
1. Click the New button at the bottom of the window to open the Activity<br />
Information window.<br />
432 www.myob.com.au
Chapter 2 Adding new activities<br />
2. Enter a unique number for the new activity in the Activity ID field.<br />
3. Enter the name of the new activity in the Activity Name field.<br />
4. Choose the Hourly selection in the Type field.<br />
5. Choose the Non-chargeable selection in the Status field.<br />
6. Enter a description for the activity in the Description field.<br />
7. The default entry in the Unit of Measurement field is Hour. You can change<br />
it, if you wish. If you track time for this activity in fractions of an hour, the<br />
unit of measurement should be Hour.<br />
8. At this point, you’ve entered the activity’s profile. Since you won’t have<br />
sales history to enter for an unchargeable activity, click the OK button to<br />
add the activity to your records and close the Activity Information window.<br />
The Activities List window will appear; the new activity will be displayed<br />
in the list.<br />
Related topics<br />
“Creating activities” on page 425<br />
4<br />
To add a non-hourly, non-chargeable activity<br />
activities:creating:non-hourly/non-chargeable;non-hourly activities;non-chargeable activities<br />
The Activities List window should be displayed.<br />
1. In the Click the New button at the bottom of the window to open the<br />
Activity Information window.<br />
2. Enter a unique number for the new activity in the Activity ID field.<br />
3. Enter the name of the new activity in the Activity Name field.<br />
4. Choose the Non-hourly selection in the Type field.<br />
5. Choose the Non-chargeable selection in the Status field.<br />
6. Enter a description for the activity in the Description field.<br />
7. Enter the unit by which you measure this activity. Some examples of nonhourly<br />
units of measure are week and kilometre.<br />
<strong>MYOB</strong> Help 433
At this point, you’ve entered the activity’s profile. Since you won’t have<br />
sales history to enter for an unchargeable activity, click the OK button to<br />
add the activity to your records and close the Activity Information window.<br />
The Activities List window will appear; the new activity will be displayed in<br />
the list.<br />
Related topics<br />
“Creating activities” on page 425<br />
434 www.myob.com.au
Chapter 3 Changing activities<br />
Chapter 3<br />
Changing activities<br />
changing:activities;activities:changing<br />
Changing activities<br />
4<br />
To change an activity’s information<br />
The Activities List window should be displayed.<br />
1. In the list that appears in the middle of the window, click the zoom arrow<br />
next to the activity whose information you want to change. The Activity<br />
Information window appears, displaying the Profile tab. This tab contains<br />
basic information assigned to the item.<br />
2. Make the changes you want in the Activity Profile tab.<br />
3. If you want to make changes to the activity’s history, click the History tab.<br />
To retain the existing history, skip to step 4.<br />
Make any changes to the number of units, sales amounts and cost of sales<br />
amounts for the appropriate financial year or years. Use the zoom arrows<br />
in the upper right corner of the window to display the table for the correct<br />
financial year.<br />
4. Click OK in the Activity Information window.<br />
Related topics<br />
“Creating activities” on page 425<br />
<strong>MYOB</strong> Help 435
Chapter 4<br />
Deleting or inactivating<br />
activities<br />
deleting:activities;activities:deleting;inactivating:activities;activities:inactivating<br />
Inactivating activities<br />
4<br />
To inactivate or reactivate an activity<br />
The Activities List window should be displayed.<br />
1. Click the zoom arrow next to the name of the activity you want to<br />
inactivate (or reactivate). The Activity Information window appears,<br />
displaying the activity you selected.<br />
2. Mark the box in front of Inactive Activity. (To return the activity to active<br />
status, simply remove the mark.)<br />
Related topics<br />
“Deleting or inactivating activities” on page 429<br />
Deleting activities<br />
4<br />
To delete an activity<br />
deleting:activities;activities:deleting<br />
The Activities List window should be displayed.<br />
1. In the list in the middle of the window, locate the activity you want to<br />
delete, then click the zoom arrow next to it. The Activity Information<br />
window appears, displaying the activity’s profile information.<br />
2. From the Edit menu, choose Delete Activity to delete the activity.<br />
Related topics<br />
“Deleting or inactivating activities” on page 429<br />
436 www.myob.com.au
Chapter 5 Activity Slips Overview<br />
Chapter 5<br />
Activity Slips Overview<br />
Activity Slips Overview;overview:Activity Slips;time billing: activity slips, See activity slips<br />
Activity slips are the principal records of the <strong>Time</strong> <strong>Billing</strong> Command Centre.<br />
Activity slips provide a record of the activities your company has performed<br />
for your customers and are used in the preparation of time billing invoices.<br />
Information from your activity slips also forms the basis of many time<br />
billing reports.<br />
Creating activity slips<br />
activity slips:creating<br />
Activity slips provide a record of the activities your company has performed<br />
for your customers. You should create an activity slip every time your<br />
company performs an activity. When you bill your customer using time<br />
billing invoices, you use your activity slip records to prepare the line items<br />
on your invoices. The information on activity slips is also used on many<br />
time billing reports, and can be useful for tracking your employees’ time.<br />
There are two ways to enter activity slips. Use the Single Slip Entry view to<br />
record the most detail possible for each slip. If you want to record several<br />
activity slips at once, or if you require a little less detail on your activity<br />
slips, use the Multiple Slip Entry view.<br />
Step by step<br />
“To add an hourly, chargeable activity” on page 430<br />
“To add a non-hourly, chargeable activity” on page 431<br />
“To add an hourly, non-chargeable activity” on page 432<br />
“To add a non-hourly, non-chargeable activity” on page 433<br />
Related topics<br />
“Creating multiple activity slips” on page 441<br />
Entering cards for an activity<br />
activity slips:entering:cards and an activity<br />
When you create an activity slip, you can enter two cards. The first card<br />
identifies the employee or supplier who actually performed the activity for<br />
your company. The second identifies the customer for whom your company<br />
performed the activity. If you’re creating an activity slip for a chargeable<br />
activity, you must enter both cards.<br />
<strong>MYOB</strong> Help 437
The Rate field appears when you enter a chargeable activity. The rate is<br />
what you charge your customers for one hour (or other billing unit) of the<br />
activity. A rate should appear in the field automatically.<br />
You can set up separate billing rates for activities, for employees and<br />
suppliers, and for customers. Indicate which rate you want to use in the<br />
Activity Information window.<br />
Step by step<br />
“To add an hourly, chargeable activity” on page 430<br />
“To add a non-hourly, chargeable activity” on page 431<br />
“To add an hourly, non-chargeable activity” on page 432<br />
“To add a non-hourly, non-chargeable activity” on page 433<br />
Entering the units worked on an activity slip<br />
activity slips:entering:units worked<br />
The units entered on an activity slip are the hours (or other billing units)<br />
spent performing the activity. When you enter a chargeable activity on an<br />
activity slip, the unit of measurement you entered for the activity appears<br />
next to the Rate field.<br />
If you want to bill your customers for a number of units that is different<br />
from the number you recorded, you can use other fields in the Enter<br />
Activity Slip window to make adjustments before you create the bill.<br />
Clocking your time<br />
You can clock your elapsed time for hourly activities by using the timer in<br />
the Enter Activity Slip window. Just leave the Enter Activity Slip window<br />
open while you perform the activity and <strong>MYOB</strong> Premier will calculate units<br />
and enter them automatically on the activity slip. (“To enter units using the<br />
timer” on page 447)<br />
Using special units<br />
If your company tracks billable time in special units of 1, 6, 10, 12, 15 or 30<br />
minutes (as determined by your selections in the System view of the<br />
Preferences window), you can enter time in those units in the Enter Activity<br />
Slip window.<br />
For example, if your company bills for time in 12-minute units, one time<br />
billing unit will equal 12 minutes. To create a record for 18 minutes of time,<br />
you would enter 1.5 units (to indicate one unit of 12 minutes multiplied by<br />
1.5) on the activity slip.<br />
438 www.myob.com.au
Chapter 5 Activity Slips Overview<br />
In time billing windows throughout the Premier system, when you're<br />
viewing by hours/units, your entries will be displayed in the units you<br />
specify here. However, time billing invoices will display your billable units<br />
as whole hours.<br />
For example, assume you bill for time in 6-minute units, and you create an<br />
activity slip for 10 units. Then, you create an invoice in the Prepare <strong>Time</strong><br />
<strong>Billing</strong> Invoice window to bill for that activity slip in full; that is, to bill for<br />
all 10 units.<br />
Your invoice will display 1 in the Hrs/Units column of the line item for the<br />
activity. Your customer knows that you're billing for an hour of your time,<br />
even though you think of it as 10 six-minute units.<br />
Rounding <strong>Time</strong>r-Calculated <strong>Time</strong><br />
You can set a preference to round time clocked using the timer in the Enter<br />
Activity Slip window to a particular minute increment and choose to round<br />
Up To the Next, Down to the Previous or To the Nearest increment.<br />
For example, if you want to round the actual time you clock using the timer<br />
up to the next minute, choose Up To the Next and enter 1 in the field. That<br />
way, if you clock 21 minutes and 32 seconds of an activity, 22 minutes will<br />
be entered automatically in the Actual Units field.<br />
Step by step<br />
“To enter units on an activity slip” on page 446<br />
“To enter time in special billing units” on page 446<br />
“To enter units using the timer” on page 447<br />
“To round timer entries automatically” on page 447<br />
“To reset the timer” on page 448<br />
Entering a job and notes on an activity slip<br />
activity slips:entering:job and notes<br />
If you’re creating an activity slip for a chargeable activity, you can allocate<br />
the activity slip to a job. You can also enter notes for the activity slip. If you<br />
create time billing invoices using the Prepare <strong>Time</strong> <strong>Billing</strong> Invoice window,<br />
you can print activity slip notes on invoices.<br />
Step by step<br />
“To add an hourly, chargeable activity” on page 430<br />
“To add a non-hourly, chargeable activity” on page 431<br />
“To add an hourly, non-chargeable activity” on page 432<br />
“To add a non-hourly, non-chargeable activity” on page 433<br />
<strong>MYOB</strong> Help 439
Entering adjustments and billing information on activity slips<br />
activity slips:entering:adjustments and billing information<br />
Use the fields on the right side of the Enter Activity Slip window (Single<br />
Slip Entry view) to enter adjustment and billing information. The<br />
Adjustment fields are useful if you want to bill your customer for a number<br />
of hours or units that is different than the number you entered in the Units<br />
field. If you’ve already billed the customer on an invoice, even partially, you<br />
can enter the amount you’ve billed in the Already Billed fields.<br />
Making adjustments<br />
Both columns in the Adjustments fields show the same information, but in<br />
different terms. Entries in the left column are in hours or billing units.<br />
Entries in the right column, which appear only for chargeable activities, are<br />
currency amounts.<br />
You can enter adjustment units or amounts as negative numbers if you want<br />
to indicate fewer hours or a lesser amount. On activity slips for nonchargeable<br />
activities, you can enter adjustment units only. However,<br />
adjustments you enter on activity slips for non-chargeable activities are for<br />
your information only, since non-chargeable activities can’t be included on<br />
time billing invoices.<br />
You can change the billable units and amount for the activity slip by<br />
entering adjustment units or an adjustment amount in the Adjustment<br />
fields.<br />
Allowing for amounts already billed<br />
You’ll rarely have to enter an amount you’ve already billed when you’re<br />
creating a new activity slip, but you can enter units or an amount for which<br />
you’ve already billed the customer in the Already Billed fields. Your entry<br />
will be subtracted from the Billable units and amount. The total units and<br />
amount that haven’t been billed yet appear in the Left To Bill fields.<br />
If you’re viewing an activity slip you’ve previously created in the Enter<br />
Activity Slip window and you’ve created a time billing invoice for the<br />
activity slip, the amount you entered on the invoice will appear in the<br />
Already Billed fields.<br />
Step by step<br />
“To add an hourly, chargeable activity” on page 430<br />
“To add a non-hourly, chargeable activity” on page 431<br />
“To add an hourly, non-chargeable activity” on page 432<br />
“To add a non-hourly, non-chargeable activity” on page 433<br />
440 www.myob.com.au
Chapter 5 Activity Slips Overview<br />
Adding the activity slip to your records<br />
When you’ve entered all the information on an activity slip, you’re ready to<br />
add it to your <strong>MYOB</strong> Premier records. When you record an activity slip, it<br />
will appear on reports. If you entered a chargeable activity on the activity<br />
slip, it will be available for billing using Prepare <strong>Time</strong> <strong>Billing</strong> Invoice<br />
window.<br />
Step by step<br />
“To add an activity slip - Single Slip Entry” on page 445<br />
Creating multiple activity slips<br />
activity slips:creating multiple slips<br />
If you want to enter many activity slips at the same time or if you require a<br />
little less detail in your activity slip records, you can enter activity slips in<br />
the Multiple Slip Entry view of the Enter Activity Slip window.<br />
In the Multiple Slip Entry view, one line in the list represents one activity<br />
slip. Though this view allows you to enter a little less detail on the activity<br />
slip, you can still view any activity slip in Single Slip Entry view and enter<br />
more detail at a later time.<br />
Step by step<br />
“To add activity slips - Multiple Slip Entry” on page 449<br />
Reviewing activity slips<br />
activity slips:reviewing:activity slips<br />
If you record many activity slips, it’s likely that you’ll want to review your<br />
activity slip information at some point. The View Activity Log window<br />
allows you to locate and review information about the activity slips you’ve<br />
recorded. You can view activity slips recorded within a specific date range<br />
for any employee or supplier you select.<br />
Step by step<br />
“To review activity slip information” on page 451<br />
Changing activity slips<br />
activity slips:changing<br />
Occasionally, you may find it necessary to change an activity slip. If you<br />
enter activity slips in the Multiple Slip Entry view of the Enter Activity Slip<br />
window, you may want to go back and enter more detail for an activity slip<br />
at a later time, as well.<br />
When you’re making changes to activity slips you’ve previously recorded,<br />
remember the effects of changes to activity slips on other areas of your<br />
record keeping. If you change an activity slip after you’ve billed for it using a<br />
time billing invoice, your changes won’t be reflected in the Sales Journal.<br />
<strong>MYOB</strong> Help 441
Step by step<br />
“To change a single activity slip” on page 452<br />
“To change multiple activity slips” on page 452<br />
Deleting activity slips<br />
activity slips:deleting<br />
<strong>MYOB</strong> Premier allows you to delete an activity slip from your records.<br />
However, if you’ve already billed for an activity slip, partially or in full, you<br />
can’t delete it. You won’t be able to delete the activity slip until you’ve<br />
purged the time billing invoice on which it was billed.<br />
Step by step<br />
“To delete an activity slip” on page 454<br />
Entering activities and items for time billing sales<br />
entering:activities and items for time billing sales;time billing:entering activities and items on sales;work in progress;activities:entering:activities and items<br />
You can enter time billing activities and items from your items list (for<br />
which you’ve marked I Sell) on time billing sales. (To choose a time billing<br />
sale layout, click the Layout button in the Sales window.)<br />
Note: “Items can be entered on time billing invoices” on page 461<br />
Working in the <strong>Time</strong> <strong>Billing</strong> Command Centre, you’ll create activities and<br />
enter activity slips to track tasks or services provided by your company for<br />
which you can track costs and bill customers on time billing invoices.<br />
When it’s time to enter a sale, you can automatically enter the activity slips<br />
on a time billing invoice; you can enter activities automatically using the<br />
Work in Progress view of the Prepare <strong>Time</strong> <strong>Billing</strong> window.<br />
Warning: “<strong>Manual</strong>ly entered time billing activities are not included in<br />
many reports” on page 462<br />
Prepare <strong>Time</strong> <strong>Billing</strong> Invoice window<br />
Using the Prepare <strong>Time</strong> <strong>Billing</strong> Invoice window, you can bill for activity<br />
slips partially or in full. You can also enter adjustments to the billing<br />
amounts on the activity slips before you include them on the sale.<br />
Warning: “Make changes to activity slip information in the Prepare<br />
Invoice window before opening the Sales window” on<br />
page 461<br />
You can find the Prepare <strong>Time</strong> <strong>Billing</strong> Invoice window in two ways -- using<br />
the Work in Progress (WIP) feature in the <strong>Time</strong> <strong>Billing</strong> layout of the Sales<br />
window or the Prepare <strong>Time</strong> <strong>Billing</strong> Invoice feature in the <strong>Time</strong> <strong>Billing</strong><br />
Command Centre.<br />
442 www.myob.com.au
Chapter 5 Activity Slips Overview<br />
Step by step<br />
“To bill for time” on page 457<br />
Related topics<br />
“To enter activities and items on a time billing sale” on page 337 (using<br />
the Sales window)<br />
Tracking work in progress on your balance sheet<br />
time billing:work in progress;work in progress:tracking;WIP: See work in progress<br />
Work you’ve done for your clients but haven’t billed yet is called “work in<br />
progress". In <strong>MYOB</strong> Premier, work in progress is represented by activity<br />
slips for chargeable activities you haven’t yet included on time billing<br />
invoices. Any activity slip that doesn’t have $0.00 or 0 units left to bill is<br />
considered work in progress.<br />
When you bill your clients on time billing invoices, your accounting records<br />
will reflect the sales transactions for the activities you’ve performed.<br />
However from an accounting perspective, even if you haven’t billed your<br />
clients yet, your clients owe you money as soon as an activity slip is<br />
recorded.<br />
Activity slips are Premier’s records of work in progress, but they don’t reflect<br />
the value of your work in progress automatically. Accounting entries are<br />
assigned to your linked accounts automatically when activity slips are billed<br />
on a time billing invoice. If your work in progress routinely represents a<br />
significant amount of money, you should consider adjusting your<br />
accounting records to reflect it.<br />
Step by step<br />
“To adjust your books for work in progress” on page 455<br />
<strong>Billing</strong> for time<br />
time billing:entering sales;billing:for time;sales:entering:time billing invoices<br />
When you’re ready to bill your customer for time, you can easily and<br />
automatically enter the sale of activities and items. The activities are those<br />
for which you’ve entered information in the Activity Information window.<br />
The items are those in your Items List that you’ve marked “I Sell".<br />
Note: “Items can be entered on time billing invoices” on page 461<br />
You can enter time billing sales by using either:<br />
• The Prepare <strong>Time</strong> <strong>Billing</strong> Invoice feature of the <strong>Time</strong> <strong>Billing</strong> Command<br />
Centre<br />
-- OR --<br />
<strong>MYOB</strong> Help 443
• The Work in Progress feature in the <strong>Time</strong> <strong>Billing</strong> layout of the Sales<br />
window.<br />
Step by step<br />
“To bill for time” on page 457<br />
Related topics<br />
“To enter activities and items on a time billing sale” on page 337 (using<br />
the Sales window)<br />
“To enter time billing payment details” on page 459<br />
“To store a recurring time billing template” on page 460<br />
444 www.myob.com.au
Chapter 6 Adding activity slips -- Single Slip Entry<br />
Chapter 6<br />
Adding activity slips --<br />
Single Slip Entry<br />
4<br />
To add an activity slip - Single Slip Entry<br />
activity slips:adding;activities:activity slips See activity slips<br />
The Single Slip view of the Enter Activity Slip window should be displayed.<br />
1. Enter the name of the employee or supplier who performed the activity.<br />
2. Review the default date and slip ID; you can change them if necessary.<br />
3. Enter the name of the customer for whom the work was done.<br />
4. Select the activity ID for the type of activity that was performed. (Entering<br />
cards for an activity)<br />
5. Enter the number of units of work that was completed. Depending upon<br />
the type of activity you’ve selected, this could be hourly increments,<br />
kilometres, pages copied or faxed, or something similar. (Entering the units<br />
worked on an activity slip)<br />
6. If the activity is chargeable, review the default billing rate that appears and<br />
change it if necessary. You can also assign a job number to the chargeable<br />
activity.<br />
7. Enter any notes you want to include on your time billing invoice. (Entering<br />
a job and notes on an activity slip)<br />
8. Review the calculated billable units and amounts on the right side of the<br />
window. Make any needed adjustments. To reduce the billable hours (or<br />
hours billed) enter the amount of the reduction as a negative number. The<br />
dollar amount will be calculated for you; you can change it if needed.<br />
(Entering adjustments and billing information on activity slips)<br />
The Already Billed fields are for your reference only. Any changes you<br />
<strong>MYOB</strong> Help 445
make here won’t appear in the Sales journal or in the activity’s history.<br />
9. Click Record. (Adding the activity slip to your records)<br />
4<br />
Note: “You can record an activity slip by changing views” on page 462<br />
To enter units on an activity slip<br />
For an hourly activity: In the Units field, enter the number of hours you<br />
spent performing the activity. You can enter parts of a unit in this field: for<br />
example, enter 1.5 if you performed one and one-half units of work.<br />
For a non-hourly activity: In the Units field, enter the number of billing<br />
units you spent performing the activity. You can enter decimals in this field.<br />
Your non-hourly unit might be “day” or “week". You can enter an activity’s<br />
unit of measurement in the Activity Information window.<br />
4<br />
Related topics<br />
“Entering the units worked on an activity slip” on page 438<br />
“To enter time in special billing units” on page 446<br />
“To enter units using the timer” on page 447<br />
“To round timer entries automatically” on page 447<br />
“To reset the timer” on page 448<br />
To enter time in special billing units<br />
1. Choose Preferences from the Setup menu to open the Preferences window.<br />
Click the System tab.<br />
2. Mark the For <strong>Time</strong> <strong>Billing</strong>, Enter <strong>Time</strong> In Special __ Minute <strong>Billing</strong> Units<br />
selection and choose the unit of time you want to use from the list.<br />
3. Click OK.<br />
Any activity slips you’ve previously entered with whole hour billing units<br />
won’t be affected by this change. You may want to change the unit of<br />
measurement for your hourly activities in the Activity Information window<br />
to suggest your new billing unit. However, don’t change the Type for your<br />
activities from Hourly to Non-hourly, because your billing unit is still based<br />
on an hour.<br />
Related topics<br />
“Entering the units worked on an activity slip” on page 438<br />
“To enter units on an activity slip” on page 446<br />
“To enter units using the timer” on page 447<br />
“To round timer entries automatically” on page 447<br />
“To reset the timer” on page 448<br />
446 www.myob.com.au
Chapter 6 Adding activity slips -- Single Slip Entry<br />
4<br />
To enter units using the timer<br />
timer:using for time billing;activity slips:timer;time billing:timer<br />
The timer is displayed on activity slips for hourly activities only.<br />
1. Click the Start button. If you haven’t entered a time in the Start <strong>Time</strong> field,<br />
your computer’s current system time appears there and the timer begins<br />
ticking in the Elapsed <strong>Time</strong> field. The Start button becomes the Stop<br />
button.<br />
If you enter a start time that is before the current system time, the<br />
difference will be added to the elapsed time measured by the timer.<br />
2. Leave the Enter Activity Slip window open to allow the timer to progress<br />
in the Elapsed <strong>Time</strong> field as you perform the activity.<br />
3. Click the Stop button when you’ve completed the activity. The timer stops<br />
ticking and the current system time appears in the Stop <strong>Time</strong> field. The<br />
elapsed time is entered automatically in the Units field. The Stop button<br />
becomes the Start button.<br />
You can edit the start and stop times, if you want. The entries in the Units<br />
and Elapsed <strong>Time</strong> fields will be updated automatically.<br />
4. Click the Start button again if you want to resume timing an activity. The<br />
entries in the Units and Stop <strong>Time</strong> fields will be cleared. The timer will<br />
continue ticking, starting from your current elapsed time.<br />
5. Follow steps 3 and 4 until you’ve finished timing the activity.<br />
4<br />
Related topics<br />
“Entering the units worked on an activity slip” on page 438<br />
“To enter units on an activity slip” on page 446<br />
“To enter time in special billing units” on page 446<br />
“To round timer entries automatically” on page 447<br />
“To reset the timer” on page 448<br />
To round timer entries automatically<br />
timer:rounding units;activity slips:timer:rounding units<br />
1. Choose Preferences from the Setup menu to open the Preferences window.<br />
2. Click the System tab.<br />
3. Mark the Round <strong>Time</strong>r-Calculated <strong>Time</strong> selection.<br />
<strong>MYOB</strong> Help 447
4. Choose to round Up To Next, Down To Previous or To Nearest, then enter<br />
the increment.<br />
5. Click OK.<br />
4<br />
Related topics<br />
“Entering the units worked on an activity slip” on page 438<br />
“To enter units on an activity slip” on page 446<br />
“To enter time in special billing units” on page 446<br />
“To enter units using the timer” on page 447<br />
“To reset the timer” on page 448<br />
To reset the timer<br />
timer:resetting;activity slips:timer:resetting<br />
The timer is displayed on activity slips for hourly activities only.<br />
Click the Clear button at any time to set the elapsed time to 0:00:00 and<br />
clear the Start <strong>Time</strong>, Stop <strong>Time</strong> and Units fields.<br />
Related topics<br />
“Entering the units worked on an activity slip” on page 438<br />
“To enter units on an activity slip” on page 446<br />
“To enter time in special billing units” on page 446<br />
“To enter units using the timer” on page 447<br />
“To round timer entries automatically” on page 447<br />
448 www.myob.com.au
Chapter 7 Adding multiple activity slips<br />
Chapter 7<br />
Adding multiple activity<br />
slips<br />
Creating activity slips in Multiple Slip Entry<br />
View<br />
4<br />
To add activity slips - Multiple Slip Entry<br />
activity slips:creating multiple slips<br />
The Enter Activity Slip window should be displayed.<br />
1. Click the Multiple Slip Entry tab.<br />
2. Enter the name of the employee who performed the activities you want to<br />
include on these activity slips in the Employee field. You also can click the<br />
search icon and choose the employee’s name from the list that appears. If<br />
you’re creating activity slips for activities performed by a supplier, you can<br />
enter a supplier card in this field.<br />
If you’ve entered activity slips for the card you enter, they appear in the list.<br />
Each line in the list represents one activity slip.<br />
3. On the first blank line, enter the date of the next activity slip you want to<br />
create in the Date field.<br />
4. Enter the name of the customer for whom your company performed the<br />
activity in the Customer field. If you’re creating an activity slip for a<br />
chargeable activity, you must enter a customer card.<br />
5. Enter the ID number of the activity your company performed in the<br />
Activity field.<br />
6. Enter the number of hours or units of the activity your company performed<br />
in the Units field.<br />
<strong>MYOB</strong> Help 449
7. In the Rate field, a rate should appear if you’ve entered a chargeable<br />
activity. The rate is the amount you charge for one hour or one unit of the<br />
activity. You can change the rate that appears, or enter a rate, if none is<br />
displayed.<br />
8. Enter any notes you want to record on the activity slip in the Notes field.<br />
9. Enter the number of a job to which you want to allocate the activity slip in<br />
the Notes field.<br />
10. Press the TAB key to record the activity slip and move the insertion point to<br />
the next line, where you can begin creating a new activity slip for the<br />
employee (or supplier) you entered in the Employee (or Supplier) field.<br />
Note: “Activity slips are recorded as you create them” on page 461<br />
11. Follow steps 4 to 10 for each activity slip you want to create.<br />
12. Click Cancel to close the window.<br />
Related topics<br />
“Creating multiple activity slips” on page 441<br />
450 www.myob.com.au
Chapter 8 Reviewing activity slips<br />
Chapter 8<br />
Reviewing activity slips<br />
Reviewing activity slip information<br />
4<br />
To review activity slip information<br />
activity slips:reviewing:summaries<br />
The View Activity Log window should be displayed.<br />
1. Enter the name of the employee whose activity slips you want to review in<br />
the Employee field. You also can click the search icon and choose the<br />
employee’s card from the list that appears. If you want to review activity<br />
slips for a supplier, enter the supplier’s card.<br />
2. Enter the date range for which you want to review activity slip information<br />
in the Dated From/To fields. A list of activity slips for the card and date<br />
range you entered appears. The list shows summary information for each<br />
activity slip.<br />
3. Click the Detail View tab to view billing information for each activity slip.<br />
<strong>Billing</strong> information in the Detail View tab is displayed in hours or units.<br />
4. To view an activity slip in the Enter Activity Slip window, highlight it and<br />
then click Edit.<br />
Related topics<br />
“Reviewing activity slips” on page 441<br />
<strong>MYOB</strong> Help 451
Chapter 9<br />
Changing activity slips<br />
Changing and adding detail to activity slips<br />
4<br />
To change a single activity slip<br />
activity slips:changing:a single slip<br />
The View Activity Log window should be displayed.<br />
1. In the Employee field, enter the name of the employee whose activity slip<br />
you want to change. (You also can click the search icon and choose the<br />
employee’s card from the list that appears.) If you want to change an<br />
activity slip for a supplier, enter the supplier’s card.<br />
2. In the Dated From/To fields, enter the date range during which the activity<br />
slip you want to change was recorded. A list of activity slips for the card<br />
and date range you entered appears.<br />
3. Highlight the activity slip you want to change and then click Edit. The<br />
activity slip is displayed in the Single Slip Entry view of the Enter Activity<br />
Slip window.<br />
4. Make any changes you want on the activity slip and click OK.<br />
4<br />
Related topics<br />
“Deleting activity slips” on page 442<br />
“Creating activity slips” on page 437<br />
“Changing activity slips” on page 441<br />
To change multiple activity slips<br />
activity slips:changing:multiple slips<br />
The Enter Activity Slip window should be displayed.<br />
1. Click the Multiple Slip Entry tab.<br />
2. Enter the name of the employee whose activity slip you want to change in<br />
the Employee field. (You also can click the search icon and choose the<br />
employee’s card from the list that appears.) If you want to change an<br />
activity slip for a supplier, enter the supplier’s card. All the activity slips<br />
you’ve created for the card you enter appear in the list.<br />
452 www.myob.com.au
Chapter 9 Changing activity slips<br />
3. Enter any changes you want to make to any activity slip in the list.<br />
4. Click Record.<br />
5. If you want to enter more details about an activity slip, click the zoom<br />
arrow in the Date field for that activity slip. The activity slip is displayed in<br />
the Single Slip Entry view.<br />
6. Enter or change any information you want on the activity slip in Single<br />
Slip Entry view.<br />
7. Click the Multiple Slip Entry tab to record your entries and return to the<br />
list of activity slips in the Multiple Slip Entry view.<br />
8. Click Cancel to close the Enter Activity Slip window.<br />
Related topics<br />
“Changing activity slips” on page 441<br />
<strong>MYOB</strong> Help 453
Chapter 10<br />
Deleting activity slips<br />
4<br />
To delete an activity slip<br />
The View Activity Log window should be displayed.<br />
1. Enter the name of the employee whose activity slip you want to delete in<br />
the Employee field. You also can click the search icon and choose the<br />
employee’s card from the list that appears. If you want to delete an activity<br />
slip for a supplier, enter the supplier’s card.<br />
2. Enter the date range during which the activity slip you want to delete was<br />
recorded in the Dated From/To fields. A list of activity slips for the card<br />
and date range you entered appears.<br />
3. Highlight the activity slip you want to delete.<br />
4. Choose Delete Activity Slip from the Edit menu.<br />
Related topics<br />
“Deleting activity slips” on page 442<br />
454 www.myob.com.au
Chapter 11 Tracking work in progress on your balance sheet<br />
Chapter 11<br />
Tracking work in<br />
progress on your<br />
balance sheet<br />
Adjusting your accounting records to reflect<br />
work in progress<br />
4<br />
To adjust your books for work in progress<br />
1. Create two new accounts in your accounts list: an income account called<br />
“Work in Progress - Income", and an asset account called “Work in<br />
Progress — Accrued". See “Creating accounts” on page 188 for more<br />
information.<br />
2. At the end of every month, print an Activity Slip [Activity Summary]<br />
report. Using report customisations, be sure to include all activities on the<br />
report and enter the dates of the first and last day of the current month in<br />
the Dated From and To fields. (“Choosing what to do with the report” on<br />
page 801)<br />
When you print the report with this information, the total in the Balance $<br />
column is your month-end work in progress amount.<br />
3. Create a general journal entry to enter the value of this month’s work in<br />
progress in your books in the following manner:<br />
a. Enter the date of the last day of the current month in the Date field.<br />
b. Enter the month-end work in progress amount from the report you<br />
printed in step 2 as a credit to the Work in Progress — Income account.<br />
<strong>MYOB</strong> Help 455
c. On the next line, balance the transaction by entering the same amount<br />
as a debit to the Work in Progress — Accrued account.<br />
d. Record the transaction.<br />
This entry increases your income on your profit & loss statement and<br />
increases the value of your assets on your balance sheet to reflect the<br />
month-end value of your work in progress. See “Creating General Journal<br />
entries” on page 171 for more information.<br />
Hint: “Save the WIP general journal entry as a recurring<br />
transaction” on page 462<br />
4. At the end of the next month, create another general journal entry to<br />
reverse the first one:<br />
a. Enter the date of the first day of the current month in the Date field.<br />
b. Enter the month-end work in progress amount from the report you<br />
printed in step 2 as a debit to the Work in Progress — Income account.<br />
c. On the next line, balance the transaction by entering the same amount<br />
as a credit to the Work in Progress — Accrued account.<br />
d. Record the transaction.<br />
5. Follow steps 2 to 4 every month. Your books will show the value of your<br />
work in progress.<br />
Related topics<br />
“Tracking work in progress on your balance sheet” on page 443<br />
456 www.myob.com.au
Chapter 12 <strong>Billing</strong> for time<br />
Chapter 12<br />
<strong>Billing</strong> for time<br />
4<br />
To bill for time<br />
activity slips:billing for time;time billing;creating:time billing sales<br />
1. Display the Work In Progress view of the Prepare <strong>Time</strong> <strong>Billing</strong> Invoice<br />
window:<br />
a. Click Prepare <strong>Time</strong> <strong>Billing</strong> Invoice in the <strong>Time</strong> <strong>Billing</strong> Command<br />
Centre.<br />
b. Highlight the customer you want to bill and click OK.<br />
-- OR --<br />
a. Select Enter Sales in the Sales Command Centre and enter or select a<br />
card in the Customer field.<br />
b. If the <strong>Time</strong> <strong>Billing</strong> layout isn’t displayed already, click the Layout<br />
button and select <strong>Time</strong> <strong>Billing</strong>. Then click the WIP (Work in Progress)<br />
button.<br />
2. Choose to view activity slips for all employees or suppliers, for a specific<br />
employee or supplier, for all jobs or for a specific job.<br />
3. The default view of this window is Work in Dollars. Mark the Work In<br />
Hrs/Units selection if you prefer an alternate view of the billing<br />
information. You can change this selection at any time as you work in this<br />
window.<br />
4. In the Bill column, enter the amount you want to bill for each of the<br />
activity slips that will be included on the invoice. If you want to raise or<br />
lower the billable amount for any activity slip, make an entry in the<br />
Adjustment column. Any activity slip with 0.00 units or $0.00 in the Left to<br />
Bill field is considered billed in full.<br />
5. Mark the Consolidate Activities On Invoice selection if you've billed<br />
activity slips for the same activity and job number and you want those<br />
activity slips to appear as a single line item on the invoice.<br />
<strong>MYOB</strong> Help 457
6. Mark the Use Activity Slip Notes Instead of Activity Name/Description On<br />
Invoice selection if you want the notes you entered in the Enter Activity<br />
Slip window for each activity slip to appear on the invoice.<br />
7. Click the Prepare Invoice button. The Sales window appears and the<br />
activity slips you selected in the Prepare <strong>Time</strong> <strong>Billing</strong> Invoice window are<br />
displayed.<br />
Note: “Items can be entered on time billing invoices” on page 461<br />
8. If you also want to bill customers for items along with your activity slips,<br />
enter the item number in the Activity column. Enter the number of items<br />
you're selling in the Hrs/Units column and the amount of each item in the<br />
Rate column.<br />
9. Bill the customer for reimbursable expenses if necessary. (“To bill a<br />
customer for reimbursable expenses” on page 762)<br />
10. Review the default entries that appear in the lower part of the window and<br />
make any changes that are needed. (“Additional information in the time<br />
billing Sales window” on page 458 and “To enter time billing payment<br />
details” on page 459)<br />
11. If you want to print the invoice, click the Print button. Otherwise, click<br />
Record. You can print the invoice later if you like, using the Print Invoices<br />
window.<br />
Related topics<br />
“<strong>Billing</strong> for time” on page 443<br />
Additional information in the time billing Sales window<br />
The <strong>Time</strong> <strong>Billing</strong> layout of the Sales window should be open. You can make<br />
many of the same entries on a time billing invoice as you do on other sales<br />
layouts.<br />
The default status of the sale is Invoice. You can change the status to a<br />
quote or order, if you wish. To do this, click the arrow in the upper left<br />
corner of the Sales window and select Quote or Order.<br />
The actual fields that appear at the bottom of the Sales window may be<br />
filled in automatically if you selected default entries in the customer’s card<br />
file. All the following fields are optional; complete only those that apply to<br />
the sale you’re entering:<br />
• Salesperson<br />
458 www.myob.com.au
Chapter 12 <strong>Billing</strong> for time<br />
• Comment<br />
• Promised Date<br />
• Journal Memo<br />
• Referral Source<br />
• Paid Today<br />
• Payment Method<br />
• Already Printed or Sent<br />
To add, edit or delete menu options in the Select From Lists for the<br />
Comment, Referral Source or Payment Methods fields, see “To add or edit<br />
Sales/Purchases Information” on page 344 or “To delete Sales/Purchases<br />
Information” on page 344.<br />
4<br />
Related topics<br />
“To bill for time” on page 457<br />
To enter time billing payment details<br />
The <strong>Time</strong> <strong>Billing</strong> layout of the Sales window should be open.<br />
Click the Details button to enter additional information about the<br />
customer’s payment in the Applied Payment Details window, if you wish.<br />
You can deposit the amount listed in the Paid Today field into either a<br />
designated account or the Undeposited Funds Account.<br />
If you want, you can change the Deposit to Account account by selecting<br />
Linked Accounts from the Setup menu. Choose Sales Accounts to display<br />
the Sales Linked Accounts window. Enter an account that is a bank<br />
account type in the bank Account for Customer Receipts field.<br />
To change the Undeposited Funds Account, select Linked Accounts from<br />
the Setup menu. Choose General Ledger to display the General Ledger &<br />
Banking Linked Accounts window. Enter an account that is a bank account<br />
type in the Bank Account for Undeposited Funds field.<br />
Related topics<br />
“<strong>Billing</strong> for time” on page 443<br />
<strong>MYOB</strong> Help 459
4<br />
To store a recurring time billing template<br />
Note: “No new activity slips will be created when you use the recurring<br />
template” on page 462<br />
1. Click the Save Recurring button to open the Save Recurring Template<br />
window.<br />
2. Enter the necessary information about the template in this window.<br />
3. Click Record to close the Save Recurring Template window.<br />
4. Click the Record button in the Sales window if you want to record the sale<br />
as an actual transaction now. Click the Cancel button if you don’t want to<br />
record the sale at this time.<br />
Related topics<br />
“<strong>Billing</strong> for time” on page 443<br />
460 www.myob.com.au
Chapter 13 Activity slips notes and warnings<br />
Chapter 13<br />
Activity slips notes and<br />
warnings<br />
Activity slips are recorded as you create them<br />
In the Multiple Slip Entry view of the Enter Activity Slip window, an<br />
activity slip is recorded when you press the TAB key to move the insertion<br />
point to the next line. When a zoom arrow appears in the Date field of an<br />
activity slip in the list, it is considered recorded. If you enter a new activity<br />
slip and click Cancel after you’ve advanced to the next line in the list, the<br />
activity slip won’t be deleted. See “Deleting activity slips” on page 442 for<br />
more information.<br />
If you’ve entered the minimum required information on an activity slip, but<br />
haven’t moved to the next line in the list, you can record the activity slip by<br />
clicking Record or by clicking the Single Slip Entry tab.<br />
Items can be entered on time billing invoices<br />
In order to include both activities and items on a time billing invoice, you<br />
must mark “I Include Items on <strong>Time</strong> <strong>Billing</strong> Invoices” in the System view of<br />
the Preferences window.<br />
Be aware that volume discounts for customers and quantity discounts for<br />
items don’t apply to items when the items are entered on time billing<br />
invoices.<br />
Make changes to activity slip information in the Prepare Invoice<br />
window before opening the Sales window<br />
You should make any changes you wish to activity slips before you click the<br />
Prepare Invoice button in the Work in Progress view of the Prepare <strong>Time</strong><br />
<strong>Billing</strong> window.<br />
If you make changes to or delete a line item of activity slip information after<br />
it has been added to a sale, those changes or deletions won’t be reflected in<br />
the original activity slip. Because of this, time billing reports based upon<br />
activity slip records may be inaccurate.<br />
<strong>MYOB</strong> Help 461
Warning: Make changes to activity slip information in the Prepare Invoice window before opening the Sales window<br />
<strong>Manual</strong>ly entered time billing activities are not included in many<br />
reports<br />
Although you can enter activities on a time billing invoice manually, no<br />
activity slip records will exist for the activities you include. Many time<br />
billing reports are based on activity slip records, so you should enter<br />
activities automatically using the Work in Progress view of the Prepare <strong>Time</strong><br />
<strong>Billing</strong> Invoice window instead.<br />
No new activity slips will be created when you use the recurring<br />
template<br />
You can store time billing invoices as recurring sales, but no activity slips<br />
will be created when you use the recurring sale in the future. You won’t be<br />
able to review activity slip information in the View Activity Log window<br />
without creating an activity slip.<br />
Recording the recurring sale also won’t update the activity slips you used to<br />
create the sale in the Prepare <strong>Time</strong> <strong>Billing</strong> Invoice window. Transactions<br />
recorded from a recurring template won’t appear in activity slip reports.<br />
Save the WIP general journal entry as a recurring transaction<br />
Save the general journal entry as a recurring entry called “WIP, Monthly<br />
Entry". Then, you can use it every month to enter the value of your work in<br />
progress. You’ll have to change only the amounts before you record it.<br />
You can record an activity slip by changing views<br />
If you click the Multiple Slip Entry tab while creating an activity slip and<br />
you’ve entered the minimum required information in Single Slip Entry view,<br />
the activity slip will be recorded before the new tab is displayed.<br />
462 www.myob.com.au


