
Create successful ePaper yourself
Turn your PDF publications into a flip-book with our unique Google optimized e-Paper software.
Deutsch<br />
WORKSHOP <strong>2011</strong><br />
DISC BRAKES<br />
Italiano<br />
Nederlands<br />
<strong>English</strong><br />
Francais<br />
THE PASSION PEOPLE<br />
www.magura.com<br />
Español
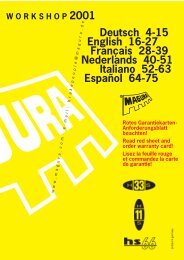
Our disc brake range | recommended use<br />
Ground contact<br />
isn’t that important<br />
to you. There is<br />
(almost), no terrain<br />
where a Freerider<br />
won’t go. Tough and<br />
stable components<br />
are amust have.<br />
Here they are.<br />
There are bikers<br />
out therefor whom<br />
uphill is just a<br />
means to an end.<br />
The downhill fun<br />
is having absolute<br />
priority for them.<br />
With lots of travel<br />
and robust components<br />
the Enduros<br />
must cope with<br />
technically hairy<br />
downhills and bikepark<br />
weekends..<br />
You’re an all-rounder.<br />
You love long<br />
and sweeping trails,<br />
up as well as down.<br />
The optimummix<br />
of light weight and<br />
stability is the hall<br />
mark of your All<br />
Mountain components<br />
meant for<br />
abroad spectrum<br />
of use.<br />
Mile after mile over<br />
the dusty trails as<br />
well ashard fast tarmac.<br />
On every ride<br />
your bike shouldbe<br />
the epitome of<br />
uncomplicated<br />
– and naturally<br />
the parts for your<br />
X-country adventures<br />
shouldn’t cost<br />
the earth.<br />
Race-orientated<br />
means for us the<br />
minimum weight<br />
that is technically<br />
possible. Every<br />
gram extra weight<br />
can be the decisive<br />
factor between<br />
winning or losing<br />
for you, the racer<br />
maniac.<br />
FREERIDE ENDURO ALL MOUNTAIN X-COUNTRY XC RACE<br />
Gustav M<br />
Gustav M<br />
Marta FR 203/203<br />
Marta SL Magnesium 203/203<br />
Marta SL Magnesium 180/180<br />
Marta SL Magnesium 160/160<br />
Marta SL 203/203<br />
Marta SL 180/180<br />
Marta SL 160/160<br />
Marta 203/203<br />
Marta 180/180<br />
Marta 160/160<br />
Marta FR 203/203<br />
Marta SL Magnesium 203/203<br />
Marta SL Magnesium 180/180<br />
Marta SL 203/203<br />
Marta SL 180/180<br />
Marta 203/203<br />
Marta 180/180<br />
Marta SL Magnesium 160/160<br />
Marta SL 160/160<br />
Marta 160/160<br />
Louise 203/203<br />
Louise 180/180<br />
Louise 160/160<br />
Louise 203/203<br />
Louise 180/180<br />
Louise 160/160<br />
Julie HP 203/203<br />
Julie HP 180/180<br />
Julie HP 160/160<br />
Julie HP 203/203<br />
Julie HP 180/180<br />
Julie HP 160/160<br />
Specifications subject to change<br />
without prior notice<br />
THE PASSION PEOPLE<br />
www.magura.com<br />
2
Table of Contents<br />
1. Introduction 4<br />
2. Safety instructions before the first ride 5<br />
3. Safety instructions before every ride 5-6<br />
4. Transport of the bicycle 6<br />
5. Brake installation 7-10<br />
6. Shortening the hose 10-11<br />
7. Maintenance 12-13<br />
8. Repairs 14<br />
9. Bleeding and Filling 15-16<br />
10. The disc brake wheel 17<br />
11. Accessories 18<br />
12. Warranty 18<br />
13. Trouble Shooting 19<br />
14. Spare parts, tuning adaptors 20-21<br />
WARNING:<br />
This symbol means possible danger for your health and even life if you do not follow the<br />
instructions given respectively if the necessary safety measures are not followed.<br />
ATTENTION:<br />
This symbol warns you of inappropriate handling that might cause serious damage to the<br />
material and/ or the environment.<br />
NOTE:<br />
This symbol gives you additional information about the general handling of the<br />
product or gives hints to paragraphs in this manual which have to be read carefully.<br />
Español Italiano Nederlands Français <strong>English</strong> Deutsch<br />
3
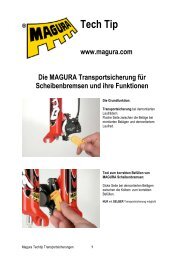
1. Welcome to the Passion People!<br />
Brake lever (master cylinder)<br />
MAGURA Julie HP<br />
Congratulations! You have purchased a<br />
fully hydraulic MAGURA disc brake proudly<br />
„Made in Germany“. You will be amazed<br />
at the awesome braking power and the<br />
minimum amount of maintenance that is<br />
necessary on our stoppers. Good to know<br />
that you are not alone, millions of riders<br />
worldwide rely on them and every day our<br />
numbers are increasing.<br />
Brake calliper and rotor<br />
MAGURA Julie HP<br />
On the fully hydraulic MAGURA disc brake system Julie HP the braking force is transmitted<br />
to the braking surface by a mineral oil column. The movement of the lever blade moves<br />
a piston, which is integrated in the brake lever (master cylinder). The piston pushes the<br />
mineral oil column through the brake hose in the direction of the brake calliper, where two<br />
pistons, on which the brake pads are fixed, are pushed out. The friction between the brake<br />
pads and the rotor slows down the bicycle and causes both the rotor and the brake calliper<br />
to heat up.<br />
Never touch either the rotor or the brake calliper after long braking as this may<br />
cause serious burns.<br />
You will be pleased to find out that the MAGURA Julie HP disc brakes offer a superior<br />
braking power even with little hand force applied, no matter what the weather conditions<br />
should be. Particularly in wet weather conditions disc brakes are much more responsive<br />
than rim brakes and transmit their enormous power immediately after activating the brake<br />
lever.<br />
Disc brakes dont’t wear your rims down. However, if they have been mounted incorrectly,<br />
they might cause a squealing noise during braking, mainly during wet weather conditions.<br />
This manual contains important information about the safe installation,<br />
operation and maintenance of your MAGURA disc brake. We urge you to read<br />
it carefully, become familiar with its contents and follow our recommendations to<br />
help make your new braking experience enjoyable and trouble free. Please note that<br />
the Louise brake is delivered in different versions with different rotor diameters and<br />
for different fitting alternatives for which we offer a variety of adaptors. The basic<br />
installations steps remain however always the same.<br />
Although the Julie HP disc brake system is relatively simple you should not overestimate<br />
your technical skills! We therefore advise you to leave the following operations<br />
to a trained technician of a professional bike shop.<br />
This manual is part of the product. Do not hand over the product to third parties<br />
without this manual. Technical specs are subject to change without prior notice.<br />
Should there be any further questions or problems we warmly recommend you to visit<br />
our website www.magura.com where you will always find the newest and hottest tips about<br />
all our products. On magura.com you can also download this manual in a<br />
convenient A4 format, in the forum you get free support around the clock. Stay tuned with<br />
the Passion People!<br />
Thank you for your confidence in our products, enjoy your ride and your new<br />
MAGURA disc stoppers!<br />
4
2. Before the first ride<br />
3. Before every ride<br />
1. Are you already familiar with hydraulic disc brakes Our brakes might be much more<br />
powerful than the stoppers on which you relied on so far.<br />
Take your bicycle to a safe area to learn the proper braking technique and operation of your<br />
new brakes and your bike.<br />
2. Check that the fornt brake is still actuated by the lever on the side your are<br />
used to braking with. Should this not be the case you wll have to train to your new<br />
setup, otherwise any unintended front wheel braking manoeuvre may cause an<br />
accident leading to possible serious injury! If in doubt get a trained technician to<br />
swap the hoses. For further hints concerning swapping of the brake hose see page 10<br />
onwards.<br />
3. New brakes and new rotors or brake pads must always be run in by<br />
braking at least 30 times from a speed of 30 km/h to achieve the maximum brake<br />
power. Take your bike to a safe place to run in the brake.<br />
4. While riding in extreme riding conditions (total weight of bike plus rider<br />
over 100 kg and/ or a gradient of more than 15 %) always use both brakes simultaneously<br />
to slow your bike down.<br />
5. Use your Julie HP disc brake according o the user chart on page 2 of this<br />
manual. Any misuse might cause serious accidents with fatal injuries to yourself<br />
and others!<br />
6. Are you familiar with the other components on your bike such as gears, clipless<br />
pedals and suspension units Always practise using your bike in a safe area to improve your<br />
handling abilities before using it on the road. Consult the user’s manual of your bike to learn<br />
more about this.<br />
7. For your own safety always wear a helmet when you ride a bicycle. Make sure as<br />
well that you wear suitable clothing and footwear.<br />
Always check carefully the following points:<br />
1. Always make sure that the quick release skewers of your wheels and seat post are<br />
correctly mounted and closed.<br />
incorrectly installed quick release skewers might cause the fixed items to<br />
become loose. Serious accidents with severe injury may result!!<br />
2. Always make sure that the brake lever pressure is o.k. by pulling the lever blade and<br />
ensuring that full braking performance is achieved before the lever blade touches the handlebars.<br />
If this is not the case, pull the lever blade several times (pump) until the brake pads<br />
touch the rotor.<br />
Español Italiano Nederlands Français <strong>English</strong> Deutsch<br />
Changing pressure points during a ride might be the result of having air in the brake<br />
system.<br />
See hints about filling and bleeding from on pages 15/16.<br />
5
3. Always make sure that the brake system does not have any leaks by activating the<br />
lever blade, holding it and checking the hose connections and reservoir cover for eventual<br />
leaks. (Also see page 11)<br />
4. Always protect your rotors and brake pads from oil and lubricants (e.g. by lubricating<br />
your chain). Avoid detergents and soap on the brake pads. Contaminating the pads with oil<br />
and lubricants will cause a permanent loss of braking power. Such contaminated pads can<br />
no longer be used and should be replaced! Clean a contaminated rotor with MAGURA disc<br />
cleaner, dishwater or alcool. See further hints about changing the brake pads on pages 12-<br />
13.<br />
5. Release your brake lever and check whether your wheel moves freely and without<br />
drag. Check eventually whether the wheels are correctly mounted and if the quick release<br />
skewers are tightened sufficiently. (Also see page 9)<br />
6. Are your tires in a good condition, and have they enough air pressure Test this<br />
with your fingers. Lift up your bike and turn the wheels of your bike. An insufficient rotation<br />
might be due to damaged tires, broken axles and/or broken spokes.<br />
7. Pick up your bike and let it drop from a moderate height. Listen for any rattling noises.<br />
If any are heard check the bearings and all screwed connections.<br />
8. Always follow the instructions given in the owner’s manual of your bicycle.<br />
Never use your bicycle if any of the points mentioned above relate to your<br />
bicycle! Consult a professional bike mechanic if you feel unsure. A faulty bicycle<br />
may result in serious accidents with possible fatal injuries of the rider! Be careful to<br />
check always to check the following points:<br />
4. Transport of the bicycle<br />
In case of a disc brake equipped bicycle you should always keep in mind the following<br />
points:<br />
Never activate the lever blade without the brake pads in place and the wheels<br />
mounted. In case this should have happened see page 10 of this manual.<br />
Never throw away the transport device, which has been delivered with the brake.<br />
Always clip it between the brake pads whenever the wheel is removed (e.g. transport<br />
of the bike).<br />
Always carefully remove wheels. Make sure that the rotors are not damaged, deformed<br />
or contaminated with lubricants.<br />
If the bike is transported upside-down squeeze (with mounted wheel or transport<br />
device!) the lever blade before, hold pressure and fix the blade in<br />
this position with a rubber band or a cable tie.<br />
During transport in an aircraft you can leave your brake as it is, e.g. you do not<br />
have to empty it.<br />
6
5. Brake Installation<br />
1. Tools for installation (+maintenance)<br />
8<br />
4<br />
3<br />
Allen key 2*, (3) and 5<br />
transport/mounting device*<br />
sharp knife<br />
8 mm open end wrench<br />
flat blade screw driver<br />
Torx T25 key*<br />
(Torx T7 key)<br />
(*delivered with the brake)<br />
Always insert the allen and torx keys completely to avoid damaging<br />
the bolt heads.<br />
6<br />
2<br />
5<br />
10<br />
Unpack your Julie HP disc brake:<br />
1. brake lever (master cylinder) connected through the<br />
2. brake hose with the<br />
3. brake caliper with transport device; ATTENTION:<br />
4. remove the transport device only shortly before installation of the wheel!<br />
5. rotor<br />
6. fitting bolts for rotor Torx T25 (6 pieces)<br />
7. fitting bolts for caliper Allen key 5 (2 pieces)<br />
8. adaptor with fitting bolts (depending on model)<br />
9. hose inserts (2 pieces)<br />
10. olives (2 pieces)<br />
11. Torx T25 key<br />
12. 2mm Allen key<br />
9<br />
12<br />
7<br />
1<br />
11<br />
Español Italiano Nederlands Français <strong>English</strong> Deutsch<br />
specifications modifying and improving this product are subject to<br />
change without prior notice.<br />
7
The brake levers and callipers of the different MAGURA disc brake models<br />
are completely different and not compatible! Never mix and match parts from the<br />
models. Any misuse might cause serious accidents!<br />
MAGURA manufacture these braking systems according to the valid standards and<br />
make many rigorous product tests. Because of the large variety of forks and frames available<br />
on the market it is impossible for MAGURA to test all possible combinations.<br />
If you mount any of our brake systems always make sure that the brakes are in conformity<br />
with the bicycle.<br />
Disc brake callipers can generate a lot of heat during extreme riding conditions.<br />
The resulting heat transfer from the calliper to the fork and/ or frame can have a<br />
negative influence on the mechanical characteristics of both the fork and/ or the<br />
frame.<br />
Insufficient heat transfer from the brake calliper to the frame and the fork,<br />
caused by fork and or frame components having low heat transfer characteristics<br />
(e.g. carbon rear triangles) can cause the brake to overheat, with the possibility of a<br />
total failure of the brake system. This can cause serious personal injury to yourself<br />
and/ or others.<br />
With respect to product liability we remind all our users that any manufacturer<br />
(also: bike mechanic or end consumer!) is responsible for the correct<br />
function of the complete bicycle in this context. Improper combinations and insufficient<br />
installation can cause damage and serious accidents!<br />
2. Mount the brake lever to the handlebar with a 5 mm allen key. If you install your<br />
brake lever the first time you’ll hear a crack, do not worry because of that. Tightening torque<br />
4 Nm/ 34 in.lbs<br />
The MAGURA disc brake Julie HP is compatible with frames and forks which<br />
meet the International Standard (IS) and for Postmount (PM) mounts. Depending on<br />
the mounting standard and/or rotor size adaptors are used for a proper installation<br />
(cf. table on page 21). Never mount the brakes with adapters or brackets from<br />
other manufacturers! All warranty will be void in case of any misuse! Use only direct<br />
mounting parts from MAGURA or the frame or fork’s manufacturer!<br />
Make sure that the calliper fitting eyelets on your frame or fork are free of any paint,<br />
powder coating or burrs. (arrows). If this is not the case you should contact your dealer who<br />
will be able to clean the surfaces, providing an absolutely flat/even mounting surface (also<br />
see page 9).<br />
ATTENTION: The treatment of suspension lower legs made of magnesium might<br />
be dangerous because of corrosion! Always follow the safety instructions given by<br />
the respective manufacturer! Always make sure after having treated the disc brake<br />
mounts that these are protected against corrosion by using an appropriate protective<br />
paint.<br />
8
A<br />
A<br />
B<br />
B<br />
B<br />
3. Mounting on forks and frames that meet the International Standard: Mount the<br />
calliper onto the fork or the frame (bolts “A”). Use a 5 mm allen key. Tightening torque: 6<br />
Nm/ 51 in.lbs. Do not tighten yet the bolts “B”<br />
4. Mount the rotor with the 6 Torx T25 bolts onto the hub. Watch out for the correct<br />
rotation direction of the rotor (laser arrow). Use only new original bolts or thread lock if you<br />
use old bolts. Tighten the bolts in a crossed pattern! Tightening torque: 4 Nm/ 34<br />
in.lbs.<br />
5. Remove the transport device shortly before installing the wheel and mount<br />
the wheel. Install the wheel by positioning the rotor between the brake pads and fixing the<br />
wheel in the dropouts. Close the quick release of your wheel which you should mount on<br />
the opposite side of the brake calliper and tighten it sufficiently. As to thru-axle hubs or<br />
wheels consult the manual of the respective fork manufacturer.<br />
6. Squeeze now the brake lever, hold the pressure.<br />
7. Tighten the fitting bolts “B”. Tightening torque: 6 Nm/ 51 in.lbs.<br />
8. Mounting on forks with Postmount: For Postmount 6” installation in combination<br />
with a 160mm rotor, Postmount 7” with 180mm rotor or Postmount 8” with a 203mm rotor<br />
on the front you do not need an adaptor. Mount the caliper DIRECTLY onto the fork with<br />
MOUNTED wheel and rotor. For a better understanding the mounted wheel is not shown<br />
on this picture. Do not tighten the caliper bolts yet! Squeeze the lever blade and keep the<br />
pressure. Tighten now the bolts. Tightening torque: 6 Nm/ 51 in.lbs. Further mounting<br />
alternatives cf. page 21 of this manual.<br />
The transport device prevents the brake pads from being pushed out too far by<br />
unintended lever squeeze. It is impossible then to install the wheel with the rotor. So<br />
never throw away the transport device. Keep it and always clip<br />
it between the brake pads when the wheel is removed.<br />
Español Italiano Nederlands Français <strong>English</strong> Deutsch<br />
9
9. Hose routing with the Heat Eater fitting.<br />
The Heat Eater fitting of the Louise caliper allows a 45° rotation for the optimum hose<br />
routing without using tools. Fix the hose on the fork and/or frame after you have found the<br />
ideal position, the Heat Eater must NOT move during compression of the fork and/or<br />
frame!<br />
Do not worry when you hear friction between rotor and pads. A slight drag is<br />
normal on disc brakes with automatic pad wear adjustment during the break-in period.<br />
This drag will disappear after a while. The reason for this is that the brake pads<br />
find their optimum working position towards the rotor, only after a slight wear during<br />
the break-in period. Slight drag might also happen after a brake pad change or in<br />
case of an incorrectly installed wheel.<br />
In case of a constantly dragging disc brake causing noise your frame is badly<br />
aligned. In such a case you should contact your dealer who can care with the<br />
MAGURA Gnann-o-mat disc optimizer for a totally even surface of the disc brake mounts.<br />
These are absolutely necessary for a drag free function of your brake.<br />
New brakes and/or new rotors or brake pads must always be run in by<br />
breaking at least 30 times from a speed of 30 km/h to achieve the maximum brake<br />
power. Take your bike to a safe place to run in the brake.<br />
10. Reach adjust is done with a 2 mm Allen key. Turning key clockwise: lever<br />
blade moves away from the handlebar, turning counterclockwise: blade moves to<br />
the handlebar.<br />
6. Shorten the hose<br />
Julie HP is a high-pressure system and comes with a reinforced hose, the<br />
„MAGURA Disc Tube“ wearing also this imprint. The Disc Tube needs an additional<br />
insert for a proper fitting. Never mix and match the parts from the<br />
MAGURA Louise with the ones of our rim brakes or other manufacturers’ brakes! Any<br />
misuse might cause serious accidents!<br />
Never touch either the rotor or the brake calliper after long braking as this may<br />
cause serious burns.<br />
10
1. Remove the wheel so that you have free access to the brake caliper.<br />
Push back both brake pads by putting the transport device or a flat blade screwdriver into<br />
the gap. Move the screwdriver slowly back and forth until both calliper pistons are fully<br />
retracted and flush with calliper body.<br />
Never push back the pistons without the brake pads mounted! Open the brake<br />
system only after having fully pushed back the brake pads.<br />
2. Loosen the brake lever clamping screw with a 5 mm allen key. Turn the brake lever<br />
and ensure that the reservoir is horizontal.<br />
3. Slide the hose protection. Unscrew the sleeve nut on the brake lever with an<br />
8 mm open-end wrench and pull the hose out carefully. Hold the hose carefully to avoid<br />
any loss of oil! Do not squeeze the lever blade with the system open!<br />
4. Put the hose on a workbench and shorten it with a sharp knife. The best tool is the<br />
MAGURA cutter. Do not use saws or pliers!<br />
If your frame is not equipped for routing hydraulic lines you should now mount the hose<br />
fitting kit (available as separate accessory, see magura.com) for your rear brake according<br />
to the instructions that are included in the kit. Hold the hose carefully so that it cannot<br />
snap away! Cut the hose squarely! The sleeve nut can be reused. The olive cannot be<br />
reused and must be replaced!<br />
5. Press by hand a new insert into the hose until it is fully seated. Clamp the hose<br />
into the groove of the mounting device as shown...<br />
6. ...or clamp the mounting device as shown into a vice and hammer the insert carefully<br />
into the hose. If your frame is not equipped for routing hydraulic lines you should now<br />
mount the hose fitting kit for your rear brake according to the instructions that are included<br />
in the kit.<br />
7. Slide on the sleeve nut and a new olive onto the hose. Push the hose with the sleeve<br />
nut and the new olive fully into the brake lever and tighten the sleeve nut with<br />
an 8 mm open-end wrench. Tightening torque: 4 Nm/34 in.lbs.<br />
6. Always check for correct installation by pulling on the hose. Make<br />
sure that the system has no leaks. Squeeze the lever blade, hold pressure<br />
and check hose connections and the reservoir cover for eventual leaks.<br />
Squeeze the lever blade several times (pump) to push the pads to their proper<br />
position until the lever feel becomes very firm. If you cannot realize this, bleed the<br />
brake (see page 15 onwards).<br />
Español Italiano Nederlands Français <strong>English</strong> Deutsch<br />
11
7. Maintenance<br />
Brake Oil: MAGURA disc brakes use a transmission medium low viscosity mineral<br />
oil, the biodegradable MAGURA ROYAL BLOOD Contrary to DOT brake fluid the MAGURA<br />
ROYAL BLOOD does not irritate human skin or strip the paint of your frame. Moreover it<br />
does not absorb water like DOT and does not have to be changed regularly. What sounds<br />
unbelievable is a fact: you can use your brakes over years without having to touch them<br />
(except brake pad change!)<br />
Always make sure that the brake system does not have any leaks by activating<br />
the lever blade, holding it and checking the hose connections and reservoir cover for<br />
eventual leaks. Consult a trained technician in case of leaks. Leaks cause poor braking<br />
performance with possible serious accidents!<br />
As to hints about repairs of the hose see page 14 onwards..<br />
Brake pads: wear, control and replacement<br />
Brake pad wear: The brake pads are subject to wear due to friction between<br />
rotor and pads. The Julie disc brake features a fully automatic pad wear adjustment.<br />
Regularly check the thickness of your brake pads and replace them, if necessary!<br />
Control and replacement of the brake pads<br />
1. Squeeze the lever blade with the wheel mounted and hold the pressure.<br />
2. Check out whether the “finger” of the transport device fits in-between the “ears” of<br />
the the brake pads. On the picture on the left this is NOT the case, the pads must be<br />
changed.<br />
3. Here the finger of the transport device fits between the “ears” of the brake pads.<br />
The pads are still o.k.. Remember: the lever has to be pulled during this procedure.<br />
Use for this a rubber band or a cable tie.<br />
Replacement of the brake pads<br />
4. Remove the wheel so that you have free access to the brake calliper.<br />
Push both brake pads back by putting the transport device or a flat blade screwdriver into<br />
the gap. Move the screwdriver slowly back and forth until both calliper pistons are fully<br />
retracted and flush with calliper body.<br />
Never push back the pistons without the brake pads mounted!<br />
12
5. Remove the cotter the brake pad fitting screw with a 2mm Allen key.<br />
6. Pull out the brake pads. Their „ears“ make this very easy. Clean the pads<br />
with a dry rag that is free of oil and grease.<br />
Never squeeze the lever blade without the brake pads in place and the wheel<br />
mounted. If this happened by accident push back the pistons with<br />
mounted brake pads by using the transport device or a flat blade screwdriver.<br />
Use only genuine MAGURA brake pads. MAGURA cannot guarantee a correct<br />
function of the brake if you use brake pads from other manufacturers, which were<br />
not tested. Using other pads might cause poor braking and cause serious injury! All<br />
warranty claims will be void in case of misuse!<br />
7. Clean on the occasion of the brake pad change, the brake body with a clean rag.<br />
Make sure that the friction side of the new brake pads points towards the rotor.<br />
8. Secure the new pads with the fitting screw, a new one is delivered with the new<br />
pads. Tightening torque: 1 Nm/ 9 in.lbs. Check the correct fitting of the pads by<br />
pulling them. The fitting bolt of the pads has to be correctly installed e.g. it has to go<br />
through the drills of the pad holders and then correctly screwed into the caliper.<br />
9. Re-install the wheel and check for a correctly tightened quick release skewer of the<br />
wheel.<br />
10. Squeeze the lever blade several times (pump) to push the pads to their proper position<br />
until the lever feel becomes very firm.<br />
New brakes and/ or new rotors or brake pads must always be run in by braking<br />
at least 30 times from a speed of 30 km/h to achieve the maximum brake power.<br />
Take your bike to a safe place to run in the brake.<br />
Never contaminate brake pads with oil or grease this causing permanent loss of<br />
brake power! Such contaminated pads can no longer be used and should be replaced!<br />
Español Italiano Nederlands Français <strong>English</strong> Deutsch<br />
13
8. Repairs<br />
Disc brake service kit<br />
Don’t panic if the hose snaps! With the disc brake service kit and a separately available<br />
spare hose (see spare parts pages 20/21), this can be repaired easily.<br />
Julie HP is a high-pressure systems and comes with a reinforced hose, the<br />
„MAGURA Disc Tube“ wearing also this imprint. The Disc Tube needs an additional<br />
insert for a proper fitting. Never mix and match either the hoses or parts from other<br />
manufacturers. Any misuse might cause serious accidents!<br />
1. Remove the damaged hose from both the brake lever and the caliper.<br />
2. Prepare a new hose: Use only the reinforced MAGURA Disc Tube (wearing also this<br />
imprint). One end of this hose comes with a pressed fitting with blue loctite threadlock,<br />
which has to be screwed into the Heat Eater as described above.<br />
The hose is available with 0° and 90° fittings (c.f. page 20)<br />
Tightening torque: 6 Nm/ 51 in.lbs.<br />
Use with all Julie HP models with adjustable Heat Eater hose fitting only the<br />
hose that comes with the fitting with blue loctite threadlock (arrow!).<br />
NEVER shorten the MAGURA Disc Tube hose at the end with the pressed<br />
fitting! You could no longer use this hose then.<br />
3. Tighten the prepared end of the new hose onto the Heat Eater.<br />
Tightening torque: 6 Nm/ 51 in.lbs.<br />
4. Install the hose as described in chapter 6.<br />
After the installation of a new hose you will always have to refill the brake. The<br />
following chapter 9 describes how the filling and bleeding has to be done.<br />
14
9. Filling and bleeding a brake<br />
Brake Oil: MAGURA disc brakes use as transmission medium low viscosity mineral<br />
oil, the biodegradable MAGURA ROYAL BLOOD. Contrary to DOT brake fluid the<br />
MAGURA ROYAL BLOOD does not irritate human skin or strip the paint of your frame.<br />
Moreover it does not absorb water like DOT and does not have to be changed regularly.<br />
What sounds unbelievable is a fact: you can use your brakes over years without<br />
having to touch them (except brake pad change!)<br />
1. Loosen slightly the clamping screw of the brake lever with a 5 mm allen key<br />
and turn the brake lever so that the reservoir is positioned approximately 15° from<br />
the horizontal position. Slightly tighten the clamp screw in that position.<br />
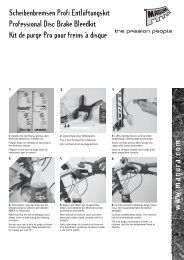
2. For filling and bleeding a MAGURA disc brake you will need the disc brake<br />
service kit including all necessary tools.<br />
3. Prepare the transparent filler tube by pushing in by hand the M6 barbed fitting. Put<br />
the other end of the filler tube on the syringe and fill the syringe completely with MAGURA<br />
ROYAL BLOOD mineral oil. Fill the syringe completely and make sure that<br />
there are no air bubbles inside. Turn the syringe eventually to push out air bubbles.<br />
4. Remove the brake pads as described on page 14 and slide the transport device as<br />
shown with its THICK END between the caliper pistons. Squeeze<br />
slightly the lever blade (pump) to tighten the transport device. It is advisable to fix the<br />
device with a rubber band on the caliper.<br />
5. Fix the Heat Eater fitting of the caliper so that it points UPWARDS!. IUnscrew now<br />
the bleed screw with a 5 mm allen key. Screw in the prepared syringe and tighten it with a 8<br />
mm open end spanner.<br />
Place now a rag, which has to be free of oil or lubricants around the reservoir<br />
and, more important, around the brake caliper. Care for a clean working environment!<br />
No dirt or particles may come into the brake system!<br />
Español Italiano Nederlands Français <strong>English</strong> Deutsch<br />
15
6. Remove ONLY the bleed plug of the reservoir with a 2,5mm Allen key that you insert<br />
into the plug before turning it slightly. The reservoir cover and the membrane underneath<br />
remain on the brake lever!<br />
7. Put the second syringe of the service kit WITHOUT PLUNGER into the opened drill<br />
of the reservoir cover. Push oil from the brake caliper upwards until the oil column arrives in<br />
the syring on the reservoir. You will see air bubbles now.<br />
8. Now suck the oil carefully back with the filling syringe on the brake caliper. Make<br />
sure that there is always enough oil in the reservoir syringe when you suck back the oil with<br />
the filling syringe! You will see air bubbles again.<br />
9. Actuate in addition CAREFULLY the lever blade to chase tiny air bubbles that might<br />
hide within the system. The job is done when no air bubbles can be seen after having followed<br />
the steps above several times.<br />
10. Before you remove the syringe on the reservoir make sure that there is only<br />
a small quantity of oil inside. Place a rag around the brake lever and the caliper thus preventing<br />
overflowing oil from dropping down and contaminating and killing the brake pads.<br />
Remove the syringe and close the end that was inserted into the reservoir quickly with your<br />
finger. Empty the remaining content of the syringe into an container.<br />
11. Close the plug on the reservoir cover as shown by pressing it by hand into the drill.<br />
That’s it!<br />
12. Remove the filling syringe and screw in the 5mm allen bleed screw.<br />
Tightening torque: 2,5 Nm/ 22 in.lbs. Re-install the brake pads and the wheel.<br />
Always pull the lever blade several times (pump) until the brake pads touch<br />
the rotor. Always check for correct installation by activating the lever blade and<br />
checking for eventual leaks. Never contaminate brake pads with oil or grease this<br />
causing permanent loss of brake power! Contaminated pads are definitely killed and<br />
MUST be replaced! A contaminated rotor can be cleaned with MAGURA brake cleaner,<br />
warm dishwater or alcohol.<br />
16
10. The disc brake wheel<br />
10. Replace the cover with the membrane onto the reservoir. Oil will spill during<br />
this procedure therefore do not forget to place a rag around the brake lever. Tighten the<br />
cover screw until the cover is flush with the reservoir. Use only the original Torx T7<br />
bolt. Any other screw will lead to leaks, damages and failure of the whole system!<br />
Tightening torque 0,6 Nm/ 5 in.lbs<br />
11. Remove the syringe and screw in the 3mm allen bleeding screw.<br />
Tightening torque: 2,5 Nm/ 22 in.lbs. Re-position the brake calliper (tightening<br />
torque 6 Nm/ 51 in. lbs.). Re-install the brake pads and the wheel.<br />
Always pull the lever blade several times (pump) until the brake pads<br />
touch the rotor.<br />
Always check for correct installation by activating the lever blade and<br />
checking for eventual leaks.<br />
Never contaminate brake pads with oil or grease this causing permanent<br />
loss of brake power! Contaminated pads are definitely dead and must be replaced! A<br />
contaminated rotor can be cleaned with MAGURA Disc cleaner, dishwater or alcohol.<br />
Español Italiano Nederlands Français <strong>English</strong> Deutsch<br />
17
11. Trouble Shooting<br />
problem reason solution<br />
not enough brake power<br />
no pressure point<br />
Squealing brake<br />
contaminated brake pads<br />
contaminated rotor<br />
wheel cannot be mounted<br />
brake was not run it<br />
oil/ lubricants on rotor and/<br />
or pads<br />
air in the system<br />
leaking systems<br />
badly aligned frame<br />
Paint/ powder coating on<br />
fitting eyelets<br />
Wheel q/r skewer insufficiently<br />
tightened<br />
Insufficiently tightened<br />
wheel spokes<br />
carelessness<br />
carelessness<br />
Lever blade was pulled with<br />
removed wheel<br />
break in the brake (page4)<br />
clean the rotor with warm<br />
dishwater or alcohol replace<br />
contaminated brake pads<br />
bleeding the brake (page15)<br />
Correct transport (page 5)<br />
Check hose connections and<br />
hose for leaks; replace hose if<br />
necessary (pages 14/15)<br />
align brake calliper with<br />
0,2mm spacers (page 9)<br />
remove any paint or powder<br />
coating and care for an even<br />
contact surface without burrs.<br />
(page7)<br />
Increase tightening of q/r<br />
skewer and mount it on<br />
opposite side of calliper.<br />
check for an evenly spoked<br />
wheel with high spoke<br />
tension<br />
brake pads must be changed<br />
clean rotor with MAGURA Disc<br />
cleaner, dish water or alcohol<br />
Push back the brake pads<br />
with transport device or a flat<br />
blade screwdriver. (page12)<br />
rattling noise and rough deceleration<br />
brake pads worn, holder of<br />
pads is wearing the rotor<br />
brake pad change (page 12)<br />
leaking hose or brake<br />
accident, incorrect<br />
installation<br />
change hose or defective<br />
brake lever or calliper (page<br />
14)<br />
You will find further tips on our website www.magura.com in the FAQ<br />
section or in our online forum!! Stay tuned.<br />
18
12. Accessories<br />
13. Warranty<br />
MAGURA disc brake service kit, code: 0721 294<br />
contains everything that you need for bleeding and repairing a brake.<br />
ATTENTION: the kit does NOT include a spare hose!<br />
MAGURA braided hose for all MAGURA disc brakes<br />
easily shortened with a cable cutter<br />
Order codes see on page 20.<br />
Watch out for the genuine hose with yellow MAGURA marker!!<br />
Use only genuine MAGURA brake pads!<br />
brake pads Performance Type 6.1 code 0722 418<br />
series pad for maximum brake power.<br />
brake pads Endurance Type 6.2 code 0722 419<br />
with optimized longevity.<br />
Use only genuine MAGURA accessories! Any parts manufactured by other<br />
manufacturers like lever blades, hoses or brake pads have not been tested and<br />
approved by MAGURA and consequently nothing can be said about their short and<br />
long-term function. Never use those parts! All warranty and product liability claims<br />
will be void in case of misuse!<br />
Never change the paint, the finish or the consistence of your brake. This might<br />
cause total failure of the whole system with serious consequences for your health!<br />
MAGURA is giving a 5-year leakproof warranty on brake levers (master<br />
cylinder) and brake callipers if the brake has been registered on magura.com. Watch out<br />
for the red info sheet in the middle of this manual!<br />
This warranty is void when damage to the brake has occurred from<br />
the following:<br />
abuse<br />
mixing and matching the brake with parts from other manufacturers<br />
damage of the exterior finish caused by improper use<br />
any attempt to disassemble the whole brake<br />
modifications<br />
non-factory changes or improper service<br />
We expressly point out that a warranty claim is only accepted with a<br />
clear proof of purchase (payment receipt of the dealer!) and recommend to register<br />
your brake online on magura.com<br />
Español Italiano Nederlands Français <strong>English</strong> Deutsch<br />
19
14. Spare parts <strong>2011</strong>/max. tightening torques<br />
0720 847 Torx T7 key<br />
0724 044 (10x)<br />
0721 207 (10x) 0,6 Nm<br />
black 0724 210<br />
silver 0724 211<br />
left 0724 333<br />
right 0724 332<br />
0720 927 (10x)<br />
0724 099 2 finger (2x)<br />
0721 187 (10x)<br />
0720 825 (10x)<br />
0720 916 (20x)<br />
0720 446 4Nm (10x)<br />
0720 405 (10x)<br />
0720 918 (10x) 4 Nm<br />
Storm SL Rotor 6 holes (IS)<br />
203 mm 0724 404<br />
180 mm 0724 403<br />
160 mm 0724 402<br />
140 mm 0724 401<br />
Titanium bolts kit 0722 562<br />
1x M5x18<br />
6x M5x10<br />
2x M6x18<br />
0721 057 (6x) 4 Nm<br />
0721 204 Torx key T25<br />
0722 636 hose 250 cm 6 Nm<br />
0721 386 braided hose 250 cm 6 Nm<br />
0722 421 (10x) 6 Nm<br />
Storm Rotor 6 holes (IS)<br />
203 mm 0724 400<br />
180 mm 0724 399<br />
160 mm 0724 398<br />
0722 530<br />
10 x 0720 848 2,5 Nm<br />
0721 418 Type 6.1<br />
Performance<br />
0721 419 Type 6.2<br />
Endurance<br />
0721 314<br />
0720 828 (10x) 1 Nm<br />
Specifications are subject to change without prior notice!<br />
20
15. Adaptors for all Julie HP models<br />
Adapter Nr. Scheibendurchmesser mm/Anbau/Bremse Bestellnummer<br />
Adaptor Rotor diameter mm/installation/brake order code<br />
Adaptateur Diamètre disque mm/montage/frein référence<br />
N°. 5 203/Int. Standard 6“ VR/Front/AV 0722 321<br />
N°. 6 180/Postmount 6“ VR/Front/AV 0722 322<br />
N°. 7 203/Postmount 6“ VR/Front/AV 0722 323<br />
N°. 8 203/Rockshox Boxxer ➞ 2009 0722 324<br />
N°. 9 203/Int. Standard HR/Rear/ARR 0722 325<br />
N°. 10 180/Int. Standard HR/Rear/ARR 0722 424<br />
N°. 11 160/Int. Standard 6“ VR/Front/AV 0722 425<br />
203/Int. Standard 8“ Fox 40<br />
180/Int. Standard 6“ VR/Front/AV (Julie 2005-2008)<br />
160/Int. Standard HR/Rear/ARR (Julie 2005-2008)<br />
N°. 12 180/Int. Standard 6“ VR/Front/AV 0722 426<br />
180/Int. Standard HR/Rear/ARR (Julie 2005-2008)<br />
160/Int. Standard 6 HR/Rear/ARR<br />
N°. 14J 210/Int. Standard 6” VR/Front/AV (Julie 2005-2008) 0722 453<br />
190/Int. Standard HR/Rear/ARR (Julie 2005-2008)<br />
N°. 15J 210/Postmount 6” (Julie 2005-2008) 0722 454<br />
N°. 26 203/Postmount 7” MAGURA Thor 0724 131<br />
N°. 27 160/Postmount 5“ 0724 495<br />
N°. 28 180/Postmount 5“ 0724 496<br />
Direktanbau<br />
Direct mount<br />
Montage direct<br />
203/Postmount 8” VR/Front/AV<br />
180/Postmount 7” VR/Front/AV (MAGURA Thor)<br />
140/Postmount 5“ HR/Rear/ARR<br />
160/Postmount 6” VR/Front/AV<br />
180/Postmount 6” VR/Front/AV (Julie 2005-2008)<br />
WARNING!<br />
Always make sure, that the fixing bolts are screwed in to a depth of at least<br />
8 mm. This corresponds to around 8 full turns!<br />
Should this not be the case, longer bolts, with a minimum hardness of 8.8 should be<br />
used and secured using blue Loctite.<br />
Español Italiano Nederlands Français <strong>English</strong> Deutsch<br />
Specifications are subejct to change without prior notice !<br />
Visit our website magura.com for further information, tech tips and free online help!!<br />
21
SIE FINDEN UNSERE WELTWEITEN HANDELSPARTNER<br />
UND SERVICE CENTER AUF MAGURA.COM!<br />
> CHECK OUT OUR WORLDWIDE PARTNERS AND<br />
SERVICE CENTERS ON MAGURA.COM!<br />
Apollo 11 | Germany<br />
Deutschland<br />
MAGURA Bike Parts<br />
GmbH + Co. KG<br />
Heinrich-Kahn-Strasse 24<br />
89150 Laichingen<br />
phone +49 (0)7333 9626-0<br />
fax + 49 (0)7333 9626-17<br />
info@magura-bikeparts.de<br />
Asia<br />
MAGURA Asia Limited Co.<br />
No. 160, Sec. 1, Chang-an Road<br />
Shi-Tun District<br />
40743 Taichung City, Taiwan<br />
phone +886 4 2316 3388<br />
fax +886 (04) 2315 4030<br />
info@magura.com.tw<br />
USA<br />
MAGURA USA<br />
724 West Clem<br />
62450 Olney, Illinois<br />
phone 6183952200<br />
fax 6183954711 magura@<br />
magurausa.com<br />
© MAGURA 2010<br />
All rights reserved<br />
Printed in Germany<br />
0689 725, 07.2010<br />
THE PASSION PEOPLE<br />
www.magura.com