TiVo Series2 Dual Tuner DVR Viewers Guide - Troubleshooting
TiVo Series2 Dual Tuner DVR Viewers Guide - Troubleshooting
TiVo Series2 Dual Tuner DVR Viewers Guide - Troubleshooting

You also want an ePaper? Increase the reach of your titles
YUMPU automatically turns print PDFs into web optimized ePapers that Google loves.
7<br />
<strong>Troubleshooting</strong><br />
Customer Support 96<br />
<strong>Troubleshooting</strong> Index 96<br />
®
<strong>Troubleshooting</strong><br />
Customer Support<br />
<strong>TiVo</strong> is dedicated to providing you with quality support and<br />
customer service. If you’re new to the <strong>TiVo</strong> service, and this is your<br />
first <strong>DVR</strong>, you probably have a few questions. This is where you’ll<br />
always be able to find answers.<br />
1. Use this chapter. This chapter contains answers to some of the<br />
most common questions customers have while getting started<br />
with the <strong>TiVo</strong> service. See the <strong>Troubleshooting</strong> Index to the<br />
right.<br />
2. Use the troubleshooting screens on your <strong>DVR</strong>. For general<br />
troubleshooting, go to the <strong>TiVo</strong> Central ® screen and select<br />
Messages & Settings, then <strong>Troubleshooting</strong>. Additionally, when<br />
the <strong>TiVo</strong> service detects a problem, the message displayed will<br />
often lead you directly to troubleshooting steps for that issue.<br />
3. Use online support. Visit <strong>TiVo</strong> Customer Support online at<br />
www.tivo.com/support. There you’ll find the most up-to-date<br />
information about the newest <strong>TiVo</strong> service features, as well as<br />
frequently asked questions, step-by-step troubleshooting, and<br />
the ability to get live interactive help from expert users.<br />
4. Call Customer Support. If you still have questions, contact a<br />
<strong>TiVo</strong> Customer Support agent by calling 1-877-367-8486<br />
(1-877-FOR-TIVO).<br />
Thank you for using the <strong>TiVo</strong> service!<br />
<strong>Troubleshooting</strong> Index<br />
This chapter contains troubleshooting for questions about:<br />
Connecting Your <strong>DVR</strong> . . . . . . . . . . . . . . . . . . . . . . . . . . . 97<br />
Completing <strong>Guide</strong>d Setup . . . . . . . . . . . . . . . . . . . . . . . . 99<br />
The <strong>TiVo</strong> Service . . . . . . . . . . . . . . . . . . . . . . . . . . . . . . . 100<br />
Channels & Channel Changing . . . . . . . . . . . . . . . . . . . . 101<br />
The <strong>TiVo</strong> Remote Control . . . . . . . . . . . . . . . . . . . . . . . . 104<br />
Now Playing . . . . . . . . . . . . . . . . . . . . . . . . . . . . . . . . . . . 105<br />
Watching Live TV . . . . . . . . . . . . . . . . . . . . . . . . . . . . . . 106<br />
Recording Programs . . . . . . . . . . . . . . . . . . . . . . . . . . . . . 107<br />
Online Scheduling . . . . . . . . . . . . . . . . . . . . . . . . . . . . . . 112<br />
Connecting to the <strong>TiVo</strong> Service . . . . . . . . . . . . . . . . . . . . 113<br />
Audio & Video . . . . . . . . . . . . . . . . . . . . . . . . . . . . . . . . . 115<br />
Networking. . . . . . . . . . . . . . . . . . . . . . . . . . . . . . . . . . . . 118<br />
Parental Controls . . . . . . . . . . . . . . . . . . . . . . . . . . . . . . . 121<br />
Music, Photos & More . . . . . . . . . . . . . . . . . . . . . . . . . . . 122<br />
96
Questions About Connecting Your <strong>DVR</strong><br />
I don’t see the Welcome screen when I plug in my<br />
<strong>DVR</strong> for the first time.<br />
• Make sure cables are connected from the OUT jack of one<br />
device to the IN jack of the next. Never connect OUT to OUT or<br />
IN to IN.<br />
• If you used a Coaxial RF cable to connect your <strong>DVR</strong> to your<br />
TV, make sure your TV is tuned to channel 3 or 4, matching the<br />
CHANNEL 3/4 switch on the back of the <strong>DVR</strong>.<br />
You might need to press the Input, Source, or TV/Video button<br />
on your TV’s remote control to change the input (i.e., the video<br />
signal your TV is displaying).<br />
• If you’re using Composite A/V cables or S-Video cables, make<br />
sure your TV is displaying the appropriate video source. Use the<br />
Input, Source, or TV/Video button on your TV’s remote to<br />
change video sources. If you are having trouble changing the<br />
video source, refer to your TV owner’s manual.<br />
• If you are passing the signal through your VCR, tune your TV<br />
the way you would to watch your VCR. Also, try turning your<br />
VCR on or off. If your VCR has multiple inputs, you may need<br />
to select the correct input on the VCR as well.<br />
<strong>Troubleshooting</strong><br />
• If your <strong>DVR</strong> is connected to an A/V receiver, and you are<br />
having trouble finding the correct input, try connecting the <strong>DVR</strong><br />
directly to the TV instead.<br />
• The cables you are using to connect your <strong>DVR</strong> to your TV or<br />
other equipment may be damaged or defective. Try using cables<br />
that you know are working properly.<br />
Why does the <strong>DVR</strong> have to be connected to a phone<br />
line or to the Internet<br />
• The <strong>DVR</strong> uses the phone line or the Internet to make periodic<br />
connections to the <strong>TiVo</strong> service. Each time it connects, your<br />
<strong>DVR</strong> receives updated program information (channels and show<br />
times), online scheduling requests, available software updates,<br />
and other information from the <strong>TiVo</strong> service.<br />
• This connection also sends anonymous viewing information—<br />
that is, anonymous information about viewing choices, which do<br />
not identify you as an individual or household—to <strong>TiVo</strong> Inc.<br />
<strong>TiVo</strong> has no way to access any personally identifiable viewing<br />
information from your <strong>DVR</strong> without your prior consent.<br />
Without your consent, the <strong>TiVo</strong> service has no way of knowing<br />
what shows you—as an individual or household—have watched<br />
or recorded. See the <strong>TiVo</strong> Privacy Policy on page 71 for more.<br />
97
<strong>Troubleshooting</strong><br />
How do I choose which channel changing cable to<br />
use with my satellite or cable box<br />
In order to record programs, the <strong>TiVo</strong> <strong>DVR</strong> needs to be able to<br />
change channels on your cable or satellite box. The <strong>DVR</strong> sends<br />
channel changing signals to your cable or satellite box using either<br />
the IR (infrared) cable or the Serial control cable.<br />
If you don’t have a cable or satellite box, your <strong>DVR</strong> does not need a<br />
channel changing cable.<br />
Using the Serial Cable<br />
You can use the Serial cable for channel changing if:<br />
• You have a DIRECTV ® satellite box<br />
with a 9-pin data connector like this:<br />
• You have a Motorola/General Instruments DCT2000 series<br />
cable box, and your cable provider has enabled it for serial<br />
control.<br />
Some DIRECTV ® satellite boxes have other connections that you<br />
may be able to try.<br />
• If your DIRECTV ® satellite box has a<br />
15-pin connector like this one, you can<br />
connect the Serial cable using a 15-pin<br />
adapter (sold separately).<br />
98<br />
15-pin data<br />
connector<br />
and adapter<br />
• Some DIRECTV ® satellite boxes have<br />
Home Control jack<br />
a Home Control connector (similar to a<br />
and cable<br />
phone jack, but slightly smaller).<br />
Home Control cables are sold separately<br />
at www.tivo.com/store. The Home<br />
Control connector on a DIRECTV<br />
satellite box is sometimes labeled “Low<br />
Speed Data.” Plug one end of the Home Control cable into this<br />
connector, and the other end into the CHANNEL CHANGING/<br />
SERIAL jack on the <strong>TiVo</strong> <strong>DVR</strong>.<br />
Using the IR Cable<br />
You can use the IR (infrared) cable to change channels on any cable<br />
or satellite box with an IR sensor.<br />
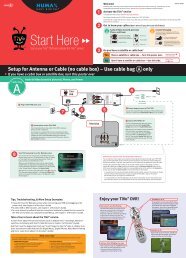
• Finding the IR sensor. To correctly position the IR cable, you<br />
need to find the IR sensor on your cable satellite box. See the<br />
Start Here poster for diagrams of common boxes, and where to<br />
find the IR sensor on each.<br />
Look for a tiny round bulb behind the dark, translucent plastic<br />
window—the IR window—on the front of your cable or satellite<br />
box. A flashlight might help you see it.<br />
• Positioning the IR cable. Position the IR cable’s emitters so they<br />
point toward the IR sensor and stick out about 1.5 inches. Use<br />
the diagram on the Start Here poster as a guide.<br />
If your Start Here poster is lost, download a replacement from<br />
www.tivo.com/guides.
Questions About Completing <strong>Guide</strong>d Setup<br />
Do I have to connect the <strong>DVR</strong> to a phone line or the<br />
Internet for <strong>Guide</strong>d Setup<br />
• Yes. To complete <strong>Guide</strong>d Setup, the <strong>TiVo</strong> <strong>DVR</strong> needs to<br />
connect to the <strong>TiVo</strong> service. To do this, the <strong>DVR</strong> uses either<br />
your home phone line or a broadband Internet connection<br />
(through a home network). Make sure you connect either the<br />
provided phone cord, a USB network adapter (sold separately),<br />
or an Ethernet cable (using the <strong>DVR</strong>’s Ethernet jack); see the<br />
Start Here poster for instructions.<br />
How do I enter a Canadian postal code<br />
• From the Zip Code screen in <strong>Guide</strong>d Setup, press the ENTER<br />
button on your <strong>TiVo</strong> remote to display the Canadian Postal Code<br />
screen.<br />
How do I choose the correct cable or satellite lineup<br />
• Make sure you have an accurate list of channels you subscribe to<br />
from your cable or satellite provider. This list may be in the form<br />
of a channel lineup card or a recent bill from your cable or<br />
satellite provider. You might also check your satellite or cable<br />
provider’s website for lineup information. If you’re not sure<br />
which channels you subscribe to, contact your cable or satellite<br />
provider.<br />
<strong>Troubleshooting</strong><br />
What if I don’t see video during <strong>Guide</strong>d Setup<br />
• One part of <strong>Guide</strong>d Setup tests the video connection from your<br />
cable or satellite box to the <strong>TiVo</strong> <strong>DVR</strong>. If you don’t see video in<br />
the background on the screen that asks “Do you see video” try<br />
the following steps:<br />
• Make sure the video cable that connects the video OUT jack<br />
on your cable or satellite box to the video IN jack on the<br />
<strong>TiVo</strong> <strong>DVR</strong> is properly and securely connected. See the Start<br />
Here poster if you need help.<br />
• Make sure your cable or satellite box is powered on and<br />
tuned to a channel you subscribe to. Try changing channels<br />
using your cable or satellite box remote until you see video.<br />
Do I have to perform all the channel changing tests<br />
• Yes. In order to record programs, the <strong>TiVo</strong> <strong>DVR</strong> needs to be<br />
able to change channels on your cable or satellite box. During<br />
<strong>Guide</strong>d Setup, the <strong>TiVo</strong> <strong>DVR</strong> performs several tests to optimize<br />
channel changing. It’s OK if nothing happens during some of the<br />
tests. Just follow the on-screen instructions.<br />
99
<strong>Troubleshooting</strong><br />
Questions About the <strong>TiVo</strong> ® Service<br />
Will my <strong>DVR</strong> work without the <strong>TiVo</strong> service<br />
• The <strong>TiVo</strong> ® <strong>DVR</strong> is designed to be used exclusively with the<br />
<strong>TiVo</strong> service. The <strong>TiVo</strong> service is required for proper operation<br />
of the <strong>DVR</strong>. No functionality is represented, warranted or should<br />
be expected without a subscription to the <strong>TiVo</strong> service. The<br />
<strong>DVR</strong> uses the program information provided by the <strong>TiVo</strong><br />
service to record the programs you request, to provide Season<br />
Pass TM functionality, to power the program guide, to allow you<br />
to search for programs by title, etc. The <strong>TiVo</strong> service may also<br />
provide you with new Showcases, access to online content, and<br />
periodic service updates.<br />
What happens if my <strong>DVR</strong> loses power temporarily<br />
• Everything is saved—including your Now Playing programs—<br />
regardless of the length of time the <strong>DVR</strong> is without power. The<br />
only thing you will miss is a recording that was scheduled to<br />
occur during the time the power was out.<br />
about viewing choices made while using your <strong>DVR</strong>, which does<br />
not identify you as an individual or household. In other words,<br />
there is no contact information associated with the viewing<br />
information that could identify the viewing information as<br />
coming from you or your household. If you don’t want even<br />
your anonymous viewing information used in any way, you may<br />
simply call and tell us, and we will stop collecting it. (See page<br />
96 for our phone number.) For more information, see Chapter 6<br />
or go to www.tivo.com/privacy.<br />
How is information from the <strong>TiVo</strong> service delivered to<br />
my <strong>DVR</strong><br />
• The <strong>DVR</strong> automatically makes regular connections to the <strong>TiVo</strong><br />
service to download program information and other data.<br />
Information may also be delivered by a special <strong>TiVo</strong> program<br />
that is recorded late at night (when it does not conflict with any<br />
of your requested recordings).<br />
Does the <strong>TiVo</strong> service collect information about my<br />
viewing habits<br />
• <strong>TiVo</strong> has designed its system and instituted policies to ensure<br />
that <strong>TiVo</strong> is unable to access any of your personally identifiable<br />
viewing information without your prior consent. <strong>TiVo</strong> does<br />
collect anonymous viewing information; that is, information<br />
100
Questions About Channels and Channel Changing<br />
I can’t get the channel to change.<br />
Cable with no cable box<br />
• Be sure that you are using the <strong>TiVo</strong> remote and that you hold it<br />
so the <strong>TiVo</strong> button points toward the <strong>DVR</strong>.<br />
• Press any button on the remote. Does the red light above the<br />
<strong>TiVo</strong> button flash If not, make sure the batteries are positioned<br />
correctly in the remote. If they are, try a new set of batteries. If<br />
the red light on the remote does flash, do the lights on the front<br />
of the <strong>DVR</strong> seem to respond when you press any button on the<br />
remote If they do not, restart your <strong>DVR</strong> by unplugging it,<br />
waiting 15 seconds, then plugging it back in.<br />
• Verify that your <strong>TiVo</strong> <strong>DVR</strong> was set up correctly by checking the<br />
System Information screen. (From the <strong>TiVo</strong> Central ® screen,<br />
select Messages & Settings, then Account & System<br />
Information, then System Information.) On the System<br />
Information screen, verify that the Program Source is listed as<br />
“Cable without Box.” If not, repeat <strong>Guide</strong>d Setup and set up the<br />
<strong>DVR</strong> for cable with no cable box. (To repeat <strong>Guide</strong>d Setup, see<br />
page 66.)<br />
Cable or satellite box with the Serial cable<br />
• Make sure the cable or satellite box is turned on.<br />
<strong>Troubleshooting</strong><br />
• Verify that the Serial Control cable is plugged into the data<br />
connector on the cable or satellite box and into the CHANNEL<br />
CHANGING/SERIAL jack on the back of the <strong>DVR</strong>.<br />
• Unplug the cable or satellite box’s power cord, then plug it back<br />
in. Then try changing channels with the <strong>TiVo</strong> remote again.<br />
• Try using the cable or satellite box’s remote to change the<br />
channel. If it doesn’t work, contact the manufacturer or service<br />
provider.<br />
• Serial control of a Motorola/General Instruments DCT2000<br />
series cable box may not be available for all customers. Check<br />
with your cable provider to find out if your cable box is enabled<br />
for serial control.<br />
Cable or satellite box with the IR cable<br />
• Make sure the cable or satellite box is turned on.<br />
• Make sure you are using the <strong>DVR</strong>’s remote control, and that you<br />
hold it so the <strong>TiVo</strong> button points toward the <strong>DVR</strong>, not at the TV,<br />
or cable or satellite box.<br />
• Refer to the Start Here poster to verify that the IR Control cable<br />
is positioned correctly in front of the IR sensor. Also, make sure<br />
101
<strong>Troubleshooting</strong><br />
the purple end of the cable is plugged into the CHANNEL<br />
CHANGING/IR jack on the back of the <strong>DVR</strong>.<br />
• Press the <strong>TiVo</strong> button to go to <strong>TiVo</strong> Central, then select<br />
Messages & Settings, then Settings, then Channels, then<br />
Channel Changing. Follow the on-screen instructions.<br />
• Try using the cable or satellite box’s remote to change channels.<br />
If it doesn’t work, contact the manufacturer or service provider.<br />
• Consider optimizing the IR connection by making an “IR tent.”<br />
See below.<br />
How do I make an IR tent<br />
Channel changing with the IR cable works better if the IR emitters<br />
and the IR window on the cable or satellite box are shaded from<br />
other infrared signals. Making an “IR tent” decreases the<br />
interference from other signals. This solution may help if changing<br />
channels with the IR cable is unreliable or inconsistent, but not if<br />
channels don’t change at all.<br />
Before securing an IR tent into place as described below, you can<br />
test whether one might work for you by draping a magazine or<br />
aluminum foil over the IR window as shown.<br />
Follow these general guidelines:<br />
1. Cover the area around the IR emitters and the cable or satellite<br />
box’s IR window with a piece of fabric like black flannel. You<br />
could create a cover using cardboard or aluminum foil instead.<br />
IR window<br />
<strong>DVR</strong><br />
cable or<br />
satellite box<br />
If possible, cover the entire IR window on the cable or satellite<br />
box, because signal interference can enter from anywhere in the<br />
window. For some cable and satellite boxes, covering the entire<br />
IR window will include covering the controls on the front. If you<br />
still need to access your cable or satellite box, use materials that<br />
are relatively easy to remove.<br />
2. Secure the cloth, tape, or other material (with tape or by another<br />
method), making sure that it fits closely around the IR window<br />
and the IR cable’s emitters, as shown below.<br />
Making an IR Tent<br />
The exact methods and materials you use to make the IR tent will<br />
depend on the shape of your cable or satellite box’s IR window and<br />
the materials you have available.<br />
102
<strong>Troubleshooting</strong><br />
I can’t go to one of my channels.<br />
• You may be using a channel list that does not include the<br />
channel you want. Use the numbers on the remote control to<br />
enter the channel number, then press ENTER/JUMP. For more<br />
information on using a channel list, see page 47.<br />
• If you have a digital cable box, the <strong>TiVo</strong> <strong>DVR</strong> can only tune to<br />
one digital cable channel at a time. If you are already recording a<br />
digital cable channel on one tuner, you cannot change to a<br />
different digital cable channel without stopping the recording.<br />
See page 107 for more.<br />
• The channel you want may be showing a program that exceeds a<br />
limit set with Parental Controls. In this case, you will see only a<br />
black screen with a notice that a limit has been exceeded. You<br />
will be able to tune to the channel if you use the Parental<br />
Controls password. (For more information on Parental Controls,<br />
see page 51.) If your cable or satellite box has a feature like<br />
Parental Controls, you may have to use the satellite or cable<br />
box’s remote to disable it as well.<br />
I can’t find all the channels I receive in the Channel<br />
List.<br />
• Have you changed your satellite or cable provider, or changed<br />
your subscription package If you have, go to <strong>TiVo</strong> Central and<br />
select Messages & Settings, then Settings, then Channels, then<br />
Channel List. Press ENTER to change your channel lineup.<br />
• If you have cable, and have not changed your cable provider, go<br />
to Messages & Settings, then Settings, then Channels, then<br />
Channel List. Look at your cable or satellite bill, then check the<br />
channel list. Make sure all the channels you subscribe to are<br />
marked with a yellow check.<br />
103
104<br />
<strong>Troubleshooting</strong><br />
Questions About the <strong>TiVo</strong> Remote Control<br />
My <strong>TiVo</strong> <strong>DVR</strong> remote control doesn’t control my TV’s<br />
power, volume, etc.<br />
• You can program the <strong>DVR</strong>’s remote control to turn your TV on<br />
and off, and control its input selection, volume and mute<br />
functions. You can also program it to control volume and mute<br />
on an A/V receiver or stereo. From the <strong>TiVo</strong> Central ® screen,<br />
select Messages & Settings, then Settings, then Remote Control.<br />
Follow the on-screen instructions.<br />
My <strong>TiVo</strong> remote control doesn't work with my <strong>DVR</strong>.<br />
• Be sure you are using the <strong>DVR</strong>’s remote, and that you hold it so<br />
that the <strong>TiVo</strong> button points toward the <strong>DVR</strong>.<br />
• Try changing the position of the <strong>DVR</strong> SWITCH on the remote<br />
control.<br />
• Press any button on the remote. Does the red light above the<br />
<strong>TiVo</strong> button on the remote flash<br />
• If the red light does not flash, make sure the batteries are<br />
positioned correctly in the remote. If they are correctly<br />
positioned, try a new set of batteries. See the inside front cover<br />
of this guide for instructions on installing batteries.<br />
• If the red light on the remote does flash, watch the lights on the<br />
front of the <strong>DVR</strong>. Do the lights seem to respond (i.e., blink or<br />
flash) when you press any button on the remote If lights on the<br />
front of the <strong>DVR</strong> do not respond to the remote, restart your <strong>DVR</strong><br />
by unplugging it, waiting 15 seconds, then plugging it back in.<br />
• You may not have the correct input selected on your TV. Use the<br />
Input, Source, or TV/Video button on your TV’s remote to<br />
change the input. If you are passing the signal through your<br />
VCR, you may need to select the correct input on the VCR as<br />
well.
<strong>Troubleshooting</strong><br />
Questions About Now Playing<br />
Can I recover a recorded program that was deleted<br />
• No. There is no way to bring back a program that has been<br />
deleted from Now Playing. You can choose to keep programs as<br />
long as you want (see page 6) or save programs to video tapes or<br />
recordable DVDs (see page 35).<br />
I haven’t scheduled enough programs to fill my <strong>DVR</strong>,<br />
but when I try to schedule more programs, the <strong>DVR</strong><br />
says there isn’t room.<br />
• The <strong>TiVo</strong> service includes smart scheduling features that track<br />
not only how much space you currently have on your <strong>DVR</strong>, but<br />
also how much space will be needed in the future to record all of<br />
the programs you have scheduled. If your <strong>DVR</strong> will be full at<br />
some point in the future, the <strong>TiVo</strong> service informs you and<br />
suggests options—such as allowing some programs to be deleted<br />
early—that will allow you to schedule additional recordings.<br />
With the <strong>TiVo</strong> service, you always have the final say over what<br />
gets recorded and how long it is kept.<br />
• In addition, the amount of recording space the <strong>DVR</strong> needs varies<br />
from channel to channel and from show to show. In general, the<br />
more action you see on your screen, such as in fast-moving<br />
sports or action movies, the more recording space is required.<br />
Weaker video signals may also require more space. The amount<br />
of space required for each show you record affects the total<br />
hours of recording capacity in your <strong>DVR</strong>.<br />
How can I fit more programs in Now Playing<br />
• To make space, delete some programs in Now Playing. You<br />
delete a program by highlighting its title, then pressing CLEAR.<br />
• Reduce the number of recordings in Now Playing that are<br />
marked “Keep Until I Delete.”<br />
• Lowering the default recording quality will allow you to fit more<br />
programs in Now Playing. See page 53 for details.<br />
• Set up Season Pass recordings with the Recording Option “Firstrun<br />
only.” You’ll collect only new episodes. You’ll also be less<br />
likely to run out of space in Now Playing and less likely to<br />
encounter conflicts.<br />
105
<strong>Troubleshooting</strong><br />
Questions About Watching Live TV<br />
Can I watch a program while it is being recorded<br />
• Yes, you can watch a program as it is being recorded; you can<br />
even start watching from the beginning while the rest of the<br />
program is recorded! You can also watch any program stored in<br />
Now Playing while another program is being recorded.<br />
The Channel Banner always says “To be<br />
announced.”<br />
• Your <strong>DVR</strong> probably does not have full program information.<br />
For details, see the question “I can’t find my program in Search<br />
by Title or WishList ® Search, even though I know it’s on,” on<br />
page 108.<br />
There aren’t any shows listed in the program guide.<br />
• Your <strong>DVR</strong> may not have program information. See “I can’t find<br />
my program in Search by Title or WishList ® Search, even<br />
though I know it’s on,” on page 108.<br />
• If category filtering of the guide is turned on, but no upcoming<br />
programs in the next six hours match both your filter and your<br />
Favorite Channels list, no programs will appear in the guide. To<br />
view programs in the guide again, use the <strong>Guide</strong> Options to turn<br />
off filtering. See page 32.<br />
I can’t find my program in the guide, even though I<br />
know it’s on.<br />
• You can choose a channel list or filter to use with the guide. Not<br />
all programs or channels will be displayed if you have chosen to<br />
use a filter or the “Favorites” channel list. Press GUIDE to<br />
display the live guide, then ENTER to choose “Channels You<br />
Receive” or to turn off filters. You can also add and remove<br />
channels on the “Channels You Receive” and “Favorites”<br />
channel lists. See page 47.<br />
• Occasionally the program information provided by the networks<br />
includes errors. We would like to hear of any inaccuracies you<br />
discover so that we can work with our providers to correct them.<br />
See the Customer Support contact information at the beginning<br />
of this chapter.<br />
106
<strong>Troubleshooting</strong><br />
Questions About Recording Programs<br />
Can I record two programs at the same time, or<br />
watch one channel and record another<br />
The <strong>TiVo</strong> ® <strong>Series2</strong> TM DT <strong>DVR</strong> is capable of recording two<br />
programs on two different channels at the same time. <strong>Dual</strong> tuner<br />
functionality depends on your TV programming source, and how it<br />
is connected to your <strong>TiVo</strong> <strong>DVR</strong>. See page 3 for more.<br />
TV Programming Source<br />
Cable with no cable box<br />
Cable Box (with RF splitter, as<br />
shown on the Start Here poster)<br />
Records Two Programs<br />
YES. Watch/record any two<br />
channels at the same time<br />
YES. Watch/record any two basic<br />
cable channels (typically 1-99),<br />
or 1 basic cable channel and 1<br />
digital cable channel (typically<br />
100 and up) at the same time<br />
What is the difference between basic cable channels<br />
and digital cable channels<br />
Basic cable channels are typically channels 1-99, and are delivered<br />
via a coaxial RF cable coming out of your wall.<br />
Digital cable channels are typically channels 100 and above, and<br />
require a digital cable box to decode and display them on your TV.<br />
Because the cable box decodes and sends only one digital cable<br />
channel at a time, the <strong>TiVo</strong> <strong>DVR</strong> can record only one digital cable<br />
channel at a time.<br />
If you have a digital cable box, and you connected the RF splitter as<br />
shown on the Start Here poster, you are sending basic cable<br />
channels directly to the <strong>TiVo</strong> <strong>DVR</strong>, and digital cable channels to the<br />
cable box.<br />
Satellite Box AND<br />
Basic Cable (no cable box)<br />
Cable Box, no RF splitter<br />
Satellite Box only<br />
YES. Watch/record any two basic<br />
cable channels (typically 1-99),<br />
or 1 basic cable channel and 1<br />
satellite channel at the same time<br />
NO.<br />
NO.<br />
107
<strong>Troubleshooting</strong><br />
How can I record a program (or programs) when<br />
there is a conflict<br />
• The <strong>DVR</strong> gives each repeating recording a priority. You can<br />
resolve some conflicts in favor of preferred programs using the<br />
Season Pass Manager to change priorities. See page 24.<br />
• If you encounter a conflict for a single episode, use View<br />
Upcoming Episodes to see if the episode you want will air at a<br />
different time. Select the program from the To Do List, then<br />
select View Upcoming Episodes.<br />
• You can sometimes resolve recording conflicts by changing the<br />
Stop Time or Start Time Recording Options. See page 25 for<br />
more about Recording Options. If you set a program to start<br />
recording one minute early, it may conflict with a recording that<br />
airs right before it. To resolve such a conflict, change the Start<br />
Time back to On Time on the Recording Options screen.<br />
• If a single episode of a repeating recording conflicts with<br />
another program, you can select that episode in the To Do List<br />
and change it independently of the rest of the repeating<br />
recording.<br />
• Set up Season Pass recordings with the Recording Option “Firstrun<br />
only.” You’ll collect only new episodes. You’ll also be less<br />
likely to run out of space in Now Playing and less likely to<br />
encounter conflicts.<br />
What does it mean when my <strong>DVR</strong> says programs will<br />
be deleted earlier than planned<br />
• By default, all programs are kept until space is needed. After<br />
that, programs you have not set to save longer may be deleted to<br />
make room for other recordings you request. The <strong>TiVo</strong> service<br />
includes smart scheduling features that keep track of when<br />
programs become available to be deleted, and of how much free<br />
space will be available at any given time in the future. If space<br />
will not be available to record a program you request, the <strong>TiVo</strong><br />
service gives you the option of deleting some programs early to<br />
make more room. However, you always have the final say on<br />
how long the <strong>DVR</strong> keeps programs. You can delete a program at<br />
any time, and you can always change how long it is saved. Just<br />
select the program in Now Playing, then select Keep Until...<br />
I can’t find my program in Search by Title or<br />
WishList ® Search even though I know it’s on.<br />
• The <strong>DVR</strong> uses your Channel List to search for programs in all<br />
the features under Pick Programs to Record. To check if you’ve<br />
selected the program’s channel, go to Messages & Settings, then<br />
Settings, then Channels, then Channel List. Does the channel<br />
have a check mark next to it To give it one, highlight the<br />
channel and press SELECT. For instructions on personalizing<br />
this list, see page 47.<br />
108
<strong>Troubleshooting</strong><br />
• Try searching by date, time or channel. From Pick Programs to<br />
Record, select Record by Time or Channel.<br />
• Look on the Phone & Network screen (from <strong>TiVo</strong> Central, select<br />
Messages & Settings, then Settings, then Phone & Network) for<br />
the time of the last successful connection to the <strong>TiVo</strong> service. If<br />
it was more than 36 hours ago, your <strong>DVR</strong> may be having trouble<br />
connecting to the <strong>TiVo</strong> service. Select Test Connection to test<br />
the current settings. If the test connection does not succeed, see<br />
page 113 for connection troubleshooting. Once you have made a<br />
successful test connection, start a regular connection by<br />
selecting Connect to the <strong>TiVo</strong> service now. If your connection is<br />
successful, new program information will be downloaded and<br />
organized, and become available to search in about 1 to 5 hours.<br />
• Is your <strong>TiVo</strong> service account up to date Check your account<br />
status on the System Information screen (from <strong>TiVo</strong> Central,<br />
select Messages & Settings, then System Information). If your<br />
account is suspended or closed and you wish to re-activate it, go<br />
to www.tivo.com/manage, or refer to page 96 for Customer<br />
Support contact information and give us a call.<br />
• Occasionally the program information provided by the networks<br />
includes errors. We would like to hear of any inaccuracies you<br />
discover so that we can work with our providers to correct them.<br />
I can’t use features in Pick Programs to Record. The<br />
<strong>DVR</strong> says it is organizing program information.<br />
• Your <strong>DVR</strong> may not have all its program information yet. The<br />
first time you go through <strong>Guide</strong>d Setup, the <strong>DVR</strong> downloads<br />
some program information from the <strong>TiVo</strong> service. The <strong>DVR</strong><br />
then indexes this information in the background over the next<br />
few hours. More program information becomes available after<br />
the next time the <strong>DVR</strong> connects to the <strong>TiVo</strong> service. After 24<br />
hours, full information (up to 2 weeks) is available.<br />
• If the <strong>DVR</strong> loses power while it is indexing program<br />
information, the indexing process will stop until the <strong>DVR</strong> makes<br />
a successful connection to the <strong>TiVo</strong> service, and then will start<br />
again. If your <strong>DVR</strong> lost power while it was indexing program<br />
information, you can get it to start indexing again by starting a<br />
connection to the <strong>TiVo</strong> service. To do this, go to <strong>TiVo</strong> Central<br />
and select Messages & Settings, then Settings, then Phone &<br />
Network, then Connect to the <strong>TiVo</strong> service now.<br />
What happens if a sports event I have scheduled to<br />
record goes into overtime<br />
• The <strong>TiVo</strong> service cannot predict whether a sporting event might<br />
go into overtime, but we provide a feature that lets you add<br />
recording time—from one minute to three hours extra—at the<br />
end of a recording. We call this the Overtime Scheduler ® feature.<br />
The Overtime Scheduler has two options: Start Recording and<br />
109
<strong>Troubleshooting</strong><br />
Stop Recording. Both are available on the Recording Options<br />
screen. You can even use the Overtime Scheduler to change the<br />
scheduled end of a recording while the program is being<br />
recorded. You can use the Overtime Scheduler with any kind of<br />
program, not just sports. For more, see page 26.<br />
• If you are watching a program while it’s being recorded, you can<br />
add extra recording time:<br />
• Go to the Now Playing List, select the recording, then select<br />
Change Recording Options. On the Recording Options<br />
screen that appears, select Stop Recording. Use RIGHT<br />
arrow to increase the length of the recording by anywhere<br />
from one minute to 3 hours.<br />
• Go to Pick Programs to Record, select the To Do List, then<br />
select the recording. Select Options next to Continue<br />
Recording. On the Recording Options screen that appears,<br />
select Stop Recording. Use RIGHT arrow to increase the<br />
length of the recording by anywhere from one minute to 3<br />
hours.<br />
Is there a way to record a program that will not be<br />
aired for weeks or months<br />
• Create an auto-recording WishList search for programs that are<br />
not yet listed in the guide. See page 19 for more.<br />
• If you know the date, time, and channel on which the program<br />
will air, you can create a manual recording to record it. Go to<br />
<strong>TiVo</strong> Central and select Pick Programs to Record, then Record<br />
by Time or Channel, then Manually Record Time/Channel. See<br />
page 16 for more.<br />
How do I set the clock so that my shows are<br />
recorded on time<br />
• The <strong>TiVo</strong> service sets your <strong>DVR</strong>’s clock during every service<br />
connection, so you never have to worry! If you move to a new<br />
time zone, change your <strong>DVR</strong>’s settings by repeating <strong>Guide</strong>d<br />
Setup. To connect to the <strong>TiVo</strong> service at any time, go to <strong>TiVo</strong><br />
Central and select Messages & Settings, then Settings, then<br />
Phone & Network, then Connect to the <strong>TiVo</strong> Service Now.<br />
• If you are missing the beginning or end of a show, it usually<br />
means that the broadcaster is not starting or stopping the show<br />
on time. You can use the Overtime Scheduler, described on page<br />
26, to compensate for this.<br />
How do I record a pay per view event<br />
• From live TV, catch up to the present broadcast by pressing the<br />
ADVANCE button. Then, order the program from your cable or<br />
satellite provider as you normally would—by using your<br />
satellite or cable box remote, or by calling your cable/satellite<br />
provider. (If the program violates a Parental Control limit—or a<br />
110
<strong>Troubleshooting</strong><br />
feature like Parental Controls on your cable or satellite box—<br />
make sure to disable both <strong>TiVo</strong> Parental Controls and your<br />
satellite or cable box’s Parental Controls.)<br />
• Make sure that the channel the pay per view event is airing on is<br />
checked in your Channel List (from <strong>TiVo</strong> Central, select<br />
Messages & Settings, then Settings, then Channels, then<br />
Channel List).<br />
• To record the program, search for it using Browse by Time<br />
(from Pick Programs to Record, select Record by Time or<br />
Channel, then Browse by Time). If there are no listings for pay<br />
per view events, record the showing using Manually Record<br />
Time/Channel.<br />
Why wasn’t my program recorded<br />
• Check Recording History for an explanation of why the program<br />
did not record. Recording History is the first selection in the To<br />
Do List (from <strong>TiVo</strong> Central, select Pick Programs to Record,<br />
then To Do List, then View Recording History). Here are some<br />
reasons why a program may not be available in Now Playing:<br />
• There may have been a dual tuner conflict. If you have a<br />
cable box, there are limitations to the <strong>DVR</strong>’s ability to record<br />
two different channels at the same time. See page 107 for<br />
more details.<br />
• If you had Season Pass recordings that were broadcast at the<br />
same time, only the programs with the higher priority would<br />
be recorded. Priorities and the Season Pass Manager are<br />
described on page 24.<br />
• If the program was a rerun, your Season Pass recording may<br />
be set to record First Run Only programs.<br />
• The program may have been deleted from Now Playing by<br />
someone else in your household.<br />
• The program may have been canceled by the network.<br />
• There may have been a conflict when requesting another<br />
program, and the proposed resolution was to delete the<br />
missing program earlier than planned. If you accepted that<br />
resolution, the program would have been deleted.<br />
• There may have been a channel changing problem. See<br />
“Questions About Channels and Channel Changing” on<br />
page 101.<br />
111
<strong>Troubleshooting</strong><br />
Questions About Online Scheduling<br />
My <strong>DVR</strong> did not record a program I requested on <strong>TiVo</strong><br />
Central ® Online.<br />
• Check Recording History. Your <strong>DVR</strong>’s Recording History may<br />
explain why the program did not record. To view Recording<br />
History, go to the <strong>TiVo</strong> Central ® screen and select Pick<br />
Programs to Record, then To Do List, then View Recording<br />
History. Find and select the program that did not record to view<br />
a brief explanation.<br />
• Check the To Do List. If you chose to record the program only if<br />
it did not conflict with other recordings at the same time, the<br />
<strong>DVR</strong> may have found an alternate showing of the program to<br />
record that did not conflict with other programs. Check the To<br />
Do List to determine whether the program is still scheduled to<br />
record. Go to <strong>TiVo</strong> Central and select Pick Programs to Record,<br />
then To Do List.<br />
• Check connection. Go to the <strong>TiVo</strong> Central ® screen and select<br />
Messages & Settings, then Settings, then Phone & Network,<br />
then Connect to the <strong>TiVo</strong> Service Now.<br />
• Check your Channel List. If the program you requested airs on a<br />
channel you don’t receive, the <strong>DVR</strong> will not be able to record it.<br />
In addition, if you receive the channel but it is not checked on<br />
your Channel List, the <strong>DVR</strong> cannot record from it. To check<br />
your Channel List, go to <strong>TiVo</strong> Central and select Messages &<br />
112<br />
Settings, then Settings, then Channels, then Channel List. Every<br />
channel you receive that you wish to schedule recordings from<br />
should have a checkmark beside it.<br />
• Program Times Shown in Red. A program’s air time shown in red<br />
on <strong>TiVo</strong> Central Online indicates that this program might not<br />
record on your <strong>DVR</strong> if you schedule it. This is due to the fact<br />
that there might not be enough time for your <strong>DVR</strong> to connect to<br />
the <strong>TiVo</strong> service and retrieve your recording request. When you<br />
click on such a program, you’ll see a “May not record” warning.<br />
I didn’t receive a confirmation e-mail.<br />
• If you or your Internet Service Provider have a filter to delete<br />
junk e-mail, you may have to change the filter’s settings to<br />
receive e-mail from <strong>TiVo</strong>.<br />
• Make sure that your e-mail address is correct at Manage My<br />
Account (www.tivo.com/manage).<br />
A program recorded at a different time than I<br />
requested.<br />
• If you chose to record the program only if it did not conflict with<br />
other recordings at the same time, the <strong>DVR</strong> may have found an<br />
alternate showing of the program to record that did not conflict<br />
with other programs.
Questions About Connecting to the <strong>TiVo</strong> Service<br />
My <strong>DVR</strong>’s phone connection to the <strong>TiVo</strong> service is<br />
failing.<br />
• First, verify that your phone line is working by connecting a<br />
phone to it, then listening for a dial tone. Make sure the phone<br />
cord is connected to both the <strong>DVR</strong> and the phone jack. If the<br />
phone line is working, continue with the troubleshooting here. If<br />
it is not working, contact your telephone service provider.<br />
• You must use a standard, analog phone line for connections to<br />
the <strong>TiVo</strong> service. Voice Over IP (VOIP) and digital PBX phone<br />
systems are not supported.<br />
• The following tips require changing your Phone Dialing<br />
Options. To change Phone Dialing Options, go to the <strong>TiVo</strong><br />
Central ® screen and select Messages & Settings, then Settings,<br />
then Phone & Network, then Change Phone Settings, then Phone<br />
Dialing Options. After you change a Phone Dialing Option, the<br />
<strong>DVR</strong> will make a test connection to verify whether or not your<br />
problem was solved.<br />
Phone Connection <strong>Troubleshooting</strong> Tips:<br />
• Try another local dial-in number. Select Set Dial-In Number.<br />
Confirm your area code, then select a new number from the<br />
list of available numbers for your area.<br />
<strong>Troubleshooting</strong><br />
• If you have voice mail on this phone line or use another nonstandard<br />
dial tone, turn off Dial Tone Detection. (Select Set<br />
Dial Tone Detection, then select Off.)<br />
• Make sure the correct dialing format is selected.<br />
• If you dial a prefix for outside lines, be sure it is entered on<br />
the Phone Dialing Options screen. To enter or change a<br />
prefix, select Set Dial Prefix, then follow instructions on the<br />
screen. For example, if you must dial 9 to reach an outside<br />
line, select Set Dial Prefix, then press 9 then the PAUSE<br />
( ) button. (This enters a 9 followed by a comma. Each<br />
comma inserts a 2 second pause.)<br />
• If you have call waiting, be sure it is disabled during the<br />
daily phone call. (Select Set Call Waiting Prefix, then enter<br />
the correct prefix, usually *70,. You would enter *70, by<br />
pressing CLEAR to enter the * then 7 then 0 then the PAUSE<br />
( ) button to enter a comma.)<br />
• Your phone line may have low voltage. Select Availability<br />
Detection, then select Off. If you have a cordless telephone,<br />
fax machine, or computer modem connected to the same<br />
line, try turning Availability Detection off, as well. When<br />
Availability Detection is off, you may hear a click on the line<br />
when the <strong>DVR</strong> tries to call. This is the sound of the <strong>DVR</strong><br />
picking up the line to see if it is free.<br />
113
<strong>Troubleshooting</strong><br />
• If you use a wireless modem jack, try connecting the <strong>DVR</strong><br />
directly to a standard wall jack.<br />
• If you have a caller ID box, try removing it from the line,<br />
since some models interfere with the <strong>DVR</strong>’s ability to make<br />
a call.<br />
• If you have DSL, try installing a DSL filter on your phone<br />
line. try not to use more than 5 DSL filters in one household.<br />
• It could be that you have too much line noise due to the<br />
length of the phone cord. Try a shorter cord, or you can buy a<br />
line noise filter at your local electronics store.<br />
• If you have a home network with a broadband Internet<br />
connection, consider switching to network connections. See<br />
page 62 for more information.<br />
What if I need to use the phone while the <strong>DVR</strong> is<br />
connecting to the <strong>TiVo</strong> service<br />
• You can interrupt the connection. To do this, pick up the phone,<br />
then hang it up. Wait about 45 seconds. When you pick it up<br />
again, there should be a dial tone. Repeat this process if<br />
necessary.<br />
What if my phone line is busy when the <strong>DVR</strong> tries to<br />
connect to the <strong>TiVo</strong> service<br />
• The <strong>DVR</strong> will continue to attempt to connect until it is<br />
successful. You can check the status of the connection on the<br />
Phone & Network screen (from <strong>TiVo</strong> Central, select Messages<br />
& Settings, then Settings, then Phone & Network). The status of<br />
the most recent connection is displayed at the top of the screen.<br />
Am I charged for connections to the <strong>TiVo</strong> service<br />
• <strong>TiVo</strong> uses either a standard phone line or a broadband Internet<br />
connection to provide the <strong>TiVo</strong> service, and is available as a<br />
local call in most areas. In some areas, however, local and long<br />
distance toll charges may apply. You are responsible for any<br />
phone charges. If you’re not sure, check with your phone service<br />
provider.<br />
114
<strong>Troubleshooting</strong><br />
Questions About Audio and Video<br />
The audio and video are out of sync.<br />
• The audio and video may re-sync if you change channels.<br />
• You may be able to re-sync audio and video by pressing the<br />
INSTANT REPLAY button on the remote control.<br />
• Press the <strong>TiVo</strong> button to go to the <strong>TiVo</strong> Central ® screen, then<br />
press the LIVE TV button to return to live TV.<br />
• Verify that all your audio and video cable connections are<br />
secure. Make sure cables are connected from the OUT jack of<br />
one device to the IN jack of the next. Never connect OUT to<br />
OUT or IN to IN.<br />
• You can also try restarting your <strong>DVR</strong>. From <strong>TiVo</strong> Central, select<br />
Messages & Settings, then Restart or Reset System, then Restart<br />
the <strong>DVR</strong>. On the Restart the <strong>DVR</strong> screen, press the THUMBS<br />
DOWN button three times, then press ENTER. You will see the<br />
Welcome screen and the system will restart within a few<br />
minutes.<br />
My <strong>DVR</strong> was working, but now the picture is frozen.<br />
• Try changing channels.<br />
• Try restarting your <strong>DVR</strong>. From <strong>TiVo</strong> Central, select Messages<br />
& Settings, then Restart or Reset System, then Restart the <strong>DVR</strong>.<br />
On the Restart the <strong>DVR</strong> screen, press the THUMBS DOWN<br />
button three times, then press ENTER. You will see the<br />
Welcome screen and the system will restart within a a few<br />
minutes. You can also restart the <strong>DVR</strong> by unplugging it, waiting<br />
at least 15 seconds, then plugging it back in.<br />
I don’t get a picture now, even though I have been<br />
able to get one in the past.<br />
• Your TV may not be set to the correct input. Most TVs have an<br />
input button that says either “TV/Video,” “Input,” or “Source.”<br />
It may be on the TV or on the TV remote control. Look at your<br />
TV and TV remote and try changing the input setting.<br />
• If you have your <strong>DVR</strong> connected to a VCR, the VCR may not be<br />
set to the correct input. Most VCRs have an input button that<br />
says either “TV/Video,” “Input,” or “Source.” It may be on the<br />
VCR or on the VCR remote control. Look at your VCR and<br />
VCR remote and try changing the input setting.<br />
• Check to make sure all of the appropriate cables are firmly<br />
connected to your <strong>DVR</strong>, television and other audio/video<br />
equipment. For help with your audio/video connections, see the<br />
Start Here poster or Appendix A of this guide.<br />
• Someone in your household may have placed the <strong>DVR</strong> in<br />
Standby mode. To return to normal mode from Standby, press<br />
either the <strong>TiVo</strong> button or the LIVE TV button. (On some<br />
115
<strong>Troubleshooting</strong><br />
remotes, there is a POWER button that puts the <strong>DVR</strong> in Standby<br />
mode and takes it back out.)<br />
My audio system is set up to play in stereo, but it is<br />
only playing mono.<br />
• Make sure that Main Audio Program (stereo) is selected on the<br />
Television Audio screen (go to <strong>TiVo</strong> Central and select<br />
Messages & Settings, then Settings, then Audio, then Television<br />
Audio). And be sure you connected audio using the <strong>DVR</strong>’s L/R<br />
Audio Out jacks.<br />
I can’t select an alternate audio track.<br />
• Secondary audio programs (SAP) are not available for all<br />
programs. If you set the SAP as the default audio, programs that<br />
have SAP will use it. Only one audio track is saved with<br />
recorded programs. If SAP is the default audio and a program<br />
you are recording has an SAP, the SAP will be the recorded<br />
program’s only audio. You can set the default audio on the<br />
Television Audio screen (from <strong>TiVo</strong> Central, select Messages &<br />
Settings, then Settings, then Audio, then Television Audio).<br />
• Recorded programs, such as those in Now Playing, always have<br />
only one audio track, the one they were recorded with.<br />
• You cannot change the audio track if you are watching a live<br />
program, but are not caught up to live TV. Catch up to live TV<br />
by pressing the ADVANCE button. Changing the audio program<br />
will clear the saved part of the program you are watching, so you<br />
will only be able to rewind live TV to the point where you<br />
changed the audio program.<br />
Programs are playing in the wrong language.<br />
• You may have selected the secondary audio program (SAP) as<br />
the default audio on the Television Audio screen. Most<br />
programs with SAP use it to broadcast in an alternate language.<br />
To turn off the SAP, change the main audio program on the<br />
Television Audio screen (from <strong>TiVo</strong> Central, select Messages &<br />
Settings, then Settings, then Audio, then Television Audio).<br />
I see a blue screen with a <strong>TiVo</strong> logo.<br />
Your <strong>DVR</strong> is having trouble tuning to the channel you are on.<br />
Follow these steps to restore the video:<br />
• Try changing channels. If the blue screen appears on just a few<br />
channels, you may be tuned to a channel to which you do not<br />
subscribe, or you may be experiencing a weak signal on a<br />
channel to which you do subscribe. If you do not subscribe to the<br />
channel, you should take it off your Channel List. See page 47.<br />
If you do subscribe to the channel, wait 24 hours to see if the<br />
signal improves, or call your cable or satellite provider.<br />
• If the blue screen appears on every channel, and you have a<br />
cable or satellite box, make sure it is turned on.<br />
116
<strong>Troubleshooting</strong><br />
• You may be experiencing a temporary cable or satellite outage;<br />
check with your cable or satellite provider.<br />
• Your video cable may have come loose. Make sure all the cable<br />
connections on the back of your <strong>DVR</strong> are secure.<br />
• Verify that you are receiving a video signal by temporarily<br />
connecting the video source directly to the TV. If you still do not<br />
see any video, there may be a problem with your cable or<br />
satellite equipment.<br />
• The cables you are using to connect your <strong>DVR</strong> to your TV or<br />
other equipment may be damaged or defective. Try exchanging<br />
the cables connected to the <strong>DVR</strong> with other cables that you<br />
know are working properly.<br />
• Restart your <strong>DVR</strong>. (From <strong>TiVo</strong> Central, select Messages &<br />
Settings, then Settings, then Restart or Reset System, then<br />
Restart the <strong>DVR</strong>. Press THUMBS DOWN three times, then<br />
press ENTER. You will see the Welcome screen, and the system<br />
will restart within about 45 seconds. You can also restart the<br />
<strong>DVR</strong> by unplugging it, waiting 15 seconds, then plugging it<br />
back in.<br />
I see a banner that says “Searching for signal...”<br />
• The other tuner may be tuned to a channel that you don’t<br />
receive, or tuned to a channel with poor signal quality. Try<br />
switching to the other tuner by pressing the LIVE TV button.<br />
Then change the channel to a channel you know you receive.<br />
• Check your cable connections from your TV programming<br />
source to the back of the <strong>TiVo</strong> <strong>DVR</strong>. Make sure all cables are<br />
firmly connected.<br />
• Try restarting your <strong>DVR</strong>. From <strong>TiVo</strong> Central, select Messages<br />
& Settings, then Restart or Reset System, then Restart the <strong>DVR</strong>.<br />
On the Restart the <strong>DVR</strong> screen, press the THUMBS DOWN<br />
button three times, then press ENTER.<br />
117
<strong>Troubleshooting</strong><br />
Questions About Networking<br />
My <strong>DVR</strong> is not connecting to the <strong>TiVo</strong> service.<br />
You can make the <strong>DVR</strong> connect to the <strong>TiVo</strong> service at any time. Go<br />
to the <strong>TiVo</strong> Central ® screen and select Messages & Settings, then<br />
Settings, then Phone & Network, then Connect to the <strong>TiVo</strong> Service<br />
Now.<br />
Your <strong>TiVo</strong> <strong>DVR</strong> connects to the <strong>TiVo</strong> service either using your<br />
home network’s broadband Internet connection, or using a phone<br />
line. To change the type of connection the <strong>DVR</strong> uses to connect to<br />
the <strong>TiVo</strong> service, go to <strong>TiVo</strong> Central and select Messages &<br />
Settings, then Settings, then Phone & Network.<br />
If your <strong>DVR</strong> is set to connect via Network, follow these steps:<br />
• Check that the Internet connection is available. If you disable<br />
your home network’s connection to the Internet, your <strong>DVR</strong> may<br />
be trying to connect while the link is down. Try to go online and<br />
view a website from a computer on the same network as your<br />
<strong>DVR</strong>. If you cannot, you must fix the connection from your<br />
home network to the Internet before troubleshooting your<br />
<strong>DVR</strong>’s connection to the <strong>TiVo</strong> service. If you can browse the<br />
web from a computer, then see “My <strong>DVR</strong> is not connecting to<br />
my home network.” on page 118.<br />
• Use a phone line. Use a regular phone line to connect to the <strong>TiVo</strong><br />
service.<br />
If your <strong>DVR</strong> is set to connect via Phone, follow these steps:<br />
• Use broadband (if available). If you have a home network with a<br />
broadband Internet connection, try allowing the <strong>DVR</strong> to use it to<br />
connect to the <strong>TiVo</strong> service over the Internet. Doing this<br />
eliminates the <strong>DVR</strong>’s need to use a phone line. See “Connecting<br />
your <strong>DVR</strong> to a Phone Line or to the Internet” on page 127.<br />
• Check Online Support. Check network troubleshooting online at<br />
www.tivo.com/support.<br />
My <strong>DVR</strong> is not connecting to my home network.<br />
Any of the steps below may fix a network connection; you probably<br />
will not have to complete each one. Additional steps for wireless<br />
networks are at “My <strong>DVR</strong> is not connecting to my wireless home<br />
network.” on page 120.<br />
• Check network connection. The network adapter that you<br />
attached may not be supported. If your network adapter is<br />
compatible with the <strong>DVR</strong> and functioning properly, a MAC<br />
address—an identifier unique to the network adapter you<br />
purchased—is visible on the Phone & Network screen. To<br />
check, go to <strong>TiVo</strong> Central and select Messages & Settings, then<br />
Settings, then Phone & Network. The MAC address should be<br />
on the top right side of the Phone & Network screen. If you do<br />
not see a MAC address listed, the <strong>DVR</strong> is not recognizing the<br />
118
<strong>Troubleshooting</strong><br />
network adapter you installed. The adapter is either not<br />
compatible, not functioning properly, or not properly connected.<br />
If you do see a MAC address, the adapter you are using may or<br />
may not be compatible. Visit www.tivo.com/adapters for a list<br />
of compatible adapters.<br />
• Check your network cable. The network cabling could be<br />
defective. If you have another USB cable or Ethernet cable<br />
available, try that.<br />
• Check connection to the network adapter. Unplug the USB cable<br />
from the back of your <strong>DVR</strong>, wait 10 seconds, then plug it back<br />
in. Make sure the cable is pushed all the way in; sometimes<br />
lights on the adapter turn on before the USB cable is pushed all<br />
the way in. Unplug the side of the USB cable connected to the<br />
adapter, wait 10 seconds, then plug it back in.<br />
• Restart the <strong>DVR</strong>. Press the <strong>TiVo</strong> button on the remote to go to<br />
<strong>TiVo</strong> Central. Select Messages & Settings, then Settings, then<br />
Restart or Reset System, then Restart the <strong>TiVo</strong> <strong>DVR</strong>. Press<br />
THUMBS DOWN three times, then press ENTER.<br />
• Check physical connections. Ensure that all network equipment<br />
is receiving power and that all cable connections for routers,<br />
hubs, access points, and computers in the network are working.<br />
Verify that the “link” light is lit on all devices connected to the<br />
network.<br />
• Powercycle network devices. If you have a router or wireless<br />
access point, unplug it, wait a moment, and then plug it back in.<br />
This will temporarily halt your network’s Internet connection. It<br />
may take up to a minute for your equipment to “restart” after you<br />
plug it back in.<br />
• Check your Network Settings. Verify that your Network Settings<br />
are correct. See “Network Settings” on page 62.<br />
• Update router or home gateway firmware. If your home network<br />
uses a router, home gateway, or wireless access point, it may<br />
need a firmware update. Firmware is a software program that is<br />
loaded onto a hardware device. You can usually find any<br />
updated firmware at the Customer Support website for the<br />
manufacturer of your hardware. (For example, if you have a<br />
Linksys device, check firmware updates available at<br />
www.linksys.com/download.) Older firmware may cause<br />
unpredictable results. It may be necessary to powercycle your<br />
device before and after you reinstall the firmware.<br />
• Check Static IP Address. If you assigned an IP address to your<br />
<strong>DVR</strong>, check that its IP address is unique on your network. Also,<br />
confirm that the first three sets of numbers of the <strong>DVR</strong>’s IP<br />
address are the same as those of other devices on the network.<br />
(For example, if you computer’s IP address starts with<br />
192.168.1, then your <strong>DVR</strong>’s IP address must also start with<br />
192.168.1.) To find TCP/IP settings on a Macintosh, open<br />
System Preferences and click on Network.<br />
119
<strong>Troubleshooting</strong><br />
My <strong>DVR</strong> is not connecting to my wireless home<br />
network.<br />
• Check power at wireless access point. Ensure the wireless<br />
access point or wireless router is receiving power and that the<br />
“link” light is on.<br />
• Verify or check password format. If you used an alphanumeric<br />
password for your wireless network, try using a hexadecimal<br />
password instead. You can find a hexadecimal password<br />
(sometimes referred to as a “Key” or “WEP Key”) in the<br />
configuration settings for your wireless access point or wireless<br />
router. If more than one hexadecimal password is listed, always<br />
use the first one. To change the password format, see “Network<br />
Settings” on page 62.<br />
• Check signal strength. On the Phone & Network screen (press<br />
the <strong>TiVo</strong> button to go to <strong>TiVo</strong> Central, then select Messages &<br />
Settings, then Settings, then Phone & Network), check the<br />
wirelesss signal strength. The following may improve wireless<br />
signal strength:<br />
120<br />
• Make sure the wireless adapter is placed well away from the<br />
<strong>DVR</strong>’s power supply, or power strips, or surge protectors.<br />
Any of these may cause interference and reduce signal<br />
strength. Some household appliances, such as microwave<br />
ovens and 2.4 GHz cordless phones (even a neighbor’s<br />
cordless phone), may also reduce signal strength when they<br />
are in use.<br />
• Verify that the wireless network adapter’s antenna is fully<br />
extended (if applicable). Consider purchasing an adapter that<br />
has an external antenna. See www.tivo.com/adapters.<br />
• Move the wireless network adapter to a higher position, or<br />
give it a better line of sight to your wireless gateway (router).<br />
• Reduce the distance between the wireless network adapter<br />
and the wireless access point. Wireless networks typically<br />
have a range of 100 to 300 feet, but distances can vary based<br />
on walls, floors, and other obstructions. It may be necessary<br />
to adjust the location adapter of your wireless access point or<br />
router to be closer to the network adapter attached to your<br />
<strong>TiVo</strong> <strong>DVR</strong>(s).<br />
• Consider adding a signal booster to your network (available<br />
from some wireless equipment manufacturers).<br />
• Check network name. In Wireless Settings (from <strong>TiVo</strong> Central<br />
select Messages & Settings, then Settings, then Phone &<br />
Network, then Change Phone or Network Settings, then<br />
Network Settings), check that the network name (SSID) for your<br />
wireless access point is listed correctly. To change the network<br />
name, see “Network Settings” on page 62.
<strong>Troubleshooting</strong><br />
Questions About Parental Controls<br />
My Parental Controls are not working.<br />
• For Parental Controls to work, they must be on (not temporarily<br />
turned off). When you enter your password to watch a program<br />
that violates Parental Controls, they are temporarily turned off.<br />
You can re-enable them on the Parental Controls screen (from<br />
the <strong>TiVo</strong> Central ® screen, select Messages & Settings, then<br />
Settings, then Parental Controls), or by putting your <strong>DVR</strong> in<br />
Standby mode and then taking it out of Standby. You can put<br />
your <strong>DVR</strong> in Standby mode by going to <strong>TiVo</strong> Central and<br />
selecting Messages & Settings, then Standby. To return to<br />
normal mode from Standby, press either the <strong>TiVo</strong> button the or<br />
LIVE TV button. (On some remotes, there is a POWER button<br />
that puts the <strong>DVR</strong> in Standby mode and takes it back out.)<br />
I disabled Parental Controls, but I still can’t tune to<br />
the channel I want.<br />
• If your cable or satellite box has a feature like Parental Controls,<br />
make sure you have disabled them with the satellite or cable<br />
box’s remote. See your cable or satellite box’s owner’s manual<br />
for instructions.<br />
• You may be using a channel list that does not include the<br />
channel you want. Use the number buttons on the remote control<br />
to enter the channel number, then press the ENTER button. For<br />
more information on using a channel list see page 47.<br />
121
<strong>Troubleshooting</strong><br />
Questions About Music, Photos & More<br />
What is Music, Photos & More<br />
• When you connect your <strong>TiVo</strong> <strong>DVR</strong> to a home network, you get<br />
access to <strong>TiVo</strong> Home Media Features, including access to Home<br />
Network Applications that may be running on your home<br />
network or on the Internet. See Chapter 4 for details.<br />
For help with connecting to a home network and using Home<br />
Media features, download the Home Media Features <strong>Guide</strong> at<br />
www.tivo.com/guides, or select Help from the <strong>TiVo</strong> Desktop<br />
application on your PC.<br />
122