Kirby Lester KL1- Easy-Start Guide - 5DIM-3802-ESG
Kirby Lester KL1- Easy-Start Guide - 5DIM-3802-ESG
Kirby Lester KL1- Easy-Start Guide - 5DIM-3802-ESG

You also want an ePaper? Increase the reach of your titles
YUMPU automatically turns print PDFs into web optimized ePapers that Google loves.
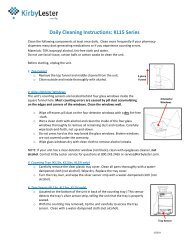
Keep this <strong>Guide</strong> near your <strong>KL1</strong><br />
Set‐up:<br />
<strong>Kirby</strong> <strong>Lester</strong> <strong>KL1</strong>‐ <strong>Easy</strong>‐<strong>Start</strong> <strong>Guide</strong> ‐ <strong>5DIM</strong>‐<strong>3802</strong>‐<strong>ESG</strong><br />
You will need no tools and only 5 minutes to begin using your <strong>KL1</strong>. It’s that easy!<br />
1. Remove the <strong>KL1</strong> from the shipping box. IMPORTANT: Save the shipping box and<br />
packing materials.<br />
2. Let the <strong>KL1</strong> warm to room temperature before turning it on for the first time.<br />
3. Insert the funnel into the square collar on the top of the unit.<br />
4. Connect the power cord to the back side of the unit and plug the other end into a<br />
standard outlet. Turn the power switch to “On”.<br />
5. Make sure the clear tray is inserted into the <strong>KL1</strong> base.<br />
Operation:<br />
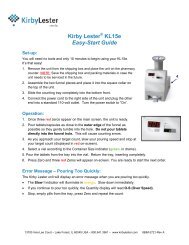
1. Once 4 red zeros appear on the main screen, the <strong>KL1</strong> is ready.<br />
2. Pour tablets/capsules as close to the outer edge of the funnel as possible so they gently tumble into the hole.<br />
Do not pour tablets directly into the funnel hole as this may cause counting errors.<br />
3. As you approach your desired quantity, slow your pouring speed and stop at your target count (displayed in red<br />
on‐screen).<br />
4. Select a vial according to the Min. Vial Size indicator (green, in drams).<br />
5. Pour the tablets from the tray into the vial (see right). Use your thumb to flip the spout cover. If you are righthanded,<br />
use your right thumb to flip the cover to the right, thus exposing the left‐most spout hole. If you are<br />
left‐handed, use your left thumb to flip the cover to the left.<br />
6. Return the tray, inserting it completely.<br />
7. The <strong>KL1</strong> will automatically reset, and four red zeros will again appear on the main screen.<br />
You are now ready to start counting the next order.<br />
Error Messages – Pour Slower and Partial Pill:<br />
The <strong>KL1</strong> is capable of counting up to 15‐18 pieces per second.<br />
If you pour faster than 15/18 per second, the Pour Slower indicator will illuminate in orange (see right). Slow<br />
down immediately.<br />
If you continue to pour too quickly, the 4‐digit display will read O‐S (Over Speed).<br />
Stop, remove tablets from the tray, reinsert the tray and repeat the count.<br />
The <strong>KL1</strong> will alert you if it detects a partial tablet/fragment less than 25% (approx.) of a whole tablet. The Partial Pill<br />
indicator will illuminate in orange.<br />
Visually inspect the contents of the tray, remove the partial tablet, and restart the count.<br />
<strong>Kirby</strong> <strong>Lester</strong>, LLC<br />
Service: 800.243.2465 or service@kirbylester.com; Sales: 800.641.3961 or sales@kirbylester.com
Special Mode:<br />
Use the “Special Mode” setting to count unique/odd‐shaped tablets or tablets with a hole. Perform a test to ensure<br />
the device can count these items accurately.<br />
To engage Special Mode, press and hold the Zero button until you hear a single beep; then release. The Special<br />
mode light will illuminate in orange.<br />
Count your order. Pour the tablets out of the tray, and reinsert the tray into the <strong>KL1</strong>.<br />
The <strong>KL1</strong> will automatically return to normal mode.<br />
Note: <strong>Kirby</strong> <strong>Lester</strong> units will not accurately count clear capsules, and may not accurately count items with a large<br />
hole or odd shape. Contact <strong>Kirby</strong> <strong>Lester</strong> Sales to ask about a particular medication.<br />
Inventory Mode:<br />
Use the “Inventory Mode” to conduct a physical inventory or to count a high number of tablets/capsules that may<br />
exceed the capacity of the tray.<br />
To engage Inventory Mode, press the Zero button and hold for approximately 3 seconds. You will hear the <strong>KL1</strong><br />
beep once for Special Mode, then beep twice for Inventory Mode. Release the Zero button when you hear it<br />
beep twice. The 4‐digit red display will show “INV” and Special will blink in orange.<br />
Count your order. If you need to empty the tray mid‐count because the amount of tablets you are counting<br />
is about to fill the tray to capacity, stop counting and remove the tray. The <strong>KL1</strong>’s 4‐digit red display will<br />
remember the quantity at which you stopped. Empty the tablets into another receptacle, reinsert the tray,<br />
and continue to pour the remainder of the tablets.<br />
To exit Inventory Mode, press and hold the zero button until you hear a double beep. The Special light will be<br />
off and not flashing.<br />
Cleaning/Maintenance:<br />
Clean the following components at least once daily. Clean more frequently if your pharmacy dispenses many chalky<br />
medications or if you experience counting errors.<br />
You will need 70% isopropyl alcohol and a lint‐free cloth (not facial tissue, cotton balls or cotton swabs).<br />
A. Power off the <strong>KL1</strong>.<br />
B. Top Funnel – Remove and clean outside and inside thoroughly with alcohol.<br />
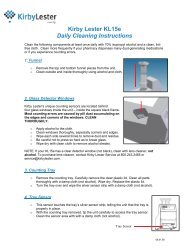
C. Glass Detector Windows – Most counting errors are caused by pill dust accumulating on the edges and corners<br />
of the windows. Clean these windows well.<br />
1. Unscrew the two round thumb screws on top of the device. Remove the square guard, and lift out the<br />
entire inside channel assembly.<br />
2. Wipe off excess dust on the glass windows with a dry cloth. Important: Perform this before using alcohol.<br />
3. (See photo, right) Wet a clean cloth with alcohol and clean the inside of the glass<br />
window holder thoroughly to remove all remaining dust and residue. Carefully<br />
wipe back‐and‐forth, not up‐and‐down. Do not press hard as this may break the<br />
glass windows. Broken windows are not covered under your warranty.<br />
4. Dry glass windows with a clean cloth to remove alcohol streaks.<br />
5. Visually inspect the windows to make sure they are dust‐free and streak‐free.<br />
D. Clear Tray – Clean thoroughly with alcohol. Wipe dry.<br />
E. Tray Sensor Window (located on the <strong>KL1</strong> behind the tray). With the tray removed,<br />
clean the sensor window with alcohol (Fig. 15). Wipe dry to remove alcohol streaks.<br />
<strong>Kirby</strong> <strong>Lester</strong>, LLC<br />
Service: 800.243.2465 or service@kirbylester.com; Sales: 800.641.3961 or sales@kirbylester.com