SEM Operation: 1. Use Carbon tape or copper tap or carbon ...
SEM Operation: 1. Use Carbon tape or copper tap or carbon ...
SEM Operation: 1. Use Carbon tape or copper tap or carbon ...

Create successful ePaper yourself
Turn your PDF publications into a flip-book with our unique Google optimized e-Paper software.
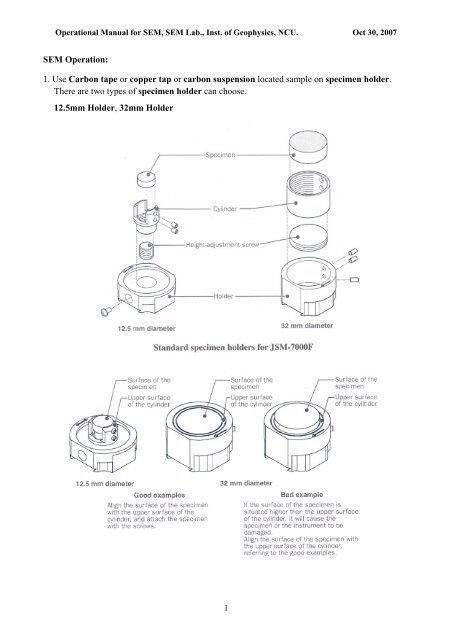
<strong>Operation</strong>al Manual f<strong>or</strong> <strong>SEM</strong>, <strong>SEM</strong> Lab., Inst. of Geophysics, NCU. Oct 30, 2007<br />
<strong>SEM</strong> <strong>Operation</strong>:<br />
<strong>1.</strong> <strong>Use</strong> <strong>Carbon</strong> <strong><strong>tap</strong>e</strong> <strong>or</strong> <strong>copper</strong> <strong>tap</strong> <strong>or</strong> <strong>carbon</strong> suspension located sample on specimen holder.<br />
There are two types of specimen holder can choose.<br />
12.5mm Holder, 32mm Holder<br />
1
<strong>Operation</strong>al Manual f<strong>or</strong> <strong>SEM</strong>, <strong>SEM</strong> Lab., Inst. of Geophysics, NCU. Oct 30, 2007<br />
2. Push VENT button (f<strong>or</strong> ~2sec., VENT button start to blink) venting the specimen exchange<br />
chamber.<br />
3. VENT button lit on (venting complete)<br />
4. Release Looking hook, open lid of specimen exchange chamber.<br />
5. Put in the specimen holder on the specimen holder chuck device.<br />
(Make sure the specimen holder on the c<strong>or</strong>rect direction, arrow mark on specimen holder<br />
should be parallel to the long direction of specimen holder chuck device.)<br />
2
<strong>Operation</strong>al Manual f<strong>or</strong> <strong>SEM</strong>, <strong>SEM</strong> Lab., Inst. of Geophysics, NCU. Oct 30, 2007<br />
6. Close the lid of specimen exchange chamber, locking on Looking hook.<br />
(EXCH POSN indication lamp should be lit on)<br />
7. Push EVAC button (f<strong>or</strong> ~2sec., EVAC button start to blink), evacuation of the specimen<br />
exchange chamber to bring it to high vacuum.<br />
8. EVAC button lit on (evacuation complete).<br />
9. <strong>Use</strong> Specimen exchange rod push the specimen holder into the Specimen chamber (HLDR<br />
indication lamp should be lit on), move out the Specimen exchange rod.<br />
(CAUTION: Specimen exchange rod is easily to damage, use it carefully)<br />
10. HLDR indication lamp lit on means that specimen holder is on the position to do image<br />
observation.<br />
1<strong>1.</strong> On PC, operate JEOL PC-<strong>SEM</strong> 7000 program.<br />
Tool Bar ---> ---> open Penning Gauge window ---> 2.8X10 -4 Pa (need 5~10min). ---<br />
> close Penning Gauge window ---> start to do image observation<br />
12. On the basic screen use Accelerating Voltage button select a suitable AV (usually 5-20kV).<br />
13. Tool Bar ---> ---> open Instrument Control window ---> choose a suitable Probe<br />
Current (usually 7-10)---> turn ON SEI Detect<strong>or</strong><br />
14. <strong>Use</strong> Vacuum Control panel open Gun Valve, use Gun Valve Close button to control Gun<br />
Valve.<br />
Gun Valve Close lit on ---> means Gun Valve is closed<br />
Gun Valve Close dim ---> means Gun Valve is opened<br />
3
<strong>Operation</strong>al Manual f<strong>or</strong> <strong>SEM</strong>, <strong>SEM</strong> Lab., Inst. of Geophysics, NCU. Oct 30, 2007<br />
15. <strong>Use</strong> <strong>Operation</strong> Panel to get the image.<br />
a. In low magnification find out the place you want to see.<br />
b. <strong>Use</strong> Brightness/Contrast knob to control image’s brightness and contrast.<br />
c. <strong>Use</strong> Focus knob to control the focus.<br />
d. <strong>Use</strong> Magnification knob to zoom in the image and check the brightness/contrast and focus.<br />
Keep going this processes until you get the image you want.<br />
e. If the image have signification you need to use Alignment X, Y knob to align the<br />
astigmatism c<strong>or</strong>rect<strong>or</strong> X <strong>or</strong> Y.<br />
f. If the image still not in good condition push down ALIGN button will open the Alignment<br />
window. Then push the HT WOBB button, use Alignment X, Y knob to control the image,<br />
let it to move on <strong>or</strong>iginal position, do not move away.<br />
(This process will help you to c<strong>or</strong>rect the Beam Align)<br />
4
<strong>Operation</strong>al Manual f<strong>or</strong> <strong>SEM</strong>, <strong>SEM</strong> Lab., Inst. of Geophysics, NCU. Oct 30, 2007<br />
Gun alignment: clicking the Gun Alignment button enables you to align the<br />
electron gun by using the Alignment X and Y knobs.<br />
Beam alignment: clicking the Beam Align button enables you to align the<br />
objective lens by using the Alignment X and Y knobs.<br />
Stig Center X <strong>or</strong> Y: clicking the Stig Center X <strong>or</strong> Y button enables you to<br />
align the astigmatism c<strong>or</strong>rect<strong>or</strong> X <strong>or</strong> Y by using the Alignment X and Y knobs.<br />
OL Stigmat<strong>or</strong>: clicking the OL Stigmat<strong>or</strong> button enables you to c<strong>or</strong>rect the<br />
object lens astigmatism by using the Alignment X and Y knobs.<br />
CL Stigmat<strong>or</strong>: clicking the CL Stigmat<strong>or</strong> button enables you to c<strong>or</strong>rect the<br />
condenser lens astigmatism by using the Alignment X and Y knobs.<br />
Align Clear: resects the clicked alignment items. (X=0, Y=0)<br />
Align Reset: resects the all alignment items. (X=0, Y=0)<br />
Lens Clear: removes the hysteresis of the lenses.<br />
After you get your image:<br />
16. Tool Bar ---> ---> open Image File Handling window ---> save the files.<br />
5
<strong>Operation</strong>al Manual f<strong>or</strong> <strong>SEM</strong>, <strong>SEM</strong> Lab., Inst. of Geophysics, NCU. Oct 30, 2007<br />
Title bar<br />
Menu bar<br />
Tool bar<br />
Specimen position indicat<strong>or</strong><br />
Observation condition indicat<strong>or</strong><br />
Title bar:<br />
EOS 7000F: machine name<br />
Caro: user’s name<br />
Using Recipe: which kind of recipe you choose<br />
Menu bar:<br />
The name of various menus f<strong>or</strong> condition setting are shown on the menu bar.<br />
Tool bar:<br />
Buttons are shown f<strong>or</strong> various operations and settings.<br />
6
<strong>Operation</strong>al Manual f<strong>or</strong> <strong>SEM</strong>, <strong>SEM</strong> Lab., Inst. of Geophysics, NCU. Oct 30, 2007<br />
Buttons f<strong>or</strong> electron-gun system<br />
The accelerating voltage is on and observation is ready.<br />
The accelerating voltage is on and observation is underway.<br />
Display of the accelerating voltage<br />
Display of selection between the emission current and filament current<br />
Display of the emission current <strong>or</strong> filament current<br />
The Instrument Maintenance button<br />
Buttons f<strong>or</strong> display system<br />
The N<strong>or</strong>mal Display button<br />
The Vertical Dual Image Mode button<br />
The H<strong>or</strong>izontal Dual Image Mode button<br />
7
<strong>Operation</strong>al Manual f<strong>or</strong> <strong>SEM</strong>, <strong>SEM</strong> Lab., Inst. of Geophysics, NCU. Oct 30, 2007<br />
The Quad Image Mode button<br />
The Spot Mode button<br />
The Reduced Scan Mode button<br />
The Scan Rotation On/Off button<br />
The Image Shift button<br />
Buttons f<strong>or</strong> image-processing system<br />
The F<strong>or</strong>mat Printout Page button<br />
The Image File Handling button<br />
The Image Contrast/Brightness/Gamma button<br />
The Annotate/Measurement button<br />
The Measure button<br />
The Diagonal Measure button<br />
The Measure X button<br />
The Measure Y button<br />
The Line Measure button<br />
Buttons f<strong>or</strong> setup system<br />
The Setup Instrument <strong>Operation</strong> button<br />
The Edit <strong>or</strong> Create Recipe button<br />
8
<strong>Operation</strong>al Manual f<strong>or</strong> <strong>SEM</strong>, <strong>SEM</strong> Lab., Inst. of Geophysics, NCU. Oct 30, 2007<br />
The Instrument Control button<br />
Buttons f<strong>or</strong> stage system<br />
The Stage Specimen Holder Exchange button<br />
9
<strong>Operation</strong>al Manual f<strong>or</strong> <strong>SEM</strong>, <strong>SEM</strong> Lab., Inst. of Geophysics, NCU. Oct 30, 2007<br />
The Stage Map and Control button<br />
Buttons f<strong>or</strong> attachments<br />
The RBEI button<br />
The AEM button<br />
The PVG button<br />
10
<strong>Operation</strong>al Manual f<strong>or</strong> <strong>SEM</strong>, <strong>SEM</strong> Lab., Inst. of Geophysics, NCU. Oct 30, 2007<br />
The PCD button<br />
Help<br />
Specimen position:<br />
Original position: (35, 25, 0)<br />
In <strong>or</strong>ange col<strong>or</strong>: does not move with the joystick<br />
Observation condition indicat<strong>or</strong>:<br />
The Scale bar:<br />
The magnification scale is indicated with a bar.<br />
NCU-ES:<br />
It can key in up to 6 alphanumeric characters from the keyboard.<br />
11
<strong>Operation</strong>al Manual f<strong>or</strong> <strong>SEM</strong>, <strong>SEM</strong> Lab., Inst. of Geophysics, NCU. Oct 30, 2007<br />
The Image Select<strong>or</strong> button:<br />
The Accelerating Voltage button:<br />
The Magnification button:<br />
The W<strong>or</strong>king Distance button:<br />
12