Coilover Kit MAZDASPEED.pdf - RX8Club.com
Coilover Kit MAZDASPEED.pdf - RX8Club.com
Coilover Kit MAZDASPEED.pdf - RX8Club.com

You also want an ePaper? Increase the reach of your titles
YUMPU automatically turns print PDFs into web optimized ePapers that Google loves.
2b<br />
Mazdaspeed RX8 <strong>Coilover</strong> <strong>Kit</strong> Installation Instructions<br />
REAR STRUT TEAR-DOWN & BUILD-UP<br />
WARNING: If removed incorrectly the shock and spring could fly off under pressure, causing injury or death.<br />
Remove the piston rod nut carefully after spring is <strong>com</strong>pressed and as follows. Secure the shock absorber in<br />
the spring <strong>com</strong>pressor before removing the piston rod nut. Read spring <strong>com</strong>pressor instructions before<br />
attempting to disassemble.<br />
6. Install the damper/spring assembly into the spring <strong>com</strong>pressor (re<strong>com</strong>mended to use a piece of cloth in<br />
order to prevent the coil spring from being scratched)-(See Figure B).<br />
7. Compress the coil spring using the spring <strong>com</strong>pressor per its instructions and remove the piston rod nut.<br />
8. Carefully remove upper mount and the shock absorber from the spring. Make sure not to loose pieces of the<br />
assembly.<br />
9. Carefully de-<strong>com</strong>press the spring per the spring <strong>com</strong>pressor instructions.<br />
10. Use the upper mount, upper nut, upper insulator and upper washer from the disassembled OE<br />
spring/damper assembly in the new coilover assembly per below.<br />
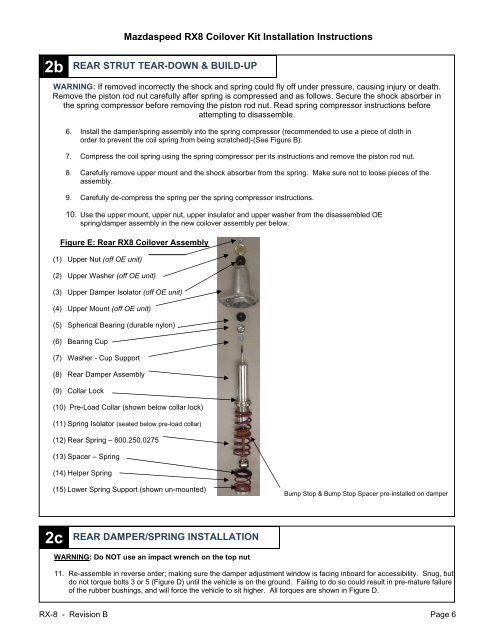
Figure E: Rear RX8 <strong>Coilover</strong> Assembly<br />
(1) Upper Nut (off OE unit)<br />
(2) Upper Washer (off OE unit)<br />
(3) Upper Damper Isolator (off OE unit)<br />
(4) Upper Mount (off OE unit)<br />
(5) Spherical Bearing (durable nylon)<br />
(6) Bearing Cup<br />
(7) Washer - Cup Support<br />
(8) Rear Damper Assembly<br />
(9) Collar Lock<br />
(10) Pre-Load Collar (shown below collar lock)<br />
(11) Spring Isolator (seated below pre-load collar)<br />
(12) Rear Spring – 800.250.0275<br />
(13) Spacer – Spring<br />
(14) Helper Spring<br />
(15) Lower Spring Support (shown un-mounted)<br />
Bump Stop & Bump Stop Spacer pre-installed on damper<br />
2c<br />
REAR DAMPER/SPRING INSTALLATION<br />
WARNING: Do NOT use an impact wrench on the top nut<br />
11. Re-assemble in reverse order; making sure the damper adjustment window is facing inboard for accessibility. Snug, but<br />
do not torque bolts 3 or 5 (Figure D) until the vehicle is on the ground. Failing to do so could result in pre-mature failure<br />
of the rubber bushings, and will force the vehicle to sit higher. All torques are shown in Figure D.<br />
RX-8 - Revision B Page 6