UC Wireless Printing: Connecting to NoWirePrint - University of ...
UC Wireless Printing: Connecting to NoWirePrint - University of ...
UC Wireless Printing: Connecting to NoWirePrint - University of ...

Create successful ePaper yourself
Turn your PDF publications into a flip-book with our unique Google optimized e-Paper software.
<strong>UC</strong> <strong>Wireless</strong> <strong>Printing</strong>: <strong>Connecting</strong> <strong>to</strong> <strong>NoWirePrint</strong><br />
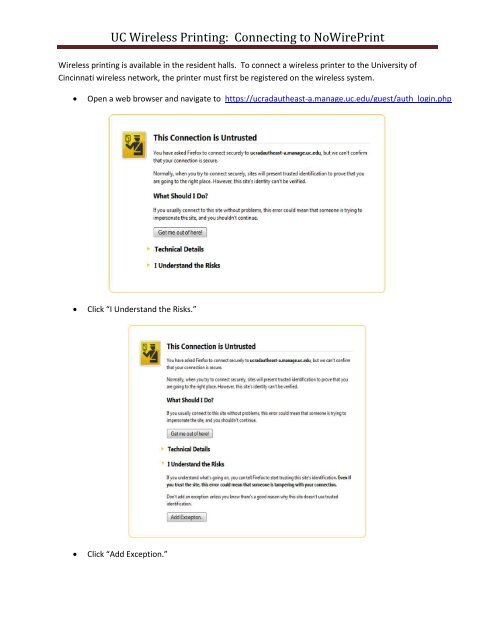
<strong>Wireless</strong> printing is available in the resident halls. To connect a wireless printer <strong>to</strong> the <strong>University</strong> <strong>of</strong><br />
Cincinnati wireless network, the printer must first be registered on the wireless system.<br />
<br />
Open a web browser and navigate <strong>to</strong> https://ucradautheast-a.manage.uc.edu/guest/auth_login.php<br />
<br />
Click “I Understand the Risks.”<br />
<br />
Click “Add Exception.”
<strong>UC</strong> <strong>Wireless</strong> <strong>Printing</strong>: <strong>Connecting</strong> <strong>to</strong> <strong>NoWirePrint</strong><br />
<br />
If you receive an Add Security Exception screen, click “Confirm Security Exception.”<br />
<br />
You will be redirected <strong>to</strong> an Opera<strong>to</strong>r Login screen.<br />
<br />
<br />
Enter your 6+2 username and password (Central Login Credentials).<br />
Click “Log In.”
<strong>UC</strong> <strong>Wireless</strong> <strong>Printing</strong>: <strong>Connecting</strong> <strong>to</strong> <strong>NoWirePrint</strong><br />
<br />
After clicking the “Log In” but<strong>to</strong>n, you will be directed <strong>to</strong> a Student Printer Registration page.<br />
<br />
<br />
Enter your Printer Name; please follow the format <strong>of</strong>, 6+2-printer, then enter the wireless MAC<br />
address <strong>of</strong> the printer. Check your manufacturer’s user guide for instructions on obtaining the<br />
MAC address.<br />
Click “Register Device.”
<strong>UC</strong> <strong>Wireless</strong> <strong>Printing</strong>: <strong>Connecting</strong> <strong>to</strong> <strong>NoWirePrint</strong><br />
<br />
<br />
<br />
The registration process has been completed. Please note the date the account will expire is<br />
one year from the registration date. The device will then need <strong>to</strong> be re-registered.<br />
The printer can now be connected <strong>to</strong> <strong>NoWirePrint</strong>.<br />
The following are the printer settings that are required <strong>to</strong> connect your printer <strong>to</strong> <strong>NoWirePrint</strong>:<br />
WPA2-PSK<br />
Preshared Key: ucprintkey<br />
AES encryption<br />
<br />
<br />
Note, the printer needs <strong>to</strong> be named in the printer setup process as, 6+2-printer. This will allow<br />
you <strong>to</strong> print by name rather than IP. The IP is subject <strong>to</strong> change but the name will remain<br />
constant.<br />
The name will appear in DNS in the format <strong>of</strong> 6+2-printer.wifi.uc.edu. When you connect <strong>to</strong> the<br />
printer from your PC or MAC you will then connect via this printer name.<br />
We highly recommend that you set a password on your printer <strong>to</strong> prevent<br />
other users from making changes <strong>to</strong> your device!!!