Viewing and updating your bank details in Themis
Viewing and updating your bank details in Themis
Viewing and updating your bank details in Themis

You also want an ePaper? Increase the reach of your titles
YUMPU automatically turns print PDFs into web optimized ePapers that Google loves.
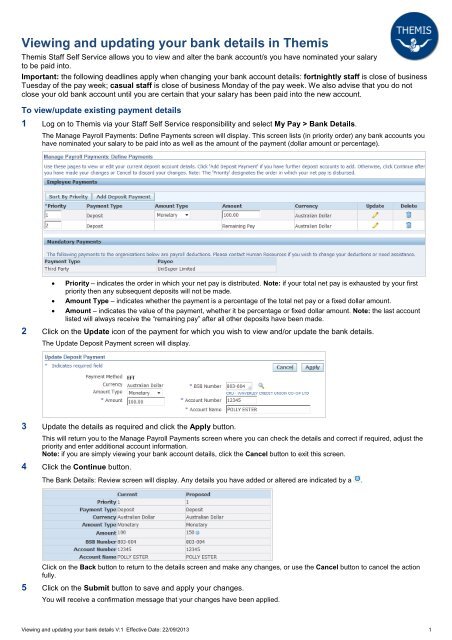
<strong>View<strong>in</strong>g</strong> <strong>and</strong> <strong>updat<strong>in</strong>g</strong> <strong>your</strong> <strong>bank</strong> <strong>details</strong> <strong>in</strong> <strong>Themis</strong><br />
<strong>Themis</strong> Staff Self Service allows you to view <strong>and</strong> alter the <strong>bank</strong> account/s you have nom<strong>in</strong>ated <strong>your</strong> salary<br />
to be paid <strong>in</strong>to.<br />
Important: the follow<strong>in</strong>g deadl<strong>in</strong>es apply when chang<strong>in</strong>g <strong>your</strong> <strong>bank</strong> account <strong>details</strong>: fortnightly staff is close of bus<strong>in</strong>ess<br />
Tuesday of the pay week; casual staff is close of bus<strong>in</strong>ess Monday of the pay week. We also advise that you do not<br />
close <strong>your</strong> old <strong>bank</strong> account until you are certa<strong>in</strong> that <strong>your</strong> salary has been paid <strong>in</strong>to the new account.<br />
To view/update exist<strong>in</strong>g payment <strong>details</strong><br />
1 Log on to <strong>Themis</strong> via <strong>your</strong> Staff Self Service responsibility <strong>and</strong> select My Pay > Bank Details.<br />
The Manage Payroll Payments: Def<strong>in</strong>e Payments screen will display. This screen lists (<strong>in</strong> priority order) any <strong>bank</strong> accounts you<br />
have nom<strong>in</strong>ated <strong>your</strong> salary to be paid <strong>in</strong>to as well as the amount of the payment (dollar amount or percentage).<br />
• Priority – <strong>in</strong>dicates the order <strong>in</strong> which <strong>your</strong> net pay is distributed. Note: if <strong>your</strong> total net pay is exhausted by <strong>your</strong> first<br />
priority then any subsequent deposits will not be made.<br />
• Amount Type – <strong>in</strong>dicates whether the payment is a percentage of the total net pay or a fixed dollar amount.<br />
• Amount – <strong>in</strong>dicates the value of the payment, whether it be percentage or fixed dollar amount. Note: the last account<br />
listed will always receive the “rema<strong>in</strong><strong>in</strong>g pay” after all other deposits have been made.<br />
2 Click on the Update icon of the payment for which you wish to view <strong>and</strong>/or update the <strong>bank</strong> <strong>details</strong>.<br />
The Update Deposit Payment screen will display.<br />
3 Update the <strong>details</strong> as required <strong>and</strong> click the Apply button.<br />
This will return you to the Manage Payroll Payments screen where you can check the <strong>details</strong> <strong>and</strong> correct if required, adjust the<br />
priority <strong>and</strong> enter additional account <strong>in</strong>formation.<br />
Note: if you are simply view<strong>in</strong>g <strong>your</strong> <strong>bank</strong> account <strong>details</strong>, click the Cancel button to exit this screen.<br />
4 Click the Cont<strong>in</strong>ue button.<br />
The Bank Details: Review screen will display. Any <strong>details</strong> you have added or altered are <strong>in</strong>dicated by a .<br />
Click on the Back button to return to the <strong>details</strong> screen <strong>and</strong> make any changes, or use the Cancel button to cancel the action<br />
fully.<br />
5 Click on the Submit button to save <strong>and</strong> apply <strong>your</strong> changes.<br />
You will receive a confirmation message that <strong>your</strong> changes have been applied.<br />
<strong>View<strong>in</strong>g</strong> <strong>and</strong> <strong>updat<strong>in</strong>g</strong> <strong>your</strong> <strong>bank</strong> <strong>details</strong> V:1 Effective Date: 22/09/2013 1
<strong>Themis</strong> Reference Card<br />
To add new payment <strong>details</strong><br />
1 Log on to <strong>Themis</strong> via <strong>your</strong> Staff Self Service responsibility <strong>and</strong> select My Pay > Bank Details.<br />
The Manage Payroll Payments: Def<strong>in</strong>e Payments screen will display.<br />
2 Click on the Add Deposit Payment button.<br />
The Add Deposit Payment screen will display.<br />
3 Enter <strong>your</strong> <strong>bank</strong> deposit <strong>details</strong>.<br />
Field Action Comment<br />
Amount Type<br />
Amount<br />
BSB Number<br />
Account Number<br />
Account Name<br />
Select the type of payment from the dropdown<br />
list.<br />
Enter the amount (either percentage or dollar<br />
value) of the payment.<br />
Enter the BSB number of the <strong>bank</strong>/f<strong>in</strong>ancial<br />
<strong>in</strong>stitution or click on the search icon to<br />
search <strong>and</strong> select from the list of values.<br />
Enter the number of the account to which you<br />
wish to make a payment.<br />
Enter the name of the account to which you<br />
wish to make a payment.<br />
Select Monetary if you wish to make a payment<br />
of a fixed dollar amount.<br />
Select Percentage if you wish to make a deposit<br />
of a specified percentage of <strong>your</strong> net payment.<br />
To search on a <strong>bank</strong> name or description, select<br />
Description from the drop-down list <strong>in</strong> the Search<br />
By field. Enter the <strong>bank</strong> name or other criteria <strong>in</strong><br />
the search field (e.g.: to search for an NAB<br />
branch enter NAB% or to search for all <strong>bank</strong>s <strong>in</strong><br />
Parkville, enter %Parkville%).<br />
Note: enter <strong>your</strong> account name <strong>in</strong> the format<br />
LASTNAME, INITIALS (e.g.: ESTER, P A)<br />
4 Click on the Apply button to save the deposit <strong>details</strong> <strong>and</strong> return to the Manage Payroll Payments screen.<br />
The new payment deposit <strong>details</strong> will be added to <strong>your</strong> payments list<strong>in</strong>g with a priority of “1”.<br />
Note: if you wish to enter multiple deposit payments, click on the Add Another button <strong>and</strong> enter the <strong>details</strong> as per step 3.<br />
5 Update the priority of <strong>your</strong> deposit list<strong>in</strong>gs, if required <strong>and</strong> click the Cont<strong>in</strong>ue button.<br />
The Bank Details: Review screen will display with the <strong>details</strong> you have added or modified <strong>in</strong>dicated by a .<br />
Click on the Back button to return to the <strong>details</strong> screen <strong>and</strong> make any changes, or use the Cancel button to cancel the action<br />
fully.<br />
6 Click on the Submit button to save <strong>and</strong> apply <strong>your</strong> changes.<br />
You will receive a confirmation message that <strong>your</strong> changes have been applied.<br />
<strong>View<strong>in</strong>g</strong> <strong>and</strong> <strong>updat<strong>in</strong>g</strong> <strong>your</strong> <strong>bank</strong> <strong>details</strong> V:1 Effective Date: 22/09/2013 2
<strong>Themis</strong> Reference Card<br />
To delete payment <strong>details</strong><br />
1 Log on via <strong>your</strong> Staff Self Service responsibility <strong>and</strong> select My Pay > Bank Details.<br />
The Manage Payroll Payments: Def<strong>in</strong>e Payments screen will display.<br />
2 Click on the Delete icon of the payment <strong>details</strong> you wish to remove.<br />
Note: if you delete the deposit <strong>details</strong> for <strong>your</strong> Rema<strong>in</strong><strong>in</strong>g Pay the payment deposit list<strong>in</strong>g with the next lowest priority will<br />
automatically become the new rema<strong>in</strong><strong>in</strong>g pay account.<br />
3 Click the Cont<strong>in</strong>ue button.<br />
Click on the Back button to return to the <strong>details</strong> screen <strong>and</strong> make any changes, or use the Cancel button to cancel the action<br />
fully.<br />
4 Click on the Submit button to save <strong>and</strong> apply <strong>your</strong> changes.<br />
You will receive a confirmation message that <strong>your</strong> changes have been applied.<br />
<strong>View<strong>in</strong>g</strong> <strong>and</strong> <strong>updat<strong>in</strong>g</strong> <strong>your</strong> <strong>bank</strong> <strong>details</strong> V:1 Effective Date: 22/09/2013 3