Cancelling or amending a leave request in Themis
Cancelling or amending a leave request in Themis
Cancelling or amending a leave request in Themis

Create successful ePaper yourself
Turn your PDF publications into a flip-book with our unique Google optimized e-Paper software.
<strong>Cancell<strong>in</strong>g</strong> <strong>or</strong> <strong>amend<strong>in</strong>g</strong> a <strong>leave</strong> <strong>request</strong> <strong>in</strong> <strong>Themis</strong><br />
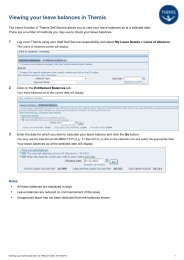
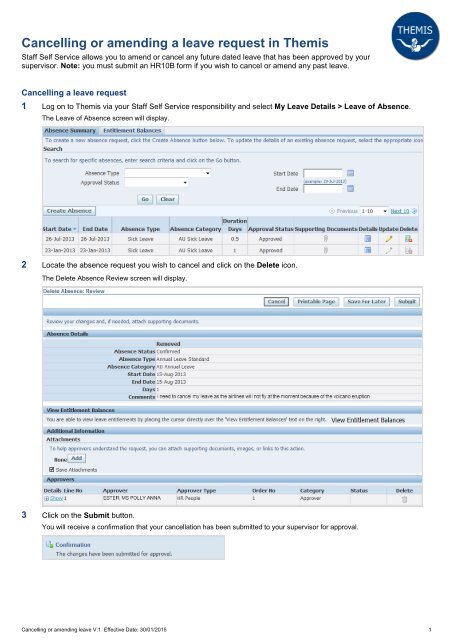
Staff Self Service allows you to amend <strong>or</strong> cancel any future dated <strong>leave</strong> that has been approved by your<br />
supervis<strong>or</strong>. Note: you must submit an HR10B f<strong>or</strong>m if you wish to cancel <strong>or</strong> amend any past <strong>leave</strong>.<br />
<strong>Cancell<strong>in</strong>g</strong> a <strong>leave</strong> <strong>request</strong><br />
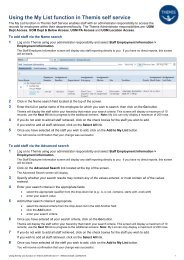
1 Log on to <strong>Themis</strong> via your Staff Self Service responsibility and select My Leave Details > Leave of Absence.<br />
The Leave of Absence screen will display.<br />
2 Locate the absence <strong>request</strong> you wish to cancel and click on the Delete icon.<br />
The Delete Absence Review screen will display.<br />
3 Click on the Submit button.<br />
You will receive a confirmation that your cancellation has been submitted to your supervis<strong>or</strong> f<strong>or</strong> approval.<br />
<strong>Cancell<strong>in</strong>g</strong> <strong>or</strong> <strong>amend<strong>in</strong>g</strong> <strong>leave</strong> V:1 Effective Date: 30/01/2015 1
<strong>Themis</strong> Reference Card<br />
Amend<strong>in</strong>g a <strong>leave</strong> <strong>request</strong><br />
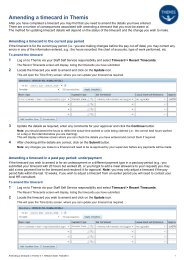
1 Log on to <strong>Themis</strong> via your Staff Self Service responsibility and select My Leave Details > Leave of Absence.<br />
The Leave of Absence screen will display.<br />
2 Locate the absence <strong>request</strong> you wish to alter and click on the Update icon.<br />
The Update Absence screen will display.<br />
3 Update the details as required and click on the Next button.<br />
This will take you to a Review screen where you can check the changes you have made.<br />
Click the Back button to return to the details screen and make any changes, <strong>or</strong> use the Cancel button to cancel the action<br />
completely.<br />
4 Click on the Submit button.<br />
You will receive a confirmation that your changes have been submitted to your supervis<strong>or</strong> f<strong>or</strong> approval.<br />
<strong>Cancell<strong>in</strong>g</strong> <strong>or</strong> <strong>amend<strong>in</strong>g</strong> <strong>leave</strong> V:1 Effective Date: 30/01/2015 2