QuickPost and Durapoly Posts
QuickPost and Durapoly Posts
QuickPost and Durapoly Posts

You also want an ePaper? Increase the reach of your titles
YUMPU automatically turns print PDFs into web optimized ePapers that Google loves.
®<br />
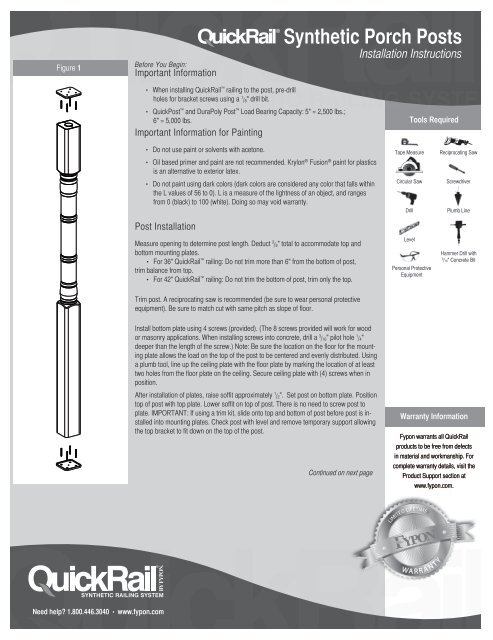
Figure 1<br />
Before You Begin:<br />
Important Information<br />
®<br />
Synthetic Porch <strong>Posts</strong><br />
Installation Instructions<br />
• When installing QuickRail railing to the post, pre-drill<br />
holes for bracket screws using a 1 /8" drill bit.<br />
• <strong>QuickPost</strong> <strong>and</strong> DuraPoly Post Load Bearing Capacity: 5" = 2,500 lbs.;<br />
6" = 5,000 lbs.<br />
Important Information for Painting<br />
Tools Required<br />
• Do not use paint or solvents with acetone.<br />
• Oil based primer <strong>and</strong> paint are not recommended. Krylon ® Fusion ® paint for plastics<br />
is an alternative to exterior latex.<br />
• Do not paint using dark colors (dark colors are considered any color that falls within<br />
the L values of 56 to 0). L is a measure of the lightness of an object, <strong>and</strong> ranges<br />
from 0 (black) to 100 (white). Doing so may void warranty.<br />
Post Installation<br />
Measure opening to determine post length. Deduct 3 /8" total to accommodate top <strong>and</strong><br />
bottom mounting plates.<br />
• For 36" QuickRail railing: Do not trim more than 6" from the bottom of post,<br />
trim balance from top.<br />
• For 42" QuickRail railing: Do not trim the bottom of post, trim only the top.<br />
Tape Measure<br />
Circular Saw<br />
Drill<br />
Level<br />
Personal Protective<br />
Equipment<br />
Reciprocating Saw<br />
Screwdriver<br />
Plumb Line<br />
Hammer Drill with<br />
3<br />
/16" Concrete Bit<br />
Trim post. A reciprocating saw is recommended (be sure to wear personal protective<br />
equipment). Be sure to match cut with same pitch as slope of floor.<br />
Install bottom plate using 4 screws (provided). (The 8 screws provided will work for wood<br />
or masonry applications. When installing screws into concrete, drill a 3 /16" pilot hole 1 /4"<br />
deeper than the length of the screw.) Note: Be sure the location on the floor for the mounting<br />
plate allows the load on the top of the post to be centered <strong>and</strong> evenly distributed. Using<br />
a plumb tool, line up the ceiling plate with the floor plate by marking the location of at least<br />
two holes from the floor plate on the ceiling. Secure ceiling plate with (4) screws when in<br />
position.<br />
After installation of plates, raise soffit approximately 1 /2". Set post on bottom plate. Position<br />
top of post with top plate. Lower soffit on top of post. There is no need to screw post to<br />
plate. IMPORTANT: If using a trim kit, slide onto top <strong>and</strong> bottom of post before post is installed<br />
into mounting plates. Check post with level <strong>and</strong> remove temporary support allowing<br />
the top bracket to fit down on the top of the post.<br />
Continued on next page<br />
Warranty Information<br />
Fypon warrants all QuickRail<br />
products to be free from defects<br />
in material <strong>and</strong> workmanship. For<br />
complete warranty details, visit the<br />
Product Support section at<br />
www.fypon.com.<br />
®<br />
Need help 1.800.446.3040 • www.fypon.com
®<br />
®<br />
Synthetic Porch <strong>Posts</strong><br />
Installation Instructions<br />
- Continued -<br />
Figure 1<br />
Installing Trim Kit (Trim Kit Sold Separately)<br />
Before post is installed, slide one trim piece at the top of the post <strong>and</strong> one trim piece at<br />
the bottom of the post.<br />
PVC glue can be applied to hold the Trim Kit into place at the top <strong>and</strong> bottom of the post.<br />
There may be some marginal spacing in the Trim Kit to Post fit. Exterior caulk can be<br />
used as a filler.<br />
Trim Kit Sold Separately<br />
Painting Instructions (DuraPoly Post <strong>and</strong> Trim Kit Only)<br />
Caulk seams between post <strong>and</strong> trim kit.<br />
Make sure all surfaces are clean prior to painting. S<strong>and</strong> <strong>and</strong> scuff post <strong>and</strong> trim kit pieces<br />
prior to priming <strong>and</strong> painting.<br />
Prime DuraPoly Post <strong>and</strong> Trim Kit pieces with a light coat of exterior latex primer.<br />
Allow primer to dry completely before applying 2 coats of exterior latex paint. (Allow<br />
adequate drying time in between each coat of paint.)<br />
Warranty Information<br />
Fypon warrants all QuickRail<br />
products to be free from defects<br />
in material <strong>and</strong> workmanship. For<br />
complete warranty details, visit the<br />
Product Support section at<br />
www.fypon.com.<br />
®<br />
Need help 1.800.446.3040 • www.fypon.com