Pinnacle Web Gradebook Application Quick Start Reference Guide
Pinnacle Web Gradebook Application Quick Start Reference Guide
Pinnacle Web Gradebook Application Quick Start Reference Guide

Create successful ePaper yourself
Turn your PDF publications into a flip-book with our unique Google optimized e-Paper software.
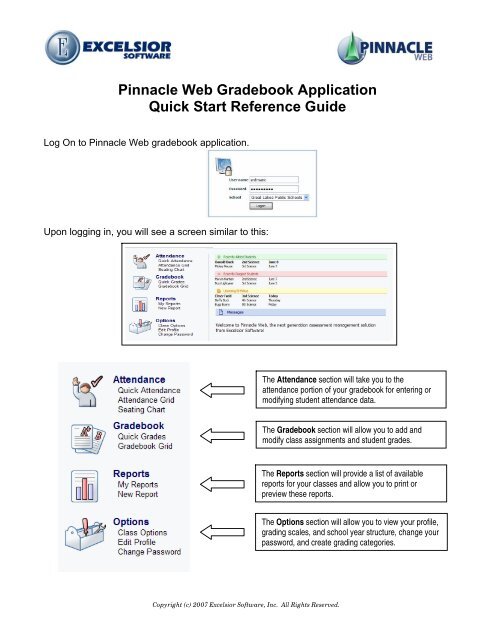
<strong>Pinnacle</strong> <strong>Web</strong> <strong>Gradebook</strong> <strong>Application</strong><br />
<strong>Quick</strong> <strong>Start</strong> <strong>Reference</strong> <strong>Guide</strong><br />
Log On to <strong>Pinnacle</strong> <strong>Web</strong> gradebook application.<br />
Upon logging in, you will see a screen similar to this:<br />
The Attendance section will take you to the<br />
attendance portion of your gradebook for entering or<br />
modifying student attendance data.<br />
The <strong>Gradebook</strong> section will allow you to add and<br />
modify class assignments and student grades.<br />
The Reports section will provide a list of available<br />
reports for your classes and allow you to print or<br />
preview these reports.<br />
The Options section will allow you to view your profile,<br />
grading scales, and school year structure, change your<br />
password, and create grading categories.<br />
Copyright (c) 2007 Excelsior Software, Inc. All Rights Reserved.
Excelsior Software <strong>Pinnacle</strong> <strong>Web</strong> System<br />
<strong>Quick</strong> <strong>Start</strong> <strong>Reference</strong> <strong>Guide</strong> for <strong>Pinnacle</strong> <strong>Web</strong> <strong>Gradebook</strong> <strong>Application</strong><br />
Once you are in an area within the <strong>Pinnacle</strong> System (Attendance, <strong>Gradebook</strong>, Reports,<br />
Options) you may navigate to different parts of the gradebook by simply clicking on an icon on<br />
the navigation bar.<br />
For example:<br />
Instead of having to click on<br />
to<br />
navigate to different parts of your<br />
<strong>Gradebook</strong>, you can simply choose where<br />
you want to go by clicking on one of these<br />
buttons<br />
THE SPLASH SCREEN<br />
1<br />
2<br />
3<br />
4<br />
NOTE: In both the <strong>Gradebook</strong> and the Attendance Grids, as well<br />
as <strong>Quick</strong> Grades and <strong>Quick</strong> Attendance, hovering over a student<br />
name will change the name to a bold font and display the<br />
student’s “business card” which includes name, student ID, grade,<br />
gender, birthday, guardian, phone, & picture (if available).<br />
1. Recently Added Students:<br />
• Lists students that have been added to any of your classes in the past 10 days, the<br />
class to which they were added, and the date they were added.<br />
2. Recently Dropped Students:<br />
• Lists students who have withdrawn from any of your classes in the past 10 days, the<br />
class from which they withdrew, and the date they withdrew.<br />
3. Upcoming Birthdays:<br />
• Displays the birthdates of students with a birthday in the next ten days.<br />
4. Messages:<br />
• This information is customizable. The information that is shown here will be seen by all<br />
teachers and gradebook managers who log into the gradebook.<br />
**The information on the Splash Screen is pulled from the school<br />
Student Information System**<br />
Page 2<br />
<strong>Quick</strong> <strong>Start</strong> <strong>Reference</strong> <strong>Guide</strong> for <strong>Pinnacle</strong> <strong>Web</strong> <strong>Gradebook</strong> <strong>Application</strong>
Excelsior Software <strong>Pinnacle</strong> <strong>Web</strong> System<br />
<strong>Quick</strong> <strong>Start</strong> <strong>Reference</strong> <strong>Guide</strong> for <strong>Pinnacle</strong> <strong>Web</strong> <strong>Gradebook</strong> <strong>Application</strong><br />
TAKING ATTENDANCE<br />
From the Home Page or from a navigation bar, click on <strong>Quick</strong> Attendance.<br />
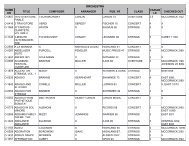
The class roster for the selected class is listed with the school attendance codes to the right of<br />
their names. The date will default to today’s date. To take attendance for a class, simply click<br />
on the appropriate attendance code for the individual student. Hover your mouse over each<br />
code for a description of that code.<br />
If no students are absent or tardy for this class, click the All Present button to mark that<br />
attendance was taken for today. If your school uses a Present code, click the All Present<br />
button to mark any student without an absent or tardy code as Present. If an attendance<br />
secretary has already entered an attendance code for a student, that code will appear in the<br />
gray column to the right of the attendance codes. Clicking the All Present button will not clear<br />
that attendance.<br />
A green checkmark on the class tab at the top of the screen indicates that attendance has<br />
been taken for this class for this date.<br />
If you accidentally choose the wrong attendance code, simply click the correct attendance<br />
code and the wrong code will automatically be cleared. If you mark attendance for the wrong<br />
student, click the code that you’ve just selected once again and the attendance code will be<br />
cleared.<br />
INVALID SCHOOL DAY: If the attendance codes are grayed out and look similar to this<br />
you will not be able to take attendance for that date as it is an invalid school<br />
attendance day or a date which has passed and marked as locked for gradebook entry. A<br />
padlock icon on the class tab indicates that date has been locked for this class.<br />
If you wish to add a comment about a student’s attendance, first select the attendance code,<br />
then click in the Comments field to the right, and enter the comment. If the office staff enters<br />
a comment about an absence or a tardy, it will overwrite your comment for that student.<br />
IMPORTANT: The yellow background which fades indicates that the information entered has<br />
been saved in the <strong>Pinnacle</strong> database. No other action is necessary to save the data.<br />
Select another class by using the class tabs at the top of the screen.<br />
If you need to edit attendance for a previous or future date, you may enter the date you want in<br />
the date field in m/dd/yyyy format or click the left and right arrows to go up and down the list of<br />
dates You may also click the calendar icon to display a monthly<br />
calendar from which to select a date. A third way of selecting a date is to enter a “smart date”,<br />
for example, yesterday, last Friday, next week Monday, etc. which will bring up that date.<br />
Edit the data by following the steps above and making the appropriate changes.<br />
Page 3<br />
<strong>Quick</strong> <strong>Start</strong> <strong>Reference</strong> <strong>Guide</strong> for <strong>Pinnacle</strong> <strong>Web</strong> <strong>Gradebook</strong> <strong>Application</strong>
Excelsior Software <strong>Pinnacle</strong> <strong>Web</strong> System<br />
<strong>Quick</strong> <strong>Start</strong> <strong>Reference</strong> <strong>Guide</strong> for <strong>Pinnacle</strong> <strong>Web</strong> <strong>Gradebook</strong> <strong>Application</strong><br />
Attendance Grid: If you would like to view the attendance for a range of dates, click on<br />
from the Home Page or from a navigation bar. This will display a grid with the<br />
dates for several weeks. The default view will highlight the current date within the current<br />
week and previous and future weeks, depending on the display of your computer screen.<br />
Entered attendance codes will be displayed in a column for each attendance day.<br />
• Invalid school days, or days which have been locked for gradebook attendance entry,<br />
have a padlock icon in the upper right corner of the date box.<br />
• A green check mark next to the date means attendance has been taken for that date<br />
in that class.<br />
If you single click on a date at the top of a column, you will be taken to the <strong>Quick</strong> Attendance<br />
screen where you are able to make the appropriate attendance changes. You may not edit<br />
attendance in the Attendance Grid.<br />
A red triangle next to a student’s attendance indicates that a comment has been<br />
entered about this attendance. Hovering your mouse over the attendance code will cause this<br />
comment to be displayed in a pop-up window.<br />
If you would like to view another week’s attendance, you may enter it in the date field in<br />
m/dd/yyyy format or click the left and right arrows to go to a previous or future week. You may<br />
also click on the calendar icon from which to select a date or enter a “smart date” such as<br />
last week which would take you to the date one week ago.<br />
On the right side of the screen, you will see<br />
Under the “A” are displayed the<br />
students’ total Absences for the selected Marking Period. The “T” lists the total Tardies the<br />
students have in the selected Marking Period. If the student has no absences or tardies, you<br />
will see a “-“. It will look similar to this:<br />
By clicking on<br />
on the right side of the screen, you will get a drop down list of the<br />
different marking periods available. Choose one to display the total absences and tardies for<br />
that Marking Period.<br />
Page 4<br />
<strong>Quick</strong> <strong>Start</strong> <strong>Reference</strong> <strong>Guide</strong> for <strong>Pinnacle</strong> <strong>Web</strong> <strong>Gradebook</strong> <strong>Application</strong>
Excelsior Software <strong>Pinnacle</strong> <strong>Web</strong> System<br />
<strong>Quick</strong> <strong>Start</strong> <strong>Reference</strong> <strong>Guide</strong> for <strong>Pinnacle</strong> <strong>Web</strong> <strong>Gradebook</strong> <strong>Application</strong><br />
ADDING / EDITING AN ASSIGNMENT<br />
From the Home Page or from a navigation bar, click on <strong>Gradebook</strong> Grid.<br />
Click on the column header which says “New…”<br />
this:<br />
which will display a screen similar to<br />
All assignments MUST have<br />
a date assigned and a date<br />
due. The date assigned will<br />
default to today’s date and<br />
the date due will default to<br />
the next valid school day.<br />
1. Fill in the name of the assignment (be as descriptive as possible)<br />
2. Select a Grading Scale from the drop-down list provided.<br />
3. Choose the date assigned and the assignment due date. The date assigned and the<br />
due date can be typed in m/dd/yyyy format, or you can click on the icon to select a<br />
date from a monthly calendar. You may also use a “smart date” such as yesterday,<br />
next Friday, next week Monday, etc.<br />
4. Fill in the maximum value for the assignment.<br />
5. The weight of the assignment should remain as 1 for the score to count once in the<br />
calculation of the Marking Period grade. Entering a number greater than 1 will multiply<br />
the points earned and the points possible for the assignment. Entering a 0 will make<br />
the assignment “not count” in the Marking Period grade.<br />
Page 5<br />
<strong>Quick</strong> <strong>Start</strong> <strong>Reference</strong> <strong>Guide</strong> for <strong>Pinnacle</strong> <strong>Web</strong> <strong>Gradebook</strong> <strong>Application</strong>
Excelsior Software <strong>Pinnacle</strong> <strong>Web</strong> System<br />
<strong>Quick</strong> <strong>Start</strong> <strong>Reference</strong> <strong>Guide</strong> for <strong>Pinnacle</strong> <strong>Web</strong> <strong>Gradebook</strong> <strong>Application</strong><br />
If you would like to add a description to a particular assignment, click on the<br />
You’ll see a screen similar to this:<br />
tab.<br />
IMPORTANT: This information will be seen by parents and students via the <strong>Pinnacle</strong> Internet<br />
Viewer (PIV).<br />
To link this assignment to one or more objectives, click on the<br />
will look similar to this:<br />
tab. Your screen<br />
Select and drag one of the Available Objectives listed in the bottom window to the Selected<br />
Objectives window at the top. Hovering your mouse over the objective will display more<br />
information about that objective.<br />
If you would like to create this same assignment for one or more of your other classes, click<br />
the<br />
tab. Select one or more classes with a check mark.<br />
When you’ve entered all of the assignment information, click on the in the upper right<br />
corner of the screen. To save the assignment and create a new one using the current settings<br />
as the default, click After the assignment is saved, click on the button to<br />
go back to the <strong>Gradebook</strong> Grid.<br />
Page 6<br />
<strong>Quick</strong> <strong>Start</strong> <strong>Reference</strong> <strong>Guide</strong> for <strong>Pinnacle</strong> <strong>Web</strong> <strong>Gradebook</strong> <strong>Application</strong>
Excelsior Software <strong>Pinnacle</strong> <strong>Web</strong> System<br />
<strong>Quick</strong> <strong>Start</strong> <strong>Reference</strong> <strong>Guide</strong> for <strong>Pinnacle</strong> <strong>Web</strong> <strong>Gradebook</strong> <strong>Application</strong><br />
On the assignment grid, the assignment header will look similar to this:<br />
Assignment Title<br />
Assignment Due Date<br />
Assignment Max Value<br />
To edit an assignment, single-click on the header of the assignment. Your cursor will turn to a<br />
hand and the background will turn a slightly darker blue color. This will allow you to add or edit<br />
any information previously entered for this particular assignment.<br />
When you’re done making the changes, click on<br />
to go back to the <strong>Gradebook</strong> Grid.<br />
at the top of the screen. Then click<br />
To easily navigate to different assignments from within the editing window, click on the drop<br />
down box at the top of the window. You will see all the assignments you’ve added in order by<br />
due date. It will look similar to this:<br />
IMPORTANT: If you make changes to an assignment<br />
and click ‘close’ without clicking Save, your changes<br />
will be lost.<br />
Page 7<br />
<strong>Quick</strong> <strong>Start</strong> <strong>Reference</strong> <strong>Guide</strong> for <strong>Pinnacle</strong> <strong>Web</strong> <strong>Gradebook</strong> <strong>Application</strong>
Excelsior Software <strong>Pinnacle</strong> <strong>Web</strong> System<br />
<strong>Quick</strong> <strong>Start</strong> <strong>Reference</strong> <strong>Guide</strong> for <strong>Pinnacle</strong> <strong>Web</strong> <strong>Gradebook</strong> <strong>Application</strong><br />
ENTERING AN ASSIGNMENT SCORE<br />
To enter an assignment score in the <strong>Gradebook</strong> Grid, click on the grade cell for a particular<br />
student.<br />
• Enter the numeric or letter grade the student received.<br />
You will see two scores for each assignment; a letter grade and numerical grade. These<br />
numbers are predefined based on the grading scale associated with the assignment. It<br />
will look similar to this:<br />
QUICK GRADES<br />
To quickly enter student grades for an assignment, click on<br />
from the Home Page<br />
or from a navigation bar. Using the drop down box or the left and right arrows, choose the<br />
assignment:<br />
• Enter the numeric score the student received into the numeric column, or<br />
• Select a letter grade from the drop-down list of letter grades displayed.<br />
Entering a letter grade will give<br />
the student the lowest possible<br />
percentage score for that<br />
grade. For example, choosing<br />
an A- will always give the<br />
student a percentage grade of<br />
90.<br />
Select the letter grade<br />
the student received.<br />
Page 8<br />
<strong>Quick</strong> <strong>Start</strong> <strong>Reference</strong> <strong>Guide</strong> for <strong>Pinnacle</strong> <strong>Web</strong> <strong>Gradebook</strong> <strong>Application</strong>
Excelsior Software <strong>Pinnacle</strong> <strong>Web</strong> System<br />
<strong>Quick</strong> <strong>Start</strong> <strong>Reference</strong> <strong>Guide</strong> for <strong>Pinnacle</strong> <strong>Web</strong> <strong>Gradebook</strong> <strong>Application</strong><br />
COMMENTS<br />
To add a comment about a student’s score on an assignment, click on<br />
From here, under the Comments area, type the comment for the student. It will look similar to<br />
this:<br />
The comment can be as long as you’d like for the particular student. If you realize you’ve typed<br />
a comment for the wrong student, highlight the comment (it will turn blue) see below for example<br />
• Right-click on the comment and choose ‘cut.’<br />
• Right-click on the appropriate student’s comment area and choose ‘paste.’<br />
• The comment will now appear in the correct student’s comment area.<br />
In the <strong>Gradebook</strong> Grid, you will see the letter and numerical grade with a red triangle in the<br />
upper right corner of the grade box similar this:<br />
The red triangle indicates that<br />
there is a comment attached to that grade. If you hover with your mouse over the red triangle,<br />
a pop-up window will display the comment.<br />
DELETING AN ASSIGNMENT<br />
If you realize you have an assignment that you don’t need, you may easily delete it. Singleclick<br />
the assignment description header to edit it. In the assignment definition window, in the<br />
upper right corner, click on the<br />
will see a message similar to this:<br />
button. After the assignment has been deleted, you<br />
If you realize that you’ve deleted the wrong assignment, click on the “click here” link to<br />
undelete the assignment. Click Save or go to another window to permanently delete the<br />
assignment.<br />
IMPORTANT: You will only have one chance to undelete an assignment. Be cautious when<br />
deleting and saving assignments.<br />
Page 9<br />
<strong>Quick</strong> <strong>Start</strong> <strong>Reference</strong> <strong>Guide</strong> for <strong>Pinnacle</strong> <strong>Web</strong> <strong>Gradebook</strong> <strong>Application</strong>
Excelsior Software <strong>Pinnacle</strong> <strong>Web</strong> System<br />
<strong>Quick</strong> <strong>Start</strong> <strong>Reference</strong> <strong>Guide</strong> for <strong>Pinnacle</strong> <strong>Web</strong> <strong>Gradebook</strong> <strong>Application</strong><br />
REPORTS<br />
Access the Reports page by clicking<br />
Reports from the Home Page.<br />
at the top of the window or selecting My<br />
To request a report, click New Report<br />
on the Home Page or click the New button<br />
on the My Reports page. Reports which have been marked as Favorites will be displayed by<br />
default.<br />
To view the reports in each category, expand the list by clicking the plus sign (+) to the left of<br />
the category title or you may click<br />
to show all of the reports available.<br />
Any of these reports may be designated as a Favorite by clicking the star icon<br />
report. Clicking the star again will remove the designation.<br />
next to the<br />
Hover your mouse cursor over the thumbnail icon of a report to preview a larger graphic of the<br />
report.<br />
Select the classes and students to be included in the report as well as the marking period and<br />
any other parameters required by the report.<br />
Click Preview<br />
a printer, click Print.<br />
to display a preview of the report on your screen. To send the report to<br />
Page 10<br />
<strong>Quick</strong> <strong>Start</strong> <strong>Reference</strong> <strong>Guide</strong> for <strong>Pinnacle</strong> <strong>Web</strong> <strong>Gradebook</strong> <strong>Application</strong>
Excelsior Software <strong>Pinnacle</strong> <strong>Web</strong> System<br />
<strong>Quick</strong> <strong>Start</strong> <strong>Reference</strong> <strong>Guide</strong> for <strong>Pinnacle</strong> <strong>Web</strong> <strong>Gradebook</strong> <strong>Application</strong><br />
OPTIONS<br />
To change your password for accessing the <strong>Pinnacle</strong> <strong>Web</strong> gradebook application, click on<br />
Change Password under Options on your Home Page. Enter your current password and then<br />
enter your new password twice to confirm.<br />
Click Edit Profile to view teacher information and to enter your email address or phone<br />
number into the <strong>Pinnacle</strong> database.<br />
It will look similar to this:<br />
The basic information such as teacher name,<br />
school year, school name, address and city, state<br />
and zip are entered for you and not changeable.<br />
You have the ability to add an email address and<br />
phone number. This information will be shown on<br />
the <strong>Pinnacle</strong> Internet Viewer.<br />
When you’re finished working in your gradebook, be sure to click the button in the<br />
upper right corner of the screen. This will ensure that you’ve completely logged out of the<br />
gradebook. You will see a message similar to this:<br />
Copyright (c) 2007 Excelsior Software, Inc. All Rights Reserved.<br />
Permission is hereby granted to customers of Excelsior Software, Inc. to reproduce this document, in its<br />
entirety and without modification, for the sole purpose of training school district personnel.<br />
Information in this manual is subject to change without notice. For the latest version of this manual, visit our<br />
web site at www.excelsiorsoftware.com<br />
Revised Sept. 2007<br />
Page 11<br />
<strong>Quick</strong> <strong>Start</strong> <strong>Reference</strong> <strong>Guide</strong> for <strong>Pinnacle</strong> <strong>Web</strong> <strong>Gradebook</strong> <strong>Application</strong>