Using Corel to Convert a RASTER image file to ... - Rabbit Laser USA
Using Corel to Convert a RASTER image file to ... - Rabbit Laser USA
Using Corel to Convert a RASTER image file to ... - Rabbit Laser USA

You also want an ePaper? Increase the reach of your titles
YUMPU automatically turns print PDFs into web optimized ePapers that Google loves.
<strong>Using</strong> <strong>Corel</strong> <strong>to</strong> <strong>Convert</strong> a <strong>RASTER</strong> <strong>image</strong> <strong>file</strong> <strong>to</strong> VECTOR type for importing<br />
in<strong>to</strong> <strong>Laser</strong>Cut ...<br />
Doing this conversion is sometimes easier <strong>to</strong> complete if you use MS Paint, <strong>Corel</strong>, and <strong>Laser</strong>Cut 5.3. please follow the<br />
steps laid out here. I will be using the A2MASK76.bmp as my starting <strong>file</strong>.<br />
1) Open the A2MASK76.bmp <strong>file</strong> in MS Paint.<br />
2) Use the "Erase" and "Fill" <strong>to</strong>ols <strong>to</strong> remove the background.
3) Use the "Erase" and "Fill" <strong>to</strong>ols <strong>to</strong> remove the colors inside the <strong>image</strong> sections.<br />
4) With all the background and fill colors removed, save te <strong>file</strong>. It is best <strong>to</strong> save as a new <strong>file</strong> name such as<br />
A2MASK76_BW.bmp.
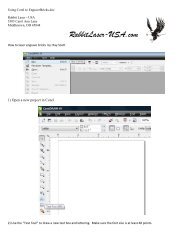
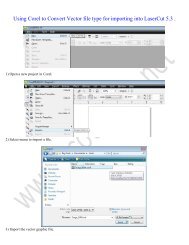
1) Open a new project in <strong>Corel</strong>.<br />
2) Select menu <strong>to</strong> import a <strong>file</strong>.<br />
3) Import the modified BMP graphic <strong>file</strong>.
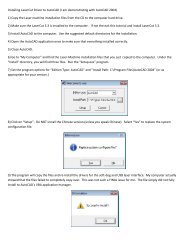
4) Place the graphic on the <strong>Corel</strong> workspace.<br />
5) Select the menu item <strong>to</strong> resample the picture.<br />
6) Please select these settings <strong>to</strong> make it easier for <strong>Corel</strong> <strong>to</strong> tune the picture in<strong>to</strong> a vec<strong>to</strong>r <strong>image</strong>.
7) Select the menu item <strong>to</strong> Trace the <strong>image</strong> <strong>to</strong> a vec<strong>to</strong>r drawing.<br />
8) Select the proper settings in the PowerTrace window <strong>to</strong> get the best line shaping for your <strong>image</strong>.
9) The newly made vec<strong>to</strong>r <strong>image</strong> will most likely be positioned directly over the old BMP <strong>image</strong>. Select the new vec<strong>to</strong>r<br />
components and then select the menu Item <strong>to</strong> export the newly made vec<strong>to</strong>r <strong>image</strong>. *** Do NOT select the old Raster<br />
<strong>image</strong>. The raster <strong>image</strong> would embed in<strong>to</strong> the DXF <strong>file</strong> and will likely crash <strong>Laser</strong>Cut 5.3.<br />
10) Select the <strong>file</strong> DXF type, location, and name.
11) Select DXF settings as version: Au<strong>to</strong>CAD 2000, Units as millimeters, Text as Curves, Bitmap as JPEG, Unmapped<br />
fills with Black.<br />
12) Close or minimize the <strong>Corel</strong> Project.
13) I used Au<strong>to</strong>CAD <strong>to</strong> verify the <strong>file</strong> conversion worked correctly.<br />
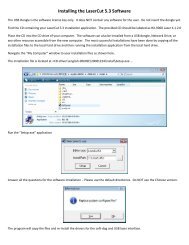
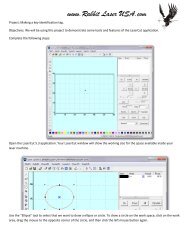
14) Open <strong>Laser</strong>Cut 5.3 with a new project or in<strong>to</strong> your existing project.
15) Select menu <strong>to</strong> import a <strong>file</strong>.<br />
16) Select the Au<strong>to</strong>CAD DXF 2000 <strong>file</strong> <strong>to</strong> import. <strong>Laser</strong>Cut works BEST with this version of Au<strong>to</strong>CAD DXF <strong>file</strong>.
17) The <strong>file</strong> is imported. Notice the graphic may have many line segments. You can use the "Unite" <strong>to</strong>ol <strong>to</strong> combine the<br />
segments. Combined segments will engrave or cut more efficiently.<br />
18) Select menu <strong>to</strong> save the <strong>file</strong>.
19) Declare the <strong>file</strong> name and location <strong>to</strong> save the <strong>file</strong>.<br />
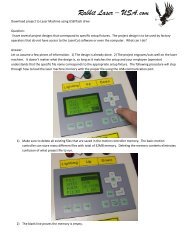
20) Use the Download Manager <strong>to</strong> send the project <strong>to</strong> the laser machine.<br />
Ray Scott – ray@scottware.net<br />
http://www.Scottware.net<br />
3503 Carol Ann Lane<br />
Middle<strong>to</strong>wn, OH 45044