The Materials - Dentsply
The Materials - Dentsply
The Materials - Dentsply

You also want an ePaper? Increase the reach of your titles
YUMPU automatically turns print PDFs into web optimized ePapers that Google loves.
16 17<br />
<strong>The</strong><br />
<strong>Materials</strong><br />
Directions for Use<br />
LEDERMIX PASTE<br />
When used as an intracanal medicament, LEDERMIX Paste can be placed into the canal<br />
in two ways. <strong>The</strong> method chosen will depend on the size of the canal and whether it has<br />
been enlarged at all. 5,6 <strong>The</strong> aim is to fill as much of the root canal space as possible with<br />
the paste so the maximum amount possible is placed. <strong>The</strong> paste needs to be in contact<br />
with the dentine walls of the root canal to ensure diffusion through the dentine. 5,6,18,20<br />
It is extremely important to ensure that NONE of the paste touches the access cavity walls<br />
or remains in the coronal part of the tooth as this can lead to discolouration of the tooth<br />
structure 45,46 with resultant aesthetic complications for the patient. Although tetracycline<br />
staining can be removed via internal bleaching following endodontic treatment, it is<br />
highly desirable and advantageous to avoid discolouration by very careful placement of<br />
the paste. <strong>The</strong> paste only needs to be in the root canal and not in the pulp chamber in<br />
order to achieve its therapeutic effects.<br />
<strong>The</strong> two methods of application of LEDERMIX Paste are as follows:<br />
1. For narrow or unprepared canals – use a small hand file to place the paste (e.g.<br />
at an emergency appointment for pain relief when there has been insufficient time<br />
available to enlarge/biomechanically prepare the canals). 5,6<br />
o Place a very small amount of LEDERMIX Paste on a small file (e.g. size 10 or 15<br />
Hedström file) and insert the file into the canal as far as possible without forcing<br />
the instrument. Use a slight anti-clockwise rotation action (approximately oneeighth<br />
turn maximum) and an “in and out vertical pumping” action (i.e. move<br />
the file 2-3 mm vertically). <strong>The</strong> slight rotation wipes some of the paste off the file<br />
by contact with the canal wall whilst the vertical movement helps to distribute the<br />
paste over the canal wall. Remove the file and repeat this process with another<br />
very small amount of paste on the file.<br />
2. For large canals and canals that have been biomechanically prepared/<br />
enlarged – use a spiral filler rotating in a low-speed handpiece to insert the paste. 5,6<br />
o<br />
Place a very small amount of the paste on the end of the spiral filler – only<br />
2-3mm of the spiral filler needs to be covered with the paste.<br />
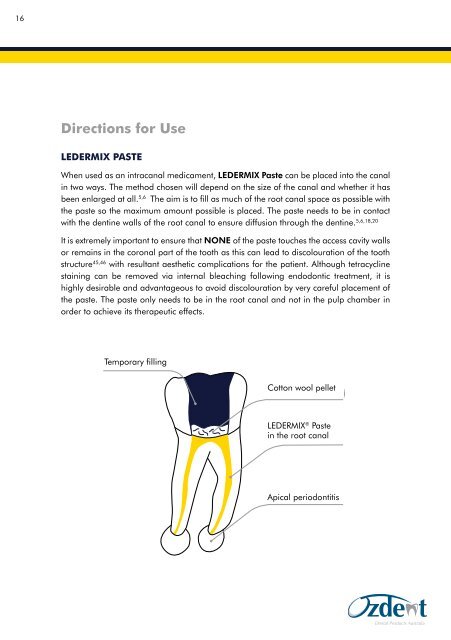
Temporary filling<br />
Cotton wool pellet<br />
o<br />
Insert the spiral filler into the canal and then start the handpiece spinning in the<br />
forward (i.e. clockwise) direction. <strong>The</strong> spiral filler should not be rotated until it has<br />
been fully inserted into the canal in order to avoid the paste being placed in the<br />
pulp chamber of the tooth.<br />
LEDERMIX ® Paste<br />
in the root canal<br />
o<br />
o<br />
<strong>The</strong> spiral filler should be kept 3-4 mm short of the canal’s Working Length and<br />
a very low speed is recommended.<br />
Use the spiral filler with an “in and out pumping” action – that is, move it up and<br />
down inside the canal but only move it 2-3 mm vertically each time. At the same<br />
time, keep spinning it in the forward direction.<br />
Apical periodontitis<br />
o<br />
Keep spinning the spiral filler at a low speed as you remove it from the canal so<br />
it keeps pushing the paste material down into the canals and it does not draw the<br />
paste back out of the canal with the instrument. This will minimise the possibility<br />
of the paste being placed in the pulp chamber, and subsequent discolouration of<br />
the tooth.<br />
o<br />
If any excess paste is inadvertently left in the pulp chamber, remove it with an<br />
excavator and then wipe the pulp chamber clean with a dry sterile cotton pellet.