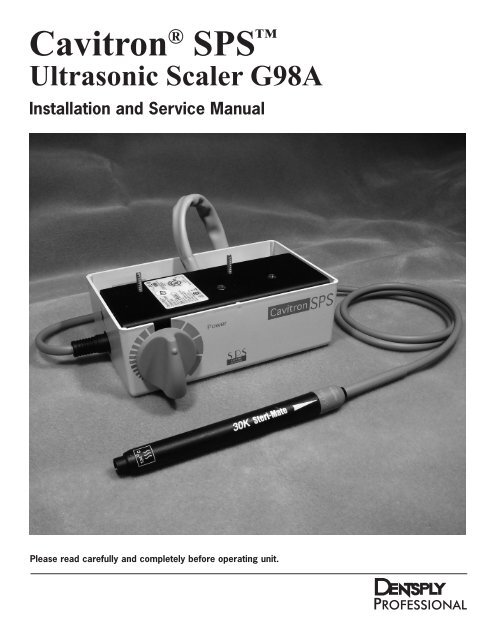
Cavitron® SPS⢠- Dentsply
Cavitron® SPS⢠- Dentsply
Cavitron® SPS⢠- Dentsply

Create successful ePaper yourself
Turn your PDF publications into a flip-book with our unique Google optimized e-Paper software.
• Where asepsis is required or deemed appropriate inthe best professional judgement of the Dental HealthcareProfessional, this product should not be used.• During boil-water advisories, this product should notbe operated as an open water system (e.g. connectedto a public water system). A Dental HealthcareProfessional should disconnect the system from thecentral water source. The Cavitron DualSelect systemcan be attached to this unit and operated as a closedsystem until the advisory is cancelled. When the advisoryis cancelled, flush all incoming waterlines from the publicwater system (e.g. faucets, waterlines and dentalequipment) in accordance with the manufacturer‘sinstructions for a minimum of 5 minutes.• Prior to beginning treatment, patients should rinse withan antimicrobial such as Chlorhexidine Gluconate 0.12%.Rinsing with an antimicrobial reduces the chance ofinfection and reduces the number of microorganismsreleased in the form of aerosols during treatment.Section 3:Precautions3.1 System Precautions• Equipment flushing and dental water supply systemmaintenance are strongly recommended.• Close manual shut-off valve on the dental office watersupply every night before leaving the office.• The use of an in-line water filter is recommended.• Never operate system without fluid flowing throughhandpiece.3.2 Precautions for UltrasonicProphylaxis Procedures• Like a toothbrush, ultrasonic inserts “wear out” withuse. Inserts with just 2 mm of wear lose about 50% oftheir scaling efficiency. In general, it is recommendedthat ultrasonic inserts be discarded and replaced after90 days, under normal use, to maintain optimalefficiency and avoid breakage. A Cavitron ® InsertEfficiency Indicator is enclosed for your use.• Discard the insert immediately if excessive wearis noted, or the insert shows signs of damage throughmishandling.• Ultrasonic insert tips that have been bent, damaged, orreshaped are susceptible to in-use breakage and shouldbe discarded and replaced immediately.• Retract the lips, cheeks, and tongue to prevent contactwith the insert tip whenever it is placed in the patient’smouth.6• Water should be used for all scaling procedures. Waterflow is adjustable from less than 10 to greater than60 ml per minute.• The Cavitron unit works with Cavitron inserts as asystem, and was designed and tested to delivermaximum performance for all currently availableCavitron and Cavitron Bellissima brand ultrasonicinserts. Companies that manufacture, repair or modifyinserts carry the sole responsibility for proving theefficacy and performance of their products when usedas a part of this system. Users are cautioned tounderstand the operating limits of their inserts beforeusing in a clinical setting.• Only adjust the system’s power adjustment knob with theinsert outside the patients mouth.Section 4:Infection Control4.1 Infection Control InformationReference Booklet• For your convenience, an Infection Control InformationReference Booklet has been included with your Cavitron ®SPS System. Additional booklets can be obtained bycalling Customer Service at 1-800-989-8826 or717-767-8502 Monday through Friday, 8:00 AM to5:00 PM (Eastern Time). For other areas, contactyour local DENTSPLY representative. Insert sterilizationinformation is included in each insert package.4.2 General Infection Control Information• Use standard personal protection equipment (i.e., wearface mask, eyewear, or face shield, gloves andprotective gown).• For maximum operator and patient safety, carefullyfollow the Infection Control Information proceduresdetailed on the reference cards accompanying yourSystem.• The combination of water and ultrasonic vibration willcreate aerosols. With proper technique, much of theaerosols can be effectively controlled and minimized.Please carefully follow the procedural guidelinesregarding the use of your System.4.3 Water Supply Recommendations• It is highly recommended that all dental water supplysystems conform to applicable CDC (Centers forDisease Control and Prevention) and ADA (AmericanDental Association) standards, and that allrecommendations be followed in terms of flushing,and general infection control procedures. Knowledge
• Connect Steri-Mate ® handpiece to the cable connectorassembly.• Adjust the blue lavage control at the back of thehandpiece to maximum (fully clockwise).Performance Check: Power and Lavage Flow• Activate foot control and purge the water system for2 minutes.• Hold the handpiece (without an insert installed) in anupright position over a sink or drain.• Activate footswitch to fill the handpiece with water.• Lubricate the rubber o-ring on the insert with water beforeplacing it into the handpiece. Fully seat insert with a gentlepush-twist motion. DO NOT FORCE.• Adjust the lavage control at the end of the handpiece fora moderate flow.• Verify operation by adjusting the power control betweenminimum and maximum on the Cavitron module andobserve a change in the water spray.Performance Check: Power Boost (availableonly with variable pressure foot controls)• Adjust power control on the Cavitron module to the top ofthe Blue Zone.• Fully depress foot control and observe sound and spray.• Reduce pressure on the foot control until a change inspray and sound is noticeable.• Vary pressure on the foot control to toggle betweenstandard and boost modes.Installation Check: Interface Test• Place handpiece in holder and depress foot control.• Verify Cavitron module does not activate.• Inspect the inside of the Dental Control Unit and verifythat all connections do not leak.The Cavitron module has been successfully installed.Replace the cover to the Dental Control Unit.6.3 Installation Notes___________________________________________________________________________________________________________________________________________________________________________________________________________________________________________________________________________________________________________________________________________________________________________________________________________________________________________________________________________________________________________________________________________________________________________________________________________________________________________________________________________________________________________________________________________________________________________________________________________________________________________________________________________________________________________________________________________________________________________________________________________________________________________________________________________________________________________________________________________________________________________________________________8
6.4 Installation Templates9
Page 10 intentionally left blank -- back side of templates
6.6 Installation and Operation TablesCavitron SPS G-98A ConnectionBROWN & YELLOW WIRES24 Volts AC PowerDental Control Unit HeadConnect to terminal strip.24 Volt AC, 300 Watt Power SupplyRED TUBEScaler Water SupplyTee into RED Control Block Manifold water tube25–60 psi Water SupplyYELLOW TUBEHandpiece Selection Pilot AirUse installation tubing kit to Tee into YELLOW-REDtube on Control Block Manifold – Pilot Air..005 Restrictor Barb installed in series.Unused handpiece holder or handpiece whipposition required.ORANGE TUBEFoot Control Drive AirTee into ORANGE-BROWN tube on Control BlockManifold – Drive Air.SCALER 24 VAC POWER ACTIVATION – Yellow Tube1. Cavitron Steri-Mate ScalerHandpiece IN Holder.2. Cavitron Steri-Mate ScalerHandpiece whip RELEASED.Scaler 24 VAC Power – OFFAir–Electric switch – CIRCUIT OPEN1. >20 psi air pressure to Yellow tube. HP HolderWhisker valve sealed.2. >20 psi air pressure to Yellow tube. Handpiecewhip bleed valve sealed.1. Cavitron Steri-Mate ScalerHandpiece selected andREMOVED from Holder.2. Cavitron Steri-Mate ScalerHandpiece whip selected andPULLED FORWARD.Scaler 24 VAC Power – ONAir–Electric switch – CIRCUITCLOSED1. 2–20 psi air pressure to Yellow tube. HP HolderWhisker valve bleeds air pressure off.2. 2–20 psi air pressure to Yellow tube. Handpiecewhip bleed releases air pressure.NORMAL & BOOST ULTRASONIC SCALING POWER – Orange TubeProportional Foot Controldepressed partially.Cavitron SPS Ultrasonic scalingpower activated in NORMAL mode.Dual Air-Electric Switch, S1 CLOSES(S1 = Blue & Black Leads)2–12 psi air pressure to Orange tube.Proportional Foot Controldepressed to a lower positionor completely.Cavitron SPS Ultrasonic scalingpower will switch from NORMALmode to BOOST mode.Dual Air-Electric Switch, S1 and S2CLOSE (S1 = Blue & Black Leads,S2 = White & Black Leads)1240 – 80 psi air pressure to Orange tube.
Section 7: SPS UltrasonicScaler System Description7.1 System ControlsThe Cavitron ® SPS module is enabled whenever theclinician removes the handpiece from the handpiece holder.ON/OFF FunctionThe Ultrasonic scaling activation is switched ON and OFFusing the treatment unit‘s footswitch.Power AdjustmentTurn knob to select ultrasonic power level for operation:clockwise increases system power, counter clockwisedecreases system power.The Blue Zone is an extended low-power range providingeffective subgingival debridement and greater patient comfortduring definitive therapy.Foot Controlled Power Boost FunctionA second position on the footswitch (fully depressedfootswitch) provides the capability to briefly increase theunit’s power output for quick, efficient removal of tenaciousdeposits using only the foot control without touching the unit.Note: Foot controlled power boost function requires avariable pressure/proportional footswitch.TYPICAL INSTALLATIONLavage Flow AdjustmentWater flow through the handpiece is adjusted by rotating acontrol element on the cable connector (blue).13
7.2 Steri-Mate Handpiece / CableThe handpiece accepts all Cavitron ® 30K Ultrasonic Inserts.Handpiece Connector(Handpiece & MatingAssembly are Keyed)Steri-Mate ® HandpieceInsert PortCable AssemblyDate Codes (MMYY)Date Codes (MMYY)Prior to connecting, align Handpiece and CableAssembly electrical connections. If Cable Assemblydoes not seat into Handpiece, gently rotatehandpiece until contacts align.DO NOT TWIST WHILE PUSHINGCONNECTOR INTO HANDPIECE.AUTOCLAVE SYMBOL- Sterilizable up to temperature specifiedBLUE Lavage KnobLavage ControlSteri-Mate ®HandpieceTurn the Lavage Control to select flow rate duringsystem operation. Clockwise increases flow at insert tip,counterclockwise decreases flow. The flow rate through thehandpiece also determines the temperature of the lavage.Lower flow rates produce warmer lavage. Higher flow ratesproduce cooler lavage.If the handpiece becomes warm, increase the flow rate. Withexperience, the Dental Healthcare Professional will be able todetermine the best flow rate setting for optimum operatingefficiency and patient comfort.Swivel FeatureReduces cable drag as handpiece rotates during procedures.Steri-Mate Grip Accessory (not shown)The Steri-Mate Grip provides an ergonomic and comfortablegrasp of the handpiece. The grip is sterilizable and is availablein several different colors as an accessory for your Steri-MateHandpiece. See installation instructions provided with the grip.14
7.3 Cavitron ® 30K Ultrasonic InsertsThe many styles of DENTSPLY Cavitron ® Ultrasonic Inserts are easily interchangeable for various procedures and applications.O-RingProvides seal for handpiece coolant.Connecting BodyTransfers and amplifies mechanicalmotion of the stack to insert tip.Insert TipShape and size of tipdetermine access andadaptation. Preheatedlavage is directed tothe tip.Finger GripMagnetostrictive StackConverts energy provided by thehandpiece into mechanical oscillationsused to activate the insert tip.Insert MarkingManufacturer, Date (YDDD= single digit year and three digit day of year)Frequency, and Type (e.g., DENTSPLY 7305 30K FSI-SLI-10S)Hold the handpiece in an upright position. Depress footswitch to fill the handpiece with water. Lubricate the rubber O-Ring onthe insert with water before placing it into the handpiece. Fully seat insert with a gentle push-twist motion. DO NOT FORCE.7.4 Foot Control Information & Operation• The Foot Control activates both ultrasonic energyand Lavage Flow at the insert tip. Lightly depressingthe footswitch whenever the handpiece is removed fromthe handpiece holder will activate the ultrasonics andlavage flow.• A boost function is activated by fully depressing thefootswitch. This feature is active in the low to mid rangeof the power control. The power level will return to thecontrol setting when the footswitch is returned to it’sslightly depressed position. The momentary increase inpower is indicated by a slight increase in noise level anda change in spray pattern.• Practicing outside the mouth is recommended for theoperator to familarize themselves with the boost feature.15
Section 8:Accessories• Steri-Mate ® Detachable Sterilizable Handpiece• Steri-Mate ® Handpiece Grips• Detachable Handpiece Cable Assembly with Swivel• Cavitron ® Ultrasonic InsertsSection 9:Techniques For Use9.1 Patient Positioning• The backrest of the chair should be adjusted for optimalaccess to both the upper and lower arches. This assurespatient comfort and clinician visibility.• Have the patient turn head to the right or left.• Position chin up or down depending on the quadrant andsurface being treated.• Evacuate irrigant using either a saliva ejector or HighVacuum Evacuator (HVE).• In general, it is suggested that a “feather-light-touch”be used for ultrasonic scaling. The motion of theactivated tip and acoustic effects of the irrigatingfluid, in most cases, are adequate to remove even themost tenacious calculus.• Periodically check the Cavitron Ultrasonic Insert for wearwith the Cavitron Insert Efficiency Indicator.• The use of a saliva ejector or High Volume Evacuator(HVE) is recommended during all procedures.• Set the system’s Power Level Control to the lowestefficient power setting for the application and theselected insert.9.3 Patient Comfort ConsiderationsReasons for sensitivity• Incorrect tip placement. Point should be directed awayfrom root surfaces.• Not keeping the tip in motion on the tooth. Do not allowthe insert to remain in a static position on any one areaof the tooth. Change the insert’s path of motion.• Applying excessive pressure. Use extremely light graspand pressure, especially on exposed cementum.• If sensitivity persists, decrease power setting and/ormove from the sensitive tooth to another and then return.9.2 Performing UltrasonicScaling ProceduresNote: Refer to the Infection Control Informationbooklet supplied with your system for generalprocedures to be followed at the beginning ofeach day and between patients.• The edges of Cavitron ® Ultrasonic Inserts are intentionallyrounded so there is minimal danger of tissue lacerationwith proper ultrasonic scaling techniques. Wherever theinsert tip is placed in the patient‘s mouth, the lips, cheekand tongue should be retracted to prevent accidental(prolonged) contact with the activated tip.• Turn Power Level Control to select ultrasonic power levelfor operation. Clockwise increases system power. Powerlevel will increase throughout the full range of the control.Hold the handpiece over a sink or drain. Press the footcontrol to activate the system. Check spray to verifyfluid is reaching the working end of the insert tip. Adjustthe Lavage Control to ensure adequate flow for theselected power setting. Greater flow settings providecooler irrigation.• It may be necessary to adjust lavage with the system in“Boost „ mode (Foot Control fully depressed) so adequatefluid will be available to cool tip to tooth interface.16
Section 10: System CareIt is recommended that you perform the followingmaintenance procedures to help maximize water quality andto be in compliance with CDC guidelines for infection control.10.1 Daily ProtocolStart-Up Procedures at thebeginning of the day:1. Switch ON the dental treatment unit (refer to instructionmanual of treatment unit).2. Remove the Cavitron ® cable connector assembly fromhandpiece holder and set power adjustment to top ofBlue Zone.3. Connect a sterilized Steri-Mate ® handpiece to the cableconnector assembly. (Refer to the Infection Controlinformation booklet for sterilizing instructions.)4. Adjust the lavage control to maximum.5. Hold the handpiece (without an insert installed) overa sink or drain. Activate the foot control and flush waterthrough handpiece for two minutes.6. Place a sterilized insert into the handpiece using a gentlepush-twist motion. (Refer to the Cavitron UltrasonicInserts Directions for use for cleaning and sterilizinginstructions.)7. Activate the ultrasonics and adjust the power andlavage control to your preferred operating positions.Between Patients:Shut-Down Procedures at theend of the day:1. Flush the Cavitron ® ultrasonic system according to thedental treatment unit manufacturer’s instructions.2. Remove any ultrasonic inserts and the Steri-Mate ®handpiece. Clean and sterilize the handpiece and allinserts used during the procedure. (Refer to the InfectionControl Information booklet and the Cavitron UltrasonicInserts Directions for Use for cleaning and sterilizinginstructions.)3. Clean and disinfect the handpiece cable assembly byapplying a water-based disinfectant solution*,carefully following the instructions provided by thesolution manufacturer. To clean the cable, generouslyspray disinfectant solution on a clean towel and wipe thecable and connector. Discard used towel. To disinfect thesystem, generously spray disinfectant on a clean toweland wipe the cable and connector. Allow the disinfectantsolution to air dry.4. Clean and disinfect all surfaces of the dental treatmentcontrol head according to the manufacturer’sinstructions.5. Place the cable connector into the handpiece holder forstorage.6. Turn OFF the power and water to the dental treatmentunit.*NOTE: Water-based disinfection solutions arepreferred. Some alcohol-based disinfectantsolutions may discolor the handpiece cable andconnector.1. Remove any ultrasonic inserts and the Steri-Mate ®handpiece. Clean and sterilize the handpiece and allinserts used during the procedure. (Refer to the InfectionControl Information booklet and the Cavitron UltrasonicInserts Directions for Use for cleaning and sterilizinginstructions.)2. Clean and disinfect the handpiece cable assembly byapplying a water-based disinfectant solution*,carefully following the instructions provided by thesolution manufacturer. To clean the cable, generouslyspray disinfectant solution on a clean towel and wipethe cable and connector. Discard used towel. Todisinfect the system, generously spray disinfectant ona clean towel and wipe the cable and connector. Allowthe disinfectant solution to air dry.3. Clean and disinfect all surfaces of the dental treatmentcontrol head according to the manufacturer’sinstructions.4. Connect a sterilized Steri-Mate ® handpiece onto itsmating cable connector. Set power adjustment to topof the Blue Zone, adjust the lavage control tomaximum.5. Hold the handpiece (without an insert installed) overa sink or drain. Activate the foot control and flush waterthrough handpiece for at least thirty seconds.6. Place a sterilized insert into the handpiece.17
Section 11: Troubleshooting and Analysis18
Section 11: Troubleshooting and Analysis, continued19
Section 11: Troubleshooting and Analysis, continued20
Section 11: Troubleshooting GuideThis troubleshooting section is meant for use by qualified Cavitron ® Service Technicians.SYMPTOMS CAUSES CORRECTIVE MEASURESLow insert scaling power orinsert stops vibrating whencontacting tooth surface.1. Insert malfunction.2. Insert is not pushed in far enoughfor automatic pick-up.1. Test with another Cavitron ® insert. If test insertworks properly, discard the original insert.2. a. Check if insert is fully seated in the handpiece.b. If a handpiece soft grip is being used, verifythat the grip is flush with the hard plastic ofthe insert port. Refer to the InstallationInstructions provided with the soft grip forcorrect installation.3. Unit improperly calibrated.3. a. Return scaler to DENTSPLY ® for factorycertified service.b. Refer to DENTSPLY ® Professional Division-Product Service SOP PS-00135.Intermittent scaling power or noscaling power.(continued on next page)1. Insert malfunction.2. Insert is not pushed in far enoughfor automatic pick-up.3. Malfunction in Steri-MateHandpiece.4. Bent or missing electrical pin inSteri-Mate Handpiece.5. Open or intermittent wires inhandpiece cable assembly.(continued on next page)1. Test with another Cavitron ® insert. If test insertworks properly, discard the original insert.2. a. Check if insert is fully seated in the handpiece.b. If a handpiece soft grip is being used, verifythat the grip is flush with the hard plastic ofthe insert port. Refer to the InstallationInstructions provided with the soft grip forcorrect installation.3. Replace Steri-Mate Handpiece.4. Replace Steri-Mate Handpiece.5. Install a working Steri-Mate Handpiece on thecable. Unplug the Handpiece cable connector at J3of the Power Drive PC Board and check thecontinuity of the wires.a. Connect the ohmmeter between RED-GRN wireterminals. Flex the handpiece cable and checkthe intermittent readings. If the ohmmeterreading is not consistent or it is indicating anopen circuit, the handpiece cable assembly islikely to be damaged and should be replaced.b. Connect the ohmmeter between WHT-GRN wireterminals and repeat the procedure above.(continued on next page)21
Section 11: Troubleshooting Guide, continuedThis troubleshooting section is meant for use by qualified Cavitron ® Service Technicians.SYMPTOMS CAUSES CORRECTIVE MEASURESIntermittent scaling power or noscaling power.6. Loose wiring or defective solderjoint in the unit wiring.6. Troubleshoot the unit wiring and connectors.(Continued)7. No power to the unit.8. Faulty Air Switch.7. a. Verify 21.6 to 26.4 Volts AC supply to the unit.b. Replace the Power Drive PC board.8. Replace the component.Handpiece heats up.1. Insufficient water to coolhandpiece.2. Air trapped in the handpiece.3. Insert water passageway clogged.4. Handpiece cable not supportedduring procedure.5. Worn insert being used.1. Increase the setting on the handpiece lavagecontrol until handpiece runs cool.2. When the inserts are changed, hold the handpiecein an upright position until the trapped air isremoved and the water flows properly.3. Replace the Cavitron ® insert and check operation.4. Loop handpiece cable around arm or support withfinger to prevent water restriction.5. Replace with a new Cavitron ® insert. Worn insertsrequire higher power settings producing moreheat.22
Section 11: Troubleshooting Guide, continuedThis troubleshooting section is meant for use by qualified Cavitron ® Service Technicians.SYMPTOMS CAUSES CORRECTIVE MEASURESInsert vibrates but no water orinsufficient water flows from thehandpiece.1. Low incoming dental office waterpressure.1. Measure water pressure at dental office.Adjust incoming source water pressure tospecification. Water pressure should be 25-60psi.2. Improper setting of the waterregulator.3. Handpiece cable water tubing andwires twisted.4. Damaged handpiece cable FlowControl.5. Obstruction or mineral deposits inthe water system in the unit.2. Adjust the water regulator for 24 psi.3. Remove restriction if possible or replacehandpiece cable assembly.4. Replace handpiece cable assembly.5. a. Remove the insert and turn the water valvefull open. Observe the water flow. If the flowis good then the obstruction is in the insert.b. If the obstruction is not in the insert, thenremove the handpiece water line at solenoidand check the water flow. If flow is good, thenthe obstruction is in handpiece supply line.Water spray from insert is notproperly covering the operatingarea of the activated tip.1. Improper water flow adjustment.2. P-style insert water tubeincorrectly aimed.3. Insert is partially clogged.1. Refer to “Directions for Use for Cavitron ® SPSUltrasonic Scaler „ for instructions on water flowadjustment.2. Use small smooth pliers, reposition the water tubeand direct the spray at the back of the insert tip.3. Replace the insert.Water drips from the handpiecewhen not operating.Water leak from the handpiecewhile in operation.1. Water solenoid valve leaking dueto trapped debris.1. O-ring worn on insert.2. Water leak in plastic water lineat handpiece or inside theSteri-Mate Handpiece.1. Replace the water solenoid assembly.1. Replace the O-ring with genuine Cavitron ® O-rings.O-rings are available in packs of 12:Green O-Rings P/N 62605Black O-Rings P/N 623512. a. Unplug the Steri-Mate handpiece from thecable and replace the small O-ring on theconnector. Part No. 79357 (12-Pack)b. Replace the Steri-Mate handpiece and/orcable assembly.23
SECTION 12: Service Parts252X3 2X 42X2X1 G98A Cavitron ® Scaler Module AssemblyITEM QUANTITY PART NO. DESCRIPTION1 2 586037005 SCREW, COVER2 1 574247007 SIL-PAD, PINK INSULATING3 2 6297501 SCREW, SOLENOID4 2 62852 SCREW, PC BOARD MOUNTING5 2 594002020 STANDOFF, HEX PC BOARD MOUNTING2528
SECTION 12: Service Parts, continued612345G98A Cavitron ® Scaler Module AssemblyITEM QUANTITY PART NO. DESCRIPTION1 1 63770 CLIP, AIR SWITCH (LARGE)2 1 562096001 CLIP, WATER REGULATOR (GREY)3 1 61631 TUBING, RED, .062" ID (PER FOOT)4 1 625036011 TUBING, ORANGE, .062" ID (PER FOOT)5 1 625036012 TUBING, YELLOW, .062" ID (PER FOOT)6 2 776030230 CLIP, DUAL AIR SWITCH (SMALL)2629
SECTION 12: Service Parts, continuedPIN 1WHITEREDBLUEBLACKGREENS1S2BLACKBLACKITEM 1BROWN12BROWNITEM 2YELLOWGREENWIREWHITEWIRE123REDTUBINGREDWIREITEM 3G98A Cavitron ® Scaler Harness AssembliesITEM QUANTITY PART NO. DESCRIPTION1 1 80949 CONTROL CABLE ASSEMBLY2 1 80950 POWER CABLE ASSEMBLY3 1 80951 HANDPIECE CABLE HARNESS2730
SECTION 12: Service Parts, continued12G98A Cavitron ® Scaler Water Solenoid and RegulatorITEM QUANTITY PART NO. DESCRIPTION1 1 79924 WATER SOLENOID ASSEMBLY (WITH FITTINGS)2 1 629195002 WATER REGULATOR ASSEMBLY (WITH FITTINGS)2831
SECTION 12: Service Parts, continuedITEM 1ITEM 2G98A Cavitron ® Scaler PC Board AssembliesITEM QUANTITY PART NO. DESCRIPTION1 1 81020-3 UNIVERSAL SPS CONTROL PC BOARD ASSEMBLY2 1 81101 POWER DRIVE PC BOARD ASSEMBLY2932
SECTION 12: Service Parts, continued1PowerCAVITRONSPS23456G98A Cavitron ® Scaler Housing and Handpiece AssembliesITEM QUANTITY PART NO. DESCRIPTION1 1 80502 KNOB, MOLDED BLUE2 1 80843 COVER, DECORATED3 1 78688 30K STERI-MATE TM HANDPIECE, DECORATED 1-PACK1 78703 30K STERI-MATE TM HANDPIECE, DECORATED 3-PACK4 1 812794-FOOT HANDPIECE CABLE, DECORATED SURF WITHSWIVEL AND FLOW CONTROL812776.5-FOOT HANDPIECE CABLE, DECORATED BLACKWITH SWIVEL AND FLOW CONTROL812790111-FOOT HANDPIECE CABLE, DECORATED SURF WITHSWIVEL AND FLOW CONTROL5 1 79357 O-RING, STERI-MATE TM HP CABLE, 12 PACK6 1 776030267 O-RING, HANDPIECE PLUG3033
SECTION 12: Service Parts, continued52ITEM 134G98A Cavitron ® Scaler Installation KitITEM QUANTITY PART NO. DESCRIPTION1 1 80918 INSTALLATION KIT (W/UNIT MOUNTING HARDWARE)2 2 625036012 TUBING, YELLOW, .062" ID (PER FOOT)3 1 623068001 RESTRICTOR ORIFICE, .005"4 3 623067001 TEE, FITTING, .062" ID5 12 80777 TUBING CLAMP, .19" ID1 623066001 TEE, FITTING, .125" ID3 562098001 TUBING CLAMP, .25" ID3 587092001 LOCKNUT, NYLON INSERT3 588072010 WASHER, FLAT NYLON #631 34
Worldwide Service CentersU n i t e d S t a t e s o f A m e ri c aDENTSPLY ProfessionalTechnical Service and Repair Department1301 Smile WayYork, PA 17404-1785Phone: (800) 989-8826 or (717) 767-8502D e u t s c h l a n d F r a n c e Au s t r a l i aDENTSPLY DeTrey GmbH DENTSPLY DeTrey DENTSPLY (Australia) Pty. LtdDe-Trey-Strasse 1 17 Michael FARADAY 11-21 Gilby Road78467 Konstanz 78380 Montigny Le Bretonneux Mount Waverley, Victoria 3149Germany France AustraliaPhone: 7531 583 0 Phone: (1) 30 14 77 77 Phone: (61) 3-9538-8280U n i t e d K i n g d o m I t a l i a C a n a d aDENTSPLY Ltd. DENTSPLY DeTrey Italia s.r.l. DENTSPLY CanadaHamm Moor Lane Via A. Cavaglieri, 26 161 Vinyl CourtAddlestone, Weybridge I-00173 Roma Woodbridge, OntarioSurrey KT15 2SE Italia L4L 4A3 CanadaEngland Phone: (06) 723 3626 Phone: (905) 851-6060Phone: (0) 1932 853422S w i s s R e p re s e n t a t i v eDENTSPLY DeTrey SàrlBaar OfficeOberdorfstr. 116342 BaarSwitzerlandManufactured by:DENTSPLY ProfessionalDENTSPLY International1301 Smile WayYork, PA 17404-1785DENTSPLY DeTrey GmbHDe-Trey-Str. 178467 KonstanzGermanyDistributed by:DENTSPLY CanadaWoodbridge, OntarioL4L 4A3Form No. 80839 Rev. 2.0 (11/07)