
Create successful ePaper yourself
Turn your PDF publications into a flip-book with our unique Google optimized e-Paper software.
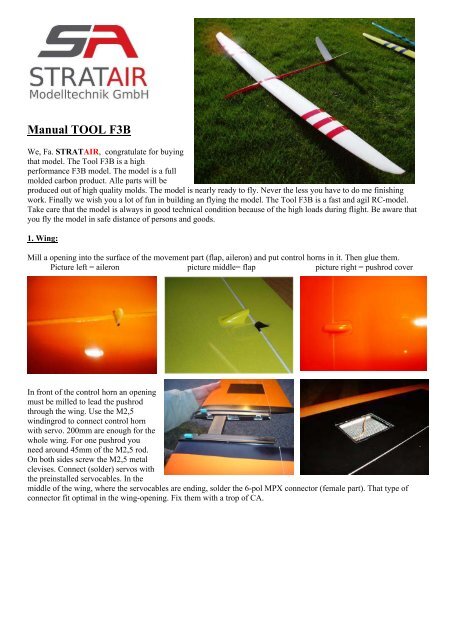
<strong>Manual</strong> <strong>TOOL</strong> <strong>F3B</strong><br />
We, Fa. STRATAIR, congratulate for buying<br />
that model. The Tool <strong>F3B</strong> is a high<br />
performance <strong>F3B</strong> model. The model is a full<br />
molded carbon product. Alle parts will be<br />
produced out of high quality molds. The model is nearly ready to fly. Never the less you have to do me finishing<br />
work. Finally we wish you a lot of fun in building an flying the model. The Tool <strong>F3B</strong> is a fast and agil RC-model.<br />
Take care that the model is always in good technical condition because of the high loads during flight. Be aware that<br />
you fly the model in safe distance of persons and goods.<br />
1. Wing:<br />
Mill a opening into the surface of the movement part (flap, aileron) and put control horns in it. Then glue them.<br />
Picture left = aileron picture middle= flap picture right = pushrod cover<br />
In front of the control horn an opening<br />
must be milled to lead the pushrod<br />
through the wing. Use the M2,5<br />
windingrod to connect control horn<br />
with servo. 200mm are enough for the<br />
whole wing. For one pushrod you<br />
need around 45mm of the M2,5 rod.<br />
On both sides screw the M2,5 metal<br />
clevises. Connect (solder) servos with<br />
the preinstalled servocables. In the<br />
middle of the wing, where the servocables are ending, solder the 6-pol MPX connector (female part). That type of<br />
connector fit optimal in the wing-opening. Fix them with a trop of CA.
2. Fuselage:<br />
Take the M2 couplers, glue them with CA onto the glasfibre pushrods and screw the plastic ball links on it. Push the<br />
these pushrods from the backside into to preinstalled pushrod sleeve. The small fuselage cover fill be fixed with<br />
tape.<br />
Depending on used servos make/mill openings for them (see picture above). Screw M2 metal clevises with M2<br />
couplers. Cut glas fibre pushrod that it fits for servoarm and glue M2 couplers with pushrod (use some CA).<br />
Make now cable-connection for wingservos. For that solder servocables with 6-pol MPX connector (male part).<br />
Battery for receiver should be positioned as in picture above. For balancing the model you need some ballast in the<br />
nose. You can use some small Pb balls and fix them afterwards with resin or you fill melt Pb into the nose. For that<br />
you have to put the nose into cold water for cooling.<br />
3. Recommended accessories:<br />
Wingservos: Volz Wing Maxx, Hitec HS-5125MG, Futaba S3150<br />
Fuselageservos: Graupner DS368, Hitec HS-85MG, Hitec HS-5125MG<br />
Receiver: Octava MZK, Graupner SMC 16,...<br />
Battery: 4xAA-Zellen (Sanyo 2700mAh)<br />
Ballast: 10-pcs. brass = 1020g STRATAIR<br />
Wingbags: wing + tail STRATAIR
4. Setup:<br />
<strong>TOOL</strong> Setup<br />
CQ<br />
95 mm behind leading edge<br />
Hook<br />
93 mm behind leading edge<br />
Neutral positions Flaps +/- Aileron +/- Elevator +/- Rudder +/-<br />
Duration 1/- 1/- 0/0 0/0<br />
Distance 0/0 0/0 0,5/0 0/0<br />
Speed 0/0 0/0 1/0 0/0<br />
Start 1 13/0 13/1 0,5/0 0/0<br />
Start 2 11/0 11/1 0/1,5 0/0<br />
Butterfly max. 10/0 5/0 0/0<br />
Movements Flaps +/- Aileron +/- Elevator +/- Rudder +/-<br />
Duration 0/0 4/15 9≠9 9≠9<br />
Distance 4/5 4/15 7≠7 7≠7<br />
Speed 4/5 4/15 6≠6 0/0<br />
Start 1 0/0 0/16 9≠9 9≠9<br />
Start 2 0/0 0/14 9≠9 9≠9<br />
Snap-Flap Flaps +/- Aileron +/- Elevator +/- Rudder +/-<br />
Duration 0/0 0/0 - -<br />
Distance 1/- 1/- - -<br />
Speed 1/- 1/- - -<br />
Start 1 - - - -<br />
Start 2 - - - -<br />
Part down = + Part up = - all in mm<br />
5. Content:<br />
Wing:<br />
1x wing (left + right)<br />
1x carbon-wing joiner<br />
2x steelplates with blind nuts for fixing wings<br />
4x glas-control horn<br />
8x M2,5 metal clevises<br />
1x 200mm M2,5 windingrod<br />
2x MPX connector female<br />
4x glas-cover for pushrod<br />
4x glas-cover for servo<br />
Tail:<br />
1x V-tail<br />
Fuselage:<br />
1x Fuselage incl. nose<br />
2x MPX connector male<br />
2x pushrod for tail<br />
2x M2 clevises<br />
4x M2 couplers<br />
2x M2 plastic ball links<br />
2x M5 wing screw
6. Technische Daten :