Sprockets and Chain Tutorial.pdf - Slingshot
Sprockets and Chain Tutorial.pdf - Slingshot
Sprockets and Chain Tutorial.pdf - Slingshot

Create successful ePaper yourself
Turn your PDF publications into a flip-book with our unique Google optimized e-Paper software.
<strong>Sprockets</strong> <strong>and</strong> <strong>Chain</strong> <strong>Tutorial</strong><br />
By: ThagAnderson81 (www.riderforums.com)<br />
Parts you will need:<br />
• Front sprocket (stock size is 15 teeth, I used a 14).<br />
• Rear sprocket (stock size is 46 teeth, I used a 48).<br />
• 520 <strong>Chain</strong> (optional, unless you're using non-stock sprocket sizes).<br />
Tools you will need:<br />
• 27mm Wrench.<br />
• 27mm, 1/2" Drive socket.<br />
• 14mm Wrench <strong>and</strong>/or socket.<br />
• 1/4" Drive ratchet.<br />
• 10mm Socket.<br />
• 8mm Socket.<br />
• 6mm Allen wrench.<br />
• 4mm Allen wrench.<br />
• 1/2" Drive air impact gun.<br />
• <strong>Chain</strong> riveter/breaker (very important).<br />
• Pliers, normal size.<br />
• Flat head screwdriver.<br />
• Hammer or small rubber mallet.<br />
Tools that might make things much easier:<br />
• Bike st<strong>and</strong> (one that allows removal of the rear wheel)<br />
• Rear axle alignment helper<br />
• Bolt cutters, large<br />
• 1/2" drive torque wrench<br />
Miscellaneous, but not required:<br />
• Rags<br />
• shop gloves<br />
R<strong>and</strong>om thoughts about the project:<br />
I'm going to start out by talking about things not directly related to the installation.<br />
First, the new rear sprocket felt much lighter than the stock steel sprocket. I had no<br />
way of weighing them, but I could tell just by holding them. The front sprocket felt<br />
the same to me. It is most likely somewhat lighter (maybe a few ounces), but, as<br />
far as I'm concerned, it is plenty beefy for the job. Once you have done this mod,<br />
your speedometer is going to be considerably off. My speedo was 3.5mph fast from<br />
the factory, <strong>and</strong> now, it indicates a speed much faster than actual. So, if you think<br />
you're getting passed a lot after you do this, it's because you are going slow. I'll<br />
post an update about how this affects riding later, as I haven't ridden it enough with<br />
them on yet.
Let's get started.<br />
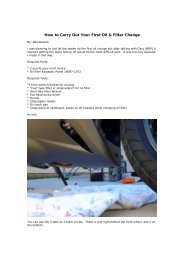
(Refer to Fig. 1) Take your 8mm socket <strong>and</strong> remove the two bolts from the front<br />
sprocket cover. Set the cover to the side. You can also remove the grey plastic piece<br />
to the right of the cover, but it's really not necessary. To remove it, unscrew the<br />
4mm Allen head bolt from the top, pull on the bottom until the clips pop out, then lift<br />
up on the whole thing <strong>and</strong> the top clip will pop allowing removal.<br />
Fig. 1<br />
(Refer to Fig. 2) Take your 10mm socket <strong>and</strong> remove the two bolts from the speed<br />
sensor. Let the sensor hang, but make sure it's out of the way of the sprocket nut.
Fig. 2<br />
(Refer to Fig.3) Take your flat head screwdriver <strong>and</strong> your hammer or mallet <strong>and</strong><br />
flatten out the retaining ring behind the front sprocket nut. Setup your air impact<br />
gun <strong>and</strong> use your 27mm socket to remove the sprocket nut.
Fig. 3<br />
(Refer to Fig. 4) Take your 4mm Allen wrench <strong>and</strong> remove the two bolts holding the<br />
chain guard to the swingarm. Set the chain guard aside with the sprocket cover you<br />
removed earlier. Use your pliers to untwist <strong>and</strong> remove the rear axle nut pin. Next,<br />
take your 27mm wrench <strong>and</strong> loosen the rear axle nut. With the rear axle loose,<br />
loosen the chain tensioners with your 14mm wrench. There's one on both sides of<br />
the swingarm. Do not screw the tensioners all the way off, just loosen them enough<br />
to move the rear tire all the way forward.
Fig. 4<br />
(Refer to Fig. 5) Take your 6mm Allen wrench <strong>and</strong> remove the two bolts holding the<br />
rear brake caliper to the swingarm. Lift up on the caliper <strong>and</strong> place it on the<br />
passenger footrest. Do not let the caliper just dangle from the hydraulic line. Also,<br />
don't depress the rear brake lever while the caliper is off the brake rotor.<br />
If you are re-using your chain for whatever reason, this is how to remove the<br />
sprockets without cutting the chain. If you have a new chain, cut your old one (or<br />
use the chain breaker) <strong>and</strong> go ahead to the next paragraph.<br />
If you haven't already, push the rear tire as far forward as it will go. There should<br />
now be lots of slack in your chain so we can remove the sprockets. Pull the front<br />
sprocket off the transmission output shaft. The chain may try to keep the sprocket<br />
in place, but it will come off. With the front sprocket off, pull the chain towards the<br />
rear of the bike, then up <strong>and</strong> off the rear sprocket. Make sure you take the chain<br />
off towards the swingarm <strong>and</strong> not towards the wheel! While we're here, you<br />
might-as-well clean out any gunk that has accumulated around the front sprocket<br />
area, as well as the chain rail on top of the swingarm.<br />
Ok. Your chain is cut <strong>and</strong>/or your sprockets are free. Put your bike up on a bike<br />
st<strong>and</strong> <strong>and</strong> remove the rear axle. Here is a picture of the axle off the bike.
Be careful not to get the axle dirty. Remove the rear wheel <strong>and</strong> set it down,<br />
sprocket-side-up. It would be a good idea to set the wheel down on a rag or<br />
something, just to keep the hub from getting scuffed on the outside or dirty on the<br />
inside. We don't want anything abrasive in the hub! Here’s a couple pictures of the<br />
rear wheel <strong>and</strong> the sprockets:
Use your 14mm wrench or socket to remove the six nuts holding the sprocket to the<br />
wheel. Take the old sprocket off, put the new sprocket on. Replace <strong>and</strong> tighten<br />
sprocket nuts to 44 ft/lbs, place wheel back under bike, replace axle, replace axle<br />
nut, but do not tighten it down.<br />
Note: DO NOT force the axle through the hub. When lined up properly, the axle will<br />
slide right through the hub with very little friction.<br />
Install your new front sprocket on the transmission output shaft. If you are re-using<br />
your old chain, you must put the chain around the sprocket before installing it.<br />
Note: The factory sprocket is very clearly marked "outside" so it is hard to install it<br />
wrong. However, the aftermarket sprocket I was using was not shaped the same as<br />
the factory sprocket, <strong>and</strong> was also not marked as to orientation. If this is the case<br />
for you, look at the spacing between the stock sprocket's teeth <strong>and</strong> the transmission.<br />
Then, compare using both sides of the new sprocket. It will be obvious which way it<br />
is supposed to go on.<br />
All right, sprocket is now on the transmission. My new sprocket was wider than the<br />
stock one, so the retaining ring could not be pushed onto the splines as it was<br />
before. I put it on before the sprocket nut anyway though, just as a washer, if<br />
nothing else. Just h<strong>and</strong> tighten the nut for now, we'll torque it down later.<br />
If you're re-using your old chain, make sure your rear tire is all the way forward, <strong>and</strong><br />
feed the chain around the bottom of the sprocket, as far up as you can go. Rotate
the tire counter-clockwise until the chain is completely around the sprocket.<br />
Unwrap your new chain, <strong>and</strong> feed it over the rear sprocket <strong>and</strong> through the front<br />
sprocket, so that the loose ends are underneath the swingarm, just in front of the<br />
rear sprocket. Make sure the rear wheel is still pushed all the way forward. If<br />
necessary, use your chain breaker to remove any un-needed links. Now, use your<br />
chain riveter to install the master link. Make sure you use the rubber bushings on<br />
both sides of the master link! Also, make sure you read the instructions provided<br />
with the new chain as to the installation of the master link. If your master link came<br />
with a retaining clip, make sure you install that too. It's easiest with pliers.<br />
Ok. <strong>Sprockets</strong>, check. <strong>Chain</strong>, check. You're almost done!<br />
Pull on the rear wheel until there is no more droop in the chain. Tighten the rear<br />
axle nut until the axle does not move freely. Do not torque the axle nut yet. Take<br />
your 14mm wrench <strong>and</strong> tighten the chain tensioners so that the red caps on the end<br />
of the swingarm are snug again. I am not going to tell you how to align the rear<br />
axle, because many people do it many different ways. I used the alignment marks<br />
on the swingarm. Once you're satisfied with the alignment of your axle, torque the<br />
axle nut down to 80 ft/lbs. You may need another wrench for the right-h<strong>and</strong> side of<br />
the axle if it wants to spin freely. It stayed in place while I was working on it, but it<br />
may not for you. The bolt head on the right-h<strong>and</strong> side is 22mm. While you still<br />
have your torque wrench <strong>and</strong> 27mm socket out, go ahead <strong>and</strong> torque the front<br />
sprocket nut down as well. Torque to 92ft/lbs. After I tightened the front sprocket<br />
nut, I also bent the retaining ring back up. Probably not necessary, as the ring is no<br />
longer being held in place, but I did it anyway.<br />
Take your 6mm Allen wrench <strong>and</strong> bolt your rear brake calliper back in place. Torque<br />
spec for the calliper mounting bolts is 18 ft/lbs. While you're back there, go ahead<br />
<strong>and</strong> use your 4mm Allen wrench to re-install the chain guard. Moving to the front,<br />
we bolt our speed sensor back on, followed by our sprocket cover. If you removed<br />
the other plastic piece from earlier, replace it too.<br />
Now, get cleaned up, suit up, <strong>and</strong> test her out!<br />
***Disclaimer***<br />
I am NOT a professional mechanic, <strong>and</strong> I do NOT guarantee that my tutorial is<br />
%100 sound advice. I am merely conveying, to anyone who wants to read it, what I<br />
did to my bike. Use this tutorial at your OWN RISK.<br />
With that out of the way, if there is anything you see that could be made better, or<br />
anything that needs to be corrected, just tell me, <strong>and</strong> I'll try to fix/add it. Thank<br />
you.<br />
**07Dec2006 EDIT**<br />
Added torque specs for required components.<br />
Added proper size of rear axle bolt head.
12 Dec 2006 : My thoughts – <strong>Sprockets</strong> <strong>and</strong> clutch springs, 500miles<br />
I've been riding/stunting with my new sprockets <strong>and</strong> clutch springs for about 500<br />
miles now, <strong>and</strong> I thought I would share my thoughts on the differences between<br />
stock <strong>and</strong> mod.<br />
Starting out, the only reason I performed these mods was to aid low-end torque <strong>and</strong><br />
clutch grab for the sole purpose of performing wheelies. 14t/48t sprockets are<br />
certainly not for everyday riders, or for people who do a lot of sustained high speed<br />
riding, such as on freeways. However, besides the obvious on-tap wheelie power I<br />
now have, I have also noticed powering out of corners in the wrong gear to be much<br />
easier. Not a habit to get into, but if you come out of a corner in 3rd when you<br />
needed 2nd, you probably won't have to down-shift unless you really want to.<br />
Another thing I've noticed is a marked decrease in fuel economy. This is mainly my<br />
fault though, as I tend to let the tacho roam into the high side before shifting, even<br />
when just cruising. If I were to shift conservatively, I would assume that fuel<br />
economy would remain unchanged.<br />
Another thing you will immediately notice is that your speedometer will be off even<br />
more than it was stock. I plan on doing more testing later, but according to my first<br />
GPS measurement, at ~65mph indicated, I am now going ~55mph actual. I don't<br />
plan on fixing the inaccuracy, but if you wish to, there are modules you can splice<br />
into your system to fix inaccurate speedos.<br />
Moving on to the clutch springs, well, there really isn't a lot to say here. They work<br />
exactly as expected. Clutch "tension" at the lever is definitely increased, <strong>and</strong> you will<br />
notice your h<strong>and</strong> getting tired quicker if you drive in a lot of traffic; but you get<br />
acclimated quickly, as I don't hardly notice anymore. Dragging the clutch is slightly<br />
more difficult, as the Barnett springs cause the clutch plates to grab the friction<br />
plates much harder <strong>and</strong> quicker than the stock springs did. You may find yourself<br />
dumping the clutch a few times while getting used to the new springs, but definitely<br />
worth it in the long run.<br />
All in all, I am very pleased with my new setup; <strong>and</strong> at under $300 for the parts, the<br />
benefits really can't be beat. On a side note, after doing the mods, I notice that my<br />
bike feels very "unstable", especially when riding two up. I was riding through a<br />
parking lot with my girl on the back just like we always do on Thursday night, <strong>and</strong> I<br />
almost fell over taking a turn I've taken at-least 20 times with her on the back. The<br />
bike just doesn't want to stay up by itself like it used to. This has happened a couple<br />
times now, <strong>and</strong> I'm thinking that the rear axle might not be aligned properly. I used<br />
the marks on the swing arm, just like the shop that built my bike did, <strong>and</strong> the chain<br />
doesn't make any noise at all. Not quite sure what's going on yet, but I'm looking<br />
into it.