Model MR Installation Manual - MTS Sensors
Model MR Installation Manual - MTS Sensors
Model MR Installation Manual - MTS Sensors

You also want an ePaper? Increase the reach of your titles
YUMPU automatically turns print PDFs into web optimized ePapers that Google loves.
®<br />
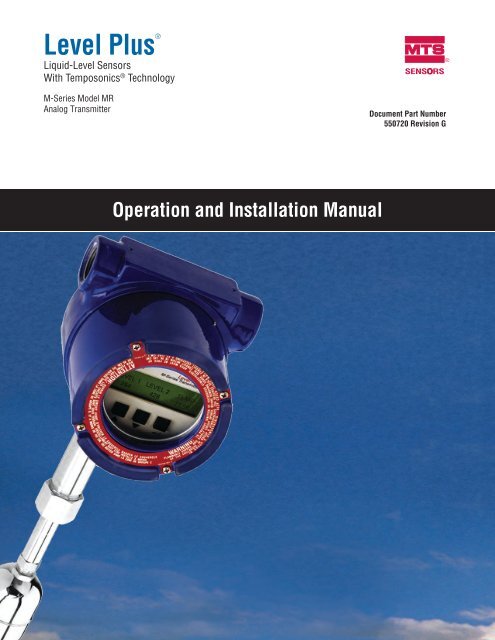
Level Plus<br />
Liquid-Level <strong>Sensors</strong><br />
With Temposonics ® Technology<br />
M-Series <strong>Model</strong> <strong>MR</strong><br />
Analog Transmitter<br />
SENSORS<br />
Document Part Number<br />
550720 Revision G<br />
®<br />
Operation and <strong>Installation</strong> <strong>Manual</strong>
United States<br />
General:<br />
Tel: +1-919-677-0100<br />
Fax: +1-919-677-2343<br />
E-mail: sensorsinfo@mts.com<br />
http://www.mtssensors.com<br />
Mailing and Shipping Address:<br />
<strong>MTS</strong> Systems Corporation<br />
<strong>Sensors</strong> Division<br />
3001 Sheldon Drive<br />
Cary, North Carolina, 27513, USA<br />
Customer Service:<br />
Tel: +1-800-457-6620<br />
Fax: +1-800-498-4442<br />
E-mail: orders@mts.com<br />
Technical SuPPORT and Applications:<br />
24 Hour Emergency Technical Support<br />
Tel: +1-800-633-7609<br />
e-mail: levelplus@mts.com<br />
<strong>Model</strong> <strong>MR</strong> Operation and <strong>Installation</strong> <strong>Manual</strong><br />
Contact Information<br />
Office Hours (EST):<br />
Monday - Thursday: 8:00 a.m. to 5:00 p.m.<br />
Friday: 8:00 a.m. to 4:00 p.m.<br />
Remittance Address:<br />
<strong>MTS</strong> Systems Corporation<br />
<strong>Sensors</strong> Division<br />
NW 5872<br />
P.O. Box 1450<br />
Minneapolis, MN, 55486-5872<br />
Quote and Contract Terms & Conditions:<br />
The parties expressly agree that the purchase and use of Material and/<br />
or Services from <strong>MTS</strong> <strong>Sensors</strong> Division are subject to <strong>MTS</strong>’ Terms<br />
and Conditions, in effect as of the date of this document, which<br />
are located at http://www.mtssensors.com/fileadmin/media/pdfs/<br />
Terms_and_Conditions.pdf and are incorporated by reference into<br />
this and any ensuing contract. Printed Terms and Conditions can be<br />
provided upon request by emailing sensorsinfo@mts.com or if you<br />
prefer, go to http://www.mtssensors.com/index and click the Quote/<br />
Contract Terms and Conditions link at the bottom of the page to<br />
download the PDF.<br />
Contact<br />
Information<br />
Germany<br />
General:<br />
Tel.: +49-2351-9587-0<br />
Fax: +49-2351-56491<br />
e-mail: info@mtssensor.de<br />
http://www.mtssensor.de<br />
Mailing and Shipping Address:<br />
<strong>MTS</strong> Sensor Technologie, GmbH & Co. KG<br />
Auf dem Schüffel 9<br />
D - 58513 Lüdenscheid, Germany<br />
Technical SuPPORT and Applications:<br />
Tel.: +49-2351-9587-0<br />
e-mail: info@mtssensor.de<br />
http://www.mtssensor.de<br />
Japan<br />
General:<br />
Tel.: +81-42-775-3838<br />
Fax: +81-42-775-5516<br />
e-mail: info@mtssensor.co.jp<br />
http://www.mtssensor.co.jp<br />
Mailing and Shipping Address:<br />
<strong>MTS</strong> <strong>Sensors</strong> Technology Corporation<br />
737 Aihara-cho, Machida-shi<br />
Tokyo 194-0211, Japan<br />
Technical SuPPORT and Applications:<br />
Tel.: +81-42-775-3838<br />
Fax: +81-42-775-5512<br />
<strong>MTS</strong> <strong>Sensors</strong><br />
i<br />
Level Plus ® Liquid-Level <strong>Sensors</strong> M-Series <strong>Model</strong> <strong>MR</strong> Analog Transmitter<br />
Operation and <strong>Installation</strong> <strong>Manual</strong>, Document Number 550720 Revision G 09/11
<strong>Model</strong> <strong>MR</strong> Operation and <strong>Installation</strong> <strong>Manual</strong><br />
Reference Information<br />
Notices used in this manual<br />
This manual contains notices to highlight specific information as follows:<br />
Notes:<br />
These notices provide important tips, guidance, or advice.<br />
Important:<br />
Reference<br />
Information<br />
These notices provide information that might help you avoid inconvenient or problem situations.<br />
Attention:<br />
These notices indicate possible damage to programs, devices, or data and is placed just<br />
before the instruction or situation in which damage could occur.<br />
Caution:<br />
These notices indicate situations that can be potentially hazardous to you. A Caution notice is placed just<br />
before a description of a potentially hazardous procedure, step, or situation.<br />
Related publications<br />
The following publications are listed below by part number followed by description and are available<br />
in Adobe Acrobat Portable Document Format (PDF) at http://www.mtssensors.com/<br />
550677 - Product Specification, <strong>Model</strong> <strong>MR</strong> Analog Transmitter<br />
551103 - Level Plus Accessories Catalog<br />
550731 - Component Replacement Guide<br />
550904 - Application Datasheet Rigid<br />
550905 - Application Datasheet Sanitary<br />
550906 - Application Datasheet 7/8” Flex<br />
For information about safe work procedures, refer to the following documentation:<br />
National Electric Code ANSI/NFPA 70<br />
CSA C22.1 Canadian Electrical Code<br />
How this manual is organized<br />
“Introduction”, provides an overview of the manual.<br />
“Terms and Definitions”, provides definitions of terms used in this manual.<br />
“Product Overview”, gives an overall product description for the Level Plus liquid-level transmitter, its specifications, use, output,<br />
and electronics.<br />
“<strong>Installation</strong> and Mounting”, provides detailed installation and mounting information.<br />
“Electrical Connections and Wiring Procedures”, provides engineering specifications and wiring diagrams to assist in the<br />
installation process.<br />
“Maintenance and Field Service”, provides guidelines for general float maintenance and procedures required for replacing the<br />
<strong>Model</strong> <strong>MR</strong> electronic module or level transmitter.<br />
“Troubleshooting”, provides a list of symptoms, their possible cause and the action to be taken when troubleshooting the<br />
transmitter.<br />
Setup using keypad display - describes modes of operation, LCD display functionality, alarm settings and how to calibrate the unit manually.<br />
Setup using HART ® Field Communicator - provides procedures for setting 4 and 20 mA set points<br />
Setup using <strong>MTS</strong> Field Setup Software - provides software installation, parameter setup, and calibration procedures.<br />
“Agency Information” provides comprehensive listings of agency approvals and standards,<br />
installation drawings, labels and applicable protocols.<br />
Getting information, help, and service<br />
You can get the latest ordering information and software updates by visiting www.mtssensors.com website<br />
General contact information, shipping and office hours are available on page i.<br />
Level Plus ® Liquid-Level <strong>Sensors</strong> M-Series <strong>Model</strong> <strong>MR</strong> Analog Transmitter<br />
Operation and <strong>Installation</strong> <strong>Manual</strong>, Document Number 550720 Revision G 09/11<br />
ii<br />
<strong>MTS</strong> <strong>Sensors</strong>
<strong>Model</strong> <strong>MR</strong> Operation and <strong>Installation</strong> <strong>Manual</strong><br />
Table of Contents<br />
Contact information<br />
General .........................................................................................i<br />
Mailing and shipping address ......................................................i<br />
Customer service .........................................................................i<br />
Technical support and applications ..............................................i<br />
Office hours .................................................................................i<br />
Remittance address .....................................................................i<br />
Quote and contract terms and conditions.....................................i<br />
Reference information<br />
Notices used in this manual......................................................... ii<br />
Related publications..................................................................... ii<br />
How this manual is organized...................................................... ii<br />
Getting information, help, and service......................................... ii<br />
Introduction<br />
Introduction................................................................ 1<br />
Public website support portal .......................................... 1<br />
Terms and Definitions<br />
Terms and definitions reference....................................... 2<br />
<strong>Model</strong> <strong>MR</strong> product overview<br />
Product overview ........................................................ 3<br />
Industries..................................................................................... 3<br />
Applications................................................................................. 3<br />
Features....................................................................................... 3<br />
Components............................................................... 3<br />
Housings...................................................................................... 3<br />
Outer pipe configurations ............................................................ 4<br />
Floats .......................................................................................... 5<br />
Internal electronics....................................................................... 5<br />
Accessories ................................................................................. 5<br />
Theory of operation....................................................... 5<br />
Accuracy. .................................................................. 5<br />
Warranty. .................................................................. 5<br />
<strong>Model</strong> number identification............................................ 6<br />
FM/CSA ....................................................................................... 6<br />
ATEX ........................................................................................... 7<br />
Product specifications................................................... 9<br />
<strong>Model</strong> <strong>MR</strong> transmitter installation and mounting<br />
<strong>Installation</strong> and mounting ............................................. 10<br />
Storage .................................................................. 10<br />
Stilling wells and guide poles ........................................ 10<br />
<strong>Installation</strong>............................................................... 10<br />
Rigid probe................................................................................ 10<br />
Flexible probe ............................................................................ 11<br />
Mounting ................................................................. 12<br />
Threaded flange mounting.......................................................... 12<br />
Welded flange mounting ........................................................... 12<br />
Sanitary Tri-Clamp mounting .................................................... 13<br />
Electrical connections and wiring procedures<br />
Electrical connections and wiring procedures ...................... 14<br />
Safety recommendations for installation............................ 14<br />
Recommended cable types ............................................ 15<br />
Cable specifications .................................................................. 15<br />
Electrical conduit installation ........................................ 15<br />
Grounding ................................................................ 16<br />
<strong>MTS</strong> <strong>Sensors</strong><br />
iii<br />
Safety barriers for IS installation ..................................... 16<br />
Maintenance and field service<br />
Maintenance and field service ........................................ 17<br />
General maintenance and field service requirements ............ 17<br />
Float maintenance ..................................................................... 17<br />
Field service .............................................................................. 17<br />
Service / RMA policy ................................................................. 17<br />
Troubleshooting<br />
Troubleshooting procedures.......................................... 17<br />
Setup<br />
Quick start-up guide..................................................... 18<br />
Before you begin ....................................................................... 18<br />
Quick start-up procedure .......................................................... 18<br />
Setup using keypad display ........................................... 18<br />
Operation modes ....................................................................... 18<br />
LCD display and keypad (optional) ............................................ 19<br />
Alarm settings .......................................................................... 19<br />
<strong>Manual</strong> calibration .................................................................... 19<br />
Setup using HART field communicator .............................. 21<br />
Preparing the transmitter for re-calibration ............................... 21<br />
Setting the low value ................................................................ 21<br />
Setting the upper range value .................................................. 21<br />
Setup using <strong>MTS</strong> Field Setup software .............................. 22<br />
Using the <strong>MTS</strong> Field Setup software ......................................... 22<br />
Advanced setup tab .................................................................. 23<br />
Calibration tab .......................................................................... 24<br />
Output tab ................................................................................ 24<br />
Agency Information<br />
Agency approvals ....................................................... 25<br />
Hazardous area installation ........................................... 26<br />
FM/CSA and ATEX ..................................................................... 26<br />
<strong>Installation</strong> drawings ............................................................. 26<br />
Notes .................................................................................... 28<br />
Wiring and connections ........................................................ 30<br />
Labels .................................................................................... 33<br />
Agency certifications ................................................... 35<br />
ATEX.......................................................................................... 35<br />
CSA..... ...................................................................................... 39<br />
FM ............................................................................................ 41<br />
Level Plus ® Liquid-Level <strong>Sensors</strong> M-Series <strong>Model</strong> <strong>MR</strong> Analog Transmitter<br />
Operation and <strong>Installation</strong> <strong>Manual</strong>, Document Number 550720 Revision G 09/11<br />
Table of<br />
Contents
Level Plus ® Liquid-Level <strong>Sensors</strong> - M-Series <strong>Model</strong> <strong>MR</strong> Analog Transmitter<br />
Operation and <strong>Installation</strong> <strong>Manual</strong>, Document Number 550720 Revision G, 09/11 EN<br />
iv<br />
<strong>MTS</strong> <strong>Sensors</strong>
<strong>Model</strong> <strong>MR</strong> Operation and <strong>Installation</strong> <strong>Manual</strong><br />
Introduction<br />
Introduction<br />
<strong>MTS</strong> is recognized as the pioneer, innovator and leader in magnetostrictive sensing. The new Level Plus ® M-Series transmitter design represents<br />
a continuation of our on-going effort to provide effective, innovative and reliable products to the Liquid Level marketplace.<br />
This manual will provide the following information about the Level Plus <strong>Model</strong> <strong>MR</strong> analog transmitter:<br />
• Terms and definitions<br />
• Product overview<br />
• <strong>Installation</strong> and mounting<br />
• Electrical connections and wiring procedures<br />
• Maintenance and field service<br />
• Troubleshooting<br />
• Quick start-up guide<br />
• Setup using the keypad display<br />
• Setup using a HART ® Field Communicator<br />
• Setup using <strong>MTS</strong> Field Setup Software<br />
• Agency information<br />
• Product certifications<br />
Public website support portal<br />
Visit our support portal at http://www.mtssensors.com for:<br />
• Building Level Plus M-Series <strong>Model</strong> <strong>MR</strong> analog transmitter model numbers<br />
• Latest documentation releases<br />
• Detailed ordering information<br />
• Latest software updates<br />
Introduction<br />
<strong>MTS</strong> <strong>Sensors</strong><br />
1<br />
Level Plus ® Liquid-Level <strong>Sensors</strong> - M-Series <strong>Model</strong> <strong>MR</strong> Analog Transmitter<br />
Operation and <strong>Installation</strong> <strong>Manual</strong>, Document Number 550720 Revision G, 09/11 EN
<strong>Model</strong> <strong>MR</strong> Operation and <strong>Installation</strong> <strong>Manual</strong><br />
Terms and Definitions<br />
Terms and definitions reference<br />
E<br />
Explosion-proof – Type of protection based on enclosure in which<br />
the parts which can ignite an explosive gas atmosphere are placed<br />
within, and which can withstand the pressure developed during an<br />
internal explosion of an explosive mixture, and which prevents the<br />
transmission of the explosion to the explosive gas atmosphere surrounding<br />
the enclosure.<br />
H<br />
HART ® – a Bidirectional communication protocol that provides data<br />
access between intelligent field instruments and host systems.<br />
I<br />
N<br />
NEMA Type 4X – A product Enclosure intended for indoor or outdoor<br />
use primarily to provide a degree of protection against corrosion,<br />
windblown dust and rain, splashing water, and hose-directed water;<br />
and to be undamaged by the formation of ice on the enclosure. They<br />
are not intended to provide protection against conditions such as<br />
internal condensation or internal icing.<br />
NPT – U.S. standard defining tapered pipe threads used to join pipes<br />
and fittings.<br />
S<br />
Specific Gravity – The density ratio of a liquid to the density of water<br />
at the same conditions.<br />
Interface – Noun; The measurement of the level of one liquid when<br />
that liquid is below another liquid.<br />
Interface – Adj.; The Software Graphical User Interface (GUI) that<br />
allows the user to access software protocols (HART).<br />
Intrinsic safety – ‘Intrinsically safe’ - Type of protection based on the<br />
restriction of electrical energy within apparatus of interconnecting<br />
wiring exposed to potentially explosive atmosphere to a level below<br />
that which can cause ignition by either sparking or heating effects.<br />
Terms and<br />
Definitions<br />
Level Plus ® Liquid-Level <strong>Sensors</strong> - M-Series <strong>Model</strong> <strong>MR</strong> Analog Transmitter<br />
Operation and <strong>Installation</strong> <strong>Manual</strong>, Document Number 550720 Revision G, 09/11 EN 2<br />
<strong>MTS</strong> <strong>Sensors</strong>
<strong>Model</strong> <strong>MR</strong> product overview<br />
<strong>Model</strong> <strong>MR</strong> Operation and <strong>Installation</strong> <strong>Manual</strong><br />
Product Overview, Components<br />
The Level Plus <strong>Model</strong> <strong>MR</strong> Liquid-Level transmitter is a continuous multi-functional magnetostrictive transmitter that provides product level,<br />
interface level, and temperature to the user via 4 to 20 mA current loops or HART. Magnetostrictive technology is one of the most accurate<br />
and repeatable level technologies available to date. <strong>MTS</strong> is the inventor and purveyor of magnetostrictive technology and has been serving the<br />
level industry for over 30 years.<br />
Industries Applications Features<br />
• Petroleum<br />
• Liquid petroleum gas<br />
• Pharmaceutical<br />
• Food & beverage<br />
• Chemical<br />
• Wastewater<br />
• Tank farms<br />
• Terminals<br />
• Bullet tanks<br />
• Separator tanks<br />
• Battery tanks<br />
• Storage tanks<br />
• 3-in-1 measurement<br />
- Product level<br />
- Interface level<br />
- Temperature<br />
• No scheduled maintenance or recalibration<br />
• Field repairable<br />
• AMS Aware<br />
Components<br />
The Level Plus <strong>Model</strong> <strong>MR</strong> liquid level transmitter consists of four main components; a housing, outer pipe, float, and electronics. Varying the<br />
components of the transmitter allows the transmitter to be customized to almost any application.<br />
Housings<br />
Level Plus <strong>Model</strong> <strong>MR</strong> transmitters are available in three housing configurations; NEMA Type 4X 316L stainless steel, explosion-proof single<br />
and dual-cavity housings as shown below:<br />
123 mm<br />
(4.85 in.) O.D.<br />
NEMA Type 4X 316L stainless-steel housing<br />
Top View<br />
152 mm<br />
(6 in.)<br />
81 mm<br />
(3.19 in.)<br />
½ in. NPT conduit access<br />
127 mm<br />
(5 in.)<br />
123 mm<br />
(4.84 in.)<br />
81 mm<br />
(3.18 in)<br />
Single cavity explosion-proof housing<br />
213 mm<br />
(8.25 in.)<br />
Optional<br />
display<br />
121 mm<br />
(4.75 in.)<br />
O.D.<br />
3/4 in. NPT<br />
conduit access<br />
M20x1.5 (ATEX)<br />
Product<br />
Overview<br />
127 mm<br />
(5 in.)<br />
127 mm<br />
(5 in.)<br />
176 mm<br />
(6.95 in.)<br />
81 mm<br />
(3.18 in)<br />
210 mm<br />
(8.25 in.)<br />
210 mm<br />
(8.25 in)<br />
Dual cavity explosion-proof housing<br />
121 mm<br />
(4.75 in.)<br />
O.D.<br />
Optional<br />
display<br />
3/4 in. NPT<br />
conduit access<br />
M20x1.5 (ATEX)<br />
<strong>MTS</strong> <strong>Sensors</strong><br />
3<br />
Level Plus ® Liquid-Level <strong>Sensors</strong> - M-Series <strong>Model</strong> <strong>MR</strong> Analog Transmitter<br />
Operation and <strong>Installation</strong> <strong>Manual</strong>, Document Number 550720 Revision G, 09/11 EN
<strong>Model</strong> <strong>MR</strong> Operation and <strong>Installation</strong> <strong>Manual</strong><br />
Product Overview, Components<br />
Outer pipe configurations<br />
The outer pipe is constructed of a variety of configurations, shown below. Contact factory for other materials (such as Hastelloy C or Teflon).<br />
3/4 in. NPT<br />
Adjustable fitting<br />
95 mm (3.75 in.)<br />
minimum<br />
Tank flange<br />
(provided by customer)<br />
49 mm<br />
(1.9 in.) Typical<br />
Sanitary process connnection<br />
(sanitary cap)<br />
Order length<br />
Pipe diameter<br />
16 mm (0.625 in.)<br />
Order length<br />
Pipe diameter 16 mm (0.625 in. dia.)<br />
constructed of 316L stainless steel<br />
74 mm (2.9 in.) min.<br />
Inactive zone<br />
Tip of transmitter<br />
Figure 1. 5/8 in. diameter rigid outer pipe of 316L stainless steel<br />
Figure 2. 5/8 in. diameter rigid outer pipe of polished 316L<br />
stainless steel with sanitary process connection and end plug<br />
1 in. NPT Adjustable<br />
compression fitting, male<br />
305 mm (12 in.)<br />
686 mm (27.0 in.)<br />
Tank<br />
flange<br />
Product<br />
Overview<br />
Order length<br />
Outer flex pipe 7/8” dia.<br />
(316L stainless steel)<br />
76.2 mm<br />
(3.0 in.)<br />
127 mm<br />
(5.0 in.)<br />
Bottom-fixing Hook<br />
Bottom-fixing<br />
Magnet<br />
50.8 mm<br />
(2.0 in.) Typ.<br />
Bottom-fixing Weight<br />
Figure 3. 7/8 in. diameter flexible pipe of 316L stainless steel<br />
Level Plus ® Liquid-Level <strong>Sensors</strong> - M-Series <strong>Model</strong> <strong>MR</strong> Analog Transmitter<br />
Operation and <strong>Installation</strong> <strong>Manual</strong>, Document Number 550720 Revision G, 09/11 EN 4<br />
<strong>MTS</strong> <strong>Sensors</strong>
<strong>Model</strong> <strong>MR</strong> Operation and <strong>Installation</strong> <strong>Manual</strong><br />
Theory of Operation, Accuracy, Accessories and Warranty<br />
Floats<br />
<strong>Model</strong> <strong>MR</strong> transmitters offer numerous floats for different applications<br />
such as stainless steel, 3-A sanitary, hastelloy, Teflon, and<br />
Nitrophyl for both product level and interface level. To be able to<br />
accurately detect the interface level there needs to be a difference of<br />
at least 0.05 in specific gravities between the product and interface<br />
liquids. For detailed information about floats, refer to the ‘Accessories<br />
Catalog’, <strong>MTS</strong> part number 551103.<br />
For assistance with selecting a specific float for your application,<br />
please contact Technical Support with the following information:<br />
• Specific gravity of liquid(s) being measured<br />
• Process temperature<br />
• Process Opening Size<br />
• Vessel pressure<br />
Internal electronics<br />
All transmitters come with two electronic components of a sensing<br />
element and a board set. All sensing elements up to 300 inches<br />
(7620 mm) are rigid and greater lengths have flexible sensing elements.<br />
Flexible sensing elements are only available under 300 inches<br />
(7620 mm) as special orders. The board set consists of a electronic<br />
puck and interconnect board. The board set can be configured for<br />
single or dual loop output offering the ability to output the product<br />
level, interface level, and temperature. All three variables can be<br />
communicated via HART.<br />
The electronic puck can be ordered with or without a display. The<br />
optional display is capable of displaying the product level, interface<br />
level, and temperature. Designed into the optional display are three<br />
push buttons for local setup of 4 and 20 mA set points.<br />
A temperature sensing function is optional with the <strong>Model</strong> <strong>MR</strong> transmitter.<br />
The temperature sensing device is a Resistive Temperature<br />
Device (RTD) mounted inside the transmitter’s outer pipe assembly.<br />
The RTD is a 1000 ohm platinum film device.<br />
Accessories<br />
<strong>MTS</strong> also offers a series of displays, housings, converters, and<br />
other accessories, please refer to the ‘Accessories Catalog’, <strong>MTS</strong><br />
part number 551103.<br />
Theory of operation<br />
Magnetostrictive M-Series transmitters precisely sense the position<br />
of an external float by applying an interrogation pulse to a waveguide<br />
medium. This current pulse causes a magnetic field to instantly surround<br />
the waveguide. The magnet installed within the float also creates<br />
a magnetic field. Where the magnetic fields from the waveguide<br />
and float intersect, a rotational force is created (waveguide twist).<br />
This, in turn, creates a torsional-sonic pulse that travels along the<br />
waveguide as shown in Figure 4.<br />
The head of the transmitter houses the sensing circuit, which detects<br />
the torsional-sonic pulse and converts it to an electrical pulse. The<br />
distance from a reference point to the float is determined by measuring<br />
the time interval between the initiating current pulse and the<br />
return pulse and precisely knowing the speed of these pulses. The<br />
time interval is converted into a level measurement.<br />
Product<br />
Overview<br />
Accuracy<br />
Warranty<br />
Important:<br />
Contact Technical Support or Customer Service for assistance if you suspect<br />
that the transmitter is not working correctly. Technical support can assist<br />
you with troubleshooting, part replacement, and Returned Material<br />
Authorization (RMA) information if required.<br />
Figure 4. Theory of operation<br />
For magnetostrictive transmitters inherent accuracy is measured<br />
in terms of non-linearity. Non-linearity is a measurement of any<br />
imperfections in the waveguide that are reflected in the linearity of<br />
the transmitter’s output. <strong>MTS</strong> tolerances reflect a maximum nonlinearity<br />
of 0.02% of full scale. <strong>MTS</strong> is able to achieve such strict<br />
tolerances by manufacturing all of its own waveguide from a proprietary<br />
alloy and testing 100% of all transmitters before shipping.<br />
All M-Series transmitters come with a two year limited warranty<br />
from the factory shipment date. A Return Materials Authorization<br />
(RMA) number is required and must accompany any transmitter<br />
returns. Any unit that was used in a process must be properly<br />
cleaned in accordance with OSHA standards, before it is returned<br />
to the factory. A Material Safety Data Sheet (MSDS) must also<br />
accompany the transmitter that was used in any process.<br />
<strong>MTS</strong> <strong>Sensors</strong><br />
5<br />
Level Plus ® Liquid-Level <strong>Sensors</strong> - M-Series <strong>Model</strong> <strong>MR</strong> Analog Transmitter<br />
Operation and <strong>Installation</strong> <strong>Manual</strong>, Document Number 550720 Revision G, 09/11 EN
<strong>Model</strong> <strong>MR</strong> Operation and <strong>Installation</strong> <strong>Manual</strong><br />
<strong>Model</strong> Number Identification - FM and CSA<br />
<strong>Model</strong> number identification for FM and CSA approvals<br />
Transmitter model = M 1<br />
m = Magnetostrictive transmitter<br />
Type = R 2<br />
r = Analog output liquid-level transmitter<br />
Input power = A 3<br />
a = 24 Vdc, 2-wire loop<br />
Product<br />
Overview<br />
Output = 4<br />
1 = 4-20 mA Single loop with HART 2 = 4-20 mA Dual loops with HART<br />
Housing type =<br />
a = NEMA Type 4X, 316L stainless steel with cable (intrinsically<br />
safe only)<br />
e = Dual cavity with display (explosion-proof and intrinsically<br />
safe)<br />
b = Single cavity (explosion-proof and intrinsically safe) l = NEMA Type 4X, 316L SS w/6-pin male connector<br />
(intrinsically safe only)<br />
c = Dual cavity (explosion-proof and intrinsically safe) 3 = NEMA Type 4X, 316L SS with internal terminal blocks<br />
(intrinsically safe only)<br />
d = Single cavity with display (explosion-proof and intrinsically safe)<br />
Electronics mounting =<br />
1 = Integral electronics<br />
Transmitter pipe =<br />
b = Industrial end-plug with stop collar f = Sanitary, drain-in-place, no hole, DN<br />
c = Sanitary, T-bar, TB h = Flexible w/bottom fixing hook (stainless steel only)<br />
d = Sanitary, drain-in-place, DP j = Flexible w/bottom fixing weight (stainless steel only)<br />
e = Sanitary, clean-in-place, CP k = Flexible w/bottom fixing magnet (stainless steel only)<br />
Materials of construction (wetted parts) =<br />
Note: contact factory for other materials<br />
1 = 316L stainless steel a = Teflon<br />
2 = Electropolished 316L stainless steel Ra 15 C = CRN Approved<br />
3 = Hastelloy C<br />
Process connection type =<br />
1 = NPT adjustable fitting 6 = 150 lb. welded RF flange<br />
4 = Sanitary, welded 7 = 300 lb. welded RF flange<br />
5 = Sanitary, adjustable 8 = 600 lb. welded RF flange<br />
Process connection size =<br />
A = ¾ in. (NPT for 5 /8 in. pipe) F = 3 in.<br />
B = 1 in. (NPT for 7 /8 in. hose) G = 4 in.<br />
C = 1½ in. H = 5 in. (except sanitary)<br />
D = 2 in. J = 6 in.<br />
E = 2½ in.<br />
TEMPERATURE =<br />
0 = None 2 = One RTD, customer defined position ∆<br />
1 = One RTD, fixed position 76 mm (3 in.) from the end of pipe<br />
Note: ∆ (if this option is selected, position ‘18 E’ must<br />
also be selected)<br />
unit of measurement =<br />
M = Metric (millimeters) Encode length in millimeters if using metric<br />
(XXXXX mm)<br />
U =<br />
US Customary (inches) Encode length in inches if<br />
ordering in US Customary (XXX.XX in.)<br />
length = 13-17<br />
5<br />
6<br />
7<br />
8<br />
9<br />
10<br />
11<br />
12<br />
= Order length based on unit of measurement = Teflon 508 mm (20 in.) to 6096 mm (240 in.)<br />
= Flexible transmitter: 3048 mm (120 in.) to 12,192 mm (480 in.) = Rigid/Sanitary transmitter: 508 mm (20 in.) to<br />
7620 mm (300 in.)<br />
special =<br />
s = Standard product e = Engineering special<br />
(not affecting agency controlled parts or features)<br />
18<br />
Level Plus ® Liquid-Level <strong>Sensors</strong> - M-Series <strong>Model</strong> <strong>MR</strong> Analog Transmitter<br />
Operation and <strong>Installation</strong> <strong>Manual</strong>, Document Number 550720 Revision G, 09/11 EN 6<br />
<strong>MTS</strong> <strong>Sensors</strong>
<strong>Model</strong> <strong>MR</strong> Operation and <strong>Installation</strong> <strong>Manual</strong><br />
<strong>Model</strong> Number Identification - ATEX<br />
<strong>Model</strong> number identification for ATEX approval<br />
transmitter model = M 1<br />
m = Magnetostrictive transmitter<br />
type = R 2<br />
R = Analog output level transmitter<br />
a = 24 Vdc<br />
input power = A 3<br />
output = 4<br />
1 = 4-20 mA Single loop with HART 2 = 4-20 mA Dual loops with HART<br />
housing type = 5<br />
F = NEMA Type 4X, 316L stainless steel with blue cable (ATEX IIA) N = NEMA Type 4X, 316L stainless steel with gray cable<br />
G = SIngle cavity (ATEX IIA) P = NEMA Type 4X, 316L stainless steel with blue cable (ATEX IIB)<br />
H = Dual cavity (ATEX IIA) R = SIngle cavity (ATEX IIB)<br />
J = Single cavity with display (ATEX IIA) S = Dual cavity (ATEX IIB)<br />
K = Dual cavity with display (ATEX IIA) T = Single cavity with display (ATEX IIB)<br />
L = NEMA Type 4X, 316L stainless steel with 6-pin male connector U = Dual cavity with display (ATEX IIB)<br />
electronics mounting = 6<br />
1 = Integral electronics<br />
transmitter pipe/HOSE = 7<br />
b = Industrial end-plug with stop collar H = Flexible w/bottom fixing hook (stainless steel only)<br />
c = Sanitary, T-bar, TB J = Flexible w/bottom fixing weight (stainless steel only)<br />
d = Sanitary, drain-in-place, DP K = Flexible w/bottom fixing magnet (stainless steel only)<br />
e = Sanitary, clean-in-place, CP L = Sanitary Special<br />
f = Sanitary, drain-in-place, no hole, DN<br />
materials of construction (wetted parts) = 8<br />
1 = Stainless steel, 1.4404 a = Teflon / FEP<br />
2 = Stainless steel, 1.4404 electropolished (3A approved, Ra 15 finish) B = Teflon / FEP with plastic floats for Zones 1, IIA and IIB<br />
3 = Hastelloy C<br />
5 = Stainless steel, 1.4404 ◊<br />
6 = Stainless steel, 1.4404 electropolished<br />
(3A approved, Ra 15 finish)◊<br />
◊<br />
Stainless-steel floats for Zone 0 IIB or plastic floats for<br />
Zone 0 IIA<br />
7 = Hastelloy C ◊<br />
process connection type = 9<br />
1 = NPT, Adjustable fitting 7 = 300 lbs. Welded RF flange<br />
4 = Sanitary, welded 8 = 600 lbs. welded RF flange<br />
5 = Sanitary, adjustable fitting 9 = DIN flange welded according to specification<br />
6 = 150 lbs. welded RF flange<br />
process connection size = 10<br />
A = ¾ in. (NPT for 5∕8 in. pipe) F = 3 in.<br />
b = 1 in. (NPT for 7∕8 in. hose) G = 4 in.<br />
C = 1½ in. H = 5 in. (except sanitary)<br />
D = 2 in. J = 6 in.<br />
E = 2½ in.<br />
TEMPERATURE = 11<br />
0 = None 1 = One RTD, fixed position 76 mm (3 in.) from the end of<br />
2 = One RTD, customer defined position łł<br />
pipe<br />
Note: łłIf this RTD option is selected, option ‘18 E ’ must also be selected<br />
unit of measurement = 12<br />
M = Metric (millimeters) Encode length in millimeters if using metric<br />
(XXXXX mm)<br />
U = US Customary (inches) Encode length in inches if ordering<br />
in US Customary (XXX.XX in.)<br />
Product<br />
Overview<br />
<strong>MTS</strong> <strong>Sensors</strong><br />
7<br />
Level Plus ® Liquid-Level <strong>Sensors</strong> - M-Series <strong>Model</strong> <strong>MR</strong> Analog Transmitter<br />
Operation and <strong>Installation</strong> <strong>Manual</strong>, Document Number 550720 Revision G, 09/11 EN
<strong>Model</strong> <strong>MR</strong> Operation and <strong>Installation</strong> <strong>Manual</strong><br />
<strong>Model</strong> Number Identification - ATEX<br />
<strong>Model</strong> number identification for ATEX approval<br />
length (Order length based on unit of measurement) = 13-17<br />
= Rigid or Sanitary transmitter: 508 mm (20 in.) to 7620 mm (300 in.) = Teflon: 508 mm (20 in.) to 6096 mm (240 in.)<br />
= Flexible transmitter: 3048 mm (120 in.) to 12,192 mm (480 in.) except ATEX IIB max. length 7620 mm (300 in.)<br />
special = 18<br />
s = Standard product e = Engineering special (not affecting agency controlled parts or features)<br />
Product<br />
Overview<br />
Level Plus ® Liquid-Level <strong>Sensors</strong> - M-Series <strong>Model</strong> <strong>MR</strong> Analog Transmitter<br />
Operation and <strong>Installation</strong> <strong>Manual</strong>, Document Number 550720 Revision G, 09/11 EN 8<br />
<strong>MTS</strong> <strong>Sensors</strong>
<strong>Model</strong> <strong>MR</strong> Operation and <strong>Installation</strong> <strong>Manual</strong><br />
Product Specifications<br />
<strong>Model</strong> <strong>MR</strong> product specifications<br />
Parameters<br />
LEVEL OUTPUT<br />
Measured<br />
variable:<br />
Output signal /<br />
Protocol:<br />
Order length:<br />
Non-linearity:<br />
Repeatability:<br />
Temperature output<br />
Measured<br />
variable:<br />
Type:<br />
Repeatability:<br />
Temperature<br />
accuracy:<br />
Drift:<br />
Electronics<br />
Input voltage:<br />
Fail safe:<br />
Reverse polarity<br />
protection:<br />
Lightning/<br />
Transient<br />
protection:<br />
Calibration<br />
Zero adjust<br />
range:<br />
Span adjust<br />
range:<br />
Specifications<br />
Product level and interface level<br />
4 to 20 mA with HART ® , 1 or 2 loop<br />
Flexible hose:<br />
(FM, CSA, ATEX IIA):<br />
3048 mm (120 in.) to 12200 mm (480 in.) Ƥ<br />
(ATEX IIB):<br />
3048 mm (120 in.) to 7600 mm (300 in.) Ƥ<br />
Rigid pipe:<br />
508 mm (20 in.) to 7620 mm (300 in.) ∆ §<br />
Sanitary pipe:<br />
508 mm (20 in.) to<br />
7620 mm (300 in.) ∆ §<br />
∆ Contact factory for longer lengths.<br />
§ Order length equals the measurement range plus<br />
the inactive zone.<br />
0.02% F.S. or 0.794 mm (1/32 in.)*<br />
* Whichever is greater<br />
0.01% F.S. or 0.381 mm (0.015 in.)*<br />
(any direction)<br />
† Contact factory for alternative materials.<br />
Single-point temperatures<br />
4 to 20 mA from 1000Ω platinum RTD<br />
at 0 °C<br />
±0.1 °C (±0.18 °F)<br />
±1.5 °C (±2.7 °F)<br />
±0.5 ºC (±0.9 ºF) per year<br />
10.5 to 36 Vdc, maximum for I.S. ATEX<br />
approval<br />
High (21.4 mA), or Low (3.8 mA)<br />
Series diode<br />
Stage 1:<br />
Line-to-ground surge suppression;<br />
IEC 61000-4-5<br />
Stage 2:<br />
Line-to-line and line-to-ground transient<br />
suppressors; IEC 61000-4-4<br />
Anywhere within the active length<br />
Full scale to 152 mm (6 in.) from zero<br />
Parameters<br />
Environmental<br />
Enclosure rating:<br />
Humidity:<br />
Operating<br />
temperatures:<br />
Vessel pressure:<br />
Specifications<br />
NEMA Type 4X<br />
0 to 100% relative humidity,<br />
non-condensing<br />
Electronics:<br />
-40 °C (-40 °F) to 71 °C (160 ºF)<br />
Sensing element:<br />
-40 °C (-40 °F) to 125 °C (257 °F) ◊<br />
Temperature element:<br />
-40 °C (-40 °F) to 105 °C (221 °F)<br />
◊ Contact factory for specific temperature ranges.<br />
Dependent on float pressure, contact<br />
factory for more information<br />
Materials: Wetted parts: 316L stainless steel †<br />
Non-wetted parts: 316L stainless steel,<br />
Epoxy coated aluminum<br />
† Contact factory for alternative materials.<br />
Field installation<br />
Housing<br />
dimensions:<br />
Mounting<br />
Rigid pipe:<br />
Flexible hose:<br />
Wiring<br />
Connections:<br />
Electrical Connections<br />
Single and Dual<br />
Cavity:<br />
NEMA Type 4X:<br />
Display<br />
Measured<br />
variables:<br />
Size:<br />
Number of digits: 16<br />
Single cavity:<br />
127 mm (5 in.) by 123 mm (4.85 in.)<br />
121 mm (4.75 in.) O.D.<br />
Dual cavity:<br />
127 mm (5 in.) by 177 mm (6.95 in.)<br />
121 mm (4.75 in.) O.D.<br />
NEMA Type 4X:<br />
81 mm (3.2 in.) by 123 mm (4.85 in.)<br />
¾ in. Adjustable MNPT fitting<br />
Flange or Tri-Clamp ® Mount<br />
1 in. Adjustable MNPT fitting<br />
Flange mount<br />
2-wire shielded cable or twisted pair,<br />
Daniel Woodhead 6-pin male connector,<br />
4570 mm (180 in.) integral cable with<br />
pigtail<br />
¾ in. FNPT conduit opening, M20 for ATEX<br />
version<br />
½ in. FNPT conduit opening<br />
Product level, interface level and<br />
temperature<br />
13 mm (0.5 in.)<br />
Product<br />
Overview<br />
<strong>MTS</strong> <strong>Sensors</strong><br />
9<br />
Level Plus ® Liquid-Level <strong>Sensors</strong> - M-Series <strong>Model</strong> <strong>MR</strong> Analog Transmitter<br />
Operation and <strong>Installation</strong> <strong>Manual</strong>, Document Number 550720 Revision G, 09/11 EN
<strong>Model</strong> <strong>MR</strong> Operation and <strong>Installation</strong> <strong>Manual</strong><br />
<strong>Installation</strong>, Mounting and Storage<br />
<strong>Installation</strong> and mounting<br />
This section contains information about storing your transmitter (prior to installation) and detailed procedures for installing and mounting your<br />
transmitter.<br />
Storage<br />
If storage is required prior to installation, store indoors in a dry environment at ambient temperature range not exceeding -40 °C (-40 °F) to<br />
71 °C (160 °F).<br />
Stilling wells and guide poles<br />
Level Plus transmitters can be mounted in slotted or unslotted stilling wells but a slotted stilling well is always preferred. Using a unslotted<br />
stilling well will negatively affect performance of any level device as the level in the stilling well can differ from the level in the tank. The Level<br />
Plus transmitter can also be installed to one side of the stilling well to also allow for sampling and manual gauging from the same opening as<br />
the automatic tank gauging. Contact Technical Support for details.<br />
Level Plus transmitters do not require a stilling well for installation. Our transmitters are installed in numerous tanks without stilling wells with<br />
no loss in performance due to our patented flexible waveguide and hose. A stilling well is highly recommended for agitated, turbulent, and/or<br />
fast filling tanks.<br />
<strong>Installation</strong><br />
The installation procedures below are illustrated using the adjustable NPT fitting for a threaded flange mount. The procedures will have to be<br />
slightly adjusted if using a welded flange or sanitary Tri-Clamp mount.<br />
Rigid probe<br />
Tools Required:<br />
• Channel lock pliers<br />
• Common screwdriver<br />
• 5/32 in. Hex<br />
Caution:<br />
It is recommended that assembly and mounting of this transmitter should not be performed alone. To ensure proper and safe assembly of the M-Series<br />
transmitter, a minimum of two (2) individuals are recommended. Gloves are also recommended. In addition , PPE is required for work areas such as<br />
safety shoes, safety glasses, hard hat, and fire resistant clothing.<br />
Perform the following steps to Install the <strong>Model</strong> <strong>MR</strong> transmitter:<br />
1. Remove the stop collar and E-ring. With assistance, feed the rigid pipe through the hole of the removed tank flange until the flange is<br />
positioned near the top of the transmitter. Insert the threaded portion of the adjustable fitting into the customer supplied flange and<br />
tighten (apply pipe thread sealant if required). Be careful not to drop the flange as it can damage the transmitter.<br />
2. Slide the product float onto the rigid pipe. Slide the interface float (optional) onto the rigid pipe. Install stop collar 2 inches from the<br />
bottom (see ‘Note’ below). Do not drop the float(s) or allow them to free fall along the rigid pipe as damage may result.<br />
<strong>Installation</strong> &<br />
Mounting<br />
Note:<br />
The stop collar can be removed or adjusted based on the float selected for the application. Please consult the factory for more information.<br />
3. Slide float(s) back down to the stop collar to prevent them from free falling during installation into the tank. Insert the rigid pipe<br />
(with floats) through the tank opening and lower the transmitter/float assembly into the tank until it rests on the bottom. DO NOT<br />
DROP OR DAMAGE THE PIPE.<br />
4. Secure the flange onto the tank mount.<br />
5. Pull the transmitter upward so the end plug is just resting on the floor of the tank. Tighten the adjustable fitting to hold the transmitter<br />
in place.<br />
6. Terminate the field wire cables noting proper wire orientation.<br />
Level Plus ® Liquid-Level <strong>Sensors</strong> - M-Series <strong>Model</strong> <strong>MR</strong> Analog Transmitter<br />
Operation and <strong>Installation</strong> <strong>Manual</strong>, Document Number 550720 Revision G, 09/11 EN 10<br />
<strong>MTS</strong> <strong>Sensors</strong>
<strong>Model</strong> <strong>MR</strong> Operation and <strong>Installation</strong> <strong>Manual</strong><br />
<strong>Installation</strong>, Mounting and Storage<br />
Flexible probe<br />
Caution:<br />
When assembling and installing the <strong>Model</strong> <strong>MR</strong> transmitter, be careful not to allow the flexible hose to kink or be coiled in less than 16 in. (406.5 mm)<br />
diameter. It is recommended that assembly and mounting of this transmitter should not be done alone. To ensure proper and safe assembly of the<br />
<strong>Model</strong> <strong>MR</strong> transmitter, a minimum of two (2) individuals are recommended. Gloves are also recommended. PPE is required for work areas such as safety<br />
shoes, safety glasses, hard hat, and fire resistant clothing.<br />
Tools Required:<br />
• 9/16 in. Socket and ratchet<br />
• Channel lock pliers<br />
• 3/16 in. Hex<br />
1. Remove the stop collar. With assistance, feed the flexible hose through the hole of the removed tank flange until the flange is<br />
positioned at the rigid section of pipe near the top of the transmitter. Insert the threaded portion of the adjustable fitting into the<br />
customer supplied flange and tighten (apply pipe thread sealant if required). Be careful not to drop flange on the flexible hose as<br />
damage may result.<br />
2. Slide the product float onto the flexible pipe. Slide the interface float (optional) onto the flexible pipe. Install stop collar 3 inches from<br />
the bottom of rigid section (see ‘Note’ below). Do not drop float(s) or allow them to free fall along the flexible pipe as damage may<br />
result.<br />
Note:<br />
The stop collar can be removed or adjusted based on the float selected for the application. Please consult the factory for more information.<br />
3. Mount the hook, weight, or the magnet to the welded end-plug section of the pipe (this is the bottom rigid section of the pipe) using the<br />
supplied nut, spacer and washer, tighten securely as shown in Figure 5. For the magnet, remove washer before<br />
installing in tank.<br />
Flexible pipe<br />
Flexible pipe<br />
Flexible pipe<br />
Welded<br />
end-plug<br />
Welded<br />
end-plug<br />
Welded<br />
end-plug<br />
Weight<br />
Nut<br />
Transmitter retention<br />
using weight<br />
Figure 5. Bottom fixing hardware<br />
Spacer<br />
Washer<br />
Magnet<br />
Remove<br />
washer<br />
Spacer<br />
Washer<br />
Nut<br />
Transmitter retention<br />
using magnet<br />
Bottom-fixing hook<br />
(mates with customer supplied<br />
hardware mounted in the<br />
tank bottom)<br />
Transmitter retention using<br />
bottom-fixing hook<br />
DO NOT DROP OR DAMAGE THE PIPE<br />
Important: Avoid kinking or bending the flexible pipe in less than 16 inch (406 mm) diameter or damage may result.<br />
4. Slide float(s) back down to the stop collar to prevent them from free falling during installation into the tank. Insert the flex pipe and<br />
floats through the tank riser pipe and lower the transmitter/float assembly into the tank until it rests on the bottom. If you are using<br />
a bottom-fixing hook, fasten the hook to the appropriate customer-supplied mating hardware at the tank bottom.<br />
5. Secure the flange onto the tank riser pipe.<br />
6. Pull the transmitter upward to straighten the flexible pipe until the resistance of the weight, magnet, or hook is felt without raising the<br />
weight or magnet off the floor of the tank. Tighten the adjustable fitting to hold the transmitter in place.<br />
7. Terminate the field wire cables noting proper wire orientation.<br />
<strong>Installation</strong> &<br />
Mounting<br />
<strong>MTS</strong> <strong>Sensors</strong><br />
11<br />
Level Plus ® Liquid-Level <strong>Sensors</strong> - M-Series <strong>Model</strong> <strong>MR</strong> Analog Transmitter<br />
Operation and <strong>Installation</strong> <strong>Manual</strong>, Document Number 550720 Revision G, 09/11 EN
<strong>Model</strong> <strong>MR</strong> Operation and <strong>Installation</strong> <strong>Manual</strong><br />
Threaded and Welded Flange Mounting<br />
Mounting<br />
The method of mounting the transmitter is dependent on the vessel or tank in which it is being used, and what type of transmitter is being<br />
mounted. There are three typical methods for mounting; threaded flange mounting, welded flange mounting, and sanitary Tri-Clamp mounting.<br />
Threaded flange mounting<br />
In most applications, the <strong>Model</strong> <strong>MR</strong> transmitter can be mounted<br />
directly to the tank or flange via a NPT threaded fitting, assuming<br />
there is a proper threaded connection available. If the float will not fit<br />
through the flange opening when the flange is removed, there must<br />
be some alternative means to mount the float on the transmitter from<br />
inside the vessel; this may require an access port nearby the entry<br />
point of the transmitter as shown in Figure 6.<br />
NPT fitting<br />
Tank flange<br />
(customer supplied<br />
or ordered separately)<br />
Riser<br />
Float access<br />
port<br />
Tip of transmitter<br />
Figure 6. Threaded flange mounting for rigid and flexible pipe<br />
Welded flange mounting<br />
The <strong>Model</strong> <strong>MR</strong> transmitter can also be mounted to a tank flange as<br />
shown in Figure 7. First, install float(s) onto the transmitter. Second,<br />
install the float retaining hardware on the tip of the transmitter. To<br />
complete the installation, mount the transmitter, flange and float(s)<br />
as a unit in to the tank.<br />
Welding sleeve<br />
28.6 mm<br />
(1.125 in.) dia<br />
Welded flange<br />
<strong>Installation</strong> &<br />
Mounting<br />
Stainless-steel<br />
flexible pipe<br />
Tank flange<br />
Riser<br />
Product float<br />
Interface float<br />
Bottom-fixing weight,<br />
magnet or hook<br />
Figure 7. Welded flange mounting for rigid and flexible pipe<br />
Level Plus ® Liquid-Level <strong>Sensors</strong> - M-Series <strong>Model</strong> <strong>MR</strong> Analog Transmitter<br />
Operation and <strong>Installation</strong> <strong>Manual</strong>, Document Number 550720 Revision G, 09/11 EN 12<br />
<strong>MTS</strong> <strong>Sensors</strong>
<strong>Model</strong> <strong>MR</strong> Operation and <strong>Installation</strong> <strong>Manual</strong><br />
Tri-Clamp Mounting<br />
Sanitary tri-clamp mounting<br />
In sanitary applications, the <strong>Model</strong> <strong>MR</strong> transmitter is mounted to the tank using a standard sanitary connection and clamp as shown in<br />
Figure 8. In most cases it is not necessary to remove the float as the sanitary end-plug fitting is sized to allow installation with the float in place.<br />
Please note that some sanitary end-plug styles have float(s) permanently mounted as shown in Figure 9. To install the clamp, the transmitter<br />
and float(s) into the mating process connection and attach the sanitary Tri-Clamp.<br />
123 mm<br />
(4.85 in.)<br />
152 mm<br />
(6.0 in.)<br />
81 mm<br />
(3.19 in.)<br />
Sanitary clamp<br />
(Customer supplied)<br />
Cable<br />
(Customer supplied)<br />
Sanitary cap (welded to transmitter pipe)<br />
Top<br />
view<br />
Mating process connection<br />
(Customer supplied)<br />
Riser<br />
Sanitary float<br />
(Permanently mounted on some<br />
transmitter pipe styles)<br />
Tip of transmitter<br />
Figure 8. M-Series <strong>Model</strong> <strong>MR</strong> transmitter. Tank mounted with sanitary connection<br />
Inactive zone:<br />
81 mm (3.2 in.)<br />
from tip (typical)<br />
Inactive zone:<br />
74 mm (2.9 in.)<br />
from tip (typical)<br />
Inactive zone:<br />
81 mm (3.2 in.)<br />
from tip (typical)<br />
Inactive zone:<br />
74 mm (2.9 in.)<br />
from tip (typical)<br />
TB<br />
Sanitary*<br />
DP<br />
Drain-in-place<br />
with end plug*<br />
CP<br />
Clean-in-place<br />
DN<br />
Drain-in-place<br />
no through hole<br />
*This end plug style has permanently mounted floats. Floats cannot be removed from pipe.<br />
Figure 9. End-plug options for transmitters in a sanitary pipe application<br />
<strong>Installation</strong> &<br />
Mounting<br />
<strong>MTS</strong> <strong>Sensors</strong><br />
13<br />
Level Plus ® Liquid-Level <strong>Sensors</strong> - M-Series <strong>Model</strong> <strong>MR</strong> Analog Transmitter<br />
Operation and <strong>Installation</strong> <strong>Manual</strong>, Document Number 550720 Revision G, 09/11 EN
Electrical Connections<br />
& Wiring<br />
<strong>Model</strong> <strong>MR</strong> Operation and <strong>Installation</strong> <strong>Manual</strong><br />
Electrical Connections, Wiring and Safety<br />
Electrical connections and wiring procedures<br />
A typical intrinsically safe connection for the Level Plus <strong>Model</strong> <strong>MR</strong> transmitter includes protective safety barriers, a power supply and a<br />
reading or monitoring device. Refer to Agency information for detailed information.<br />
A typical explosion proof connection for the <strong>Model</strong> <strong>MR</strong> transmitter includes a power supply and a reading or monitoring device connected<br />
using explosion proof conduit. Refer to Agency information for detailed information.<br />
Notes:<br />
For explosion proof installation, safety barriers are not required and wiring shall be installed in accordance with the National Electric Code ANSI/NFPA 70,<br />
Article 501-30 or the regional equivalent.<br />
Safety recommendations for installation<br />
Be sure to:<br />
1. Always follow applicable local and national electrical codes and observe polarity when making electrical connections.<br />
2. Never make electrical connections to the M-Series transmitter with power turned on.<br />
3. Make sure that no wire strands are loose or sticking out of the terminal block connection which could short and cause a problem.<br />
4. Make sure that no wire strands, including shield, are in contact with the electronic module enclosure.<br />
5. The electronics module enclosure is grounded through internal circuitry and is electronically isolated from the explosion-proof housing.<br />
Refer to the safe operating power chart (see Figure 10), which shows the relationship between loop resistance and operating voltage.<br />
Resistance<br />
(Ohms)<br />
800<br />
750<br />
INSUFFICIENT<br />
700<br />
OPERATING POWER<br />
650<br />
600<br />
550<br />
500<br />
450<br />
400<br />
350<br />
300<br />
250<br />
200<br />
150<br />
EXCESS POWER<br />
100<br />
50<br />
0<br />
10 12 14 16 18 20 22 24 26 28 30 32 34 36 38 40<br />
Supply Voltage<br />
(Volts DC)<br />
Figure 10. Safe operating power chart<br />
Level Plus ® Liquid-Level <strong>Sensors</strong> - M-Series <strong>Model</strong> <strong>MR</strong> Analog Transmitter<br />
Operation and <strong>Installation</strong> <strong>Manual</strong>, Document Number 550720 Revision G, 09/11 EN 14<br />
<strong>MTS</strong> <strong>Sensors</strong>
Recommended cable types<br />
Refer to ‘Table 1’ below for general requirements of cable types for the Level Plus <strong>Model</strong> <strong>MR</strong> analog transmitter.<br />
Cable Specifications<br />
Parameter<br />
Minimum cable size<br />
Cable type<br />
Specification<br />
24 AWG or heavier (0.51 mm diameter)<br />
Contact factory for assistance selecting proper cable.<br />
Single pair shielded or multiple pair with overall shield<br />
Maximum cable length Twisted pair: 10,000 ft. (3,048 m)<br />
Multiple twisted pair: 5,000 ft. (1,524 m)<br />
Maximum cable length formula<br />
L = 1,494 m (4,900 ft.)<br />
Table 1. Cable specification and parameters<br />
Electrical conduit installation<br />
Use the following formula to determine the maximum cable length for a specific application:<br />
Where: L = [(65 x 106) ÷ (R x C)] - [(Cf + 10,000) ÷ C]<br />
L = Length in meters or feet<br />
R = Resistance in ohms, current sense resistance plus barrier resistance<br />
C = Cable capacitance in pF/ft, or pF/m<br />
Cf = Maximum shunt capacitance of smart field devices in pF<br />
Example:<br />
Assume a high performing smart transmitter, a control system,<br />
and a single pair of shielded wires.<br />
R = 250 ohms<br />
C = 50 pF/ 0,3 m (ft)<br />
Cf = 5,000 pF<br />
L = [(65 x 106) ÷ 250 x 50)] - [(5,000 + 10,000) ÷ 50]<br />
<strong>Model</strong> <strong>MR</strong> Operation and <strong>Installation</strong> <strong>Manual</strong><br />
Cable Types and Electrical Conduit <strong>Installation</strong><br />
Electrical Connections<br />
& Wiring<br />
Important:<br />
Seal all conduits within 18 inches.<br />
Plugged entry<br />
Do not use<br />
(see notes)<br />
View shown with<br />
cover removed<br />
Loop 1 Test<br />
+ —<br />
HART<br />
Loop 2 Test<br />
+ —<br />
Explosionproof type<br />
conduit sealing fitting<br />
Notes:<br />
1. Use an explosion proof type conduit sealing fitting.<br />
2. Tighten housing cover (both front and back covers if dual cavity) to<br />
full stop against the O-ring.<br />
3. Do not over-tighten compression fittings.<br />
4. Use side conduit entry only.<br />
5. In high humidity areas, use a breather drain type conduit sealing<br />
fitting to minimize moisture intrusion.<br />
NPT Fitting<br />
Do not over-tighten<br />
compression fitting!<br />
TO REMOVE ELECTRONICS MODULE, PULL UNIT<br />
Level Plus®<br />
M-Series Transmitter<br />
IN UPWARD DIRECTION - DO NOT TWIST ORTURN<br />
Conduit<br />
(flexible or rigid)<br />
3/4 NPT conduit access<br />
Use NPT conduit fitting only!<br />
Do not remove cover with circuit live<br />
in hazardous locations!<br />
Follow safe work procedures.<br />
Conduit from<br />
control room<br />
Product float<br />
(ordered<br />
separately)<br />
Interface float<br />
(ordered<br />
separately)<br />
<strong>MTS</strong> <strong>Sensors</strong><br />
15<br />
Figure 11. Electrical conduit installation<br />
Level Plus ® Liquid-Level <strong>Sensors</strong> - M-Series <strong>Model</strong> <strong>MR</strong> Analog Transmitter<br />
Operation and <strong>Installation</strong> <strong>Manual</strong>, Document Number 550720 Revision G, 09/11 EN
Electrical Connections<br />
& Wiring<br />
<strong>Model</strong> <strong>MR</strong> Operation and <strong>Installation</strong> <strong>Manual</strong><br />
Grounding and Safety Barriers<br />
Grounding<br />
Note:<br />
Grounding the transmitter through a threaded conduit connection does not provide sufficient ground.<br />
There are two methods to provide an earth ground to the earth ground of the electronics. Refer to’ Table 2’ for safety barrier references.<br />
• Run an earth ground through the conduit and connect directly to the earth ground lug inside the housing.<br />
• Run an earth ground directly to the ground lug on the outside of the housing.<br />
Safety barriers for IS installation<br />
Refer to Table 2 for entity parameters and Figure 12 for passive and active safety barrier types for <strong>Model</strong> <strong>MR</strong> transmitter installations.<br />
Entity parameters<br />
FM/CSA<br />
ATEX<br />
Supplier<br />
Vmax = 36.1 Vdc<br />
Imax = 118 mA<br />
Ci = 0.0 µF<br />
Li = 0.2 mH<br />
Vmax = 28 Vdc<br />
Imax = 118 mA<br />
Ci = resistivity low<br />
Li = 0.2 mH<br />
Type<br />
Maximum<br />
voltage<br />
Maximum current<br />
(each channel)<br />
Maximum power<br />
(each channel)<br />
Maximum resistance<br />
(each channel)<br />
STAHL 9001/51-280-091-141 28 Vdc 91 mA 637 mW 350Ω 1<br />
Table 2. Safety barrier entity parameter references<br />
Number of<br />
channels<br />
Non Hazardous Area<br />
Hazardous Area<br />
+ 24 Vdc Input Certified<br />
Level<br />
Safety<br />
+ 1 to 5 Vdc Output<br />
Transmitter<br />
Barrier<br />
Load<br />
250 Ohm<br />
0.1%, 2.5 W<br />
Power and signal common<br />
Figure 12. Safety barrier connections<br />
Non Hazardous Area<br />
Hazardous Area<br />
Certified<br />
Safety Bariers<br />
24 Vdc<br />
Supply-<br />
Voltage<br />
Transmitter 1<br />
I (A)<br />
4-20<br />
mA<br />
Level Plus ® Liquid-Level <strong>Sensors</strong> - M-Series <strong>Model</strong> <strong>MR</strong> Analog Transmitter<br />
Operation and <strong>Installation</strong> <strong>Manual</strong>, Document Number 550720 Revision G, 09/11 EN 16<br />
24 Vdc<br />
Supply-<br />
I.S. Ground connection<br />
Certified<br />
Safety Bariers<br />
Transmitter 2<br />
<strong>MTS</strong> <strong>Sensors</strong>
<strong>Model</strong> <strong>MR</strong> Operation and <strong>Installation</strong> <strong>Manual</strong><br />
Maintenance and Field Service / Troubleshooting<br />
Maintenance and field service<br />
This section contains information about post installation maintenance and provides an overview of <strong>MTS</strong> <strong>Sensors</strong>’ repair and replacement<br />
procedures.<br />
General maintenance and field service requirements<br />
Notes:<br />
Please contact Technical Support or Customer Service for help when damage occurs in order to obtain a return materials authorization (RMA) number.<br />
Packages without a RMA number may be rejected. Any unit that was used in a process must be properly cleaned in accordance with OSHA standards,<br />
before it is returned to the factory. A Material Safety Data Sheet (MSDS) must accompany material that was used in any media.<br />
Float maintenance<br />
Level Plus M-Series transmitters use magnetostrictive technology and only have one moving part—the float. This technology ensures no<br />
scheduled maintenance or recalibration is required. However, <strong>MTS</strong> recommends that you check the transmitter pipe annually for build up of<br />
process material. Floats should move freely along the pipe. If they do not, routine cleaning should be performed.<br />
Field service<br />
If damage does occur to a M-Series transmitter, the transmitter can be serviced in the field with replacement parts. All electronic parts can<br />
be changed in the field without having to open the process vessel. Please contact Technical Support and refer to the Transmitter Electronics<br />
Replacement Guide (<strong>MTS</strong> part no. 550731) for detailed steps of field replacement.<br />
Service / RMA Policy<br />
Maintenance & Field Service<br />
Troubleshootiing<br />
If the customer suspects their transmitter is damaged or not functioning correctly, call <strong>MTS</strong> Technical Support for further instruction. If it is<br />
necessary to return the transmitter to the factory, an RMA number is required and can only be issued by Technical Support. Product returns<br />
that do not include an RMA will be returned to the customer. <strong>MTS</strong> evaluates the transmitter and advises the customer whether a repair or<br />
replacement is necessary and any cost that might be incurred. If the customer declines repair/replacement or the transmitter has no fault found,<br />
the unit is sent back as is and the customer is charged with a standard evaluation fee.<br />
If the transmitter is under warranty and a manufacturer’s defect is detected, there will be no cost to the customer for repair or replacement. If<br />
the transmitter is out of warranty or if the customer has damaged the transmitter, a repair or replacement quote will be provided. In specific<br />
cases where the transmitter can not be removed and returned to the factory for evaluation, field evaluations can be performed in the field by an<br />
<strong>MTS</strong> technician. If field evaluation must be performed, the customer is responsible for all expenses incurred for travel, evaluation, parts and<br />
repair time. However, if the transmitter is under warranty and the problem is due to a manufacturer’s defect, there is no cost to the customer<br />
for replacement parts. To discuss all service options, contact Technical Support.<br />
Troubleshooting<br />
The table below contains troubleshooting information for the <strong>Model</strong> <strong>MR</strong> analog transmitter.<br />
Troubleshooting procedures<br />
Symptom Possible Cause Action<br />
No communication with transmitter No power Check voltage at transmitter<br />
Wiring incorrect<br />
Reference installation drawing<br />
(see ‘Electrical connections and wiring’)<br />
Wrong software<br />
Confirm correct software<br />
Output in Alarm (3.8 mA or 21.4 mA) Float not recognized Confirm that the float is attached<br />
Float is in the dead zone<br />
Raise float to see if the error stops<br />
Wrong number of floats selected<br />
Confirm that the number of floats on the<br />
transmitter and the number of floats the<br />
transmitter is attempting to verify are the<br />
same.<br />
Table 3. Troubleshooting reference<br />
<strong>MTS</strong> <strong>Sensors</strong><br />
17<br />
Level Plus ® Liquid-Level <strong>Sensors</strong> - M-Series <strong>Model</strong> <strong>MR</strong> Analog Transmitter<br />
Operation and <strong>Installation</strong> <strong>Manual</strong>, Document Number 550720 Revision G, 09/11 EN
<strong>Model</strong> <strong>MR</strong> Operation and <strong>Installation</strong> <strong>Manual</strong><br />
Setup<br />
Quick start-up guide<br />
Before you begin<br />
Note:<br />
Output will vary depending on the location of the 4 and 20 mA set points.<br />
Tools Needed:<br />
• 24 Vdc linear regulated power supply<br />
• Current Meter<br />
Setup using keypad display<br />
Quick staRT-up procedure<br />
1. Connect 24 Vdc power supply<br />
2. Turn on power supply<br />
3. Connect Current Meter to test pins on the front of the puck<br />
4. Move the float to the tip of the pipe and verify 4 mA output<br />
5. Move the float to the top of the pipe and verify 20 mA output<br />
6. If using two floats, repeat steps 4 and 5 for second float<br />
7. Turn off power and disconnect power supply<br />
8. Install in tank<br />
9. Connect power and turn on<br />
Setup<br />
The <strong>Model</strong> <strong>MR</strong> transmitter can be calibrated by using the HART<br />
communications protocol or it may be manually calibrated using the<br />
optional keypad display. This section explains modes of operation<br />
and the steps you need to perform to calibrate your transmitter<br />
manually using the keypad display.<br />
Operation modes<br />
Display / Keypad usage in Program Mode<br />
The <strong>Model</strong> <strong>MR</strong> transmitter can be configured by pressing three<br />
keys, the Up keypad, Down keypad, and Enter keypad as shown in<br />
Figure 13. This gives the user a means to calibrate and set up various<br />
operating parameters.<br />
HART test port<br />
The <strong>Model</strong> <strong>MR</strong> transmitter runs in one of the following modes of<br />
operation. You can use these modes to calibrate and set up various<br />
operating parameters.<br />
Run Mode<br />
Run mode is the primary mode of operation. This mode will perform<br />
measurements, display data, and respond to HART commands.<br />
The run mode can be configured for various output options. The<br />
minimum configuration will only perform a single-level measurement.<br />
More complex configurations will perform a second float<br />
measurement (interface), or temperature measurements. Level<br />
measurement. More complex configurations will perform a second<br />
float measurement (interface), or temperature measurements.<br />
Program Mode<br />
The program mode is only applicable to <strong>Model</strong> <strong>MR</strong> transmitter with<br />
the keypad display option. Enter this mode by pressing any of the<br />
three keys, Up keypad, Down keypad, and Enter keypad as shown<br />
in Figure 12. Menus guide the user through various programming<br />
options. When in the program mode, HART communications are<br />
not functional. An automatic time out feature is provided so that the<br />
transmitter does not remain inadvertently in program mode.<br />
Display Test Mode<br />
This mode is invoked through the keypad.<br />
Loop 1 test port<br />
Up Key<br />
Loop 1 Test<br />
+ —<br />
TO REMOVE ELECTRONICS MODULE, PULLUNIT<br />
Figure 13. Keypad display<br />
HART<br />
Loop 2 Test<br />
+ —<br />
Level Plus ®<br />
M-Series Transmitter<br />
IN UPWARD DIRECTION - DO NOT TWIST ORTURN<br />
Down Key<br />
Loop 2 test port<br />
Enter Key<br />
Custom LCD Display<br />
The three keypads are identified with “∇” “∆”, and “
<strong>Model</strong> <strong>MR</strong> Operation and <strong>Installation</strong> <strong>Manual</strong><br />
Setup<br />
Notes:<br />
In program mode, the transmitter will not respond to incoming HART commands. This function will prevent a user at a remote terminal from overwriting<br />
a parameter that is being entered at the same time from a local site.<br />
Program Mode Timer<br />
After you enter the programming mode, a one-minute timer is started. Each time you press a button, the timer is reset. If you do not press a<br />
menu button within one minute, the timer will expire and the transmitter will return to the run mode.<br />
Loop 1 and Loop 2 Test Ports<br />
Using a standard multi-meter set the meter to DC current and attach across the terminals, loop current can be read directly from ports 1 and 2<br />
(see Figure 14). The current read on the meter should correspond with the data being displayed. These ports allow the loop current to be read<br />
directly without having to interrupt power.<br />
HART Port<br />
This port allows for direct connection of the HART field calibrator or other HART host device as long as there is a load on loop 1.<br />
LCD Display and keypad (optional)<br />
A sixteen character, seven-segment LCD display and three push-button “keypad” option is available. Level and temperature measurements are<br />
displayed when in run mode. When power is applied to the unit, a start” message is displayed. Then, while in run mode, the display is updated<br />
every three seconds with new data. There are three data fields on the display [Level 1, Level 2, Temperature]. If a measurement is not available,<br />
there will be dashes (- - - - -) shown in the corresponding field.<br />
Setup<br />
LEVEL 1<br />
is always enabled<br />
during Run Mode<br />
LEVEL 2 is only enabled<br />
during Run Mode and when Level 2<br />
measurement is enabled<br />
LEVEL 1 LEVEL 2 TEMP<br />
8.8.8.8.8. 8. 8.8.8.8.8.8. 8.8.8.8.<br />
TEMP is only enabled<br />
during Run Mode and when<br />
temperature is enabled<br />
Level 1 Data Field<br />
% mA in ft mm cm m % mA in ft mm cm m °C °F<br />
Temperature Data Field<br />
Level 1 Units Level 2 Units Level 2 Data Field Temperature Units<br />
Figure 14. Keypad display LCD display<br />
Alarm settings<br />
When a fault condition is detected by the internal microprocessor, the 4 to 20 mA current will go to the selected alarm mode. If in the 4 mA<br />
alarm mode when a fault is detected, the output will be continuous at 3.8 ± 0.1 mA. If in the 20 mA alarm mode when a fault is detected, the<br />
output will be continuous at 21.5 ±0.2 mA.<br />
<strong>Manual</strong> calibration<br />
The procedure to enter calibration mode and modify levels 1 and 2, adjust LCD contrast and perform a LCD testis shown in Figure 15 on the<br />
next page.<br />
<strong>MTS</strong> <strong>Sensors</strong><br />
19<br />
Level Plus ® Liquid-Level <strong>Sensors</strong> - M-Series <strong>Model</strong> <strong>MR</strong> Analog Transmitter<br />
Operation and <strong>Installation</strong> <strong>Manual</strong>, Document Number 550720 Revision G, 09/11 EN
<strong>Model</strong> <strong>MR</strong> Operation and <strong>Installation</strong> <strong>Manual</strong><br />
Setup<br />
Press any button<br />
to Enter Menu<br />
‘Enter’ or ‘Carriage Return’<br />
Down arrow button<br />
Up arrow button<br />
To exit Calibration Mode<br />
at any time, press all three<br />
buttons simultaneously:<br />
+ +<br />
Accept new value?<br />
If No: +<br />
If Yes:<br />
Calibrate Level 1?<br />
= Calibrate Span<br />
= Calibrate Zero<br />
Reads current float<br />
position, Move float<br />
to desired position<br />
+ hold for 1 second<br />
Setup<br />
Calibrate Level 2?<br />
= Calibrate Span<br />
= Calibrate Zero<br />
Reads current float<br />
position, Move float<br />
to desired position + hold for 1 second<br />
Increases Value<br />
Adjust<br />
LCD Contrast?<br />
Shows current<br />
LCD contrast value<br />
Accept new value?<br />
If No: +<br />
If Yes:<br />
+ hold for 1 second<br />
Decreases Value<br />
Perform<br />
LCD Test?<br />
Tests all segments<br />
of LCD<br />
(lasts 10 seconds)<br />
Figure 15. <strong>Manual</strong> calibration matrix<br />
Level Plus ® Liquid-Level <strong>Sensors</strong> - M-Series <strong>Model</strong> <strong>MR</strong> Analog Transmitter<br />
Operation and <strong>Installation</strong> <strong>Manual</strong>, Document Number 550720 Revision G, 09/11 EN 20<br />
<strong>MTS</strong> <strong>Sensors</strong>
<strong>Model</strong> <strong>MR</strong> Operation and <strong>Installation</strong> <strong>Manual</strong><br />
Setup<br />
Setup using HART Field Communicator<br />
Refer to the documentation that comes with the Rosemount <strong>Model</strong> 275 and 375 Field Communicator for specific sensor calibration information.<br />
This section describes how the HART protocol is applied to the Level Plus <strong>Model</strong> <strong>MR</strong> transmitter only.<br />
Using the HART interface allows for calibration without having to remove the transmitter from the process and position of the floats. You can<br />
perform this function by using HART commands 35 and 65.<br />
Any measured output may be assigned to any variable. Loop #1 is always the primary variable (PV); level 1 is usually assigned to loop 1. Loop<br />
2 is always the Second Variable (SV); usually represents temperature or level 2. The Third Variable (TV) and Fourth Variable (FV) may be<br />
assigned to any remaining output such as, level 2, temperature. Analog output codes are 0, 1, and 2 respectively.<br />
Calibration set points for level are given as the absolute displacement (in the appropriate units) from the tip of the sensor pipe. For example, if<br />
the Zero (LRV) position for level 1 is given as 5 inches, the transmitter will produce 4 mA when the float is 5 inches from the tip of the sensor<br />
pipe. If the Span (URV) position for level 1 is given as 30 inches, the transmitter will produce 20 mA when the float is 35 inches from the top<br />
of the sensor pipe. To calibrate the temperature set points, the Zero (LRV) and Span (URV) points are given in degrees. For temperature, the<br />
Zero (LRV) value (in degrees) must always be less than the Span (URV) value (in degrees).<br />
Preparing the transmitter for re-calibration<br />
The <strong>Model</strong> <strong>MR</strong> transmitter can be re-calibrated by using the model 275 and 375 Field Communicator. Complete the following procedure to reset<br />
the zero and span values for loop 1 (only loop 1 can be calibrated with the HART Field Communicator using the generic XMTR type driver. To<br />
access both loops as well as other parameters, the <strong>MTS</strong> device driver must be purchased and installed in to the 275/375 field communicator.<br />
For more information about the HART device driver, go to HARTcomm.org.<br />
Attention:<br />
DO NOT enter a high value that exceeds the active length of the sensor.<br />
Setup<br />
Before you begin, perform the following steps:<br />
1. Connect the transmitter to a clean 24 Vdc power supply. Use a linear supply, switching types do not provide ripple-free power. HART<br />
cannot tolerate more than a 25 mV voltage ripple.<br />
2. If the unit is installed in a live application, place your automatic controllers in manual mode and be advised that the output current will<br />
change during calibration.<br />
3. Follow safe working procedures for working on live equipment in a hazardous location before you remove the housing cover.<br />
4. Connect the HART Field Communicator to the terminals that are labeled HART located on the front panel display of the Level Plus<br />
transmitter.<br />
5. Press the black and white I/O button on the HART terminal. The HART terminal will perform an automatic self test. The Main window<br />
displays. If the device is not connected properly, the message “No device found” displays.<br />
6. In the Main window, press the Key #1, the Device Setup window displays.<br />
7. In the Device setup window, press Key #3. The Basic Setup window displays.<br />
8. In the Basic Setup window, press Key #3. The Range Values window displays.<br />
Setting the low value<br />
Complete the following steps to set the low value:<br />
1. To set the low value, Process Variable, Low Range Value (PV LRV) to 4 mA, select Key #1. The PV LRV window displays the current low<br />
value. Below the highlighted value located under the current value, key in the low value you want (example 3.00 in. is shown; if 4 inches<br />
is the value you want, key in 4.) then, press Enter (F4) located below the LCD display.<br />
2. To write the changed lower value to memory, press the Send key.<br />
3. Two Warning messages will display before the new values take affect; if your new low values are correct, respond to the Warning<br />
messages by pressing OK when prompted. This action resets the Low Range Value, or 4 mA position into the transmitter’s memory.<br />
4. Go back to the Range Values window to verify that the new parameters have been accepted into the transmitter’s memory.<br />
5. Do one of the following:<br />
5a. Exit program mode.<br />
5b. To reset the upper value, continue with “Setting the Upper Range Value.<br />
Setting the upper range value<br />
Complete the following steps to set the Upper Range Value:<br />
<strong>MTS</strong> <strong>Sensors</strong><br />
21<br />
Level Plus ® Liquid-Level <strong>Sensors</strong> - M-Series <strong>Model</strong> <strong>MR</strong> Analog Transmitter<br />
Operation and <strong>Installation</strong> <strong>Manual</strong>, Document Number 550720 Revision G, 09/11 EN
<strong>Model</strong> <strong>MR</strong> Operation and <strong>Installation</strong> <strong>Manual</strong><br />
Setup<br />
Caution:<br />
DO NOT enter a high value that exceeds the active length of the sensor.<br />
1. Open the Range Values window. To set the 20 mA Upper Range Value, press Key #2. The Process Variable, Upper Range Value<br />
(PV URV) window displays.<br />
2. As shown the Lower Value window, the current value displays with a highlighted number below the value displayed. To change the<br />
upper value, key in the new value. You can use whole numbers or whole numbers and decimals (example, 40 = 40 inches, or<br />
40.5 = 40.50 inches.) Whole numbers will be converted as decimal equivalents automatically by the HART terminal.<br />
3. Key in the new Upper Range Value and press Enter or (F4). The Range Values window displays.<br />
4. Verify that the upper and lower values are correct. If the values are correct, press Send.<br />
5. You will be prompted with two Warning messages, press OK in response to both warnings.<br />
Setup using <strong>MTS</strong> Field Setup software<br />
Adjustments to the calibration and setup parameters of the transmitter may be done using the <strong>MTS</strong> Field Setup Software and a RS232 to<br />
HART converter (SMAR HI-311, <strong>MTS</strong> Part # 380068). Be sure to install the latest software package, go to www.mtssensors.com for more<br />
information.<br />
Using the <strong>MTS</strong> Field Setup Software<br />
Setup<br />
Tools Required:<br />
• HART adapter/converter<br />
• 24 Vdc power supply<br />
• PC<br />
Complete the following steps to Install Setup Software<br />
1. Insert the software installation CD into computer or go to www.mtssensors.com and download the latest software.<br />
2. Open folder “Setup software Analog_Digital”<br />
3. Open folder “Analog”<br />
4. Open file “M-Series Field Setup”<br />
5. Follow on screen instructions<br />
Complete the following steps to Install the hardware<br />
1. Connect Power Supply to level transmitter<br />
2. Connect HART adapter to level transmitter and PC<br />
Attention:<br />
Be sure loop #1 is connected to a load of 250 to 500 ohm. A transmitter installed in a control loop is a good example of the loop load. A<br />
250 ohm load resistor may need to be added to the loop for HART to communicate effectively.<br />
3. Turn on power<br />
4. Open Setup Software. Data should fill in. If no data appears select a different serial communication port.<br />
Level Plus ® Liquid-Level <strong>Sensors</strong> - M-Series <strong>Model</strong> <strong>MR</strong> Analog Transmitter<br />
Operation and <strong>Installation</strong> <strong>Manual</strong>, Document Number 550720 Revision G, 09/11 EN 22<br />
<strong>MTS</strong> <strong>Sensors</strong>
<strong>Model</strong> <strong>MR</strong> Operation and <strong>Installation</strong> <strong>Manual</strong><br />
Setup<br />
ADVANCED SETUP TAB<br />
Gradient : A calibration factor that is specific to each level transmitter. This value should not be changed unless directed to do so by Technical<br />
Support.<br />
Length: The order length of the transmitter. This value should not be changed unless directed to do so by Technical Support.<br />
Units: The unit of measure for Length and Head Adder. This is used when writing new values of Length and Head Adder to the transmitter.<br />
Use the Output Tab to change units of measure for all data.<br />
Head Adder: The distance between the sensing element and the order length. Each model has a slightly different head adder. This value<br />
should not be changed unless directed to do so by Technical Support.<br />
Transmitter style<br />
NEMA 4X housing, standard rigid pipe<br />
Single or Dual Cavity Housing, standard rigid pipe<br />
NEMA 4X housing, flexible hose<br />
Single or Dual Cavity Housing, flexible hose<br />
Length<br />
4.3 to 4.5 in (109 to 114 mm)<br />
5.6 to 5.7 in (142 to 145 mm)<br />
14.0 to 14.5 in (356 to 368 mm)<br />
14.0 to 14.5 in (356 to 368 mm)<br />
Setup<br />
Display Units: Units used only on LCD display of units, mA, or percent Float #2: The second or interface float that can be enabled or disabled<br />
Temperature: The ability to measure temperature that can be enabled or disabled<br />
Display: The optional LCD display that can be enabled or disabled<br />
Alarm: The output state that the level transmitter enters upon failure. Alarm can be Low (3.8 mA) or High (21.5 mA).<br />
<strong>MTS</strong> <strong>Sensors</strong><br />
23<br />
Level Plus ® Liquid-Level <strong>Sensors</strong> - M-Series <strong>Model</strong> <strong>MR</strong> Analog Transmitter<br />
Operation and <strong>Installation</strong> <strong>Manual</strong>, Document Number 550720 Revision G, 09/11 EN
<strong>Model</strong> <strong>MR</strong> Operation and <strong>Installation</strong> <strong>Manual</strong><br />
Setup<br />
CALIBRATION TAB<br />
Setup<br />
1. Changing the 4 and 20 mA set points occurs on the Calibration Tab. The procedure is the same for Level 1, Level 2 and Temperature.<br />
2. Click ‘Read’ to determine current set point and units.<br />
3. Select units from drop down menu.<br />
4. Change set point. The 4 mA set point is the Zero or Lower Range Value (LRV). The 20 mA set point is the Span or Upper Range Value<br />
(URV).<br />
5. Click ‘Write.’ Click ‘Read’ and confirm the new set points are correct.<br />
The Offset field can be used for making adjustments to the optional LCD display, not the current output. This allows the display to be scaled<br />
for local viewing only.<br />
1. Click ‘R’ to determine current offset<br />
2. Enter offset in same units as set points and click ‘W’<br />
3. Click ‘R’ and validate offset is correct. Display should now be adjusted.<br />
OUTPUT TAB<br />
Output Mapping: allows process variables measured by the level transmitter to be mapped to current loops of level transmitter and HART<br />
variables. Contact Technical Support for questions.<br />
Output Units: The units of measure for level and temperature may be selected using the pull down menus. When changing units, these<br />
selections should be changed on this screen first, prior to changing units on any of the other tabs (Advance Setup or Calibration).<br />
Read: This button sends a single read command to the transmitter and displays the data which the transmitter responds with.<br />
Level Plus ® Liquid-Level <strong>Sensors</strong> - M-Series <strong>Model</strong> <strong>MR</strong> Analog Transmitter<br />
Operation and <strong>Installation</strong> <strong>Manual</strong>, Document Number 550720 Revision G, 09/11 EN 24<br />
<strong>MTS</strong> <strong>Sensors</strong>
Agency approvals<br />
Explosion proof<br />
FM 3615<br />
C22.2 No. 30<br />
Class I, Division 1, Groups B, C and D ••<br />
Class II, Division 1, Groups E, F and G ••<br />
Division 1, NEMA Type 4X<br />
•• Explosion-proof housing required<br />
Intrinsically safe<br />
FM 3610<br />
C22.2 No. 157<br />
EN 60079-11:2007<br />
<strong>Model</strong> <strong>MR</strong> Operation and <strong>Installation</strong> <strong>Manual</strong><br />
Agency Information<br />
Class I, Division 1, Groups A, B, C and D<br />
Class II, Division 1, Groups E, F and G<br />
Class III, T4<br />
Division 1, NEMA Type 4X<br />
PTB 10 ATEX 2011 X<br />
II 1/2 G bzw. II 2 G<br />
Ex ia IIB T4 bzw. Ex ia IIA T4 **<br />
** Contact factory for model numbers<br />
Agency<br />
Information<br />
<strong>MTS</strong> <strong>Sensors</strong><br />
25<br />
Level Plus ® Liquid-Level <strong>Sensors</strong> - M-Series <strong>Model</strong> <strong>MR</strong> Analog Transmitter<br />
Operation and <strong>Installation</strong> <strong>Manual</strong>, Document Number 550720 Revision G, 09/11 EN
Agency<br />
Information<br />
<strong>Model</strong> <strong>MR</strong> Operation and <strong>Installation</strong> <strong>Manual</strong><br />
Agency Information<br />
Hazardous area installation<br />
FM/CSA/ATEX<br />
Figure 16. Terminal block installation drawing (Reference only, see 650805)<br />
Level Plus ® Liquid-Level <strong>Sensors</strong> - M-Series <strong>Model</strong> <strong>MR</strong> Analog Transmitter<br />
Operation and <strong>Installation</strong> <strong>Manual</strong>, Document Number 550720 Revision G, 09/11 EN 26<br />
<strong>MTS</strong> <strong>Sensors</strong>
<strong>Installation</strong> Drawing (FIGURE 17)<br />
<strong>Model</strong> <strong>MR</strong> Operation and <strong>Installation</strong> <strong>Manual</strong><br />
Agency Information<br />
Agency<br />
Information<br />
Figure 17. Integral cable installation drawing (Reference only, see 650805)<br />
<strong>MTS</strong> <strong>Sensors</strong><br />
27<br />
Level Plus ® Liquid-Level <strong>Sensors</strong> - M-Series <strong>Model</strong> <strong>MR</strong> Analog Transmitter<br />
Operation and <strong>Installation</strong> <strong>Manual</strong>, Document Number 550720 Revision G, 09/11 EN
Agency<br />
Information<br />
<strong>Model</strong> <strong>MR</strong> Operation and <strong>Installation</strong> <strong>Manual</strong><br />
Agency Information<br />
<strong>Installation</strong> Drawing notes (FIGUREs 16 and 17)<br />
NOTES:<br />
1. FOR I.S. FIELD INSTALLATION WIRING SHALL BE INSTALLED IN ACCORDANCE<br />
WITH THE COUNTRY IN USE (eg CANADIAN ELECTRICAL CODE, PART 1, NATIONAL<br />
ELECTRIC CODE ANSI/NFPA 70 ARTICLE 504-30.)<br />
2. SHIELDED TWISTED CABLE OF 24 AWG OR HEAVIER SHOULD BE USED.<br />
CABLE CAPACITANCE SHALL BE LESS THAN 30 PF PER FOOT.<br />
3. CONTROL ROOM EQUIPMENT SHOULD NOT USE OR GENERATE MORE THAN 250 V RMS.<br />
4. FOR F<strong>MR</strong>C & CSA APPROVED GAUGES, BARRIERS MUST BE F<strong>MR</strong>C & CSA APPROVED.<br />
5. THE CONNECTION BETWEEN THE EARTH GROUND TERMINAL OF F<strong>MR</strong>C OR CSA ENTITY<br />
APPROVED SAFETY BARRIERS AND SYSTEM EARTH GROUND MUST BE LESS THAN 1 ohm.<br />
6. SAFETY BARRIERS ARE F<strong>MR</strong>C AND CSA ENTITY APPROVED SAFETY BARRIERS USED IN AN<br />
APPROVED CONFIGURATION WHERE TRANSMITTER Vmax IS GREATER THAN BARRIER Voc<br />
AND TRANSMITTER Imax IS GREATER THAN BARRIER Isc.<br />
7. TRANSMITTER Ci PLUS TOTAL CABLE CAPACITANCE FOR EACH LOOP MUST NOT EXCEED<br />
BARRIER Ca. TRANSMITTER Li PLUS TOTAL CABLE INDUCTANCE FOR EACH LOOP MUST<br />
NOT EXCEED BARRIER La. (SEE NOTE 14)<br />
8. GAUGE ENCLOSURE SHALL BE GROUNDED TO EARTH GROUND THROUGH THE PROVIDED<br />
GROUND LUG IN THE ENCLOSURE. WHERE INTEGRAL CABLE IS PROVIDED, LOOP 2 SHIELD IS INSTRUMENT GROUND.<br />
9. NO REVISIONS SHALL BE MADE WITHOUT NOTIFICATION OF APPROVAL AGENCY(S).<br />
10.<br />
INTRINSICIALLY SAFE FOR:<br />
CLASS I, DIVISION 1, GROUPS A, B, C AND D<br />
CLASS , DIVISION 1, GROUPS E, F AND G, CLASS III<br />
WITH NEMA/TYPE 4X, FOR OUTDOOR USE.<br />
11. EACH LOOP ENTITY PARAMETERS<br />
Vmax= 36V<br />
Imax= 118mA<br />
C = 0<br />
L = 200uH<br />
12. TEMPERATURE CODE IS T4.<br />
13. HART COMMUNICATOR WHICH FM & CSA APPROVED (AS APPLICABLE) MUST<br />
ONLY BE CONNECTED IN ACCORDANCE W/MFG IS INSTALLATION INSTRUCTIONS.<br />
14. USE ONLY NRTL LISTED AND CSA CERTIFIED DUST-TIGHT SEAL FOR CLASS<br />
AND CLASS HAZARDOUS LOCATIONS.<br />
Figure 16 and 17 - Notes - Integral cable installation drawing (Reference only, see 650805)<br />
Level Plus ® Liquid-Level <strong>Sensors</strong> - M-Series <strong>Model</strong> <strong>MR</strong> Analog Transmitter<br />
Operation and <strong>Installation</strong> <strong>Manual</strong>, Document Number 550720 Revision G, 09/11 EN 28<br />
<strong>MTS</strong> <strong>Sensors</strong>
FM/CSA/ATEX<br />
<strong>Installation</strong> Drawing notes (FIGURE 17)<br />
<strong>Model</strong> number<br />
Approval agency<br />
Approval type<br />
FM CSA ATEX XP IS<br />
Approval classification<br />
<strong>MR</strong>A_ A X X X CL. I, Div. 1, GR. A, B, C, D<br />
CL. II, Div. 1, GR. E, F, G CL. III<br />
<strong>Model</strong> <strong>MR</strong> Operation and <strong>Installation</strong> <strong>Manual</strong><br />
Agency Information<br />
Ground connection<br />
Figure 18<br />
<strong>MR</strong>A_ B X X X CL. I, DIV. 1, GR. A, B, C, D<br />
CL. II, DIV. 1, GR. E,F,G CLASS III Figure 21<br />
<strong>MR</strong>A _ D X X X CL. I, Div. 1, GR. B, C, D<br />
CL. II, Div. 1, GR. E, F, G CL. III<br />
<strong>MR</strong>A _ C X X X CL. I, DIV. 1, GR. B, C, D<br />
CL. II, DIV. 1, GR. E, F, G CLASS III Figure 22<br />
<strong>MR</strong>A_ E X X X CL. I, DIV. 1, GR. A, B, C, D<br />
CL. II, DIV. 1, GR. E,F,G CLASS III<br />
<strong>MR</strong>A _ L X X X CL. I, DIV. 1, GR. A, B, C, D<br />
Figure 19<br />
CL. II, DIV. 1, GR. E, F, G CLASS III<br />
<strong>MR</strong>A _ 3 X X X CL. I, DIV. 1, GR. A, B, C, D<br />
Figure 20<br />
CL. II, DIV. 1, GR. E, F, G CLASS III<br />
<strong>MR</strong>A _ F X X<br />
Figure 18<br />
Ex II ½ G bzw. II2 G Ex ia IIA T4<br />
<strong>MR</strong>A _ G X X<br />
Figure 21<br />
Ex II ½ G bzw. II2 G Ex ia IIA T4<br />
<strong>MR</strong>A _ J X X<br />
Figure 21<br />
Ex II ½ G bzw. II2 G Ex ia IIA T4<br />
<strong>MR</strong>A _ H X X<br />
Figure 22<br />
Ex II ½ G bzw. II2 G Ex ia IIA T4<br />
<strong>MR</strong>A _ K X X<br />
Figure 22<br />
Ex II ½ G bzw. II2 G Ex ia IIA T4<br />
<strong>MR</strong>A _ P X X<br />
Figure 18<br />
Ex II ½ G bzw. II2 G Ex ia IIB T4<br />
<strong>MR</strong>A _ R X X<br />
Figure 21<br />
Ex II ½ G bzw. II2 G Ex ia IIB T4<br />
<strong>MR</strong>A _ T X X<br />
Figure 21<br />
Ex II ½ G bzw. II2 G Ex ia IIB T4<br />
<strong>MR</strong>A _ S X X<br />
Figure 22<br />
Ex II ½ G bzw. II2 G Ex ia IIB T4<br />
<strong>MR</strong>A _ U X X<br />
Figure 22<br />
Ex II ½ G bzw. II2 G Ex ia IIB T4<br />
Figure 17 - Notes. Product <strong>Model</strong> / Hazardous location breakdown (Reference only, see 650805)<br />
Agency<br />
Information<br />
<strong>MTS</strong> <strong>Sensors</strong><br />
29<br />
Level Plus ® Liquid-Level <strong>Sensors</strong> - M-Series <strong>Model</strong> <strong>MR</strong> Analog Transmitter<br />
Operation and <strong>Installation</strong> <strong>Manual</strong>, Document Number 550720 Revision G, 09/11 EN
Agency<br />
Information<br />
<strong>Model</strong> <strong>MR</strong> Operation and <strong>Installation</strong> <strong>Manual</strong><br />
Agency Information<br />
Wiring and connections<br />
Figure 18. NEMA 4X housing with integrated cable.<br />
Wiring diagram (Figure 19)<br />
Pin no.: Signal<br />
1 Loop 1 (-)<br />
2 Loop 1 (+)<br />
3 Loop 2 (-)<br />
4 Loop 2 (+)<br />
5 Not used<br />
6 Not used<br />
Figure 19. NEMA 4X housing with 6-pin connection<br />
Level Plus ® Liquid-Level <strong>Sensors</strong> - M-Series <strong>Model</strong> <strong>MR</strong> Analog Transmitter<br />
Operation and <strong>Installation</strong> <strong>Manual</strong>, Document Number 550720 Revision G, 09/11 EN 30<br />
<strong>MTS</strong> <strong>Sensors</strong>
Wiring and Connections (Continued)<br />
<strong>Model</strong> <strong>MR</strong> Operation and <strong>Installation</strong> <strong>Manual</strong><br />
Agency Information<br />
Agency<br />
Information<br />
Figure 20. NEMA 4X housing with connecting clamps<br />
<strong>MTS</strong> <strong>Sensors</strong><br />
31<br />
Level Plus ® Liquid-Level <strong>Sensors</strong> - M-Series <strong>Model</strong> <strong>MR</strong> Analog Transmitter<br />
Operation and <strong>Installation</strong> <strong>Manual</strong>, Document Number 550720 Revision G, 09/11 EN
Agency<br />
Information<br />
<strong>Model</strong> <strong>MR</strong> Operation and <strong>Installation</strong> <strong>Manual</strong><br />
Agency Information<br />
Wiring and Connections (Continued)<br />
Figure 21. Single-cavity housing<br />
Figure 22. Dual-cavity housing<br />
Level Plus ® Liquid-Level <strong>Sensors</strong> - M-Series <strong>Model</strong> <strong>MR</strong> Analog Transmitter<br />
Operation and <strong>Installation</strong> <strong>Manual</strong>, Document Number 550720 Revision G, 09/11 EN 32<br />
<strong>MTS</strong> <strong>Sensors</strong>
Product Labels - M-Series Analog transmitters<br />
Product label Identification<br />
<strong>Model</strong> <strong>MR</strong> Operation and <strong>Installation</strong> <strong>Manual</strong><br />
Agency Information<br />
Agency<br />
Information<br />
M-SERIES LEVEL GAUGE<br />
FM<br />
®<br />
APPROVED<br />
<strong>MTS</strong> Systems Corporation<br />
<strong>Sensors</strong> Division<br />
3001 Sheldon Drive, Cary, NC 27513<br />
INTRINSICALLY SAFE Exia<br />
CL. I, Div. 1, GR. A, B, C, D:<br />
CL. II, Div. 1, GR. E, F, G CL. III T4<br />
INSTALL PER DRAWING #650805<br />
WARNING SUBSITUTION OF COMPONENTS<br />
MAY IMPAIR INTRINSIC SAFETY.<br />
XX/XX<br />
XXXXXXX<br />
<strong>MR</strong>AXXXXXXXXXXXXXXX<br />
EXPLOSION PROOF FOR CL. I, Div. 1, GR. B, C, D<br />
CL. II, Div. 1, GR. E, F, G CL. III<br />
MAX. PRESSURE 275 PSI NEMA TYPE 4X<br />
SUPPLY VOLTAGE 11.1 TO 36 VDC, 4 TO 20 mA<br />
MAX. AMBIENT 71˚C <strong>MTS</strong> PART NUMBER 550685 REV A<br />
Figure 23. Product label for M-Series <strong>Model</strong>s <strong>MR</strong>A_B,C,D,E<br />
Vmax=36V, I max=118 mA, Ci=0μF Li=200μH<br />
Intrinsically safe<br />
CL. I, II, Div 1, GR. A,B,C,D<br />
CL. I, II, Div 1, GR. E,F,G<br />
Class III when connected<br />
in accordance with CSA/FM<br />
approved installation drwg.#<br />
650805<br />
Figure 24. Product label for M-Series <strong>Model</strong>s <strong>MR</strong>A_F, P<br />
<strong>MTS</strong> <strong>Sensors</strong><br />
33<br />
Level Plus ® Liquid-Level <strong>Sensors</strong> - M-Series <strong>Model</strong> <strong>MR</strong> Analog Transmitter<br />
Operation and <strong>Installation</strong> <strong>Manual</strong>, Document Number 550720 Revision G, 09/11 EN
Agency<br />
Information<br />
<strong>Model</strong> <strong>MR</strong> Operation and <strong>Installation</strong> <strong>Manual</strong><br />
Agency Information, Product Labels<br />
Product label Identification (Continued.)<br />
®<br />
<strong>MTS</strong> SENSOR TECHNOLOGIE<br />
GmbH & Co KG<br />
Auf dem Schuffel 9<br />
D-58513 Lüdenscheid<br />
Level Plus M-Series<br />
Gauging-Systems<br />
0102 D-550683-2<br />
Type No.: <strong>MR</strong>AXXXXXXXXXXXXXXX<br />
Serial No.: XXXXXXXX/XXXX<br />
Length: XXXXX<br />
Gradient: X.XXXXXμs/in.<br />
RTD Location from tip<br />
Protection: IP66 (NEMA 4X)<br />
Agency Marking<br />
Um: 28 V<br />
Im: 118 mA<br />
Ci: 0<br />
Li: 0.2 uH<br />
Figure 25 Product label for M-Series <strong>Model</strong>s <strong>MR</strong>A_A,L,3<br />
®<br />
<strong>MTS</strong> SENSOR TECHNOLOGIE<br />
GmbH & Co KG<br />
Auf dem Schuffel 9<br />
D-58513 Lüdenscheid<br />
Level Plus M-Serie<br />
PTB 10 ATEX 2011 X<br />
Typ : <strong>MR</strong>AXXXXXXXXXXXXXXX<br />
Serien Nr.: XXXXXXXX<br />
II 1/2G EEx ia IIB T4<br />
IP68<br />
0102<br />
Um: 28V Ci: 0.0μF<br />
Im: 118 mA Li: 0.2 mH<br />
Order length: XXXX mm<br />
RTD Location: XXX mm From sensor pipe end<br />
Setpoints: Loop 1 Loop 2<br />
4 mA: XXX mm<br />
20 mA: XXXX mm<br />
Patent Numbers:<br />
4 mA: XXX mm<br />
20 mA: XXXX mm<br />
<strong>MTS</strong> D 550696<br />
Figure 26. Product label for M-Series <strong>Model</strong>s <strong>MR</strong>A_G,H,J,K,R,S,T,U<br />
Level Plus ® Liquid-Level <strong>Sensors</strong> - M-Series <strong>Model</strong> <strong>MR</strong> Analog Transmitter<br />
Operation and <strong>Installation</strong> <strong>Manual</strong>, Document Number 550720 Revision G, 09/11 EN<br />
34<br />
<strong>MTS</strong> <strong>Sensors</strong>
Agency Certifications<br />
ATEX Approval<br />
<strong>Model</strong> <strong>MR</strong> Operation and <strong>Installation</strong> <strong>Manual</strong><br />
Agency Information<br />
Agency<br />
Information<br />
<strong>MTS</strong> <strong>Sensors</strong><br />
35<br />
Level Plus ® Liquid-Level <strong>Sensors</strong> - M-Series <strong>Model</strong> <strong>MR</strong> Analog Transmitter<br />
Operation and <strong>Installation</strong> <strong>Manual</strong>, Document Number 550720 Revision G, 09/11 EN
Agency<br />
Information<br />
<strong>Model</strong> <strong>MR</strong> Operation and <strong>Installation</strong> <strong>Manual</strong><br />
Agency Information, Product Labels<br />
ATEX Approval<br />
Level Plus ® Liquid-Level <strong>Sensors</strong> - M-Series <strong>Model</strong> <strong>MR</strong> Analog Transmitter<br />
Operation and <strong>Installation</strong> <strong>Manual</strong>, Document Number 550720 Revision G, 09/11 EN 36<br />
<strong>MTS</strong> <strong>Sensors</strong>
ATEX Approval<br />
<strong>Model</strong> <strong>MR</strong> Operation and <strong>Installation</strong> <strong>Manual</strong><br />
Agency Information<br />
Agency<br />
Information<br />
<strong>MTS</strong> <strong>Sensors</strong><br />
37<br />
Level Plus ® Liquid-Level <strong>Sensors</strong> - M-Series <strong>Model</strong> <strong>MR</strong> Analog Transmitter<br />
Operation and <strong>Installation</strong> <strong>Manual</strong>, Document Number 550720 Revision G, 09/11 EN
Agency<br />
Information<br />
<strong>Model</strong> <strong>MR</strong> Operation and <strong>Installation</strong> <strong>Manual</strong><br />
Agency Information<br />
ATEX Approval<br />
Level Plus ® Liquid-Level <strong>Sensors</strong> - M-Series <strong>Model</strong> <strong>MR</strong> Analog Transmitter<br />
Operation and <strong>Installation</strong> <strong>Manual</strong>, Document Number 550720 Revision G, 09/11 EN 38<br />
<strong>MTS</strong> <strong>Sensors</strong>
CSA Approval<br />
<strong>Model</strong> <strong>MR</strong> Operation and <strong>Installation</strong> <strong>Manual</strong><br />
Agency Information<br />
Agency<br />
Information<br />
<strong>MTS</strong> <strong>Sensors</strong><br />
39<br />
Level Plus ® Liquid-Level <strong>Sensors</strong> - M-Series <strong>Model</strong> <strong>MR</strong> Analog Transmitter<br />
Operation and <strong>Installation</strong> <strong>Manual</strong>, Document Number 550720 Revision G, 09/11 EN
Agency<br />
Information<br />
<strong>Model</strong> <strong>MR</strong> Operation and <strong>Installation</strong> <strong>Manual</strong><br />
Agency Information<br />
CSA APPROVAL<br />
Level Plus ® Liquid-Level <strong>Sensors</strong> - M-Series <strong>Model</strong> <strong>MR</strong> Analog Transmitter<br />
Operation and <strong>Installation</strong> <strong>Manual</strong>, Document Number 550720 Revision G, 09/11 EN<br />
40<br />
<strong>MTS</strong> <strong>Sensors</strong>
FM Approval<br />
<strong>Model</strong> <strong>MR</strong> Operation and <strong>Installation</strong> <strong>Manual</strong><br />
Agency Information<br />
Agency<br />
Information<br />
<strong>MTS</strong> <strong>Sensors</strong><br />
41<br />
Level Plus ® Liquid-Level <strong>Sensors</strong> - M-Series <strong>Model</strong> <strong>MR</strong> Analog Transmitter<br />
Operation and <strong>Installation</strong> <strong>Manual</strong>, Document Number 550720 Revision G, 09/11 EN
Agency<br />
Information<br />
<strong>Model</strong> <strong>MR</strong> Operation and <strong>Installation</strong> <strong>Manual</strong><br />
Agency Information<br />
FM Approval<br />
Level Plus ® Liquid-Level <strong>Sensors</strong> - M-Series <strong>Model</strong> <strong>MR</strong> Analog Transmitter<br />
Operation and <strong>Installation</strong> <strong>Manual</strong>, Document Number 550720 Revision G, 09/11 EN 42<br />
<strong>MTS</strong> <strong>Sensors</strong>
FM Approval<br />
<strong>Model</strong> <strong>MR</strong> Operation and <strong>Installation</strong> <strong>Manual</strong><br />
Agency Information<br />
Agency<br />
Information<br />
<strong>MTS</strong> <strong>Sensors</strong><br />
43<br />
Level Plus ® Liquid-Level <strong>Sensors</strong> - M-Series <strong>Model</strong> <strong>MR</strong> Analog Transmitter<br />
Operation and <strong>Installation</strong> <strong>Manual</strong>, Document Number 550720 Revision G, 09/11 EN
Agency<br />
Information<br />
<strong>Model</strong> <strong>MR</strong> Operation and <strong>Installation</strong> <strong>Manual</strong><br />
Agency Information<br />
FM Approval<br />
Level Plus ® Liquid-Level <strong>Sensors</strong> - M-Series <strong>Model</strong> <strong>MR</strong> Analog Transmitter<br />
Operation and <strong>Installation</strong> <strong>Manual</strong>, Document Number 550720 Revision G, 09/11 EN 44<br />
<strong>MTS</strong> <strong>Sensors</strong>
<strong>MTS</strong> <strong>Sensors</strong><br />
45<br />
Level Plus ® Liquid-Level <strong>Sensors</strong> - M-Series <strong>Model</strong> <strong>MR</strong> Analog Transmitter<br />
Operation and <strong>Installation</strong> <strong>Manual</strong>, Document Number 550720 Revision G, 09/11 EN
Document Part Number: 550720 Revision G, 09/11, 04/12 EN<br />
<strong>MTS</strong>, Temposonics and Level Plus are registered trademarks of <strong>MTS</strong> Systems Corporation. All other trademarks are the property of their respective owners.<br />
Printed in USA. Copyright © 2012 <strong>MTS</strong> Systems Corporation. All Rights Reserved in all media.<br />
All specifications are subject to change. Contact <strong>MTS</strong> for specifications and engineering drawings that are critical to your application. Drawings contained<br />
in this document are for reference only. Go to http://www.mtssensors.com for the latest product information.awings contained in this document are for<br />
reference only. Go to http://www.mtssensors.com for the latest product informatio<br />
SENSORS<br />
®<br />
<strong>MTS</strong> Systems Corporation<br />
<strong>Sensors</strong> Division<br />
3001 Sheldon Drive<br />
Cary, North Carolina,<br />
27513, USA<br />
Tel.: +1-800-633-7609<br />
Fax: +1-919-677-2343<br />
+1-800-498-4442<br />
e-mail: sensorsinfo@mts.com<br />
http://www.mtssensors.com<br />
<strong>MTS</strong> Sensor Technologie<br />
GmbH & Co. KG<br />
Auf dem Schüffel 9<br />
D - 58513 Lüdenscheid, Germany<br />
Tel.: +49-2351-9587-0<br />
Fax: +49-2351-56491<br />
e-mail: info@mtssensor.de<br />
http://www.mtssensor.de<br />
<strong>MTS</strong> <strong>Sensors</strong> Technology<br />
Corporation<br />
737 Aihara-cho, Machida-shi<br />
Tokyo 194-0211, Japan<br />
Tel.: +81-42-775-3838<br />
Fax: +81-42-775-5516<br />
e-mail: info@mtssensor.co.jp<br />
http://www.mtssensor.co.jp