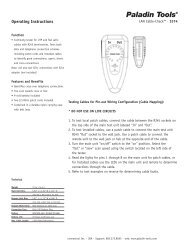
VDV MultiMedia Cable Tester - Ideal Industries Inc.
VDV MultiMedia Cable Tester - Ideal Industries Inc.
VDV MultiMedia Cable Tester - Ideal Industries Inc.

You also want an ePaper? Increase the reach of your titles
YUMPU automatically turns print PDFs into web optimized ePapers that Google loves.
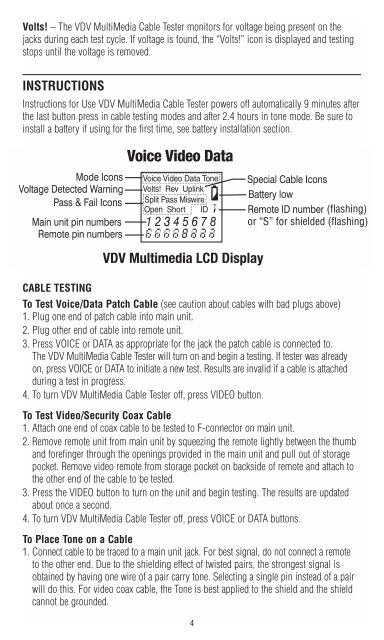
Volts! – The <strong>VDV</strong> <strong>MultiMedia</strong> <strong>Cable</strong> <strong>Tester</strong> monitors for voltage being present on the<br />
jacks during each test cycle. If voltage is found, the “Volts!” icon is displayed and testing<br />
stops until the voltage is removed.<br />
INSTRUCTIONS<br />
Instructions for Use <strong>VDV</strong> <strong>MultiMedia</strong> <strong>Cable</strong> <strong>Tester</strong> powers off automatically 9 minutes after<br />
the last button press in cable testing modes and after 2.4 hours in tone mode. Be sure to<br />
install a battery if using for the first time, see battery installation section.<br />
CABLE TESTING<br />
To Test Voice/Data Patch <strong>Cable</strong> (see caution about cables with bad plugs above)<br />
1. Plug one end of patch cable into main unit.<br />
2. Plug other end of cable into remote unit.<br />
3. Press VOICE or DATA as appropriate for the jack the patch cable is connected to.<br />
The <strong>VDV</strong> <strong>MultiMedia</strong> <strong>Cable</strong> <strong>Tester</strong> will turn on and begin a testing. If tester was already<br />
on, press VOICE or DATA to initiate a new test. Results are invalid if a cable is attached<br />
during a test in progress.<br />
4. To turn <strong>VDV</strong> <strong>MultiMedia</strong> <strong>Cable</strong> <strong>Tester</strong> off, press VIDEO button.<br />
To Test Video/Security Coax <strong>Cable</strong><br />
1. Attach one end of coax cable to be tested to F-connector on main unit.<br />
2. Remove remote unit from main unit by squeezing the remote lightly between the thumb<br />
and forefinger through the openings provided in the main unit and pull out of storage<br />
pocket. Remove video remote from storage pocket on backside of remote and attach to<br />
the other end of the cable to be tested.<br />
3. Press the VIDEO button to turn on the unit and begin testing. The results are updated<br />
about once a second.<br />
4. To turn <strong>VDV</strong> <strong>MultiMedia</strong> <strong>Cable</strong> <strong>Tester</strong> off, press VOICE or DATA buttons.<br />
To Place Tone on a <strong>Cable</strong><br />
1. Connect cable to be traced to a main unit jack. For best signal, do not connect a remote<br />
to the other end. Due to the shielding effect of twisted pairs, the strongest signal is<br />
obtained by having one wire of a pair carry tone. Selecting a single pin instead of a pair<br />
will do this. For video coax cable, the Tone is best applied to the shield and the shield<br />
cannot be grounded.<br />
4