C224-E050C Autograph AGS-X è±æ Bæ¹è¨
C224-E050C Autograph AGS-X è±æ Bæ¹è¨
C224-E050C Autograph AGS-X è±æ Bæ¹è¨
Create successful ePaper yourself
Turn your PDF publications into a flip-book with our unique Google optimized e-Paper software.
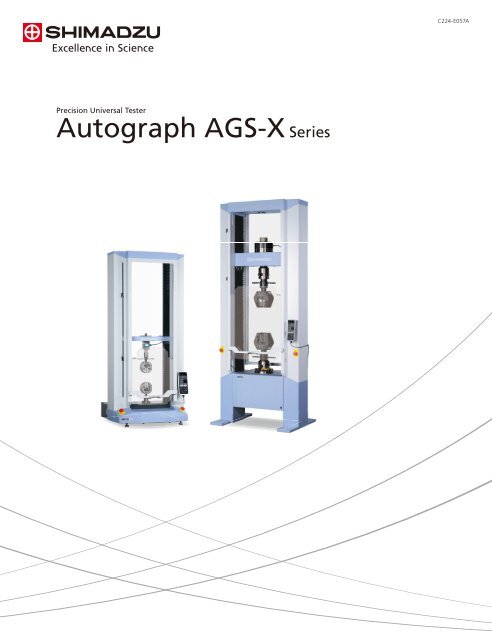
Precision Universal Tester<br />
<strong>Autograph</strong> <strong>AGS</strong>-X Series<br />
<strong>C224</strong>-E057A
<strong>Autograph</strong><br />
<strong>AGS</strong>-X Series<br />
PRACTICAL TESTING SOLUTIONS<br />
10 kN 20 kN 50 kN
The Shimadzu <strong>Autograph</strong> <strong>AGS</strong>-X series provides superior performance and practical testing<br />
solutions for a wide array of applications. Offering high-level control and intuitive operation,<br />
the <strong>AGS</strong>-X series sets a new standard for strength evaluations while providing the utmost in<br />
safety considerations in a modern, stylish design.<br />
The <strong>AGS</strong>-X comes standard with industry-leading TRAPEZIUM X data processing software.<br />
Offering comprehensive functions, TRAPEZIUM X offers an unparalleled level of operation.<br />
TRAPEZIUM LITE X, Shimadzu’s entry-level data processing software, provides enhanced<br />
productivity and efficiency for quality control operations.<br />
100 kN 300 kN
Convincing Cost Performance<br />
New <strong>AGS</strong>-X Provides Practical, Affordable Testing Solutions<br />
Easy Control of Stress and Strain<br />
Offers real-time auto tuning of control<br />
parameters, based on measured test<br />
force and strain data. Safely make<br />
comparisons to unknown sample data<br />
without the need for preliminary tests.<br />
In addition, the AUTOTUNING<br />
FUNCTION easily performs strain<br />
control, an ISO 6892-2009 requirement.<br />
IRON & STEEL<br />
PLASTICS & RESIN<br />
Required Needs<br />
In addition to conventional stress control,<br />
tensile testing with strain control is<br />
increasingly in demand.<br />
ISO 6892-2009 JIS Z2241-2010<br />
Measuring the modulus of elasticity in the<br />
ultra-small strain domains proscribed by ISO<br />
and JIS standards has become a necessity.<br />
ISO 527 ISO 178 JIS K7171<br />
CERAMICS<br />
Many samples are damaged by microscopic<br />
displacements, so accurate control is<br />
needed, right from the start of testing.<br />
Achieve an Accurate S-S Curve<br />
with High-Precision Load Cells<br />
Load Cell<br />
Precision<br />
Load Cell<br />
Precision<br />
Range<br />
(1000 Hz)<br />
High-Speed<br />
Sampling<br />
The wide, guaranteed load cell precision range of 1/500 to<br />
1/1 improves testing efficiency and ensures that virtually all<br />
of your testing can be performed without switching the load<br />
cell or jig.<br />
Furthermore, high-speed sampling of 1msec ensures no<br />
missed strength changes.<br />
Sampling Interval<br />
1 msec<br />
50 msec<br />
Improved Safety<br />
SAFETY FUNCTION / ONE-TOUCH STROKE LIMIT<br />
The safety function stops the testing machine if force changes exceed a certain level during specimen setting or return.<br />
In addition, setting stroke limiters is easy with one touch of the switch.<br />
SAFETY COVER<br />
Controls scattering of the test specimen during testing. The interlock improves safety: operators can open and close it easily<br />
with the slide mechanism.<br />
DUAL EMERGENCY-STOP SWITCHES<br />
Features emergency-stop switches on both sides (20 kN–300 kN frame).<br />
4
Smarter Work Space<br />
New and enhanced functions support easier, more efficient testing<br />
1<br />
2<br />
3<br />
4<br />
5<br />
6<br />
7<br />
8<br />
9<br />
6
1<br />
Safety Guard to Protect Against Flying Debris<br />
6<br />
Built-in Main Operation Panel (for 10 kN frame)<br />
A vertically sliding safety guard is<br />
available. Opens easily with one hand.<br />
When the safety guard is open, an<br />
interlock function disables testing and<br />
return movement.<br />
Call up test methods from TRAPEZIUM<br />
LITE X to conduct testing.<br />
Naturally, <strong>AGS</strong>-X can be used as a<br />
standalone tester to test specimens using<br />
methods created with the tester itself.<br />
2<br />
One-Touch Stroke Limiters<br />
3<br />
Load Cell<br />
Pinch and slide; release to lock.<br />
One-touch stroke limiters permit simple<br />
one-touch adjustment and firm locking<br />
of the crosshead stroke limit positions.<br />
For the range of 1/500 to 1/1 of the<br />
load cell rating, a single load cell that<br />
guarantees test force accuracy to<br />
±0.5% of the indicated value (for<br />
high-precision type) covers an extensive<br />
testing range. The load cell rated value is<br />
stored in the calibration cable and<br />
automatically recognized when the cable is<br />
connected.<br />
7<br />
8<br />
Main Operation Panel<br />
Emergency Stop Button<br />
The main operation panel enables the<br />
development and storing of test<br />
conditions, allowing testing without<br />
having to connect to a PC.<br />
Perform various operations with the jog<br />
wheel, such as opening and shutting the<br />
button for automatic grips or the<br />
automatic extensometer.<br />
The main operational panel is movable,<br />
allowing convenient adjustment of the<br />
angle.<br />
- The controller is needed separately for the automatic<br />
opening and shutting of jigs.<br />
Reliably cuts off power to the servo amplifier, instantaneously<br />
stopping crosshead movement in the event of an emergency.<br />
4<br />
Crosshead<br />
Achieves a 1,600 mm/min testing speed and a 2,200 mm/min<br />
return speed (20 kN frame), significantly reducing the time<br />
required to conduct repetitive testing.<br />
9<br />
Multipurpose Tray (Desk-top frame)<br />
Large space in front of the instrument.<br />
Perfect for placing jigs,<br />
arranging specimens, or taking notes.<br />
5<br />
Common Joint for Both Tensile<br />
and Compression Tests (20–300 kN frame)<br />
Adopts a single joint for both tension<br />
and compression tests.<br />
This makes it easier to exchange jigs. In<br />
addition, the joint is set with a nut<br />
placed in the upper part of the loading<br />
cell, which allows for safe detachment<br />
of the joint on the table.<br />
Jog Controller (option for 10 kN frame)<br />
Allows hand-held control of the crosshead<br />
position. The jog dial makes fine<br />
positioning a breeze, particularly when<br />
setting the start position for bending<br />
and compression tests.<br />
<strong>Autograph</strong> <strong>AGS</strong>-X Series<br />
Precision Universal Tester<br />
7
Quest for Convenience<br />
Compatible with<br />
Windows 7<br />
Materials Testing Operation Software<br />
Cutting-Edge Software Meets Your Materials<br />
Development and Quality Control Needs<br />
Quickly Obtained Data<br />
4<br />
1<br />
5<br />
2<br />
6<br />
3<br />
7<br />
1<br />
Test Method & Situation Panel<br />
Confirm testing conditions and the situation from the main<br />
window.<br />
2<br />
Advanced Navigation System with a Learning Function<br />
The Navigation Bar shows only the functions required for selected<br />
situations. In addition, the “Learning Function” records user<br />
actions for each situation and adds frequently-used functions as<br />
navigation buttons. This improves work efficiency by matching<br />
functions to a user’s operational style.<br />
3<br />
Multiple Graph Function<br />
Enables displaying up to four graphs. The graph can set two axes,<br />
respectively. In addition, a maximum of 50 graphs can be overlaid<br />
and point picking allows acquiring the value of a random point.<br />
This provides for a more detailed examination.<br />
4<br />
Real-time Data Display Panel<br />
Displays the test force, stroke (strain), extensometer or strain<br />
gauge value and other input values, enabling one-window<br />
monitoring.<br />
In addition, the random calculation value can be display<br />
simultaneously for smooth confirmation of data.<br />
5<br />
Quick Panel<br />
Quickly enter the speed, dimension, and report information from<br />
the main window.<br />
6<br />
Result Panel<br />
In addition to re-testing and extra lot tests, this panel allows<br />
changing a variety of settings before and after testing. Specimens<br />
can be inserted in any position or added to only a specific batch,<br />
and the specimen order can be changed after completing the test.<br />
7<br />
Checkbox to Select Display Curve<br />
8
Intuitive Machine Operation<br />
Visual wizard guidance ensures trouble-free entry of method settings<br />
• Enter complicated method settings using the Method Wizard, which provides an overview of the entire process.<br />
• Setting entry guidance, linked to online help, is available in each window.<br />
• Easy-to-understand illustrations are used in the [Tension], [Specimen], and [Data Processing] windows, greatly simplifying the entry of<br />
settings.<br />
Displays illustrations for each specimen shape.<br />
A single glance shows which dimensions should be entered.<br />
In addition to manual input, dimensions can be set via [Excel<br />
batch reading] or [Automatic input via calipers].<br />
Enter additional, non-dimensional information for each specimen.<br />
Prepare data processing items in advance.<br />
Simply press buttons on the figure to select settings.<br />
Illustrations change according to the test mode and specimen<br />
material.<br />
Create random calculation formula using a data processing item or<br />
specimen size.<br />
An example of selected plastic (Beside this, rubber and metal are available,)<br />
Perform high-efficiency, continuous testing utilizing fast data searches and one-touch method selection<br />
All Functions<br />
All operations are accessible from a top screen.<br />
Start testing in just one step after frequently-used methods are<br />
recorded in the Quick Method List.<br />
Search Conditions<br />
Use a keyword or date to quickly search for saved test results and<br />
Method files. Also, easily call up files using previews of reports<br />
and lists of settings.<br />
Summary Preview<br />
Search Result<br />
<strong>Autograph</strong> <strong>AGS</strong>-X Series<br />
Precision Universal Tester<br />
9
Generate Detailed Reports<br />
Richly expressive report creation includes free<br />
positioning of report elements<br />
Report Designer allows flexible layouts. Create reports that include<br />
data, charts, photographs, and logs. Freely change the layout and<br />
element size, and use detailed settings for each element's font,<br />
color, and ruled line.<br />
Reports can be output in PDF, Microsoft Word, Excel, HTML<br />
formats.<br />
After exporting, use your everyday software to customize the report.<br />
Conventional Process Control Function<br />
Utilize daily test records to create an XBar-R control chart using<br />
data that has been extracted for a certain period.<br />
Daily test result statistics are available in various units, including<br />
date, specimen, batch, etc. The statistical result is displayed on the<br />
screen.<br />
It is possible to print them by adding the text and to output it as a<br />
PDF file.<br />
Choose from Four Software Components to Fit Your Specific Application<br />
When multiple software components are purchased, easily switch between modes at a single touch, without starting<br />
up separate software.<br />
Single Software<br />
Performs general<br />
single-direction<br />
testing.<br />
Examples include<br />
tensile, compression,<br />
bending and peeling<br />
tests.<br />
Cycle Software<br />
Similar to endurance<br />
testing, this software<br />
is used for testing<br />
where force is<br />
repeatedly applied<br />
and then released.<br />
Control Software<br />
Create any testing<br />
machine operation<br />
pattern. Perform foam<br />
rubber compression<br />
and holding cycle<br />
tests.<br />
Texture Software<br />
Measures the features<br />
(texture) of foods and<br />
pharmaceuticals.<br />
Produce special data<br />
processing results,<br />
including mastication,<br />
jelly strength and<br />
adhesion.<br />
10
Simple Software Improves Productivity<br />
Compatible with<br />
Windows 7<br />
Improves Productivity and Efficiency of<br />
Quality Control<br />
Performs general single-direction testing. Examples include tensile, compression, bending and peeling tests.<br />
Simple Screen Layout<br />
Few buttons ensure easily navigated operations<br />
One-touch test method selection<br />
Supports Industry Standards<br />
Recording convenient test method files enables instant testing<br />
Includes test method files for rubbers, plastics, and films that comply with<br />
JIS/ISO/ASTM standards. The terminology and data processing items<br />
specified in the test standard are pre-registered in the respective test<br />
method file to permit smooth testing in compliance with the standards.<br />
“Quick Method List” Makes Testing Easy<br />
No mouse or keyboard required<br />
Register often-used test methods to the Quick Method List to start testing<br />
instantly. The registered test methods can be directly selected or edited at<br />
the <strong>AGS</strong>-X tester, making testing easy even for users who find using a PC<br />
troublesome.<br />
Macros Enhance Work Efficiency<br />
Just set up the test and start testing.<br />
All tedious operations have been automated.<br />
The sequence of operations frequently conducted after testing can be fully<br />
automated. Functions for coordinating with the <strong>AGS</strong>-X permit saving of test<br />
data and report generation and printing without touching a PC.<br />
Save Results<br />
CSV Output<br />
Print Graph<br />
Save Results<br />
Create Report<br />
Read Next Method<br />
Statistical Process Control Functions<br />
Effectively utilize daily test results.<br />
Extract and compile<br />
test results over a<br />
fixed period to create<br />
histograms and<br />
XBar-R control charts.<br />
Compile statistics on<br />
daily test results by<br />
date, specimen, or<br />
batch, and display the<br />
results on screen. Add<br />
text to statistical<br />
information for<br />
printing or output to<br />
a PDF file.<br />
Examples of Macros<br />
<strong>Autograph</strong> <strong>AGS</strong>-X Series<br />
Precision Universal Tester<br />
11
Accessories<br />
Experience the range of possibilities available with this full-featured system<br />
<strong>AGS</strong>-300kNX + 300kN Non-Shift Wedge Type Grips<br />
<strong>AGS</strong>-10kNX + 1kN Parallel Tightening Grips<br />
+ SES-1000 Extensometer for soft specimens<br />
GRIPS<br />
Used to grip the sample, a wide variety is available to accommodate different specimen types and test force amounts.<br />
Non-Shift Wedge Type Grips <br />
Grip<br />
capacity<br />
300 kN<br />
250 kN<br />
100 kN<br />
50 kN<br />
20 kN<br />
5 kN<br />
Standard grip face<br />
Grip face Clearance (mm) Grip width (mm) Grip length (mm)<br />
File teeth for<br />
flat specimens<br />
0 to 8.5<br />
0 to 8.5<br />
0 to 7<br />
0 to 7<br />
0 to 7<br />
0 to 7<br />
50<br />
50<br />
40<br />
40<br />
25<br />
25<br />
75<br />
75<br />
55<br />
55<br />
55<br />
55<br />
Plastics Metals Lumber<br />
Upper grip<br />
weight<br />
(kg)<br />
33<br />
33<br />
10<br />
9.5<br />
3.6<br />
3.6<br />
Non-Shift Wedge Type Grips<br />
Pneumatic Flat Grips <br />
External dimensions (mm)<br />
Grip<br />
capacity<br />
W L (upper/lower)<br />
Plastics Rubber Textiles<br />
Grip width<br />
(mm)<br />
Clearance<br />
(mm)<br />
10 kN<br />
154 268.5 / 278.5 60<br />
0 to 10<br />
5 kN<br />
154 224 / 235<br />
60<br />
0 to 6<br />
1 kN<br />
102 163 / 174<br />
50<br />
0 to 6<br />
50 N<br />
64<br />
118 / 135<br />
35<br />
0 to 6<br />
*1 Grips with foot-valve units and crosshead - linked control functions are also available.<br />
*2 Grips can be opened and closed via the Smart Controller when using the crosshead-linked control kit.<br />
Cloth Paper Film<br />
Upper grip<br />
weight<br />
(kg)<br />
—<br />
5.7<br />
1.7<br />
0.4<br />
Pneumatic Flat Grips<br />
12
Screw-Type Flat Grips <br />
Grip<br />
capacity<br />
5 kN<br />
1 kN<br />
50 N<br />
Standard grip face<br />
Grip face Clearance (mm) Grip width (mm) Grip length (mm)<br />
File teeth<br />
Flat<br />
0 to 16<br />
0 to 15<br />
0 to 14<br />
60<br />
50<br />
35<br />
Plastics Rubber Textiles<br />
50<br />
30<br />
25<br />
Cloth<br />
Upper grip weight<br />
(kg)<br />
2<br />
0.7<br />
0.3<br />
Paper<br />
Parallel Tightening Grips<br />
Plastics Metals Lumber<br />
Screw-Type Flat Grips<br />
Grip<br />
capacity<br />
Size (mm)<br />
W<br />
L<br />
Grip face width and length<br />
(mm)<br />
Face clearance<br />
(mm)<br />
Upper grip weight<br />
(kg)<br />
300 kN<br />
100 kN<br />
574<br />
446<br />
440<br />
310<br />
60, 90<br />
40, 70<br />
0 to 60<br />
0 to 40<br />
170<br />
90<br />
*1 Requires a separate hydraulic unit<br />
*2 Optional compression jigs and bending jigs that can be connected directly to the grips are also available.<br />
Parallel Tightening Grips<br />
Compression plate<br />
Plastics Metals Rubber Lumber Cement<br />
Used to compress the specimen, several type are available to accommodate different specimens and test force amounts.<br />
Fixed Type<br />
Maximum<br />
capacity<br />
Upper plate dimensions (mm)<br />
diameter by thickness<br />
Upper plate<br />
mass (kg)<br />
Operational<br />
temperature (°C)<br />
250 kN<br />
ø100 × 25<br />
ø50 × 25<br />
ø200 × 40<br />
1.6<br />
0.5<br />
6.3<br />
0 to 40<br />
Spherical Seat Type<br />
Maximum<br />
capacity<br />
250 kN<br />
Upper plate<br />
dimensions (mm)<br />
ø100<br />
Upper plate<br />
mass (kg)<br />
3.8<br />
Operational<br />
temperature (°C)<br />
0 to 40<br />
Fixed-Type Compression Plates<br />
Spherical Seat-Type<br />
Compression Plates<br />
* With spherical compression plates, only the upper plate is spherical.<br />
Spherical seat-type compression plates provide contact flexibility for uniform load application.<br />
* Select the kit number that corresponds to the load cell used.<br />
Bending tests<br />
Plastics<br />
Simply attach the bending test jig kit to the main unit to perform bending testing.<br />
Max.<br />
test force<br />
10 kN<br />
100 kN<br />
Punch tip<br />
radius × width (mm)<br />
R2 × 34<br />
R5 × 34<br />
R5 × 34<br />
R1/8" × 72 R1/8" × 110<br />
R5 × 72<br />
R1/8" × 72<br />
Support tip<br />
radius × width<br />
Support spacing<br />
(mm)<br />
(mm)<br />
R2 × 110<br />
R5 × 110<br />
R1/8" × 110<br />
20 to 200<br />
50 to 500<br />
Deflection Measuring Device for Three-point Bending Test<br />
Applicable to the ISO 178 three-point bending test, it is possible to use this device with plastic three-point bending jigs.<br />
Applicable to ISO 178 Modulus measurement<br />
0.8 to 8" 0 to 40<br />
2 to 20"<br />
Operational<br />
temperature (°C)<br />
Applicable test standards<br />
JIS K6911, JIS K6902* 1 , JIS C6481* 2 , JIS K7171,<br />
ISO 178, Specimens with thickness of 3 mm or less<br />
JIS K7171, ISO 178, Specimens with thickness above 3 mm<br />
ASTM D790 (Test method 1)<br />
JIS K6911, JIS K6902* 1 , JIS C6481* 2 , JIS K7171,<br />
ISO 178, Specimens with thickness of 3 mm or less<br />
JIS K7171, ISO 178, Specimens with thickness above 3 mm<br />
ASTM D790 (Test method 1* 3 )<br />
*1 Corresponds to bending strength. Compatible with support spacing from 20 mm to 200 mm. *2 Corresponds to bending strength.<br />
*3 Compatible with support spacing from 2 inches to 20 inches.<br />
Requires an adaptor when the SIE or SES extensometer is used.<br />
Plastics<br />
Three-point Bending<br />
Test Jig for Plastics<br />
Deflection Measuring<br />
Device with Three-point<br />
Bending Jig for Plastics<br />
<strong>Autograph</strong> <strong>AGS</strong>-X Series<br />
Precision Universal Tester<br />
13
Precise Measurement of Displacement<br />
Class 0.5<br />
Plastics<br />
Metal<br />
Metal Foil<br />
Rubber<br />
Film<br />
TRViewX Non-Contact Digital Video<br />
Extensometer<br />
Conducts accurate gauge length elongation<br />
measurements on specimens, based on CCD<br />
camera images, over an extensive range.<br />
Single camera<br />
(TRViewX S Series)<br />
Double camera * 2<br />
(TRViewX D Series)<br />
Model<br />
TRViewX55S<br />
TRViewX120S<br />
TRViewX240S<br />
TRViewX500S<br />
TRViewX800S<br />
Model<br />
TRViewX500D<br />
TRViewX800D<br />
Camera Field-of-View (GL + elongation)<br />
55 mm* 1<br />
120 mm* 1<br />
240 mm* 1<br />
500 mm<br />
800 mm<br />
Camera Field-of-View (GL + elongation)<br />
Camera 1: 120 mm * 1<br />
Camera 2: 500 mm<br />
Camera 1: 120 mm * 1<br />
Camera 2: 800 mm<br />
*1 Elongation accuracy at normal temperatures is ISO Class 0.5 compliant.<br />
*2 With the double camera model, camera 1 takes measurements with a field of view up to<br />
120 mm, beyond which the system switches to camera 2. Select models 500D/800D if you<br />
require a wide field of view (500 mm/800 mm) and Class 0.5 compliance up to a 120 mm<br />
field of view.<br />
<strong>AGS</strong>-10kNXD + Pneumatic Flat Grips<br />
+ TRViewX Non-Contact Digital Video Extensometer<br />
Class 0.5<br />
Plastics<br />
Metal<br />
Plastics<br />
Rubber<br />
Automatic Extensometer<br />
SIE Series<br />
Automatic gauge position detection, gauge<br />
length setting, and arm clamping and<br />
unclamping of specimen.<br />
DSES-1000 Extensometer<br />
for Soft Specimens<br />
Easily and accurately measures large elongation<br />
amounts. 1000 mm Maximum Movement<br />
Distance, ±0.2% Relative Elongation<br />
Measurement Precision.<br />
Class 0.5<br />
Plastics Metal Metal<br />
Class 1<br />
Strain Gauge One-touch<br />
Extensometer SSG-H Series<br />
Lightweight, compact extensometer that can be<br />
attached or removed by a simple, one-touch<br />
operation.<br />
* Requires external amplifier (option).<br />
Differential Transformer Type<br />
Extensometers DT Series<br />
Applicable to the elongation measurement of<br />
metal.<br />
Maximum diameter, thickness 45 mm<br />
Compliant with Strain Rate Control Test Methods<br />
ISO 6892<br />
Plastics<br />
Metal<br />
Rubber<br />
Lumber<br />
Plastics<br />
Metal<br />
Rubber<br />
Compression Plate Displacement<br />
Measurement Device<br />
Measures displacement of compression plates<br />
during compression tests.<br />
Strain Gauge Type Width Sensor<br />
Measures changes in specimen width.<br />
14
Testing in Controlled Environments<br />
Temperature<br />
Range<br />
−70 °C to +280 °C<br />
Compact Thermostatic Chamber<br />
TCE Series<br />
Enables testing across a temperature range of<br />
−70 °C to +280 °C. +150 mm and +250 mm<br />
extension models are also avilable.<br />
<strong>AGS</strong>-10kNXD + Screw Type Flat Grips<br />
+ Compact Thermostatic Chamber TCE series<br />
Temperature<br />
Range<br />
Humidity<br />
Range<br />
+20 °C to 60 °C<br />
(−40 °C to 250 °C with no humidity<br />
control)<br />
40% to 95%<br />
Refrigerator Type Environmental<br />
Temperature and Humidity Chamber<br />
Optimal chamber for testing materials with<br />
mechanical properties sensitive to temperature<br />
and humidity effects, such as fibers, paper, or<br />
films.<br />
Temperature regulation: Automatic control by<br />
heater and refrigerator.<br />
Temperature<br />
Range<br />
−70 °C to +280 °C<br />
Gas Jet Type Thermostatic Chamber<br />
TCL, TCH Series<br />
Liquid nitrogen or carbon dioxide is injected to<br />
lower the temperature. Offers colder testing<br />
environments than the refrigerator type.<br />
Heating: Heater; Cooling: Liquid nitrogen or CO2<br />
injection<br />
Temperature<br />
Range<br />
+300 °C +900 °C<br />
+300 °C +1100 °C<br />
Class 1<br />
900 °C / 1100 °C<br />
High-Temperature<br />
Tensile Test Device<br />
This test device is for tensile, bending and<br />
compression testing of steel, heat-resistant<br />
materials and ceramics under high temperature<br />
conditions.<br />
High Precision Digital Extensometer<br />
for High-Temperature Tensile<br />
Test Device<br />
This device complies with ISO Class 1 and ASTM<br />
B2 Class and is also applicable to the strain<br />
control for tensile testing of metals.<br />
<strong>Autograph</strong> <strong>AGS</strong>-X Series<br />
Precision Universal Tester<br />
15
Jigs for Specific Testing and Specimen Shapes<br />
Yarn<br />
Cord<br />
JIS Z0237<br />
JIS Z1528<br />
Adhesive<br />
tape<br />
Adhesive<br />
sheet<br />
Pneumatic Capstan Grips for Yarn<br />
Adhesive Tape Peeling Test Device<br />
These grips grip a yarn or cord specimen from<br />
the capstan (winch). The pneumatic operation<br />
allows application of an initial test force.<br />
The sample table slides in synchronization with<br />
the upper grip movement to maintain a 90°<br />
peeling angle. Peeling test jig compliant with<br />
JIS Z0237 and JIS Z1528.<br />
ASTM 1894<br />
ISO 8295<br />
JIS K7312<br />
JIS K7125<br />
Plastics<br />
Film<br />
ISO 37<br />
ASTM D412<br />
JIS K6251 / JIS K7312<br />
O-ring<br />
Friction Modulus Test Device<br />
1 kN Roller Grips<br />
For measurements of the coefficient of sliding<br />
friction between identical plastics or films or<br />
between different materials across the<br />
continuous range from static friction to dynamic<br />
friction. Two versions: compliant with JIS K7312 /<br />
ASTM 1894 and compliant with JIS K7125 / ISO<br />
8295.<br />
The O-ring is hooked onto rollers, which rotate<br />
during tensile testing. Conforms to JIS K6251,<br />
JIS K7312, ISO 37, and ASTM D412 test<br />
standards.<br />
• Jigs for CFRP Testing Standards<br />
CFRP<br />
ASTM D6484 / D6484M<br />
ASTM D7137 / D7137M<br />
Open-Hole Compression Strength<br />
Testing on Polymer Matrix<br />
Composite Laminate<br />
ASTM D6484 is a typical method used to<br />
determine the compressive strength of CFRP<br />
open-hole samples.<br />
Testing the Compressive Residual<br />
Strength Characteristics of a<br />
Damaged Polymer Matrix Composite<br />
Plate<br />
The testing is performed on rectangular samples<br />
made of composite materials that have already<br />
been subjected to impact testing. The sample is<br />
mounted on the jig and subjected to<br />
compression loads.<br />
ASTM D5379 / D5379M<br />
JIS K7079-2<br />
ASTM D7078 / D7078M<br />
In-Plane Shear Testing<br />
Double-V-Notched Sample Shearing<br />
V-Notched Rail Shear Testing and<br />
Evaluation of Composites<br />
The in-plane shear strength, in-plane shear<br />
fracture strain, and in-plane shear elastic<br />
modulus of carbon-fiber-reinforced plastics can<br />
be determined by the Iosipescu test, which is an<br />
in-plane shear test on double-V-notched<br />
samples.<br />
This testing applies shear forces to mounted<br />
samples with 90-degree V-notches at the top and<br />
bottom.<br />
16
Options<br />
Optional Frames for <strong>AGS</strong>-X Series<br />
Capacity 10 kN<br />
20 kN 50 kN 100 kN 250 kN/300 kN<br />
Reinforced Yoke Specification<br />
+250 mm Extended Column<br />
+500 mm Extended Column<br />
Reinforced Yoke Options<br />
Permits tensile testing in the download direction. (Only for 10 kN model)<br />
Extended Column Options<br />
For testing with a longer test stroke.<br />
+500 mm<br />
+250 mm<br />
STD<br />
Options for <strong>AGS</strong>-10kNX Frame<br />
Jog Controller<br />
The jog dial allows manual positioning<br />
of the crosshead.<br />
Power Cable<br />
EU specification (VDE standard)<br />
Chinese specification (GB standard)<br />
Japanese, N. American specification<br />
(UL, CSA, PSE standards)<br />
supplied as standard.<br />
Options for <strong>AGS</strong>-X Series<br />
Control I/O Box<br />
Expands the number of control I/O<br />
ports to four. Multiple options can be<br />
simultaneously connected to the<br />
control I/O ports.<br />
Sensor I/O Box<br />
Expands the number of sensor I/O<br />
ports to two. Multiple options can be<br />
simultaneously connected to the<br />
sensor I/O ports. BNC cables can be<br />
connected to the analog I/O ports (2<br />
ports each).<br />
Other options are also available. For details, refer to the separate catalog (Shimadzu <strong>Autograph</strong> Optional Accessories).<br />
<strong>Autograph</strong> <strong>AGS</strong>-X Series<br />
Precision Universal Tester<br />
17
<strong>AGS</strong>-X Series Specifications<br />
<strong>AGS</strong>-10kNX<br />
<strong>AGS</strong>-20kNX<br />
Model<br />
Max. Load Capacity<br />
<strong>AGS</strong>-10kNX<br />
10 kN<br />
Table-top<br />
<strong>AGS</strong>-20kN<br />
20 kN<br />
Lineup of Models Differing by Load Cell Capacity<br />
1 N / 2 N / 5 N / 10 N / 20 N / 50 N<br />
100 N / 500 N / 1 kN / 5 kN / 10 kN<br />
20 kN<br />
Force<br />
Measurement<br />
Crosshead<br />
Accuracy<br />
High-Precision Type<br />
(1/500, ±0.5%)<br />
Standard-Precision Type<br />
(1/500, ±1%)<br />
Calibration<br />
Speed Range<br />
Max. Return Speed<br />
Crosshead Speed Accuracy * 2<br />
Crosshead Speed and Permitted Test Force<br />
Crosshead<br />
Position Detection<br />
Crosshead – Table Distance<br />
(Tensile stroke) * 3<br />
Effective Test Width<br />
Sampling Speed<br />
Test Method Files<br />
Standard Functions<br />
Measurement Method<br />
Display Method<br />
Positional Accuracy<br />
Within ±0.5% indicated test force (at 1/500 to 1/1 load cell rating)<br />
Conforms to EN 10002-2 Grade 0.5, ISO 7500-1 Class 0.5, BS 1610 Class 0.5, ASTM E4, and<br />
JIS B7721 Class 0.5. * 1<br />
Within ±1% indicated test force<br />
(at 1/500 to 1/1 load cell rating)<br />
Conforms to EN 10002-2 Grade 1, ISO 7500-1 Class 1, BS 1610 Class 1, ASTM E4, and<br />
JIS B7721 Class 1. * 1<br />
Automatic test force calibration: select tensile, compression, or tensile and compression<br />
0.001 to 1000 mm/min (stepless)<br />
0.001 to 1600 mm/min (stepless)<br />
1500 mm/min<br />
2200 mm/min<br />
±0.1%<br />
1200 mm<br />
(760 mm, MWG)<br />
To load cell capacity across entire speed range<br />
425 mm<br />
Optical encoder<br />
Digital display (display resolution: 0.001 mm)<br />
±0.1% indicated value or ±0.01 mm, whichever is larger<br />
1000 Hz max. * 4<br />
40 files (PC link: 20 files, standalone controller: 20 files)<br />
• Automatic reading of load cell characteristic values<br />
• Test force display, stress display, stroke display,<br />
position display<br />
• External analog output (2 channels)<br />
• External analog input (2 channels) * 4<br />
• External digital input (2 channels) * 4<br />
• Analog recorder (option) output<br />
• Dataletty (option) output * 5<br />
1250 mm<br />
(765 mm, MWG)<br />
• Automatic test force / stress control<br />
(Autotuning)<br />
• Automatic strain control (Autotuning) * 4<br />
• Test force auto-zeroing<br />
• Test force auto-calibration<br />
• Break detection, auto-return<br />
• Load cell overload detection<br />
• Touch-load detection function<br />
Accessories<br />
Load cell (with CAL cable), Power cable (2.5 m),<br />
turning rod, cable clamps, instruction manual<br />
Load Cell (with CAL cable), Power cable (5 m),<br />
turning rod, cable clamps, instruction manual<br />
*Special-purpose desk (option)<br />
(Unit: mm)<br />
*Special-purpose desk (option)<br />
(Unit: mm)<br />
Dimensions<br />
600<br />
*500<br />
520<br />
*950<br />
800 600<br />
641<br />
*1200<br />
600<br />
653<br />
Front<br />
600<br />
600 718<br />
600<br />
Front<br />
Weight<br />
Power Requirements<br />
Operating Environment<br />
W653 × D520 × H1603 mm<br />
85 kg<br />
Single phase 100/120/220/240 V AC (switching type)<br />
50/60 Hz 1.2 kVA<br />
W718 × D641 × H1633 mm<br />
235 kg<br />
Single phase AC 200–230<br />
50/60 Hz 4.0 kVA<br />
Supply voltage fluctuations within ±10% of the set value.<br />
D-class (100 Ω max.) grounding resistance.<br />
Temperature: 5 °C to 40 °C; Humidity: 20% to 80% (no condensation)<br />
Floor vibrations: frequency 10 Hz max., amplitude 5 µm max.<br />
*1 Official certification after installation is recommended to comply with EN 10002-2, ISO 7500-1, ASTM E4 standards, and JIS B7721.<br />
*2 Crosshead speed accuracy is calculated from the crosshead travel within a prescribed time at a constant speed between 0.5 mm/minute and 500 mm/minute.<br />
*3 The tensile stroke is the effective stroke when SCG (screw-type flat grips) or MWG (non-shift wedge-type grips) are mounted.<br />
*4 TRAPEZIUM X or TRAPEZIUM LITE X is needed for these functions. Moreover, when automatic test force/stress control (auto tuning) and the automatic strain control (auto tuning)<br />
are used, the sampling speed becomes 10 msec.<br />
18
<strong>AGS</strong>-50kNX <strong>AGS</strong>-100kNX <strong>AGS</strong>-300kNX<br />
Table Top Type<br />
<strong>AGS</strong>-50kNX<br />
50 kN<br />
<strong>AGS</strong>-100kNX<br />
100 kN<br />
Floor Type<br />
<strong>AGS</strong>-300kNX<br />
300 kN<br />
50 kN<br />
100 kN<br />
300 kN<br />
Within ±0.5% indicated test force (at 1/500 to 1/1 load cell rating)<br />
Within ±0.5% indicated test force<br />
(at 1/250 to 1/1 load cell rating)<br />
Conforms to EN 10002-2 Grade 0.5, ISO 7500-1 Class 0.5, BS 1610 Class 0.5, ASTM E4, and JIS B7721 Class 0.5.* 1<br />
Within ±1% indicated test force (at 1/500 to 1/1 load cell rating)<br />
Conforms to EN 10002-2 Grade 1, ISO 7500-1 Class 1, BS 1610 Class 1, ASTM E4, and JIS B7721 Class 1. * 1<br />
Automatic test force calibration: select tensile, compression, or tensile and compression<br />
0.001 to 800 mm/min (stepless)<br />
0.001 to 500 mm/min (stepless)<br />
1100 mm/min<br />
550 mm/min<br />
±0.1%<br />
To load cell capacity across entire speed range<br />
0.001–200 kN: 0.001–500 mm/min (entire speed range)<br />
200–300 kN: 0.001–400 mm/min<br />
1210 mm<br />
1255 mm<br />
1475 mm<br />
(745 mm, MWG)<br />
(745 mm, MWG)<br />
(635 mm, MWG)<br />
425 mm<br />
600 mm<br />
Optical encoder<br />
Digital display (display resolution: 0.001 mm)<br />
±0.1% indicated value or ±0.01 mm, whichever is larger<br />
1000 Hz max. * 4<br />
40 files (PC link: 20 files, standalone controller: 20 files)<br />
• Automatic reading of load cell characteristic values<br />
• Test force display, stress display, stroke display,<br />
position display<br />
• External analog output (2 channels)<br />
• External analog input (2 channels) * 4<br />
• External digital input (2 channels) * 4<br />
• Analog recorder (option) output<br />
• Dataletty (option) output * 5<br />
• Automatic test force / stress control (Autotuning)<br />
• Automatic strain control (Autotuning) * 4<br />
• Test force auto-zeroing<br />
• Test force auto-calibration<br />
• Break detection, auto-return<br />
• Load cell overload detection<br />
• Touch-load detection function<br />
Load Cell (with CAL cable), Power cable (5 m), turning rod, cable clamps, instruction manual<br />
800 600<br />
641<br />
*Special-purpose desk (option)<br />
(Unit: mm)<br />
*1200<br />
(Unit: mm)<br />
500<br />
600<br />
725<br />
(Unit: mm)<br />
500<br />
600<br />
725<br />
600 718<br />
600<br />
Front<br />
795<br />
600 945<br />
600<br />
Front<br />
795<br />
600 945<br />
600<br />
Front<br />
W718 × D641 × H1633 mm<br />
260 kg<br />
Single phase AC 200–230 V<br />
50/60 Hz 4.0 kVA<br />
D-class (100 Ω max.) grounding resistance.<br />
W945 × D725 × H2164 mm<br />
W945 × D725 × H2414 mm<br />
525 kg<br />
675 kg<br />
400 V model: Three phases AC 380–440 V 50/60 Hz 4.5 kVA 400 V model: Three phases AC 380–440 V 50/60 Hz 5.5 kVA<br />
200 V model: Three phases AC 200–230 V 50/60 Hz 6.5 kVA 200 V model: Three phases AC 200–230 V 50/60 Hz 7.5 kVA<br />
Supply voltage fluctuations within ±10% of the set value.<br />
400 V model: C-class (10 Ω max.) grounding resistance.<br />
200 V model: D-class (100 Ω max.) grounding resistance.<br />
Temperature: 5 °C to 40 °C; Humidity: 20% to 80% (no condensation)<br />
Floor vibrations: frequency 10 Hz max., amplitude 5 µm max.<br />
*5 Dataletty (option) and TRAPEZIUM X / TRAPEZIUM LITE X can not be used together.<br />
* Values stated in this catalog are based on measurements conducted according to separately defined inspection standards.<br />
* Windows 7/ Windows Vista/ Windows XP is a registered trademark in the United States and other countries of Microsoft Corporation.<br />
<strong>Autograph</strong> <strong>AGS</strong>-X Series<br />
Precision Universal Tester<br />
19
Testing and Evaluation Machines<br />
Precision Universal Tester<br />
AG-X plus series<br />
Small Table-Top Tester<br />
EZ Test<br />
Universal Testing Machines<br />
UH-X/FX series<br />
<strong>Autograph</strong> <strong>AGS</strong>-X Series<br />
Micro Hardness Tester<br />
HMV-G series<br />
Dynamic Ultra Micro Hardness Tester<br />
DUH-211/211S<br />
Electromagnetic Force Fatigue /<br />
Endurance Testing System<br />
Servopulser EMT series<br />
Company names, product/service names and logos used in this publication are trademarks and trade names of Shimadzu Corporation or its<br />
affiliates, whether or not they are used with trademark symbol “TM” or “®”.<br />
Third-party trademarks and trade names may be used in this publication to refer to either the entities or their products/services. Shimadzu<br />
disclaims any proprietary interest in trademarks and trade names other than its own.<br />
www.shimadzu.com/an/<br />
For Research Use Only. Not for use in diagnostic procedures.<br />
The contents of this publication are provided to you “as is” without warranty of any kind, and are subject to change without notice. Shimadzu<br />
does not assume any responsibility or liability for any damage, whether direct or indirect, relating to the use of this publication.<br />
© Shimadzu Corporation, 2014<br />
Printed in Japan 3655-12311-30ANS


