Digital Photo Frame User Manual Safety precaution - Westwell
Digital Photo Frame User Manual Safety precaution - Westwell
Digital Photo Frame User Manual Safety precaution - Westwell

You also want an ePaper? Increase the reach of your titles
YUMPU automatically turns print PDFs into web optimized ePapers that Google loves.
<strong>Digital</strong> <strong>Photo</strong> <strong>Frame</strong><br />
<strong>User</strong> <strong>Manual</strong><br />
<strong>Safety</strong> <strong>precaution</strong><br />
1) Use only the supplied adapter with output 5V.<br />
2) Turn off power before cleaning. Use only a soft cloth to clean the unit. Do<br />
not use liquid cleaners.<br />
3) Avoid exposing the unit to extreme heat.<br />
4) Do not disassemble the <strong>Digital</strong> Picture <strong>Frame</strong>, otherwise it may result in<br />
electric shock and void your warranty.<br />
1. Features<br />
� 7.0 inch LCD display<br />
� Supports Secure <strong>Digital</strong> (SD), Multimedia Card (MMC), Memory Stick (MS)<br />
memory card formats<br />
� Browse the pictures from memory cards/USB flash drive directly<br />
� High resolution of 480 x 234 pixel<br />
� Supports high resolution photos<br />
� Auto photo slide show<br />
2. Packaging<br />
� Main Unit � <strong>User</strong> <strong>Manual</strong> � Power Adaptor<br />
� Bracket � Warranty Card � Quick Guide<br />
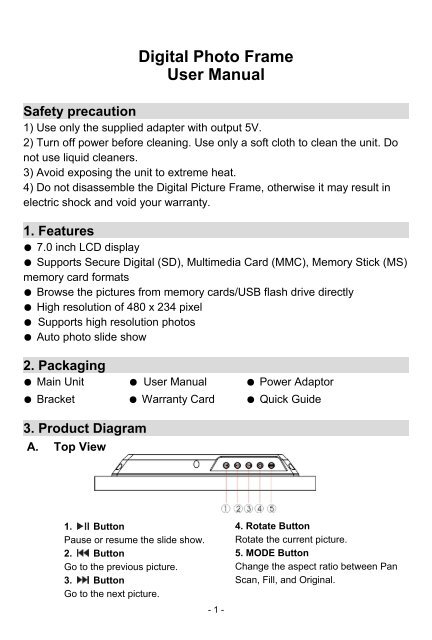
3. Product Diagram<br />
A. Top View<br />
1. �Button<br />
Pause or resume the slide show.<br />
2. Button<br />
Go to the previous picture.<br />
3. �Button<br />
Go to the next picture.<br />
- 1 -<br />
4. Rotate Button<br />
Rotate the current picture.<br />
5. MODE Button<br />
Change the aspect ratio between Pan<br />
Scan, Fill, and Original.
B. Front View C. Rear View<br />
6. LCD Screen<br />
D. Bottom View<br />
8. USB Port<br />
Insert the USB flash drive into this port<br />
9. SD/MS /MMC Card Slot<br />
Insert the SD/MS/MMC card into this port.<br />
10. DC 5V IN<br />
Connect to the supplied power adapter.<br />
Using Your <strong>Digital</strong> Picture <strong>Frame</strong><br />
Step 1: Mount the bracket for tabletop display. Insert the contact points of the<br />
bracket into the holes on the back, and push it forward until it is fixed.<br />
(for horizontal view) (for vertical view )<br />
- 2 -<br />
7. Bracket Holder<br />
Attach the bracket here to support the<br />
<strong>Digital</strong> Picture <strong>Frame</strong>.
Step 2: Connect the power adapter to an electronic socket and the DC IN port<br />
of the device.<br />
Step 3: Insert a memory card (with the card’s electrical contacts towards the<br />
front of the unit) or USB flash drive in the <strong>Digital</strong> Picture <strong>Frame</strong>. A slide<br />
show should begin automatically.<br />
Step 4: In the slide show mode, you can:�<br />
�Press the� � button to display the previous or next picture.<br />
�Repeatedly press the Rotate button to change time interval between<br />
slides.<br />
� Repeatedly press the MODE button to cycle through 3 display modes<br />
– Pan Scan, Fill and Original<br />
�Press the � button to stop slide show.<br />
Step 5: Briefly press the � button to stop the slide show and enter the Single<br />
Show mode. A tool bar will appear at the top right corner of the screen,<br />
which indicates functions that you can use at the moment. The current<br />
photo will remain on the screen until the button is pressed again, at<br />
which time the slide show will resume.<br />
In the Single Show mode, you can:<br />
�Press the� � button to display the previous or next picture.<br />
�Press the Rotate button to rotate the current picture clockwise:<br />
90°� 180° � 270°. (it can only be operated when slide show is<br />
stopped)<br />
�Press the MODE button to cycle through 3 display modes –Pan<br />
Scan, Fill and Original.<br />
�Press the � button to start slide show.<br />
Technical Notes<br />
1. Your <strong>Digital</strong> Picture <strong>Frame</strong> is a sophisticated electronic device. Do not drop<br />
or subject the unit to jarring or strong vibrations.<br />
2. Avoid placing the <strong>Digital</strong> Picture <strong>Frame</strong> in areas of high humidity or where it<br />
might be subjected to splashing.<br />
3. The panel is made of plastic and can be easily damaged. Avoid sharp<br />
objects.<br />
4. Use only a soft dry cloth to clean the screen.<br />
5. The device does not guarantee the compatibility with all USB flash disks or<br />
memory cards from various manufacturers. USB flash disks with special<br />
features such as encryption, anti-virus etc. may not be supported.<br />
- 3 -
Question/Troubleshooting Guide<br />
This chapter presents some troubleshooting problems you may encounter<br />
while using the device. Even if the following guide fails to solve your problem,<br />
please do not disassemble the device, but leave the problems to professional<br />
staff.<br />
1. Question: What kind of photos does this device’s supports?<br />
Answer: The <strong>Frame</strong> will display digital photos that are stored in the JPEG<br />
format which is the standard format for nearly all digital cameras. Some<br />
cameras allow images to be stored as TIFF, RAW files as well as JPEG. But<br />
with this device, only the JPEG format is compatible.<br />
2. Question: What should I do if the system does not respond when the<br />
power is turned on?<br />
Answer: Please make sure the unit is properly connected to a power source.<br />
Then turn it off, reconnect the power and turn it on again.<br />
3. Question: Why is the memory card or USB flash drive not recognized?<br />
Answer: The memory card or USB flash drive might be inserted incorrectly or<br />
is not pushed in far enough. Insert the memory card or USB flash drive in the<br />
right direction. If the card / USB flash drive still cannot be read, please turn off<br />
the unit and then power it again.<br />
Specifications<br />
Panel Size 7.0 inches<br />
Resolution 480 x 234<br />
File Format Type JPEG<br />
Max. <strong>Photo</strong> Size 16megapixels<br />
Power Requirement 5 V DC<br />
Operating Temperature -10~55 degrees centigrade<br />
Storage Temperature -20~55 degrees centigrade<br />
Copyright<br />
This manual contains information protected by copyright law.<br />
No part of this document may be used or reproduced in any form or by any means, or<br />
stored in a database/retrieval system without prior written permission from us.<br />
The information of this manual is base on the current version of the product.<br />
We reserve the rights to change without prior notice.<br />
All brand names in this manual are the property of their respective owners.<br />
- 4 -