Chem 102b Experiment 14: Part II Revised Preparation of Esters
Chem 102b Experiment 14: Part II Revised Preparation of Esters
Chem 102b Experiment 14: Part II Revised Preparation of Esters
You also want an ePaper? Increase the reach of your titles
YUMPU automatically turns print PDFs into web optimized ePapers that Google loves.
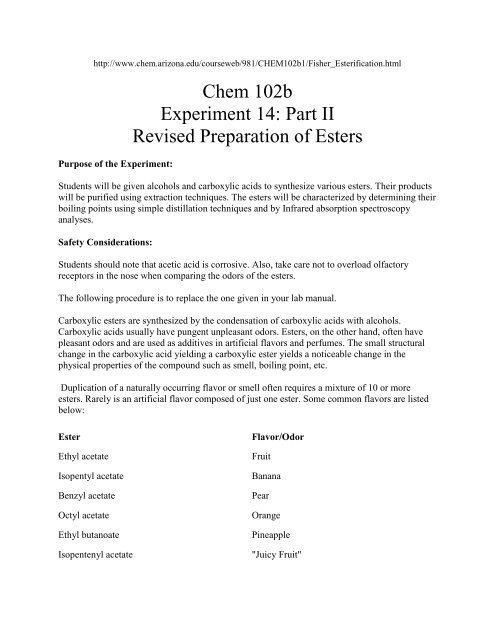
http://www.chem.arizona.edu/courseweb/981/CHEM<strong>102b</strong>1/Fisher_Esterification.html<br />
Purpose <strong>of</strong> the <strong>Experiment</strong>:<br />
<strong>Chem</strong> <strong>102b</strong><br />
<strong>Experiment</strong> <strong>14</strong>: <strong>Part</strong> <strong>II</strong><br />
<strong>Revised</strong> <strong>Preparation</strong> <strong>of</strong> <strong>Esters</strong><br />
Students will be given alcohols and carboxylic acids to synthesize various esters. Their products<br />
will be purified using extraction techniques. The esters will be characterized by determining their<br />
boiling points using simple distillation techniques and by Infrared absorption spectroscopy<br />
analyses.<br />
Safety Considerations:<br />
Students should note that acetic acid is corrosive. Also, take care not to overload olfactory<br />
receptors in the nose when comparing the odors <strong>of</strong> the esters.<br />
The following procedure is to replace the one given in your lab manual.<br />
Carboxylic esters are synthesized by the condensation <strong>of</strong> carboxylic acids with alcohols.<br />
Carboxylic acids usually have pungent unpleasant odors. <strong>Esters</strong>, on the other hand, <strong>of</strong>ten have<br />
pleasant odors and are used as additives in artificial flavors and perfumes. The small structural<br />
change in the carboxylic acid yielding a carboxylic ester yields a noticeable change in the<br />
physical properties <strong>of</strong> the compound such as smell, boiling point, etc.<br />
Duplication <strong>of</strong> a naturally occurring flavor or smell <strong>of</strong>ten requires a mixture <strong>of</strong> 10 or more<br />
esters. Rarely is an artificial flavor composed <strong>of</strong> just one ester. Some common flavors are listed<br />
below:<br />
Ester<br />
Ethyl acetate<br />
Isopentyl acetate<br />
Benzyl acetate<br />
Octyl acetate<br />
Ethyl butanoate<br />
Isopentenyl acetate<br />
Flavor/Odor<br />
Fruit<br />
Banana<br />
Pear<br />
Orange<br />
Pineapple<br />
"Juicy Fruit"
Fischer esterification yields equilibrium between the reactants and products. As Le Chateliers<br />
principle states, the equilibrium system will adjust to minimize any stress applied to the system.<br />
If the concentration <strong>of</strong> either <strong>of</strong> the reactants is increased or if the concentration <strong>of</strong> either <strong>of</strong> the<br />
products (i.e. carboxylic acid and ester) is decreased, the reaction will "shift to the right." Thus,<br />
the yield <strong>of</strong> the products will be increased. Anhydrous sodium sulfate is a drying agent that<br />
absorbs water. If anhydrous sodium sulfate were added to the product collection flask, water<br />
would be removed and the reaction would be shifted to the right. The yield <strong>of</strong> the ester would<br />
increase.<br />
The experiment is to be performed by a group <strong>of</strong> 4 students. Each member <strong>of</strong> the group will<br />
make, isolate, and characterize one <strong>of</strong> the esters listed below using the Fischer esterification<br />
techniques. The product will be a liquid that will be purified via a two-step process. Purity <strong>of</strong> the<br />
product will be determined using Fourier Transform Infrared absorption Spectroscopy.<br />
Ester Alcohol Acid Boiling Point<br />
Ethyl Acetate Ethanol Acetic Acid 77 C<br />
Benzyl Acetate Benzyl Alcohol Acetic Acid 213 C<br />
Isopentyl Acetate Isopentanol Acetic Acid <strong>14</strong>2 C<br />
Octyl Acetate Octanol Acetic Acid 199 C<br />
IR spectra will be collected for each <strong>of</strong> the esters synthesized and compared within each group.<br />
IR spectra are specific for every compound and can be considered to be a kind <strong>of</strong> "fingerprint"<br />
for that compound. As you learned in the qualitative analysis experiment, compounds that share<br />
the same functional groups share some <strong>of</strong> the same properties. After the esters have been<br />
synthesized and characterized, the groups should compare boiling points and IRs <strong>of</strong> the products.<br />
You will be given spectra <strong>of</strong> the reactants. Please compare your analysis to the IRs <strong>of</strong> the<br />
reactants and make some assessments about the completion <strong>of</strong> your reaction. Please note that<br />
only the alcohol used to make the ester has changed. Consequently, the spectra for all the esters<br />
will have many similaritiestake care to note the differences.<br />
Glassware:<br />
You will need to check out a macrokit from the preproom. In the macrokit there will be 2 round<br />
bottom flasks (a 250-mL and a 100 mL); a condenser, a vacuum adapter, a distillation adapter,<br />
and a thermometer adapter. You will also need 2 lengths <strong>of</strong> tygon tubing per student and a<br />
mercury thermometer that will measure about 400 C. Taped to the inside <strong>of</strong> the macrokit lid is a<br />
list <strong>of</strong> glassware that should be in the kit. Please make certain all items are there and are not<br />
broken. The kits cost approximately $65.00 apiece. You need to be very cautious with this<br />
glassware.
NOTE: Begin the esterification at the beginning <strong>of</strong> week 7 before the pre-lab lecture and<br />
recrystallization <strong>of</strong> your aspirin product.<br />
The Reaction:<br />
1. The following alcohols will be available for the reaction: ethanol, isopentanol, benzyl<br />
alcohol, and octanol. You will use one <strong>of</strong> these according to your TAs instructions.<br />
2. Obtain an aluminum dish and fill - full with sand. Place on a hotplate and heat<br />
moderately (turn dial to 3 or 4).<br />
3. Check out macrokit from preproom.<br />
4. Place 2-3 boiling chips in the 100-mL round bottom flask (reaction flask).<br />
5. Place 5 mL <strong>of</strong> your assigned alcohol into the reaction flask.<br />
6. Place 10 mL <strong>of</strong> acetic acid into the reaction flask.<br />
7. Add 10 drops <strong>of</strong> concentrated H 2 SO 4 to the reaction flask. Cut a cotton ball amount <strong>of</strong><br />
glass wool and place the plug loosely in the end <strong>of</strong> the condenser.<br />
8. When the reflux apparatus is ready to go, have your setup checked by your instructor.<br />
9. Lower the reflux apparatus into the sandbath moving the sand until the baseline <strong>of</strong> the<br />
sand covers the bottom 1/3 <strong>of</strong> the flask. Increase the heat to 5-6. Reflux for 60-70<br />
minutes. Cool the reaction mixture.<br />
B: The Extraction<br />
1. While stirring slowly add 5 mL <strong>of</strong> the 5% sodium bicarbonate into the reaction vessel.<br />
Swirl the flask until CO 2 formation ceases.<br />
2. Transfer contents <strong>of</strong> the reaction mixture to a centrifuge tube. Shake the mixture<br />
vigorously for 2-3 minutes.<br />
3. Allow the two layers to separate. Using a micropipet, remove the lower layer (the water<br />
layer) and put it into a small beaker.<br />
4. Add another 5 mL <strong>of</strong> the sodium bicarbonate solution and shake again for another 2-3<br />
minutes. Again remove the bottom water layer.<br />
5. Repeat one more time for a total <strong>of</strong> three bicarbonate extractions. The third time, try to<br />
remove as much water as possible.<br />
6. Add 1 g <strong>of</strong> anhydrous sodium sulfate. This is a drying agent and will remove remaining<br />
water in the flask. Let the flask stand for at least 10-15 minutes. This is a good place to<br />
stop if time is short. Start cleaning your glassware. Be certain to return the macrokit<br />
intact to the preproom.
C: The Distillation<br />
1. Transfer the dry ester to the round bottom flask and assemble a distillation apparatus.<br />
Remember to clamp the round bottom flask, the condenser, and the vacuum adapter to a<br />
ring stand. When inserting the thermometer into the thermometer adapter, use extreme<br />
caution. The position <strong>of</strong> the thermometer needs to be at the "y" junction <strong>of</strong> the distilling<br />
adapter to correctly determine the boiling point <strong>of</strong> the ester.<br />
2. Use a clean 250-mL round bottom flask (which is clamped to ringstand) to receive the<br />
distillate.<br />
3. Have your instructor check your setup before proceeding.<br />
4. Raise the sandbath/hotplate (seated on a ring that is clamped to a ringstand) to the<br />
reaction flask. Be certain to cover the lower 1/3 <strong>of</strong> the reaction flask with sand.<br />
5. Turn the hotplate on high. Make a note <strong>of</strong> your esters boiling point. When you are<br />
within 20 degrees <strong>of</strong> your bp, lower the heat to a moderate heating level. Record<br />
temperature every minute and make observations in your lab notebook.<br />
6. Note the temperature when material begins to come out <strong>of</strong> the adapter. Note the<br />
temperature again when it stops coming out. This is your boiling point range for your<br />
ester.<br />
7. The material you have collected should be your pure ester. You will take an IR spectra <strong>of</strong><br />
this material. Please label your flask according. Note the smell <strong>of</strong> your groups esters in<br />
your lab notebook.<br />
D: Infrared Spectroscopy<br />
1. Check out an IR card from the 3 South preproom window.<br />
2. Your instructor will demonstrate how to run a background on the instrument.<br />
3. Using a micropipet, place 1-2 drops <strong>of</strong> your ester onto the cards surface.<br />
4. Run a spectrum <strong>of</strong> your ester.<br />
5. Print the spectrum.<br />
6. You will have IRs <strong>of</strong> the starting materials: ethanol, benzyl alcohol, isopentanol, octanol,<br />
and acetic acid.<br />
7. Compare the IR <strong>of</strong> your ester with the starting materials and the other esters in your<br />
group. Which peaks are shared; which peaks are unique to your spectra; do you have any<br />
starting materials in your sample; do you have any water in your sample? Remember that<br />
it is not efficient or effective to try to identify all the peaks <strong>of</strong> the spectrum. The peaks<br />
that should interest you most are at Ester--1735 cm -1 (C=O)strong absorption, 1280-<br />
1050 cm -1 (C-O) usually gives two or more absorptions with one stronger than the others<br />
do. Acetic Acid will have a very broad O-H peak at 3300-2500 cm -1 , the C=O peak will<br />
be a broad stretch at 1730-1700 cm -1 , and the C-O peak will be strong in the 1320-1210<br />
cm -1 range.
8. NOTE: Water is a product <strong>of</strong> the esterification reaction. It has an O-H bond that will be a<br />
broad stretch at 3300-2500 cm -1 . If you have a stretch in that range, note the 1280-1050<br />
cm -1 range to identify if you have starting material (acetic acid) or water in your sample.


