IMPORTANT! - Murrplastik Systemtechnik
IMPORTANT! - Murrplastik Systemtechnik
IMPORTANT! - Murrplastik Systemtechnik

You also want an ePaper? Increase the reach of your titles
YUMPU automatically turns print PDFs into web optimized ePapers that Google loves.
Quick guide<br />
Initial start-up<br />
and<br />
driver installation/setup<br />
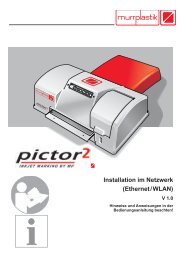
Pictor<br />
Inkjet printer for printing<br />
on<br />
polycarbonate (PC) plates
Status: 01.05.2012<br />
Device description<br />
The device in question is an inkjet-based labelling unit.<br />
The device is designed for use with special inks (do not<br />
use other types of ink!) and is to be used exclusively to<br />
print labels on plates made from polycarbonate (PC).<br />
Labels can be printed using both black and colour ink.<br />
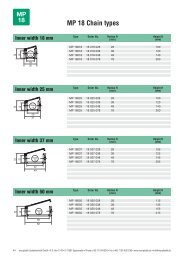
Technical data<br />
Power supply: 100 – 240 V AC universal<br />
Print area: Approx. A4, 4 aluminium base plates (2 x 2)<br />
Print speed: 30 sec. for 2 / 60 sec. for 4 base plates<br />
(including processing of print job)<br />
Interface: USB<br />
Colours: 7 colours / 7 cartridges + 1 gloss (empty)<br />
(cartridges are chip-coded; all must<br />
be installed, incl. empty cartridges)<br />
Print volume: Approx. 200,000 chars per cartridge<br />
(if font size set to 24 in ACS software)<br />
Print resolution: 720 dpi<br />
Nozzles per colour: 190<br />
Min. drop size: 1 pl (picolitre)<br />
Ink: Special solvent ink (eco solvent)<br />
Dimensions: 53 cm x 53 cm x 26 cm (all approx.)<br />
Weight: Approx. 30 kg<br />
<strong>Murrplastik</strong> <strong>Systemtechnik</strong> GmbH - Dieselstraße 10 - 71570 Oppenweiler - www.murrplastik.de<br />
2
Status: 01.05.2012<br />
Advantages<br />
� Labels can be printed at high speed<br />
� High resolution<br />
� Outstanding lettering quality<br />
� Photo quality<br />
� Simple to use<br />
<strong>Murrplastik</strong> <strong>Systemtechnik</strong> GmbH - Dieselstraße 10 - 71570 Oppenweiler - www.murrplastik.de<br />
3
Status: 01.05.2012<br />
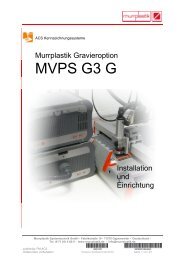
Device description<br />
Relevant device parts<br />
(7, 8)<br />
(2)<br />
(4) (5) (6)<br />
(7)<br />
(8)<br />
(1)<br />
(3)<br />
(1) Magazine cover<br />
(2) Tray<br />
(3) Drip tank for ink<br />
(4) Init key (connection)<br />
(5) Cleaning key<br />
(6) Mains power on/off<br />
(7) Mains power socket<br />
(8) USB port<br />
<strong>Murrplastik</strong> <strong>Systemtechnik</strong> GmbH - Dieselstraße 10 - 71570 Oppenweiler - www.murrplastik.de<br />
4
Status: 01.05.2012<br />
Scope of delivery<br />
The following are supplied with the unit:<br />
1. Mains power cable<br />
2. USB connection cable<br />
3. Seven colour cartridges<br />
Yellow/Magenta/Cyan/Matte Black/Photo Black/Red/Blue<br />
4. Seven cleaning cartridges<br />
Yellow/Magenta/Cyan/Matte Black/Photo Black/Red/Blue<br />
5. One empty gloss cartridge<br />
Optional accessories:<br />
GP3/GP4 etc. base plates, aluminium construction<br />
Two interchangeable plates<br />
(for more rapid population with label frames)<br />
<strong>Murrplastik</strong> <strong>Systemtechnik</strong> GmbH - Dieselstraße 10 - 71570 Oppenweiler - www.murrplastik.de<br />
5
Status: 01.05.2012<br />
Initial start-up<br />
Ensure you complete the following steps for initial<br />
start-up:<br />
1. Installing the ink cartridges<br />
2. Connecting the unit to the PC with a USB cable<br />
3. Switching on the unit<br />
4. Initialisation/activating the connection<br />
5. Driver installation<br />
6. Driver setup<br />
7. Adding the device in the ACS software<br />
8. Inserting the base plates<br />
9. Cleaning process (if necessary)<br />
Important!<br />
Please observe at any rate the notes<br />
on pages 21 and 22!<br />
<strong>Murrplastik</strong> <strong>Systemtechnik</strong> GmbH - Dieselstraße 10 - 71570 Oppenweiler - www.murrplastik.de<br />
6
Status: 01.05.2012<br />
Initial start-up<br />
1. Installing the ink cartridges: Step 1<br />
Using a pair of scissors, carefully cut open each of the ink<br />
cartridge pouches and remove the cartridges.<br />
CAUTION! Do not touch the chip on the front edge with<br />
your fingers.<br />
<strong>Murrplastik</strong> <strong>Systemtechnik</strong> GmbH - Dieselstraße 10 - 71570 Oppenweiler - www.murrplastik.de<br />
7
Status: 01.05.2012<br />
Initial start-up<br />
1. Installing the ink cartridges: Step 2<br />
Pull the yellow foil strip slowly to remove it from the<br />
cartridge. The cartridge's ventilation hole must be fully<br />
uncovered.<br />
CAUTION! Do not leave any foil residues<br />
covering the cartridge ventilation hole.<br />
R e m o v e any f o i l r e s i d u e s c a r e f u l l y.<br />
<strong>Murrplastik</strong> <strong>Systemtechnik</strong> GmbH - Dieselstraße 10 - 71570 Oppenweiler - www.murrplastik.de<br />
8
Initial start-up<br />
1. Installing the ink cartridges: Step 3<br />
Open the cartridge magazine cover.<br />
Now open the cartridge magazine<br />
cover guard.<br />
Remove the protective film.<br />
Now insert the cartridges<br />
in the order specified below.<br />
Then close the cover guard and<br />
the cover again.<br />
Installation order:<br />
Yellow – Magenta – Cyan – Matte Black – Photo Black – Red – Blue – Gloss<br />
Status: 01.05.2012<br />
<strong>Murrplastik</strong> <strong>Systemtechnik</strong> GmbH - Dieselstraße 10 - 71570 Oppenweiler - www.murrplastik.de<br />
9
Status: 01.05.2012<br />
Initial start-up<br />
2. Connecting up the unit<br />
Connect up the printer to your PC by plugging the USB cable<br />
supplied into the USB port on the left side of the unit.<br />
Power connection<br />
3. Switching on the unit<br />
USB<br />
Use the supplied power cord to plug the unit into a mains<br />
power socket.<br />
Set the mains power switch to position I (On).<br />
The power indicator light comes on.<br />
Power switch<br />
<strong>Murrplastik</strong> <strong>Systemtechnik</strong> GmbH - Dieselstraße 10 - 71570 Oppenweiler - www.murrplastik.de<br />
10
Status: 01.05.2012<br />
Initial start-up<br />
4. Initialisation/activating the connection<br />
Ensure that the tray is pushed into the unit as far as it will go.<br />
Now press the Init key for approx. 2 seconds. The LED on<br />
the Init key starts flashing and the tray is extended.<br />
Init key<br />
<strong>IMPORTANT</strong>!<br />
Do not start to push the tray back until the LED<br />
has stopped flashing.<br />
The connection to the PC is now activated and the device<br />
will be detected by Windows.<br />
If this is the initial start-up, then the driver can now be<br />
installed.<br />
If the driver is installed and the unit is set up, then the printer<br />
is ready for use.<br />
CAUTION!<br />
On each subsequent use of the printer, you must<br />
establish a connection with the computer by pressing<br />
the Init key (see above) after the unit is switched on.<br />
<strong>Murrplastik</strong> <strong>Systemtechnik</strong> GmbH - Dieselstraße 10 - 71570 Oppenweiler - www.murrplastik.de<br />
11
Status: 01.05.2012<br />
5. Driver installation (1)<br />
Drivers are supplied for use with 32-bit and 64-bit versions of<br />
Windows (German and English).<br />
Windows XP / Windows Vista / Windows 7<br />
The driver files for the various versions are supplied as selfextracting<br />
.EXE files:<br />
32-bit Windows 64-bit Windows<br />
epson324617eu.exe (German)<br />
epson12379.exe (English)<br />
Installing the corresponding driver<br />
epson324618eu.exe (German)<br />
epson12380.exe (English)<br />
Switch the printer on. Establish a connection (Init key).<br />
(Cancel the Windows Add Hardware Wizard if it starts!)<br />
Run the .EXE file for the appropriate driver<br />
Click on [Setup].<br />
The files will be<br />
extracted and Setup will<br />
execute.<br />
Now confirm the printer<br />
model by clicking [OK].<br />
<strong>Murrplastik</strong> <strong>Systemtechnik</strong> GmbH - Dieselstraße 10 - 71570 Oppenweiler - www.murrplastik.de<br />
12
Status: 01.05.2012<br />
5. Driver installation (2)<br />
Confirm the license agreement<br />
by clicking [Accept].<br />
Caution!<br />
If the connection cannot be<br />
established (the device is not<br />
automatically detected), then<br />
an appropriate error message<br />
will be displayed. If this<br />
happens, confirm that the<br />
device is switched on and that<br />
the Init key has been pressed.<br />
Also check the USB cable for<br />
possible damage.<br />
At this screen, confirm by<br />
clicking<br />
[Continue installation].<br />
<strong>Murrplastik</strong> <strong>Systemtechnik</strong> GmbH - Dieselstraße 10 - 71570 Oppenweiler - www.murrplastik.de<br />
13
Status: 01.05.2012<br />
5. Driver installation (2)<br />
The necessary driver<br />
files will now be<br />
copied.<br />
Following this,<br />
installation is<br />
complete.<br />
The unit is displayed in the Windows Printers and Faxes<br />
(Devices and Printers) list and can now be configured.<br />
<strong>Murrplastik</strong> <strong>Systemtechnik</strong> GmbH - Dieselstraße 10 - 71570 Oppenweiler - www.murrplastik.de<br />
14
Status: 01.05.2012<br />
6. Device setup (1)<br />
Windows<br />
Right-click the printer name and then select the command<br />
Printing preferences….<br />
<strong>Murrplastik</strong> <strong>Systemtechnik</strong> GmbH - Dieselstraße 10 - 71570 Oppenweiler - www.murrplastik.de<br />
15
Status: 01.05.2012<br />
6. Device setup (2)<br />
Windows (recommended settings)<br />
On the tab page Main, select the<br />
option Text & Image.<br />
This is the setting that controls the<br />
printing of high-quality text and<br />
graphics.<br />
Now click the button [Advanced]:<br />
on this screen, set colour<br />
management to ICM. Then set ICC<br />
Profile to Applied by Printer<br />
Software.<br />
Other options may of course<br />
be selected: select any<br />
settings as necessary to suit<br />
your requirements.<br />
The paper size is set to a<br />
length of 3100 by using<br />
Custom Paper Size.<br />
<strong>Murrplastik</strong> <strong>Systemtechnik</strong> GmbH - Dieselstraße 10 - 71570 Oppenweiler - www.murrplastik.de<br />
16
Status: 01.05.2012<br />
7. Device setup (3)<br />
Settings in the ACS software<br />
Start the ACS software and choose the command Output Device<br />
Setup from the Settings menu.<br />
Select the printer from the Output device list (A) and then<br />
click [Add]. The device is now added to the<br />
List of output devices (B).<br />
Now configure the following settings:<br />
Rows/Page = 2<br />
Frames/Row = 2<br />
Calibration point x = 30.0 (default, adjust as required)<br />
Calibration point y = -65.0 (default, adjust as required)<br />
Distance between frames vertical = 138.8<br />
<strong>Murrplastik</strong> <strong>Systemtechnik</strong> GmbH - Dieselstraße 10 - 71570 Oppenweiler - www.murrplastik.de<br />
17
Status: 01.05.2012<br />
8. Inserting the GPx base plates<br />
If the tray has been extended during initialisation, the base<br />
plates and material to be printed to can be inserted.<br />
If the tray has already been retracted, then (following<br />
correct initialisation) it can be manually extended and<br />
pushed back in manually at any time.<br />
The base plates (hard plastic/aluminium) are placed on the<br />
carriage plate. The label frames are then placed on these<br />
base plates. Now push the tray back into the unit<br />
COMPLETELY, i.e. as far as it will go.<br />
TOP<br />
<strong>Murrplastik</strong> <strong>Systemtechnik</strong> GmbH - Dieselstraße 10 - 71570 Oppenweiler - www.murrplastik.de<br />
18
Status: 01.05.2012<br />
9. Cleaning process<br />
If the quality of the printed lettering is poor, then you will<br />
need to run the printer cleaning process. On initial start-up,<br />
we also recommend running the cleaning process with<br />
inserted cartridges, so as to prime the printing system.<br />
1. Switch the unit on<br />
2. Initialise the unit<br />
3. Push the tray back in completely<br />
4. Press the Cleaning key for approx. 2 seconds<br />
5. The cleaning process starts<br />
Cleaning key<br />
If you need to run the cleaning process several times in<br />
sequence, then you can use the supplied cleaning<br />
cartridges when running the cleaning process. This involves<br />
replacing the individual ink cartridges with the matching<br />
cleaning cartridges.<br />
Note, however, that the last cleaning process must always<br />
be run using the normal ink cartridges, in order to prime the<br />
print head with ink.<br />
<strong>Murrplastik</strong> <strong>Systemtechnik</strong> GmbH - Dieselstraße 10 - 71570 Oppenweiler - www.murrplastik.de<br />
19
Status: 01.05.2012<br />
Note!<br />
The EPSON Status Monitor window appears briefly<br />
during printing. This merely indicates that the print<br />
job was sent to the printer successfully.<br />
<strong>Murrplastik</strong> <strong>Systemtechnik</strong> GmbH - Dieselstraße 10 - 71570 Oppenweiler - www.murrplastik.de<br />
20
Status: 01.05.2012<br />
Please observe imperatively!<br />
1. Please make sure that the air vent at each cartridge is<br />
completely free. If in doubt please check with a pointed<br />
object! If the vent is not free the ink cannot flow properly.<br />
It looks as if both<br />
vents are free.<br />
The right vent is free. The left vent is still<br />
covered with foil.<br />
Here you can really see the difference.<br />
<strong>Murrplastik</strong> <strong>Systemtechnik</strong> GmbH - Dieselstraße 10 - D-71570 Oppenweiler - www.murrplastik.de<br />
21
Status: 01.05.2012<br />
Please observe imperatively!<br />
2. When installing the driver make sure that you install the<br />
correct driver corresponding to the installed Windows<br />
version – 32 resp. 64 bit.<br />
3. Before you start printing make sure that the carrier plate is<br />
pushed back completely into the device.<br />
4. You cannot send two or more print jobs successively. This<br />
would result in a media error.<br />
5. The notice on the inside of the cartridge flap (yellow label) is<br />
to be considered as follows:<br />
If the device should not be used longer than 48 hours, please<br />
switch off the printer and remove the ink cartridges. Then<br />
insert the cleaner cartridges instead and leave the equipment<br />
switched off. Remove the cleaner cartridges BEFORE the<br />
next use while the device is switched off. After that insert the<br />
ink cartridges again. Then the printer is ready for use.<br />
<strong>Murrplastik</strong> <strong>Systemtechnik</strong> GmbH - Dieselstraße 10 - D-71570 Oppenweiler - www.murrplastik.de<br />
22
Material numbers<br />
86625010 Pictor, Inkjet labelling system<br />
Ink and cleaner cartridges for Pictor<br />
86625021 Yellow ink<br />
86625022 Magenta ink<br />
86625023 Cyan ink<br />
86625024 Matte black ink<br />
86625025 Photo black ink<br />
86625026 Red ink<br />
86625027 Blue ink<br />
86625028 Gloss (empty)<br />
86625031 Yellow cleaning liquid<br />
86625032 Magenta cleaning liquid<br />
86625033 Cyan cleaning liquid<br />
86625034 Matte black cleaning liquid<br />
86625035 Photo black cleaning liquid<br />
86625036 Red cleaning liquid<br />
86625037 Blue cleaning liquid<br />
Cleaning liquids are clear fluids. The name of the colour refers<br />
only to the position in the cartridge depot.