Create A Burnt Edge Effect - Advanced Technology Support, Inc.
Create A Burnt Edge Effect - Advanced Technology Support, Inc.
Create A Burnt Edge Effect - Advanced Technology Support, Inc.

You also want an ePaper? Increase the reach of your titles
YUMPU automatically turns print PDFs into web optimized ePapers that Google loves.
Photoshop Tutorial: <strong>Create</strong> A <strong>Burnt</strong> <strong>Edge</strong> <strong>Effect</strong><br />
By Steve Patterson, Photoshop Essentials.com<br />
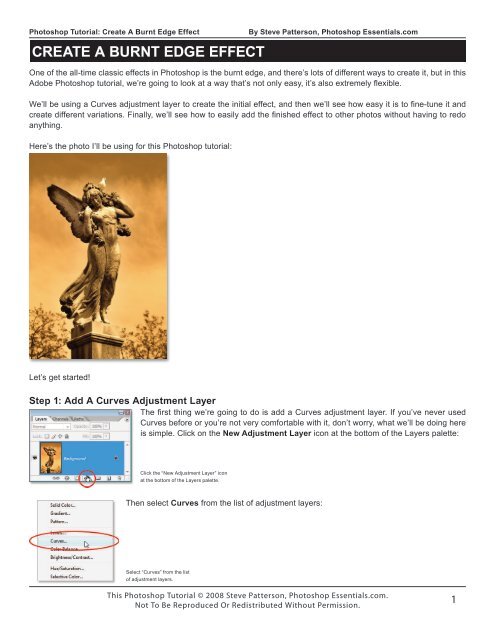
CREATE A BURNT EDGE EFFECT<br />
One of the all-time classic effects in Photoshop is the burnt edge, and there’s lots of different ways to create it, but in this<br />
Adobe Photoshop tutorial, we’re going to look at a way that’s not only easy, it’s also extremely flexible.<br />
We’ll be using a Curves adjustment layer to create the initial effect, and then we’ll see how easy it is to fine-tune it and<br />
create different variations. Finally, we’ll see how to easily add the finished effect to other photos without having to redo<br />
anything.<br />
Here’s the photo I’ll be using for this Photoshop tutorial:<br />
Let’s get started!<br />
Step 1: Add A Curves Adjustment Layer<br />
The first thing we’re going to do is add a Curves adjustment layer. If you’ve never used<br />
Curves before or you’re not very comfortable with it, don’t worry, what we’ll be doing here<br />
is simple. Click on the New Adjustment Layer icon at the bottom of the Layers palette:<br />
Click the “New Adjustment Layer” icon<br />
at the bottom of the Layers palette.<br />
Then select Curves from the list of adjustment layers:<br />
Select “Curves” from the list<br />
of adjustment layers.<br />
This Photoshop Tutorial © 2008 Steve Patterson, Photoshop Essentials.com.<br />
Not To Be Reproduced Or Redistributed Without Permission.<br />
1
Photoshop Tutorial: <strong>Create</strong> A <strong>Burnt</strong> <strong>Edge</strong> <strong>Effect</strong><br />
By Steve Patterson, Photoshop Essentials.com<br />
This brings up the Curves dialog box. As I mentioned, if you’re not familiar or comfortable<br />
with using Curves yet, don’t worry. We just need to do one simple thing here. See that little<br />
square in the top right corner that I’ve circled in red? All we’re going to be doing is moving<br />
it:<br />
The “Curves” dialog box in Photoshop.<br />
Step 2: Drag The White Point Marker Straight Down<br />
With the Curves dialog box open, grab the white point marker in the top right corner (it’s<br />
the little square I circled on the previous page) and simply drag it straight down, almost<br />
to the bottom, until the Output option in the bottom left corner (also circled in red below)<br />
reads somewhere between 10 and 20:<br />
Drag the white point marker straight<br />
down until the “Output” reads<br />
somewhere between 10 and 20.<br />
This is going to make your image appear to be darkened almost to the point where it becomes black:<br />
The image now appears darkened<br />
almost to solid black.<br />
Step 3: <strong>Create</strong> A Border Area With The Rectangular Marquee Tool<br />
Next, grab the Rectangular Marquee Tool from the Tools palette or press M to quickly select it:<br />
Select the “Rectangular<br />
Marquee Tool”.<br />
With the Rectangular Marquee Tool, drag out a selection inside the image to create a border area around the edges (next<br />
page):<br />
This Photoshop Tutorial © 2008 Steve Patterson, Photoshop Essentials.com.<br />
Not To Be Reproduced Or Redistributed Without Permission.<br />
2
Photoshop Tutorial: <strong>Create</strong> A <strong>Burnt</strong> <strong>Edge</strong> <strong>Effect</strong><br />
By Steve Patterson, Photoshop Essentials.com<br />
Drag out a selection inside<br />
the image to create a border<br />
area around the edges.<br />
Step 4: Fill The Selection With Black On The Curves Layer Mask<br />
Click on the layer mask thumbnail for the Curves adjustment layer in the Layers palette to<br />
select it:<br />
Click on the Curves layer<br />
mask thumbnail to select it<br />
in the Layers palette.<br />
Make sure black is your foreground color, then press Alt-Backspace (Win) / Option-<br />
Delete (Mac) to fill the selected area with black. This will hide the Curves adjustment<br />
layer in the area of the image that was inside the selection, leaving only the border area<br />
around it dark:<br />
Only the border area around<br />
the edges is now affected by<br />
the Curves adjustment layer.<br />
The layer mask thumbnail in the Layers palette now appears black with a white border<br />
around it:<br />
The layer mask thumbnail now appears black in the center with a white border around it.<br />
This Photoshop Tutorial © 2008 Steve Patterson, Photoshop Essentials.com.<br />
Not To Be Reproduced Or Redistributed Without Permission.<br />
3
Photoshop Tutorial: <strong>Create</strong> A <strong>Burnt</strong> <strong>Edge</strong> <strong>Effect</strong><br />
By Steve Patterson, Photoshop Essentials.com<br />
Step 5: Apply The Gaussian Blur Filter To The Layer Mask<br />
We need to soften the border edges, and we’re going to use the Gaussian Blur filter<br />
for that, which will give us a nice preview of what we’re doing. With the Curves layer<br />
mask still selected in the Layers palette, go up to the Filter menu at the top of the<br />
screen, select Blur, and then select Gaussian Blur. This brings up the Gaussian<br />
Blur dialog box. Drag the slider bar at the bottom to increase or decrease the amount<br />
of blurring until you’ve softened the border edges to your liking. Keep an eye on the<br />
image for a preview of what you’re doing. I’ve set my Radius value to about 25<br />
pixels here:<br />
Use the slider bar at the bottom<br />
to adjust the blurring amount<br />
and soften the border edges.<br />
And here’s how my image looks:<br />
The dark edges are now softened.<br />
Step 6: Use Free Transform To Resize The Layer Mask If<br />
Needed<br />
I mentioned at the beginning of this tutorial that we’re creating this effect in<br />
a way that’s very flexible, and one of the reasons it’s so flexible is because<br />
we can resize the edges around the image if needed simply by resizing the<br />
layer mask using Photoshop’s Free Transform command. To do that, with<br />
the Curves adjustment layer selected in the Layers palette, simply use the<br />
keyboard shortcut Ctrl+T (Win) / Command+T (Mac) to bring up the Free<br />
Transform box and handles, and then drag any of the handles in or out to<br />
resize the mask, which resizes the edge effect around the image:<br />
Hold down Shift+Alt (Win) / Shift+Option (Mac) while dragging any of the<br />
corner handles to resize the mask from the center and maintain the same<br />
proportions.<br />
Resize the edges around the image if needed by resizing the layer mask with the “Free Transform” command.<br />
This Photoshop Tutorial © 2008 Steve Patterson, Photoshop Essentials.com.<br />
Not To Be Reproduced Or Redistributed Without Permission.<br />
4
Photoshop Tutorial: <strong>Create</strong> A <strong>Burnt</strong> <strong>Edge</strong> <strong>Effect</strong><br />
By Steve Patterson, Photoshop Essentials.com<br />
Step 7: Lower The Opacity Of The Curves Adjustment Layer If Needed<br />
Another reason this method is so flexible is that we can reduce the amount of darkening<br />
around the edges if we need to simply by lowering the opacity of the Curves adjustment<br />
layer. To do that, with the Curves adjustment layer selected, go up to the Opacity option in<br />
the top right corner of the Layers palette, hover your mouse directly over the word “Opacity”<br />
which turns your mouse cursor into Photoshop’s “scrubby sliders” icon, and then drag your<br />
mouse to the left. As you drag, you’ll be lowering the opacity and lightening the edges. I’ve<br />
lowered mine to 60% here:<br />
Lower the opacity of the Curves adjustment layer to lighten the edges if needed.<br />
This gives me a more subtle edge darkening effect:<br />
The edge darkening is now more subtle.<br />
We’ll look at a couple of other easy variations on the effect next.<br />
Step 8: Change The Layer Blend Mode For Different Variations<br />
You can also change the blend mode of the Curves adjustment layer for different variations<br />
on the effect. To do that, simply go up to the blend mode options in the top left corner of<br />
the Layers palette, click on the down-pointing arrow to the right of the word “Normal” and<br />
select a different blend mode from the list. Here’s the effect with the Curves adjustment<br />
layer set to Overlay (I’ve set my Opacity value back to 100%):<br />
The Curves adjustment layer set to the “Overlay” blend mode.<br />
This gives me dark, saturated colors around the edges (next page):<br />
This Photoshop Tutorial © 2008 Steve Patterson, Photoshop Essentials.com.<br />
Not To Be Reproduced Or Redistributed Without Permission.<br />
5
Photoshop Tutorial: <strong>Create</strong> A <strong>Burnt</strong> <strong>Edge</strong> <strong>Effect</strong><br />
By Steve Patterson, Photoshop Essentials.com<br />
The edges now have dark, saturated colors.<br />
Here’s another variation, this time with the blend mode set to Color:<br />
The Curves adjustment layer set to the “Color” blend mode.<br />
Despite the name, the “Color” blend mode actually removes all the color from the<br />
edges, leaving them black and white, with the color fading in towards the center of<br />
the photo:<br />
Finally, let’s see how to now use this Curves adjustment layer to quickly add the<br />
exact same effect to a different photo. We’ll do that next.<br />
The edges are now black and white, with<br />
the color fading in towards the center.<br />
This Photoshop Tutorial © 2008 Steve Patterson, Photoshop Essentials.com.<br />
Not To Be Reproduced Or Redistributed Without Permission.<br />
6
Photoshop Tutorial: <strong>Create</strong> A <strong>Burnt</strong> <strong>Edge</strong> <strong>Effect</strong><br />
By Steve Patterson, Photoshop Essentials.com<br />
Step 9: Open Another Image You Want To Add The <strong>Burnt</strong>-In <strong>Edge</strong> <strong>Effect</strong> To<br />
Let’s look at how easy it is now to add our finished effect to another image without having<br />
to redo any of the steps. Before we do, I’m just going to reset my layer blend mode back to<br />
“Normal”. You don’t have to do this if you prefer one of the other blend modes. I just want<br />
to set mine back to the original effect:<br />
The layer blend mode is now<br />
set back to “Normal”.<br />
Now that I’ve done that, I’m going to open a second image that I want to apply this effect to, so I end up with two document<br />
windows on my screen:<br />
A second image now opened on the screen along with the original.<br />
Step 10: Drag The Curves Adjustment Layer Over To The Second Image<br />
All we need to do in order to create the same effect in the second<br />
image is to copy the Curves adjustment layer from our original<br />
image over to the second one. To do that, first click on the original<br />
image’s Document Window to select it. Then, grab the Move tool<br />
either from the Tools palette or by pressing V on your keyboard.<br />
With the Curves adjustment layer selected in the Layers palette,<br />
click anywhere inside the original image’s Document Window and<br />
drag your mouse into the second image. You won’t be dragging the<br />
first image onto the second. Instead, you’ll be dragging the Curves<br />
adjustment layer onto the second image. Hold down your Shift<br />
key just before releasing your mouse to automatically center the<br />
adjustment layer onto the second image:<br />
With both images open, drag the Curves adjustment<br />
layer from the original image onto the second one.<br />
This Photoshop Tutorial © 2008 Steve Patterson, Photoshop Essentials.com.<br />
Not To Be Reproduced Or Redistributed Without Permission.<br />
7
Photoshop Tutorial: <strong>Create</strong> A <strong>Burnt</strong> <strong>Edge</strong> <strong>Effect</strong><br />
And instantly, the effect is recreated on the second image with no effort at all:<br />
By Steve Patterson, Photoshop Essentials.com<br />
The effect is instantly added to the second image.<br />
You can then change the blend mode, resize the layer mask, or lower the opacity to your liking.<br />
And there we have it! That’s how easy it is to create this classic “burnt-in edge” effect in Photoshop, fine-tune it, create<br />
different variations using different layer blend modes, and then add the same effect to another image instantly!<br />
For more Adobe Photoshop tutorials, visit Photoshop Essentials.com @ www.photoshopessentials.com!<br />
This Photoshop Tutorial © 2008 Steve Patterson, Photoshop Essentials.com.<br />
Not To Be Reproduced Or Redistributed Without Permission.<br />
8