Combining Reality With A Rotoscope-Style Painting In Photoshop
Combining Reality With A Rotoscope-Style Painting In Photoshop
Combining Reality With A Rotoscope-Style Painting In Photoshop

Create successful ePaper yourself
Turn your PDF publications into a flip-book with our unique Google optimized e-Paper software.
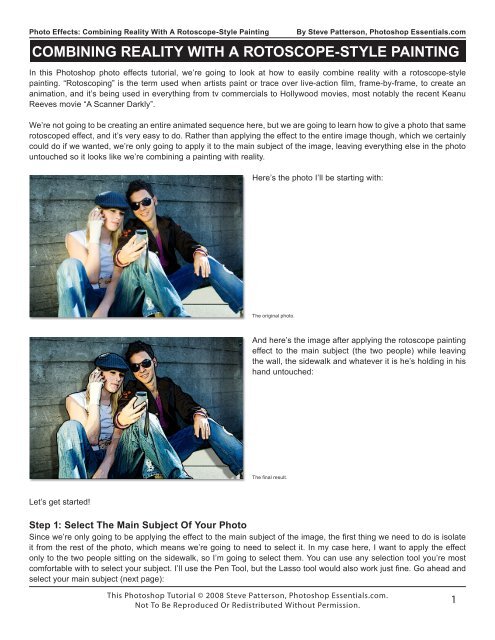
Photo Effects: <strong>Combining</strong> <strong>Reality</strong> <strong>With</strong> A <strong>Rotoscope</strong>-<strong>Style</strong> <strong>Painting</strong>By Steve Patterson, <strong>Photoshop</strong> Essentials.comCOMBINING REALity with a rotoscope-style painting<strong>In</strong> this <strong>Photoshop</strong> photo effects tutorial, we’re going to look at how to easily combine reality with a rotoscope-stylepainting. “Rotoscoping” is the term used when artists paint or trace over live-action film, frame-by-frame, to create ananimation, and it’s being used in everything from tv commercials to Hollywood movies, most notably the recent KeanuReeves movie “A Scanner Darkly”.We’re not going to be creating an entire animated sequence here, but we are going to learn how to give a photo that samerotoscoped effect, and it’s very easy to do. Rather than applying the effect to the entire image though, which we certainlycould do if we wanted, we’re only going to apply it to the main subject of the image, leaving everything else in the photountouched so it looks like we’re combining a painting with reality.Here’s the photo I’ll be starting with:The original photo.And here’s the image after applying the rotoscope paintingeffect to the main subject (the two people) while leavingthe wall, the sidewalk and whatever it is he’s holding in hishand untouched:The final result.Let’s get started!Step 1: Select The Main Subject Of Your PhotoSince we’re only going to be applying the effect to the main subject of the image, the first thing we need to do is isolateit from the rest of the photo, which means we’re going to need to select it. <strong>In</strong> my case here, I want to apply the effectonly to the two people sitting on the sidewalk, so I’m going to select them. You can use any selection tool you’re mostcomfortable with to select your subject. I’ll use the Pen Tool, but the Lasso tool would also work just fine. Go ahead andselect your main subject (next page):This <strong>Photoshop</strong> Tutorial © 2008 Steve Patterson, <strong>Photoshop</strong> Essentials.com.Not To Be Reproduced Or Redistributed <strong>With</strong>out Permission.1
Photo Effects: <strong>Combining</strong> <strong>Reality</strong> <strong>With</strong> A <strong>Rotoscope</strong>-<strong>Style</strong> <strong>Painting</strong>By Steve Patterson, <strong>Photoshop</strong> Essentials.comNotice that I’ve selected around whatever it is the guy isholding in his hand, since I don’t want the painting effect tobe applied to it.Use the selection tool of your choice toselect the main subject of your image.Step 2: Copy The Selection To A New Layer<strong>With</strong> the main subject selected, use the keyboard shortcut Ctrl+J (Win) / Command+J (Mac)to copy the selection onto a new layer above the Background layer. You won’t see anythinghappen in your document window, but if you look in your Layers palette, you’ll see that yourselection has been copied to a new layer which <strong>Photoshop</strong> has automatically named “Layer1”:Press “Ctrl+J” (Win) / “Command+J” (Mac)to copy the selection to a new layer.Step 3: Apply The “Poster Edges” Filter To The New Layer<strong>With</strong> “Layer 1” selected in the Layers palette, go up to the Filter menu at the top of the screen, choose Artistic, andthen choose Poster Edges. This brings up <strong>Photoshop</strong>’s Filter Gallery set to the “Poster Edges” filter options on the right(circled in red):Go to Filter > Artistic > Poster Edges to bringup <strong>Photoshop</strong>’s “Filter Gallery” set to the“Poster Edges” options on the far right.Keep an eye on the large preview area on the left to see what’s happening to your image as you adjust the Poster Edgesoptions. For my image, I’ve set Edge Thickness and Edge <strong>In</strong>tensity both to 1, and Posterization to 2. These settings workbest for this image, but feel free to experiment with the options yourself to see if other settings work better for your image.The object is to make the subject look less like an actual photo and more like a painting. The main option here is the thirdone, “Posterization”, which determines how many different shades of color your image will contain. Lower values tend towork best.This <strong>Photoshop</strong> Tutorial © 2008 Steve Patterson, <strong>Photoshop</strong> Essentials.com.Not To Be Reproduced Or Redistributed <strong>With</strong>out Permission.2
Photo Effects: <strong>Combining</strong> <strong>Reality</strong> <strong>With</strong> A <strong>Rotoscope</strong>-<strong>Style</strong> <strong>Painting</strong>By Steve Patterson, <strong>Photoshop</strong> Essentials.comClick OK when you’re happy with the results to exit out ofthe Filter Gallery. Here’s my image after applying the filter:The image after applying the “PosterEdges” filter to the main subject.Step 4: Add A Black Stroke Around The Main SubjectWe’re going to enhance the effect a little by adding a black stroke around the main subject. <strong>With</strong>“Layer 1” still selected, click on the Layer <strong>Style</strong>s icon at the bottom of the Layers palette:Click the “Layer <strong>Style</strong>s” icon at thebottom of the Layers palette.The choose Stroke from the bottom of the list of Layer <strong>Style</strong>s that appears:Click on “Stroke” at the bottom of thelist of Layer <strong>Style</strong>s to select it.This brings up the Layer <strong>Style</strong> dialog box set to the Stroke options in the middlecolumn. <strong>Photoshop</strong> always sets the default color of the stroke to red (which makesno sense at all). We want our stroke color to be black, so to change it, click on thecolor swatch to the right of the word “Color”:Click on the color swatch tochange the stroke’s color.<strong>Photoshop</strong>’s Color Picker will appear. Click in the bottom left corner of the large square area on the left to select black.You’ll know you’ve selected pure black because the values for the “R”, “G”, and “B” options on the right will all read “0”(next page):This <strong>Photoshop</strong> Tutorial © 2008 Steve Patterson, <strong>Photoshop</strong> Essentials.com.Not To Be Reproduced Or Redistributed <strong>With</strong>out Permission.3
Photo Effects: <strong>Combining</strong> <strong>Reality</strong> <strong>With</strong> A <strong>Rotoscope</strong>-<strong>Style</strong> <strong>Painting</strong>By Steve Patterson, <strong>Photoshop</strong> Essentials.comSelect black for the stroke color by clicking in thebottom left corner of the large square area.Click OK to exit out of the Color Picker. Then, back in the Stroke options in theLayer <strong>Style</strong> dialog box, set the stroke Size at the top to somewhere between 2-4pixels depending on the size of your image. I’ve left mine set to the default of 3pixels. Then change the stroke Position to Center by clicking on the down-pointingarrow and choosing “Center” from the list:Change the “Size” of your stroke to somewhere between2-4 pixels, then change the “Position” to “Center”.After adding the black stroke around your subject (the twopeople in my photo), your image should now look somethinglike this:Don’t click out of the Layer <strong>Style</strong> dialog box yet. We haveone more effect to add.The image after applying the black stroke around themain subject to enhance the rotoscope “tracing” effect.Step 5: Add A Drop Shadow<strong>With</strong> the Layer <strong>Style</strong> dialog box still open, click directly on the words Drop Shadow on the left of theLayer <strong>Style</strong> dialog box. Make sure you click directly on the words and don’t simply click inside thecheckbox. We want access to the Drop Shadow options, and for that, you need to click directly onthe words:Click on the words “Drop Shadow” on theleft of the Layer <strong>Style</strong> dialog box.The middle column of the Layer <strong>Style</strong> dialog box will change to show the Drop Shadow options. The first thing we want todo here is lower the Opacity of the drop shadow down to around 40% so it’s not so dark and intense. Then, increase theshadow Distance by dragging the slider to the right. Keep an eye on your image to see how far your shadow is extendingoutward from your subject as you drag the slider. I’ve increased my shadow distance to 30 pixels. Depending on the sizeThis <strong>Photoshop</strong> Tutorial © 2008 Steve Patterson, <strong>Photoshop</strong> Essentials.com.Not To Be Reproduced Or Redistributed <strong>With</strong>out Permission.4
Photo Effects: <strong>Combining</strong> <strong>Reality</strong> <strong>With</strong> A <strong>Rotoscope</strong>-<strong>Style</strong> <strong>Painting</strong>of your image, you may want to set yours higher:By Steve Patterson, <strong>Photoshop</strong> Essentials.comLower the drop shadow opacity andincrease the shadow distance.Here’s my image after adding the drop shadow:The image after applying the drop shadow.Step 6: Clean Up Any Unwanted Shadow Areas If NeededThe image is looking good except for one thing. If you recall from the beginning of the tutorial, I pointed out that the guyin the photo is holding something in his hand, and because I only wanted the rotoscope painting effect to be applied tothe two people in the image, I made sure that whatever it is he’s holding wasn’t included in my initial selection so thatit wouldn’t be affected. Problem is, the drop shadow I just applied is extending over top it, as well as the strap danglingbelow it, and it doesn’t look right. I need to clean that up.Go to Layer > Layer <strong>Style</strong> > Create Layers toconvert layer styles into normal layers.To clean up the drop shadow, I’m going to use the Eraser tool, but before I can use it on a layer style,I need to convert the layer style into a normal layer. To do that, I’m going to go up to the Layer menuat the top of the screen, then I’ll choose Layer <strong>Style</strong>, and then Create Layers:If I look in my Layers palette, I can see that both the stroke and the drop shadow have beenplaced on their own layers, with the stroke appearing above “Layer 1” and the drop shadowappearing below it. I’m going to click on the Drop Shadow layer to select it:Both the Stroke and the Drop Shadow havebeen converted into normal layers.Then I’m going to grab my Eraser tool from the Tools palette:Select the Eraser tool fromthe Tools palette.This <strong>Photoshop</strong> Tutorial © 2008 Steve Patterson, <strong>Photoshop</strong> Essentials.com.Not To Be Reproduced Or Redistributed <strong>With</strong>out Permission.5
Photo Effects: <strong>Combining</strong> <strong>Reality</strong> <strong>With</strong> A <strong>Rotoscope</strong>-<strong>Style</strong> <strong>Painting</strong>By Steve Patterson, <strong>Photoshop</strong> Essentials.comI could also press the letter E on my keyboard to quickly select it. Then, with the Erasertool in hand and my drop shadow layer style now converted into a normal layer, allI need to do is click and drag my mouse over the areas where I want to remove thedrop shadow, which in my case is over the item the guy is holding, including the straphanging from it:Use the Eraser tool to remove the dropshadow from any unwanted areas.Once I’m done erasing away the drop shadow, the effect is complete! Here is the final “rotoscoped painting combinedwith reality” effect:The final result.And there we have it!For more Adobe <strong>Photoshop</strong> tutorials, visit <strong>Photoshop</strong> Essentials.com @ www.photoshopessentials.com!This <strong>Photoshop</strong> Tutorial © 2008 Steve Patterson, <strong>Photoshop</strong> Essentials.com.Not To Be Reproduced Or Redistributed <strong>With</strong>out Permission.6