

Vec012 Manual (Target) 11/02
Vec012 Manual (Target) 11/02
Vec012 Manual (Target) 11/02

You also want an ePaper? Increase the reach of your titles
YUMPU automatically turns print PDFs into web optimized ePapers that Google loves.
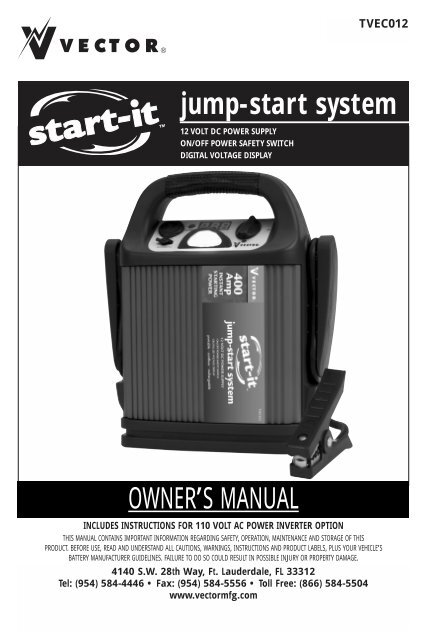
TVEC012<br />
V E C T O R ®<br />
jump-start system<br />
12 VOLT DC POWER SUPPLY<br />
ON/OFF POWER SAFETY SWITCH<br />
DIGITAL VOLTAGE DISPLAY<br />
OWNER’S MANUAL<br />
INCLUDES INSTRUCTIONS FOR <strong>11</strong>0 VOLT AC POWER INVERTER OPTION<br />
THIS MANUAL CONTAINS IMPORTANT INFORMATION REGARDING SAFETY, OPERATION, MAINTENANCE AND STORAGE OF THIS<br />
PRODUCT. BEFORE USE, READ AND UNDERSTAND ALL CAUTIONS, WARNINGS, INSTRUCTIONS AND PRODUCT LABELS, PLUS YOUR VEHICLE’S<br />
BATTERY MANUFACTURER GUIDELINES. FAILURE TO DO SO COULD RESULT IN POSSIBLE INJURY OR PROPERTY DAMAGE.<br />
4140 S.W. 28th Way, Ft. Lauderdale, FL 33312<br />
Tel: (954) 584-4446 • Fax: (954) 584-5556 • Toll Free: (866) 584-5504<br />
www.vectormfg.com
JUMP-START WARNINGS AND CAUTIONS<br />
1. There is risk of explosive gas being released when batteries are improperly charged or discharged.<br />
Failure to follow instructions may cause property damage, explosion hazard and/or personal injury.<br />
2. Do not smoke while jump-starting.<br />
3. Only attempt to jump-start a vehicle or boat in a well ventilated area.<br />
4. This power system is to be used ONLY on vehicles or boats with 12 volt DC battery systems.<br />
5. Do not wear vinyl clothing when jump-starting a vehicle - friction can cause dangerous static<br />
electricity sparks.<br />
6. Remove all metal jewelry - this can cause short circuits. Always use protective eye wear when<br />
jump-starting: contact with battery acid may cause blindness and/or severe burns.<br />
7. Do not attempt to jump-start a frozen battery.<br />
8. Keep out of reach of children.<br />
9. Vehicles that have on-board computerized systems may be damaged if vehicle battery is jump-started.<br />
Before jump-starting this type of vehicle, read the vehicle’s owner manual to confirm that external<br />
starting assistance is advised.<br />
10. Excessive engine cranking can damage the vehicle’s starter motor. If the engine fails to start after<br />
the recommended number of attempts, discontinue jump-start procedure and look for other<br />
problems that may need to be corrected.<br />
<strong>11</strong>. If vehicle to be started has a Negative Grounded System (negative battery terminal is connected to<br />
chassis):<br />
A. Connect positive (POS) (+) red clamp to vehicle battery’s POS (+) terminal.<br />
B. Connect negative (-) black clamp to vehicle chassis or a solid, non-moving, metal vehicle<br />
component or body part. DO NOT clamp directly to positive battery terminal or moving part.<br />
If vehicle to be started has a Positive Grounded System (positive battery terminal is connected<br />
to chassis): Replace steps <strong>11</strong>A and <strong>11</strong>B (above) of the jump-start procedure with the following<br />
steps A and B, and then proceed to step <strong>11</strong>.<br />
A. Connect negative (-) black clamp to vehicle battery’s negative terminal.<br />
B. Connect positive (+) red clamp to vehicle chassis or a solid, non-moving, metal vehicle<br />
component or body part.<br />
DO NOT clamp directly to positive battery terminal or moving part.<br />
12. IF YOU HEAR AN AUDIBLE ALARM AND SEE THE RED LED LIGHT - DO NOT TURN ON THE<br />
SAFETY SWITCH - THE POLARITY IS REVERSED. INTERCHANGE CLAMP POSITIONS.<br />
13. Replace worn or defective parts immediately - contact Vector Technical Support Department at<br />
(954) 584-4446 or toll free at 866-584-5504.<br />
14. Skin: if battery acid comes in contact with skin, rinse immediately with water, then wash thoroughly<br />
with soap and water. If redness, pain, or irritation occurs, seek immediate medical attention.<br />
15. Eyes: if battery acid comes in contact with eyes, flush eyes immediately for a minimum of 15<br />
minutes, seek immediate medical attention.<br />
GENERAL WARNINGS<br />
• NEVER immerse Start-It in water - it is water-resistant, not waterproof.<br />
• When recharging the unit near water (pool, dockside, beach, etc.) do not allow the electrical<br />
cords and outlets to get wet or come near water — electrical shock could result! Use GFCI AC<br />
receptacles.<br />
• Jump-starter is NOT designed to be used instead of a vehicular battery.<br />
• NEVER insert anything other than the supplied power/recharging cables or recommended<br />
appliance power/recharging cables into the charging/power sockets on this unit.<br />
ALL WIRES, CABLES AND CORDS MUST BE POSITIONED SO THAT THEY CANNOT BE TRIPPED<br />
OVER OR DAMAGED BY MOVING PARTS, BY PINCHING OR ABRADING.
TWO YEAR LIMITED WARRANTY REGISTRATION FORM<br />
This limited warranty program is the only one that applies to this product, and it sets forth all the responsibilities of<br />
Vector Manufacturing, Ltd., regarding this product. There is no other warranty, other than those described herein.<br />
This Vector Manufacturing, Ltd. product is warranted, to the original purchaser only, to be free of defects in<br />
materials and workmanship for two years from the date of purchase without additional charge. The warranty does<br />
not extend to subsequent purchasers or users. Vector Manufacturing, Ltd. will not be responsible for any amount of<br />
damage in excess of the retail purchase price of the product under any circumstances. Incidental and consequential<br />
damages are specifically excluded from coverage under this warranty.<br />
This product is not intended for commercial use. This warranty does not apply to accessories or damage to units from<br />
misuse or incorrect installation. Misuse includes wiring or connecting to improper polarity power sources.<br />
RETURN/REPAIR POLICY: Defective products, other than accessories, may be returned postage<br />
prepaid to Vector Manufacturing. Any defective product, other than accessories, that is returned to Vector<br />
Manufacturing within 30 days of the date of purchase, will be replaced free of charge. If such a product is returned<br />
more than 30 days, but less than two years, from the purchase date, Vector Manufacturing will repair the unit or, at<br />
its option, replace it free of charge. If the unit is repaired, new or reconditioned replacement parts may be used, at<br />
Vector Manufacturing’s option. A unit may be replaced with a new or reconditioned unit of the same or comparable<br />
design. The repaired or replaced unit will then be warranted under the terms of the remainder of the warranty period.<br />
The customer is responsible for the shipping charges on all returned items after 30 days. During the warranty<br />
period, Vector Manufacturing, Ltd. will be responsible for the return shipping charges.<br />
LIMITATIONS: This warranty does not cover accessories, bulbs, fuses and batteries, defects resulting from normal wear<br />
and tear (including chips, scratches, abrasions, discoloration or fading due to usage or exposure to sunlight),<br />
accidents, damage during shipping to our service facility, alterations, unauthorized use or repair, neglect, misuse,<br />
abuse, failure to follow instructions for care and maintenance, fire, flood and Acts of God.<br />
If your problem is not covered by this warranty, call our Technical Support Department at (954) 584-4446<br />
or toll free at 866-584-5504 for general repair information and charges if applicable. You may also contact us<br />
through our website at www.vectormfg.com.<br />
STATE LAW RIGHTS: This warranty gives you specific legal rights. Some states do not allow limitations on how long<br />
an implied warranty lasts or the exclusion or limitation of incidental or consequential damages, so the exclusions or<br />
limitations stated herein may not apply. This warranty gives the purchaser specific legal rights; other rights, which<br />
vary from state to state, may apply.<br />
TO REQUEST WARRANTY SERVICE FOR THIS PRODUCT: Contact Vector Manufacturing Technical Support by telephone,<br />
fax or mail. We suggest that you keep the original packaging in case you need to ship the unit. When<br />
returning a product, include your name, address, phone number, dated sales receipt (or copy) and a description of<br />
the reason for return and product serial number. After repairing or replacing the unit, we will make every effort to<br />
return it to you within four weeks.<br />
WARRANTY ACTIVATION: Please complete Warranty Activation Card and mail to Vector Manufacturing. Enter<br />
“TVEC012” as Model. All Vector Manufacturing, Ltd. products must be registered within (30) days of purchase to<br />
activate this warranty. Mail the completed registration form, along with a copy of the original sales receipt to:<br />
ATTN.: CUSTOMER SERVICE / VECTOR MANUFACTURING, Ltd.<br />
4140 SW 28th Way, Ft. Lauderdale, FL 33312<br />
PH: 954-584-4446 • TOLL FREE: 866-584-5504 • Fax: 954-584-5556.<br />
You may also contact us at our web site www.vectormfg.com<br />
Please activate my Limited Warranty for Model TVEC012<br />
I have enclosed a copy of the original sales receipt.<br />
V E C T O R ®<br />
Name . . . . . . . . . . . . . . . . . . . . . . . . . . . . . . . . . . . . . . . . . . . . . . . . . . . . . . . . . . . . . . . . . . . . . . . . . . . . . . . . . . . . . . . . . .<br />
Street Address . . . . . . . . . . . . . . . . . . . . . . . . . . . . . . . . . . . . . . . . . . . . . . . . . . . . . . . . . . . . . . . . . . . . . . . . . . . . . . . . . . . .<br />
City . . . . . . . . . . . . . . . . . . . . . . . . . . . . . . . . . . . . . . . . . . .State . . . . . . . . . . . . .Zip code . . . . . . . . . . . . . . . . . . . . . . . .<br />
Phone . . . . . . . . . . . . . . . . . . . . . . . . . . . . . . . . . . . . . . . . . . . . . . . . . . . . . . . . . . . . . .Fax . . . . . . . . . . . . . . . . . . . . . . . .<br />
E-mail . . . . . . . . . . . . . . . . . . . . . . . . . . . . . . . . . . . . . . . . . . . . . . . . . . . . . . . . . . . . . . . . . . . . . . . . . . . . . . . . . . . . . . . . . .<br />
Item Purchased . . . . . . . . . . . . . . . . . . . . . . . . . . . . . . . . . . . . . . . . . . . . . . . . . . . . . . . . . . . . . . . . . . . . . . . . . . . . . . . . . . .<br />
Cut here<br />
Date of Purchase . . . . . . . . . . . . . . . . . . . .Store Where Purchased . . . . . . . . . . . . . . . . . . . . . . . . . . . . . . . . . . . . . . . . . . . .<br />
UPC Number from package (12 digits) . . . . . . . . . . . . . . . . . . . . . . . . . . . . . . . . . . . . . . . . . . . . . . . . . . . . . . . . . . . . . . . . . .<br />
✄
1<br />
CONTENTS<br />
1. Introduction . . . . . . . . . . . . . . . . . . . . . . . . . . . . . . . . . . . . . . . . . . . . . . .2<br />
1.1. Additional Key Features . . . . . . . . . . . . . . . . . . . . . . . . . . . . . . . . . .3<br />
1.2. Use The Start-It To: . . . . . . . . . . . . . . . . . . . . . . . . . . . . . . . . . . . .3,4<br />
2. Us As A Jump-start System . . . . . . . . . . . . . . . . . . . . . . . . . . . . . . . . . . . .4<br />
2.1. Review Of Jump-start Warnings And Cautions . . . . . . . . . . . . . . . .4,5<br />
2.2. Jump-start Procedure . . . . . . . . . . . . . . . . . . . . . . . . . . . . . . . . . . . .5<br />
3. Use As A 12 Volt DC Portable Power Supply . . . . . . . . . . . . . . . . . . . . . .5,6<br />
4. Charging/Recharging . . . . . . . . . . . . . . . . . . . . . . . . . . . . . . . . . . . . . . . .6<br />
4.1. AC Recharge . . . . . . . . . . . . . . . . . . . . . . . . . . . . . . . . . . . . . . . . . .6<br />
4.2. DC Recharge . . . . . . . . . . . . . . . . . . . . . . . . . . . . . . . . . . . . . . . .6,7<br />
5. Maintenance/Replacement Parts . . . . . . . . . . . . . . . . . . . . . . . . . . . . . . . .7<br />
6. Battery Disposal . . . . . . . . . . . . . . . . . . . . . . . . . . . . . . . . . . . . . . . . . . . .7<br />
7. Specifications . . . . . . . . . . . . . . . . . . . . . . . . . . . . . . . . . . . . . . . . . . . . . .7<br />
8. Warranty . . . . . . . . . . . . . . . . . . . . . . . . . . . . . . . . . . . . . . . . . . . . . . . . .8
2<br />
1. INTRODUCTION<br />
Congratulations on selecting the Vector Model TVEC012 Start-It Jump-Start System. This system is an<br />
advanced power and jump-start system with unique features that set it far above the value and utility of<br />
ordinary jump-starters. It supplies DC for 12 Volt appliances to 20 amps. It can jump-start any vehicle<br />
with a standard 12 Volt DC electrical system: boat, truck, car, airplane, RV, personal watercraft,<br />
snowmobile, tractor, etc.<br />
This advanced design is for serious work during emergencies and it can also enhance your fun by<br />
powering DC appliances on the road, at the beach and at camp. Be sure to read and understand all<br />
WARNINGS and CAUTIONS before using this product. Please read this guide carefully before use to<br />
ensure optimum performance and avoid damage to the system or items that you are using it with.<br />
The built-in LED area light is invaluable when it becomes necessary to locate battery terminals while<br />
preparing to jump-start a dead battery in the dark. An audible polarity alarm warns of incorrect connections<br />
while preparing to jump-start a dead vehicle battery.<br />
It is also ideal for use with Vector 12 Volt DC cordless, portable, rechargeable appliances with ratings<br />
up to 20 amperes. For information about Vector appliances, contact Vector Customer Service for the<br />
location of the nearest retailer.<br />
The unit has an easy-to-read, digital voltmeter that displays the battery level. The digital display activates<br />
whenever the charge status pushbutton is pressed and it displays the battery voltage. The display activates<br />
automatically during recharge operations to show a circulating pattern. The display shows FULL<br />
when the battery is completely charged.<br />
One 12 Volt DC accessory socket is provided for use with appliances that can operate from a 12 Volt DC<br />
accessory socket. The DC accessory socket allows for DC recharge from a vehicle or other 12 volt accessory<br />
socket. Note that the exposed electrical socket and recharge port have covers that help keep out dirt,<br />
dust and moisture. All covers must be open for socket or port use; closed after use.<br />
FIGURE 1 Switches, Indicators and Ports on top Panel<br />
12 Volt DC<br />
accessory<br />
socket<br />
Battery status<br />
display<br />
pushbutton<br />
Digital LED voltage display<br />
(battery status display)<br />
On/Off power<br />
safety switch<br />
Reverse<br />
polarity LED<br />
Recharge<br />
port<br />
Switches, LED indicators and ports are located on the top panel.<br />
Area light<br />
switch<br />
The Safety Power Switch (OFF/ON) is located on the upper right side of the panel. When it is in the OFF<br />
position, the cable clamps are not powered and the reverse polarity alarm system is enabled and ready<br />
to sound, if connected to an incorrect polarity. A small red LED above the Vector Logo also indicates<br />
Reverse Polarity.<br />
On top of the Area Light “dome” is a slide switch that turns the Area Light ON and OFF. The Area Light<br />
is powered ON when the ON/OFF slide switch is moved to the right hand side. The Area Light provides<br />
the user with light while changing a tire, and connecting battery clamps. The area light is a long lasting<br />
lamp and will continuously operate for three days from a fully charged battery.
To the left of the Area Light dome is the Recharging Port. It is covered by a rubber cap that keeps dust,<br />
dirt, and moisture out of the socket. The recharge adapter barrel connector plugs into this port during<br />
recharge.<br />
The Battery Status Display is a large character, three-digit voltmeter. During AC recharge, the Battery<br />
Status Display automatically activates with a circulating pattern. When the battery is fully charged, the<br />
display shows FULL. To the left of the digital display is the Battery Level Status Pushbutton. Press this<br />
Pushbutton to display the battery voltage. There is a slight delay before the actual battery voltage is displayed.<br />
To the left of the Battery Level Status Pushbutton is a 12 Volt Accessory Socket. It is covered with a<br />
rubber protective cap. The cap keeps dust, dirt and moisture out of the socket. When the cap is lifted, the<br />
accessory socket can be used for powering 12 volt appliances that draw up to 20 amps current.<br />
Figure 2 shows the storage location for the jumper clamps.<br />
FIGURE 2<br />
3<br />
1.1. Additional Key Features<br />
• ON/OFF safety power switch (no key required, no key to get lost!).<br />
• Cordless/rechargeable-includes recharge adapters for standard <strong>11</strong>0-volt AC wall socket, and vehicle’s<br />
12 Volt DC accessory outlet using adapter cables.<br />
• Powerful-400 instantaneous cranking amps; 1200 peak amps.<br />
• Includes non-spillable, maintenance-free, heavy duty, 19 ampere hour, sealed, lead-acid battery.<br />
• Requires no maintenance (other than recharging) for optimum operation.<br />
• Heavy duty, industrial grade copper clamps and welding grade jumper cables with exclusive cable holsters.<br />
• Exclusive cable storage channels that keep jumper cables out of the way until they are needed.<br />
• <strong>11</strong>0-volt AC charger is Underwriter Laboratories (UL) safety tested and listed.<br />
• Easy-to-read Digital Battery Status Display - activated by pressing the Charge Status Pushbutton.<br />
1.2. Use the Start-It to:<br />
• Jump-start (using heavy-duty battery cable and clamps): Any vehicle with a standard 12 Volt DC<br />
battery system: boat, truck, car, airplane, RV, personal watercraft, snowmobile, tractor, etc.<br />
• Operate (using 20 ampere rated 12 Volt Accessory Sockets): 12 Volt DC Fans, fluorescent work lights,<br />
cellular phones*, air compressors, spotlights, TVs, portable radios, cassette or CD players, and more.<br />
*Can quick-charge a cellular phone by using the phone’s 12 Volt DC adapter cord.
4<br />
• Illuminate areas: under the hood, inside tents, work areas while changing tires, etc.<br />
Note that other Vector appliances may also be used with this jump-starter as long as they do not exceed<br />
the 20-ampere limit of the jump-starter’s 12V DC accessory socket. For AC appliance operation we recommend<br />
the Vector VEC<strong>02</strong>3 Power Inverter. It can be purchased separately and it powers AC appliances<br />
to 175 Watts.<br />
READ INSTRUCTION MANUAL AND PRODUCT LABELING CAREFULLY, BEFORE USING THIS PROD-<br />
UCT. FOLLOW RECOMMENDED WARNINGS, CAUTIONS, AND SAFETY PROCEDURES, AND MANU-<br />
FACTURER’S GUIDELINES FOR YOUR VEHICLE BATTERY.<br />
IMPORTANT<br />
This unit is delivered in a partially charged state - you must fully charge it before using it for the<br />
first time. Initial AC Charge should be for 24 hours.<br />
Refer to Section 4 for use of AC/DC Recharge Adapters and detailed charging instructions.<br />
2. USE AS A JUMP-START SYSTEM<br />
Read and understand all Warnings, Cautions and Notes before operating Start-It.<br />
Warnings alert the user to hazardous conditions that can be harmful. Cautions alert the user to conditions<br />
that can cause property damage. Notes are important operational information.<br />
2.1 Review of Jump-start Warnings and Cautions<br />
1. There is risk of explosive gas being released when batteries are improperly charged or discharged.<br />
Failure to follow instructions may cause property damage, explosion hazard and/or personal injury.<br />
2. Do not smoke while jump-starting.<br />
3. Only attempt to jump-start a vehicle or boat in a well ventilated area.<br />
4. This power system is to be used ONLY on vehicles or boats with 12 volt DC battery systems.<br />
5. Do not wear vinyl clothing when jump-starting a vehicle - friction can cause dangerous static<br />
electricity sparks.<br />
6. Remove all metal jewelry - this can cause short circuits. Always use protective eye wear when<br />
jump-starting: contact with battery acid may cause blindness and/or severe burns.<br />
7. Do not attempt to jump-start a frozen battery.<br />
8. Keep out of reach of children.<br />
9. Vehicles that have on-board computerized systems may be damaged if vehicle battery is jump-started.<br />
Before jump-starting this type of vehicle, read the vehicle’s owner’s manual to confirm that<br />
external starting assistance is advised.<br />
10. Excessive engine cranking can damage the vehicle’s starter motor. If the engine fails to start after the<br />
recommended number of attempts, discontinue jump-start procedure and look for other problems that<br />
may need to be corrected.<br />
IF YOU HEAR AN AUDIBLE ALARM AND SEE THE RED LED LIGHT - DO NOT TURN ON THE SAFETY<br />
SWITCH - THE POLARITY IS REVERSED. INTERCHANGE CLAMP POSITIONS.<br />
<strong>11</strong>. If vehicle to be started has a Negative Grounded System (negative battery terminal is connected to<br />
chassis):<br />
A. Connect positive (POS) (+) red clamp to vehicle battery’s POS (+) terminal.<br />
B. Connect negative (-) black clamp to vehicle chassis or a solid, non-moving, metal vehicle<br />
component or body part. DO NOT clamp directly to positive battery terminal or moving part.<br />
If vehicle to be started has a Positive Grounded System (positive battery terminal is connected to chassis):<br />
Replace steps <strong>11</strong>A and <strong>11</strong>B (above) of the jump start procedure with the following steps A and B, and<br />
then proceed to step <strong>11</strong>.
5<br />
A. Connect negative (-) black clamp to vehicle battery’s negative terminal.<br />
B. Connect positive (+) red clamp to vehicle chassis or a solid, non-moving, metal vehicle component<br />
or body part. DO NOT clamp directly to positive battery terminal or moving part.<br />
12. Replace worn or defective parts immediately - contact Vector Technical Support Department at (954)<br />
584-4446 or toll free at 866-584-5504.<br />
13. Skin: if battery acid comes in contact with skin, rinse immediately with water, then wash thoroughly<br />
with soap and water. If redness, pain, or irritation occurs, seek immediate medical attention.<br />
14. Eyes: if battery acid comes in contact with eyes, flush eyes immediately for a minimum of 15<br />
minutes, seek immediate medical attention.<br />
2.2. Jump-start Procedure<br />
1. Turn Off ignition and all accessories (radio, a/c, lights, cell phone, etc). Place vehicle in “park”<br />
and set the emergency brake.<br />
2. Make sure the unit’s Power Switch is turned OFF.<br />
3. Observe jump-starting negative or positive ground system, as follows: Negative ground (negative<br />
battery terminal connected to chassis) - most common.<br />
4. Make sure Start-It’s Power Switch is turned OFF.<br />
5. Carefully lift negative (black) jumper cable wire from storage channel starting at clamp end of cable.<br />
6. Squeeze negative (black) clamp handle and remove clamp from holster.<br />
7. Carefully lift positive (red) jumper cable wire from storage channel starting at clamp end of cable.<br />
8. Squeeze positive (red) clamp handle and remove clamp from holster.<br />
9. Connect positive (+) red clamp to vehicle’s positive battery terminal.<br />
10. Connect negative (-) black clamp to chassis or a solid, non-moving, metal vehicle component or<br />
body part - never clamp directly to negative battery terminal or moving part.<br />
IF THE REVERSE POLARITY LED OR AUDIBLE ALARM SOUNDS, DO NOT TURN ON THE SAFETY<br />
SWITCH. REVERSE THE CLAMP POSITIONS. ONLY TURN ON THE POWER SWITCH WHEN THE AUDI-<br />
BLE ALARM IS SILENT AND THE RED LED IS NOT LIT.<br />
<strong>11</strong>. Turn ON unit’s Power Switch.<br />
12. Start vehicle (crank engine in 5-6 second bursts). If engine won’t start, seek help and go to step 15.<br />
13. After vehicle starts turn the Power Switch to OFF position.<br />
14. Leave engine running.<br />
15. Remove clamps (disconnect the negative (black) clamp first; followed by the positive (red) clamp and<br />
store cables and clamps).<br />
16. Squeeze negative (black) clamp handles and slide clamp into holster.<br />
17. Carefully press negative (black) jumper cable wire into storage channel.<br />
18. Squeeze positive (red) clamp handles and slide clamp into holster.<br />
19. Carefully press positive (red) jumper cable wire into storage channel.<br />
20. Recharge Start-It as soon as possible.<br />
3. USE AS A 12 VOLT DC PORTABLE POWER SUPPLY<br />
WARNING - NEVER INSERT A CIGARETTE LIGHTER INTO ACCESSORY SOCKET.<br />
NOTE: Make sure that the Unit’s Power Switch is ALWAYS in the OFF position when using the unit’s 12<br />
Volt DC accessory outlet.<br />
1. Lift up the cover of the unit ‘s 12 Volt DC socket.<br />
2. Insert the 12 Volt DC plug from the appliance into the 12V DC accessory socket on the unit.<br />
3. Switch on the appliance, as usual.<br />
4. Periodically press the Battery Level Status Pushbutton to check battery status. When the battery level<br />
reads 10.5 volts, you must recharge it as soon as possible.
6<br />
CAUTION: DO NOT OPERATE APPLIANCES THAT DRAW MORE THAN 20 AMPS.<br />
4. CHARGING/RECHARGING<br />
Lead-acid batteries require maintenance to maintain a full charge and to ensure good battery life. All<br />
lead-acid batteries suffer from self-discharge over time and more rapidly when they are at higher temperatures.<br />
Therefore, these types of batteries need periodic charging to replace energy lost through selfdischarge.<br />
When Start-It is not in use, Vector recommends that the batteries be recharged at least every<br />
60 days using the AC/DC Recharge Adapter.<br />
NOTE: During recharge a circulating pattern is display on the digital display<br />
NOTE: Generally the AC/DC Recharge method ensures full charge, DC recharge can only bring the battery<br />
to the voltage of the charging source.<br />
All batteries must be recharged as soon as possible after each use. If a battery is allowed to remain in a<br />
discharged state, battery life will be reduced.<br />
NOTE: RECHARGING BATTERY AFTER EACH USE WILL PROLONG BATTERY LIFE; FREQUENT HEAVY<br />
DISCHARGES BETWEEN RECHARGES WILL REDUCE BATTERY LIFE. OVERCHARGING WILL<br />
REDUCE BATTERY LIFE.<br />
NOTE: PRESSING THE BATTERY LEVEL STATUS Pushbutton TURNS ON THE DIGITAL BATTERY<br />
STATUS DISPLAY.<br />
4.1 AC Recharge<br />
AC Recharge requires the use of the supplied AC/DC Adapter. The adapter must be powered from<br />
a <strong>11</strong>0 volt AC, 60 Hz North American standard AC receptacle. The AC/DC recharge adapter barrel<br />
connector is inserted into the Recharge Port. Refer to figure 1 for the location of the Recharge Port.<br />
FIGURE 3<br />
Barrel connector<br />
Make sure that all switches are turned OFF. Charge the unit, until the Battery Status Displays indicates<br />
“FULL”. AC recharge is a taper charge and the AC Recharger can be left connected to the Jump-starter<br />
for long periods.<br />
4.2 DC Recharge<br />
The Start-It Jump-starter is supplied with a DC Recharge cable. See Figure 4.<br />
Recharging Start-It from an external DC power source requires the use of the DC Recharge Cable. This<br />
cable has one large DC plug and one barrel connector. The DC plug is inserted into the<br />
ACCESSORY SOCKET of the Start-It; the barrel connector is inserted into the recharge port of the<br />
vehicle or other DC source. Periodically check the battery voltage by pressing the Battery Level Status<br />
Pushbutton.<br />
FIGURE 4<br />
Barrel connector
MAKE SURE ALL SWITCHES ARE IN THE OFF POSITION DURING RECHARGING. THIS MAY SLOW<br />
RECHARGE.<br />
To check the battery status, press the Battery Status Display Pushbutton. If the Jump-starter’s battery is fully<br />
discharged, it is recommended that the host vehicle or boat’s engine being used for recharging be left<br />
operating while the unit is being charged using the 12 Volt DC/DC method.<br />
WARNING: DO NOT RECHARGE UNIT FOR MORE THAN 8 HOURS MAXIMUM USING 12 VOLT DC<br />
METHOD.<br />
7<br />
5. MAINTENANCE/REPLACEMENT PARTS<br />
For replacement parts, charging adapters, cables, etc., contact Vector Technical Support:<br />
(954) 584-4446. There are no user serviceable parts inside Start-It. Periodically, the cables and<br />
connectors should be inspected for damage, corrosion, dust and dirt. If surfaces are dirty, they can be<br />
wiped clean with a cloth moistened with water and a drop of detergent. Clamp contacts can be wiped<br />
clean with a dry cloth.<br />
WARNINGS<br />
THERE ARE NO USER SERVICEABLE PARTS INSIDE. DO NOT OPERATE UNIT IF THERE IS ANY<br />
EVIDENCE OF DAMAGE. THE PRODUCT MUST BE RETURNED TO VECTOR FOR TESTING<br />
AND REPAIR. REPLACE ANY DAMAGED CABLES AND CHARGING ADAPTERS IMMEDIATELY<br />
BEFORE FURTHER USE.<br />
6. SAFE BATTERY DISPOSAL<br />
PRBA<br />
PRBA<br />
ALWAYS RECYCLE<br />
Contains a maintenance-free, sealed, non-spillable, lead acid battery, which must be<br />
disposed of properly. Recycling is required -contact your local authority for information.<br />
Failure to comply with local, state and federal regulations can result in fines, or imprisonment.<br />
For more information on recycling this battery, call toll-free 1-877-288-7722<br />
Battery Disposal Warnings<br />
• Do not dispose of the battery in fire as this may result in an Explosion.<br />
• Before disposing of the battery, protect exposed terminals with heavy-duty electrical tape to<br />
prevent shorting (shorting can result in injury or fire).<br />
• Do not expose battery to fire or intense heat as it may explode.<br />
7. SPECIFICATIONS<br />
Jump-start Clamps . . . . . . . . . . . . . . . . . . . . . . . . . . . . . .400 Amps - Heavy Duty Copper<br />
Jumper Cables . . . . . . . . . . . . . . . . . . . . . . . . . . . . . . . . . . . . .Heavy Duty Welding Cable<br />
Peak Amps . . . . . . . . . . . . . . . . . . . . . . . . . . . . . . . . . . . . . . . . . . . . . . . . . . . . . . . .1200<br />
Instant Amps . . . . . . . . . . . . . . . . . . . . . . . . . . . . . . . . . . . . . . . . . . . . . . . . . . . . . . .400<br />
Battery . . . . . . . . . . . . . . . . . . . . . . . . . . . . . . . . .12 Volt 19 Amp Hour, Sealed Lead-Acid<br />
Area Light . . . . . . . . . . . . . . . . . . . . . . . . . . . . . . . . . . . . .Three High Intensity White LEDs<br />
Accessory Socket Protection . . . . . . . . . . . . . . . . . . . . . . . . .20 Amp Self-Resetting Breaker<br />
AC/DC Recharge Adapter . . . . . . . . . . . . . . . . . . . . . . . . . . . . . . . . .12 Volt DC@700 mA<br />
Height . . . . . . . . . . . . . . . . . . . . . . . . . . . . . . . . . . . . . . . . . . . . . . . .12.75 in (32.39 cm)<br />
Width . . . . . . . . . . . . . . . . . . . . . . . . . . . . . . . . . . . . . . . . . . . . . . . .<strong>11</strong>.00 in (<strong>11</strong>.26 cm)<br />
Depth . . . . . . . . . . . . . . . . . . . . . . . . . . . . . . . . . . . . . . . . . . . . . . . . . .5.5 in (13.97 cm)<br />
Weight . . . . . . . . . . . . . . . . . . . . . . . . . . . . . . . . . . . . . . . . . . . . . . . . . . .16 lbs (7.26 kg)
V E C T O R ®<br />
VECTOR MANUFACTURING, Ltd.<br />
4140 S.W. 28th Way, Ft. Lauderdale, FL 33312


