Download This Issue - US Concealed Carry
Download This Issue - US Concealed Carry
Download This Issue - US Concealed Carry

Create successful ePaper yourself
Turn your PDF publications into a flip-book with our unique Google optimized e-Paper software.
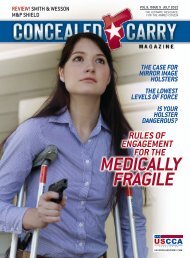
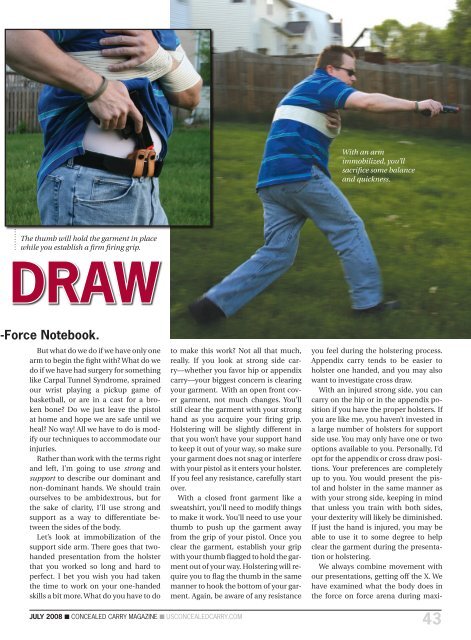
With an arm<br />
immobilized, you’ll<br />
sacrifice some balance<br />
and quickness.<br />
The thumb will hold the garment in place<br />
while you establish a firm firing grip.<br />
DRAW<br />
-Force Notebook.<br />
But what do we do if we have only one<br />
arm to begin the fight with? What do we<br />
do if we have had surgery for something<br />
like Carpal Tunnel Syndrome, sprained<br />
our wrist playing a pickup game of<br />
basketball, or are in a cast for a broken<br />
bone? Do we just leave the pistol<br />
at home and hope we are safe until we<br />
heal? No way! All we have to do is modify<br />
our techniques to accommodate our<br />
injuries.<br />
Rather than work with the terms right<br />
and left, I’m going to use strong and<br />
support to describe our dominant and<br />
non-dominant hands. We should train<br />
ourselves to be ambidextrous, but for<br />
the sake of clarity, I’ll use strong and<br />
support as a way to differentiate between<br />
the sides of the body.<br />
Let’s look at immobilization of the<br />
support side arm. There goes that twohanded<br />
presentation from the holster<br />
that you worked so long and hard to<br />
perfect. I bet you wish you had taken<br />
the time to work on your one-handed<br />
skills a bit more. What do you have to do<br />
to make this work? Not all that much,<br />
really. If you look at strong side carry—whether<br />
you favor hip or appendix<br />
carry—your biggest concern is clearing<br />
your garment. With an open front cover<br />
garment, not much changes. You’ll<br />
still clear the garment with your strong<br />
hand as you acquire your firing grip.<br />
Holstering will be slightly different in<br />
that you won’t have your support hand<br />
to keep it out of your way, so make sure<br />
your garment does not snag or interfere<br />
with your pistol as it enters your holster.<br />
If you feel any resistance, carefully start<br />
over.<br />
With a closed front garment like a<br />
sweatshirt, you’ll need to modify things<br />
to make it work. You’ll need to use your<br />
thumb to push up the garment away<br />
from the grip of your pistol. Once you<br />
clear the garment, establish your grip<br />
with your thumb flagged to hold the garment<br />
out of your way. Holstering will require<br />
you to flag the thumb in the same<br />
manner to hook the bottom of your garment.<br />
Again, be aware of any resistance<br />
you feel during the holstering process.<br />
Appendix carry tends to be easier to<br />
holster one handed, and you may also<br />
want to investigate cross draw.<br />
With an injured strong side, you can<br />
carry on the hip or in the appendix position<br />
if you have the proper holsters. If<br />
you are like me, you haven’t invested in<br />
a large number of holsters for support<br />
side use. You may only have one or two<br />
options available to you. Personally, I’d<br />
opt for the appendix or cross draw positions.<br />
Your preferences are completely<br />
up to you. You would present the pistol<br />
and holster in the same manner as<br />
with your strong side, keeping in mind<br />
that unless you train with both sides,<br />
your dexterity will likely be diminished.<br />
If just the hand is injured, you may be<br />
able to use it to some degree to help<br />
clear the garment during the presentation<br />
or holstering.<br />
We always combine movement with<br />
our presentations, getting off the X. We<br />
have examined what the body does in<br />
the force on force arena during maxi-<br />
JULY 2008 n CONCEALED CARRY MAGAZINE n <strong>US</strong>CONCEALEDCARRY.COM<br />
43