12 Days of Christmas Quilt - Amazing Designs Blog
12 Days of Christmas Quilt - Amazing Designs Blog
12 Days of Christmas Quilt - Amazing Designs Blog
Create successful ePaper yourself
Turn your PDF publications into a flip-book with our unique Google optimized e-Paper software.
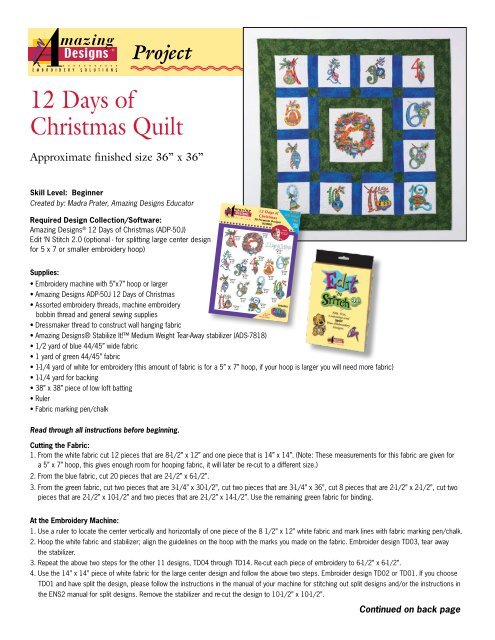
Project<br />
<strong>12</strong> <strong>Days</strong> <strong>of</strong><br />
<strong>Christmas</strong> <strong>Quilt</strong><br />
Approximate finished size 36” x 36”<br />
Skill Level: Beginner<br />
Created by: Madra Prater, <strong>Amazing</strong> <strong>Designs</strong> Educator<br />
<strong>12</strong> <strong>Days</strong> <strong>of</strong> <strong>Christmas</strong> - JUMBO<br />
THESE DESIGNS CAN BE SEWN AND SOLD<br />
Required Design Collection/S<strong>of</strong>tware:<br />
<strong>Amazing</strong> <strong>Designs</strong> ® <strong>12</strong> <strong>Days</strong> <strong>of</strong> <strong>Christmas</strong> (ADP-50J)<br />
Edit ‘N Stitch 2.0 (optional - for splitting large center design<br />
for 5 x 7 or smaller embroidery hoop)<br />
<strong>12</strong> <strong>Days</strong> <strong>of</strong> <strong>Christmas</strong> - JUMBO ADP-50J<br />
Supplies:<br />
• Embroidery machine with 5”x7” hoop or larger<br />
• <strong>Amazing</strong> <strong>Designs</strong> ADP-50J <strong>12</strong> <strong>Days</strong> <strong>of</strong> <strong>Christmas</strong><br />
• Assorted embroidery threads, machine embroidery<br />
bobbin thread and general sewing supplies<br />
• Dressmaker thread to construct wall hanging fabric<br />
• <strong>Amazing</strong> <strong>Designs</strong>® Stabilize It! Medium Weight Tear-Away stabilizer (ADS-7818)<br />
• 1/2 yard <strong>of</strong> blue 44/45” wide fabric<br />
• 1 yard <strong>of</strong> green 44/45” fabric<br />
• 1-1/4 yard <strong>of</strong> white for embroidery (this amount <strong>of</strong> fabric is for a 5” x 7” hoop, if your hoop is larger you will need more fabric)<br />
• 1-1/4 yard for backing<br />
• 38” x 38” piece <strong>of</strong> low l<strong>of</strong>t batting<br />
• Ruler<br />
• Fabric marking pen/chalk<br />
www.amazingdesigns.com ADP-50J<br />
Lit# ADPF-ADP50J<br />
DAYS<strong>12</strong>1<br />
W: 2.4"<br />
H: 2.4"<br />
Contains designs for 4" x 4" hoops or larger on 1 CD-ROM compatible with these embroidery formats:<br />
ART (Bernina), BLF (Outline File), DST (Tajima), EXP (Bernina, Melco), HUS (Viking), JEF (Janome),<br />
PES (Baby Lock, Bernina, Brother, Simplicity, White), SHV (Viking), VIP (Pfa f, Viking).<br />
DAYS115<br />
W: 1.8"<br />
H: 1.2"<br />
DAYS119<br />
W: 2.3"<br />
H: 2.6"<br />
DAYS<strong>12</strong>4 **<br />
W: 3.3"<br />
H: 7.0"<br />
DAYS<strong>12</strong>9 **<br />
W: 0.6"<br />
H: 7.0"<br />
DAYS130 **<br />
W: 2.6"<br />
H: 7.0"<br />
* Jumbo<br />
** Rotated<br />
DAYS<strong>12</strong>3<br />
W: 3.9"<br />
H: 2.3"<br />
DAYS116<br />
W: 1.5"<br />
H: 1.6"<br />
©2008 AMAZING DESIGNS IS A REGISTERED<br />
TRADEMARK OF TACONY CORPORATION.<br />
ALL RIGHTS RESERVED. ©2008 MICHELLE<br />
PALMER, LICENSED BY LINDA MCDONALD<br />
ALL RIGHTS RESERVED.<br />
DAYS<strong>12</strong>0<br />
W: 2.4"<br />
H: 1.0"<br />
DAYS117<br />
W: 1.8"<br />
H: 1.7"<br />
DAYS<strong>12</strong>2<br />
W: 1.9"<br />
H: 2.4"<br />
DAYS<strong>12</strong>7<br />
W: 3.9"<br />
H: 0.5"<br />
DAYS<strong>12</strong>8<br />
W: 3.9"<br />
H: 0.3"<br />
DAYS<strong>12</strong>5*<br />
W: 2.6"<br />
H: 5.0"<br />
Suggested Retail Price: $99.00<br />
DAYS<strong>12</strong>6<br />
W: 2.7"<br />
H: 3.9"<br />
Legal Notice: Making a copy, by any means, <strong>of</strong> <strong>Amazing</strong> <strong>Designs</strong>’ artwork or design s<strong>of</strong>tware is a violation <strong>of</strong> copyright law.<br />
<strong>Designs</strong> contained herein are intended for the original purchaser only for use on home embroidery machines.<br />
DAYS118<br />
W: 1.6"<br />
H: 1.3"<br />
DAYS104*<br />
W: 2.7"<br />
H: 5.0"<br />
DAYS109*<br />
W: 2.7"<br />
H: 5.0"<br />
DAYS103*<br />
W: 3.9"<br />
H: 5.0"<br />
DAYS113 **<br />
W: 5.0"<br />
H: 5.2"<br />
DAYS105*<br />
W: 3.7"<br />
H: 5.0"<br />
DAYS110*<br />
W: 4.1"<br />
H: 5.0"<br />
<strong>12</strong> <strong>Days</strong> <strong>of</strong><br />
<strong>Christmas</strong><br />
30 Premium <strong>Designs</strong><br />
JUMBO<br />
DAYS106*<br />
W: 2.8"<br />
H: 5.0"<br />
DAYS101*<br />
W: 7.8"<br />
H: 9.0"<br />
DAYS114*<br />
W: 4.3"<br />
H: 5.0"<br />
DAYS111*<br />
W: 2.6"<br />
H: 5.0"<br />
DAYS107*<br />
W: 3.0"<br />
H: 5.0"<br />
DAYS1<strong>12</strong>*<br />
W: 3.5"<br />
H: 5.0"<br />
DAYS102* **<br />
W: 1.8"<br />
H: 7.0"<br />
©2008<br />
Michelle<br />
Palmer<br />
DAYS108*<br />
W: 4.9"<br />
H: 5.0"<br />
In-Store<br />
FREE Design<br />
Offer<br />
DETAILS<br />
INSIDE<br />
Read through all instructions before beginning.<br />
Cutting the Fabric:<br />
1. From the white fabric cut <strong>12</strong> pieces that are 8-1/2” x <strong>12</strong>” and one piece that is 14” x 14”. (Note: These measurements for this fabric are given for<br />
a 5” x 7” hoop, this gives enough room for hooping fabric, it will later be re-cut to a different size.)<br />
2. From the blue fabric, cut 20 pieces that are 2-1/2” x 6-1/2”.<br />
3. From the green fabric, cut two pieces that are 3-1/4” x 30-1/2”, cut two pieces that are 3-1/4” x 36”, cut 8 pieces that are 2-1/2” x 2-1/2”, cut two<br />
pieces that are 2-1/2” x 10-1/2” and two pieces that are 2-1/2” x 14-1/2”. Use the remaining green fabric for binding.<br />
At the Embroidery Machine:<br />
1. Use a ruler to locate the center vertically and horizontally <strong>of</strong> one piece <strong>of</strong> the 8 1/2” x <strong>12</strong>” white fabric and mark lines with fabric marking pen/chalk.<br />
2. Hoop the white fabric and stabilizer; align the guidelines on the hoop with the marks you made on the fabric. Embroider design TD03, tear away<br />
the stabilizer.<br />
3. Repeat the above two steps for the other 11 designs, TD04 through TD14. Re-cut each piece <strong>of</strong> embroidery to 6-1/2” x 6-1/2”.<br />
4. Use the 14” x 14” piece <strong>of</strong> white fabric for the large center design and follow the above two steps. Embroider design TD02 or TD01. If you choose<br />
TD01 and have split the design, please follow the instructions in the manual <strong>of</strong> your machine for stitching out split designs and/or the instructions in<br />
the ENS2 manual for split designs. Remove the stabilizer and re-cut the design to 10-1/2” x 10-1/2”.<br />
Continued on back page
Making the wall hanging: (See picture <strong>of</strong> wall hanging for block placement.) All seam allowances are 1/4”.<br />
To make top section:<br />
1. Sew a blue 2-1/2” x 6-1/2” piece <strong>of</strong> fabric between the 1st day block and the 2nd day block, sew a blue piece between the 3rd day block and the 4th<br />
day block. Sew a blue piece between the 2nd day block and the 3rd day block. Press seams.<br />
2. Make two sashing strips by: sewing a green 2-1/2” square block to the right end <strong>of</strong> a blue 2-1/2” x 6-1/2” block, continue sewing these pieces<br />
together until you have: a blue, green, blue, green, a blue a green and a blue stitched together, press. Sew one <strong>of</strong> the sashing strips to the bottom <strong>of</strong><br />
row one matching seam lines and press. The remaining strip will be used in Bottom section.<br />
To make the center section:<br />
1. Sew a 2-1/2” x 6-1/2” strip to the bottom <strong>of</strong> 5th day block; sew the 7th day block to the bottom <strong>of</strong> the blue strip. Sew a green 2-1/2” square<br />
between two <strong>of</strong> the blue strips and press seams. Sew this strip to the right side <strong>of</strong> blocks 5 and 7 matching seams, and press seams.<br />
2. Sew a blue strip to the bottom <strong>of</strong> 6th day block; sew the 8th day block to the bottom <strong>of</strong> the blue strip and press seams. Sew a 2-1/2” green square<br />
between two blue strips, press seams. Sew this strip to the left side <strong>of</strong> blocks 6 and 8 matching seams and press seams.<br />
3. Sew one <strong>of</strong> the 2-1/2” x 10-1/2” green strips to the top <strong>of</strong> the center embroidered square (<strong>12</strong> days <strong>of</strong> <strong>Christmas</strong>) and one to the bottom.<br />
4. Sew one <strong>of</strong> the 2-1/2” x 14-1/2” green strips to each side <strong>of</strong> the center embroidered square and press seams.<br />
5. Sew the section completed in “1” to the left side and section “2” to the right side <strong>of</strong> the large center block just completed and press seams. (The<br />
blue sashing will be toward the center block.)<br />
To make bottom section:<br />
1. Sew a blue 2-1/2” x 6-1/2” blue piece <strong>of</strong> fabric between the 9th day block and the 10th day block, sew a blue piece between the 11th day block and<br />
the <strong>12</strong>th day block. Sew a blue strip between the 10th day block and 11th and press seams.<br />
2. Sew remaining sashing strip to the top <strong>of</strong> the block section just completed, matching seams and press.<br />
To complete the quilt:<br />
1. Sew the bottom <strong>of</strong> section 1 to the top <strong>of</strong> the center section, matching seams<br />
and press.<br />
2. Sew the top <strong>of</strong> the bottom section to the bottom <strong>of</strong> the center section, matching<br />
seams and press.<br />
3. Sew one <strong>of</strong> the 3-1/4” x 30-1/2” green border strips to the top <strong>of</strong> the quilt and one<br />
to the bottom.<br />
4. Sew one <strong>of</strong> the 3-1/4” x 36” green border strips to each side <strong>of</strong> the quilt.<br />
5. Make a fabric sandwich by placing the backing fabric with right side down, the<br />
batting on top <strong>of</strong> it, place the quilt on top <strong>of</strong> the batting with right side up and<br />
pin securely.<br />
6. Stitch in the ditch around the border and the blocks, complete quilting as desired<br />
7. Square wall hanging if necessary, trim batting and backing even with edges <strong>of</strong> wall<br />
hanging front.<br />
8. Bind using your favorite method; you will need approximately 4-1/4 yards.<br />
Enjoy your beautiful new quilt hanging!<br />
For other exciting projects like this one visit our site at www.<strong>Amazing</strong><strong>Designs</strong>.com<br />
Lit# AD-PP0808


