In-The-Hoop Eye Mask - Amazing Designs Blog
In-The-Hoop Eye Mask - Amazing Designs Blog
In-The-Hoop Eye Mask - Amazing Designs Blog

You also want an ePaper? Increase the reach of your titles
YUMPU automatically turns print PDFs into web optimized ePapers that Google loves.
<strong>In</strong>-<strong>The</strong>-<strong>Hoop</strong> <strong>Eye</strong> <strong>Mask</strong>s<br />
®<br />
Project<br />
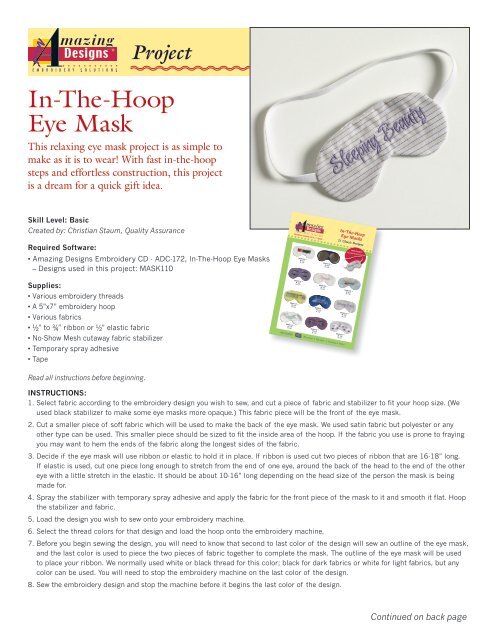
<strong>In</strong>-<strong>The</strong>-<strong>Hoop</strong><br />
<strong>Eye</strong> <strong>Mask</strong><br />
This relaxing eye mask project is as simple to<br />
make as it is to wear! With fast in-the-hoop<br />
steps and effortless construction, this project<br />
is a dream for a quick gift idea.<br />
Skill Level: Basic<br />
Created by: Christian Staum, Quality Assurance<br />
Required Software:<br />
• <strong>Amazing</strong> <strong>Designs</strong> Embroidery CD - ADC-172, <strong>In</strong>-<strong>The</strong>-<strong>Hoop</strong> <strong>Eye</strong> <strong>Mask</strong>s<br />
– <strong>Designs</strong> used in this project: MASK110<br />
Supplies:<br />
• Various embroidery threads<br />
• A 5”x7” embroidery hoop<br />
• Various fabrics<br />
• ½” to ¾” ribbon or ½” elastic fabric<br />
• No-Show Mesh cutaway fabric stabilizer<br />
• Temporary spray adhesive<br />
• Tape<br />
Read all instructions before beginning.<br />
www.amazingdesigns.com<br />
INSTRUCTIONS:<br />
1. Select fabric according to the embroidery design you wish to sew, and cut a piece of fabric and stabilizer to fit your hoop size. (We<br />
used black stabilizer to make some eye masks more opaque.) This fabric piece will be the front of the eye mask.<br />
2. Cut a smaller piece of soft fabric which will be used to make the back of the eye mask. We used satin fabric but polyester or any<br />
other type can be used. This smaller piece should be sized to fit the inside area of the hoop. If the fabric you use is prone to fraying<br />
you may want to hem the ends of the fabric along the longest sides of the fabric.<br />
3. Decide if the eye mask will use ribbon or elastic to hold it in place. If ribbon is used cut two pieces of ribbon that are 16-18” long.<br />
If elastic is used, cut one piece long enough to stretch from the end of one eye, around the back of the head to the end of the other<br />
eye with a little stretch in the elastic. It should be about 10-16” long depending on the head size of the person the mask is being<br />
made for.<br />
4. Spray the stabilizer with temporary spray adhesive and apply the fabric for the front piece of the mask to it and smooth it flat. <strong>Hoop</strong><br />
the stabilizer and fabric.<br />
5. Load the design you wish to sew onto your embroidery machine.<br />
6. Select the thread colors for that design and load the hoop onto the embroidery machine.<br />
Lit# ADPF-ADC172<br />
THESE DESIGNS CAN BE SEWN AND SOLD<br />
Legal Notice: Making a copy, by any means, of <strong>Amazing</strong> <strong>Designs</strong>’ artwork or design software is a violation of copyright law.<br />
<strong>Designs</strong> contained herein are intended for the original purchaser only for use on home embroidery machines.<br />
Suggested Retail Price: $50.00<br />
7. Before you begin sewing the design, you will need to know that second to last color of the design will sew an outline of the eye mask,<br />
and the last color is used to piece the two pieces of fabric together to complete the mask. <strong>The</strong> outline of the eye mask will be used<br />
to place your ribbon. We normally used white or black thread for this color; black for dark fabrics or white for light fabrics, but any<br />
color can be used. You will need to stop the embroidery machine on the last color of the design.<br />
8. Sew the embroidery design and stop the machine before it begins the last color of the design.<br />
MASK113 **<br />
W: 3.5"<br />
H: 7.0"<br />
MASK119 **<br />
W: 3.5"<br />
H: 7.0"<br />
MASK117 **<br />
W: 3.5"<br />
H: 7.0"<br />
Contains Jumbo designs for 5" x 7" hoops or larger on 1 CD-ROM compatible with these embroidery formats:<br />
ART (Bernina), BLF (Outline File), DST (Tajima), EXP (Bernina, Melco), HUS (Viking),<br />
JEF (Janome), PES (Baby Lock, Bernina, Brother), SHV (Viking), VIP (Pfa f, Viking), VP3 (Pfaff, Viking).<br />
* 5 x 7 or larger<br />
** Rotated<br />
©2010 AMAZING DESIGNS IS A REGISTERED<br />
TRADEMARK OF TACONY CORPORATION.<br />
ALL RIGHTS RESERVED. ©2010 MORANGO<br />
DESIGNS, INC. ALL RIGHTS RESERVED.<br />
MASK120 **<br />
W: 3.5"<br />
H: 7.0"<br />
MASK106 **<br />
W: 3.5"<br />
H: 7.0"<br />
MASK108 **<br />
W: 3.5"<br />
H: 7.0"<br />
MASK122 **<br />
W: 3.5"<br />
H: 7.0"<br />
ADC-172<br />
MASK103 **<br />
W: 3.5"<br />
H: 7.0"<br />
MASK101 **<br />
W: 3.5"<br />
H: 7.0"<br />
MASK102 **<br />
W: 3.5"<br />
H: 7.0"<br />
<strong>In</strong>-<strong>The</strong>-<strong>Hoop</strong> <strong>Eye</strong> <strong>Mask</strong>s ADC-172<br />
MASK112 **<br />
W: 3.5"<br />
H: 7.0"<br />
MASK114* **<br />
W: 3.5"<br />
H: 7.0"<br />
INCLUDES 21 DESIGNS FOR 5" x 7" HOOPS<br />
MASK107 **<br />
W: 3.5"<br />
H: 7.0"<br />
MASK115 **<br />
W: 3.5"<br />
H: 7.0"<br />
MASK111* **<br />
W: 3.5"<br />
H: 7.0"<br />
MASK116 **<br />
W: 3.5"<br />
H: 7.0"<br />
MASK118 **<br />
W: 3.5"<br />
H: 7.0"<br />
MASK109* **<br />
W: 3.5"<br />
H: 7.0"<br />
INCLUDES: Re-color! • Re-size! • Preview & Print!<br />
<strong>In</strong>-<strong>The</strong>-<strong>Hoop</strong><br />
<strong>Eye</strong> <strong>Mask</strong>s<br />
21 Classic <strong>Designs</strong><br />
MASK110 **<br />
W: 3.5"<br />
H: 7.0"<br />
MASK104 **<br />
W: 3.5"<br />
H: 7.0"<br />
FREE PROJECT<br />
<strong>In</strong>cluded with Collection<br />
MASK105* **<br />
W: 3.5"<br />
H: 7.0"<br />
Continued on back page
9. Remove the hoop from the embroidery machine but do not unhoop the fabric. [Image 1]<br />
10. Now you will place the ribbon in place. One piece will be used for each side of the mask. Centering horizontally with the embroidery<br />
design, place one end of the ribbon so that it extends about ½” beyond the outline of the eye mask. Tape the ends of the ribbon or<br />
elastic in place just inside of the outline and then gather and tape the loose ribbon in the middle of the outline so that it lays flat.<br />
[Image 2]<br />
11. Now take the fabric for the back piece of the mask and cut it in half lengthwise. Place one piece on the top ¾ of the embroidery<br />
design. This piece should come down over the ribbon and end ½” above the nose of the outline. [Image 3] Place the second piece<br />
of fabric to cover the bottom ¾ of the design overlapping the top piece by 1” - 1 ½”. If the fabric has a correct side, the correct side<br />
of the fabric should face the embroidery design. If the fabric is hemmed, the flat side should face the embroidery design. Smooth the<br />
fabric down so that it lies as flat as possible. [Image 4]<br />
12. Place the hoop back onto your embroidery machine and sew the last color of the design. This will outline the eye mask and sew all the<br />
fabric pieces together and fix the ribbon in place.<br />
13. Remove the hoop from the embroidery machine and remove the fabric from the hoop.<br />
14. Cut around the outline of the eye mask leaving 1/4” of fabric from the outline stitching. [Image 5]<br />
15. Open the overlapped fabric and gently remove the tape that is holding down the ribbon. Turn the eye mask inside out and push the<br />
fabric out to shape the seam. Press with an iron if needed.<br />
Notes: <strong>The</strong> fabric flaps on the back can have a few hand stitches added to hold closed if preferred. You can even fill the eye masks with cotton<br />
to pad them, or even add a mesh bag of lavender or herbs to make them aromatic.<br />
Image 1 Image 2 Image 3<br />
Image 4 Image 5<br />
Have a great nights sleep!<br />
For other exciting projects like this one, visit our website at<br />
www.<strong>Amazing</strong><strong>Designs</strong>.com