Anleitung Boden und Facon e 0807 - Schmidt Maschinenbau
Anleitung Boden und Facon e 0807 - Schmidt Maschinenbau
Anleitung Boden und Facon e 0807 - Schmidt Maschinenbau

You also want an ePaper? Increase the reach of your titles
YUMPU automatically turns print PDFs into web optimized ePapers that Google loves.
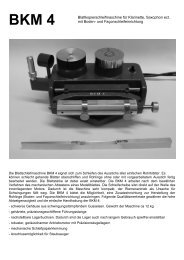
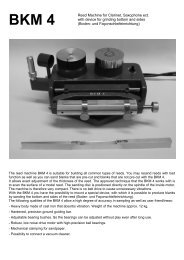
Assembly and Operating Instructions for the "<strong>Boden</strong>- <strong>und</strong><br />
Façonschleifeinrichtung"<br />
(retrofit kit for sanding the bottom and sides of reeds)<br />
Dimensions of producible blanks:<br />
Length: 60 to 75 mm (adjustable)<br />
Width at the tip: 12 to 13 mm (adjustable)<br />
Conicity of the Façon: according to the conicity of the bar (available conicity 1 : 50 or parallel)<br />
Thickness: 3.0 to 3.5 mm<br />
Operating principle:<br />
The "<strong>Boden</strong>- <strong>und</strong> Façonschleifeinrichtung" as retrofit kit for the taper reed machine BKM 4 includes:<br />
• An add-on part, which is to be mounted on the left side of the machine instead of the standard<br />
suction nozzle holder<br />
• A bar, on which the split piece of reed will be clamped<br />
The add-on part carries a mechanical stop (eccentric), parallel with the scanning disc and the sanding<br />
disc. You drive the bar by hand along the eccentric and the scanning disc. In so doing, parallel and<br />
even surfaces will be sanded onto the piece of reed. By turning the eccentric you adjust the space<br />
between bar and sanding disc. In this way you vary the width and the thickness of the blank you are<br />
producing.<br />
Mounting of the add-on part (if delivered as retrofit kit):<br />
Mount the add-on part at the body of the BKM 4 in that way, so you can position the bar with its<br />
broad side on the eccentric and the scanning disc at the same time. Thereby it must not shake and no<br />
light gap should be seen. Therefore tighten one of the Allen screws moderately tight, twist the add-on<br />
part accordingly and then tighten the other screw. When doing this, make sure, that the position does<br />
not change any more (press against it if necessary). Check parallelism after having tightened the first<br />
screw; if necessary repeat procedure of adjustment.<br />
When sanding the taper the add-on part may remain at the machine.<br />
Clamping a piece of reed:<br />
First, the bar needs to be adjusted to the length of the piece of the reed. For that reason you displace<br />
the fixed clamping claw, which is screwed onto the narrow side of the bar from below, so much that<br />
the distance between the tips is about 2 mm less than the length of the reed is. The piece of reed<br />
needs to be placed outside to the bottom into the recess of the bar. First you press the front, that will<br />
later become the tip of the reed, into the claw at the broad side of the bar and shift this claw<br />
backwards. Then you can put the whole piece of reed into the recess and have it pressed by the back<br />
shifted clamping claw against the fixed clamping claw. When the ends of the piece of reed are<br />
pressed into the recess both by setting it into the shiftable clamping claw as well as by placing it to the<br />
fixed clamping claw, it will align automatically parallel with the bar.<br />
You unclamp the sanded blank accordingly in reversed order.<br />
Sanding:<br />
For your first try, leave the scanning disc in its normal position and turn the eccentric to 5 (this will<br />
result in maximum width and thickness).<br />
For sanding the Façon (the sides) and the bottom hold the narrow end of the bar in your left hand, the<br />
broad end in your right hand, and as a basic principle move the bar from the left to the right, i.e.<br />
in the opposite direction of sanding. Thereby it must be held securely.<br />
First you sand the Façon. For this you position the broad end of the bar with the piece of reed<br />
upwards at the scanning disc. Then you guide the narrow end of the bar to the eccentric and finally
move the bar along the scanning disc and the eccentric to the right. In case the piece of reed touches<br />
the suction nozzle holder, it first has to be roughly pre-sanded, then finish-sanded.<br />
^ÅÅçêÇáåÖäóI=óçì=ë~åÇ=íÜÉ=çíÜÉê=ëáÇÉ=ïáíÜ=íÜÉ=éáÉÅÉ=çÑ=êÉÉÇ=ÜÉäÇ=Ççïåï~êÇëK=<br />
qç=ã~âÉ=íÜÉ=Äçííçã=óçì=éêçÅÉÉÇ=ëáãáä~êäóK=_ÉÅ~ìëÉ=çÑ=íÜÉ=ä~êÖÉê=ïáÇíÜ=çÑ=Åìí=áí=áë=~Çîáë~ÄäÉ=íç=ë~åÇ=<br />
ëÉîÉê~ä=íáãÉë=EÄìí=ãçîáåÖ=íÜÉ=Ä~ê=~äï~óë=Ñêçã=íÜÉ=äÉÑí=íç=íÜÉ=êáÖÜíFI=~åÇ=êÉÇìÅÉ=äÉëë=ã~íÉêá~äK==<br />
_ó=íïáëíáåÖ=íÜÉ=ÉÅÅÉåíêáÅ=óçì=î~êó=íÜÉ=Çáëí~åÅÉ=ÄÉíïÉÉå=ë~åÇÉÇ=ëìêÑ~ÅÉë=~åÇ=íÜÉ=Ä~êK=låÉ=ëÅ~äÉ=<br />
Öê~Çì~íáçå=ã~êâ=Éèì~íÉë=íç=MKN=ããK=pç=íÜÉ=ïáÇíÜ=çÑ=íÜÉ=êÉÉÇ=Å~å=ÄÉ=ÇáãáåáëÜÉÇ=Äó=O=EO=ë~åÇÉÇ=<br />
ëìêÑ~ÅÉëF=ñ=R=EëÅ~äÉ=Öê~Çì~íáçå=ã~êâëF=ñ=MKN=ãã=Z=N=ããI=íÜÉ=íÜáÅâåÉëë=Äó=MKR=ããK=<br />
_~ëáÅ~ääóI=íïáëíáåÖ=íÜÉ=ëÅ~ååáåÖ=ÇáëÅI=íççI=Å~å=Çç=íÜÉ=~ÇàìëíãÉåíK=eçïÉîÉêI=íç=íêÉ~í=áíë=ÄÉ~êáåÖë=ïáíÜ=<br />
Å~êÉI=óçì=ëÜçìäÇ=Çç=íÜáë=çåäó=áå=Å~ëÉ=íÜÉ=ëÉííáåÖ=ê~åÖÉ=çÑ=íÜÉ=ÉÅÅÉåíêáÅ=áë=åçí=áåëìÑÑáÅáÉåíK=<br />
=<br />
qÜÉ=Ñä~íåÉëë=çÑ=íÜÉ=ë~åÇÉÇ=Äçííçã=çÑ=íÜÉ=êÉÉÇ=ÇÉéÉåÇë=çå=Üçï=ëíê~áÖÜí=íÜÉ=éáÉÅÉ=çÑ=êÉÉÇ=áëK=^=ÄìäÖó=<br />
çê=ÅçåÅ~îÉ=éáÉÅÉ=çÑ=êÉÉÇ=ï~êéë=ïÜÉå=Åä~ãéÉÇK=k~íìê~ääóI=ïÜÉå=óçì=ìåÅä~ãé=áí=íÜÉ=Äçííçã=ïáää=åçí=ÄÉ=<br />
éä~åÉ=~åó=ãçêÉK=<br />
eçïÉîÉêI=áÑ=óçì=ìëÉ=~=êÉÉÇ=íÜ~í=áë=êÉ~ëçå~Ääó=ëíê~áÖÜíI=íÜÉ=Äçííçã=çÑ=íÜÉ=êÉÉÇ=ïáää=ÄÉÅçãÉ=Ñä~í=ÉåçìÖÜ=<br />
Ñçê=óçì=íç=É~ëáäó=ÑáåáëÜ=áíW=óçì=éìää=íÜÉ=ïççÇ=~ë=óçì=ìëì~ääó=Çç=~Åêçëë=~=ë~åÇé~éÉê=íÜ~í=äáÉë=çå=~=Ñä~í=<br />
éä~íÉ=çê=~=éä~åÉ=ëÜ~êéÉåáåÖ=ëíçåÉK=<br />
=<br />
=<br />
=<br />
=<br />
=<br />
=<br />
=<br />
=<br />
=<br />
=<br />
=<br />
=<br />
=<br />
=<br />
=<br />
=<br />
=<br />
=<br />
=<br />
=<br />
=<br />
=<br />
=<br />
=<br />
=<br />
=<br />
=<br />
=<br />
=<br />
=<br />
mêçÇìÅíáçå=~åÇ=ÇáëíêáÄìíáçåW=<br />
táäÑêáÉÇ=pÅÜãáÇí=j~ëÅÜáåÉåÄ~ì=<br />
^áñÉê=píêK=QQ=<br />
aJTOMTO=qΩÄáåÖÉå=<br />
dÉêã~åó=<br />
qÉäKW=HQV=EMF=TMTN=PUUTM=<br />
c~ñW=HQV=EMF=TMTN=PUUTS=<br />
áåÑç]å~ÄÉåÇóå~ãçKÇÉ=