DV6010 DV9610 DV1210 - Service - Black & Decker
DV6010 DV9610 DV1210 - Service - Black & Decker
DV6010 DV9610 DV1210 - Service - Black & Decker

You also want an ePaper? Increase the reach of your titles
YUMPU automatically turns print PDFs into web optimized ePapers that Google loves.
<strong>DV1210</strong><br />
<strong>DV6010</strong><br />
<strong>DV9610</strong>
A<br />
B<br />
C<br />
D<br />
E<br />
2<br />
F
G<br />
H<br />
I<br />
J<br />
3
ENGLISH<br />
(Original instructions)<br />
Technical data<br />
Voltage<br />
Weight<br />
Charger<br />
Input Voltage<br />
Output Voltage<br />
Current<br />
Approx. charge time<br />
Battery<br />
Voltage<br />
Type<br />
Intended use<br />
Your <strong>Black</strong> & <strong>Decker</strong> Dustbuster® handheld vacuum cleaner<br />
has been designed for light dry vacuum cleaning purposes.<br />
This appliance is intended for household use only.<br />
Safety instructions<br />
@<br />
@<br />
Warning! Read all safety warnings and all<br />
instructions. Failure to follow the warnings and<br />
instructions listed below may result in electric shock,<br />
Warning! When using battery-powered appliances,<br />
basic safety precautions, including the following,<br />
leaking batteries, personal injury and material damage.<br />
Read all of this manual carefully before using the appliance.<br />
The intended use is described in this manual. The use of<br />
any accessory or attachment or the performance of any<br />
operation with this appliance other than those recommended<br />
in this instruction manual may present a risk of<br />
personal injury.<br />
Retain this manual for future reference.<br />
Using your appliance<br />
Do not use the appliance to pick up liquids or any materi-<br />
Do not use the appliance near water.<br />
Do not immerse the appliance in water.<br />
Never pull the charger lead to disconnect the charger<br />
from the socket. Keep the charger lead away from heat,<br />
oil and sharp edges.<br />
<br />
V DC<br />
kg<br />
V AC<br />
V<br />
AC<br />
mA<br />
h<br />
V DC<br />
<strong>DV6010</strong>(H1)<br />
6<br />
1.12<br />
KA100020B<br />
220<br />
10<br />
200<br />
16<br />
6<br />
NiCD<br />
<strong>DV9610</strong>(H1)<br />
9.6<br />
1.26<br />
KA150020D<br />
220<br />
15<br />
200<br />
16<br />
9.6<br />
NiCD<br />
<strong>DV1210</strong>(H1)<br />
12<br />
1.4<br />
KA150020G<br />
220<br />
15<br />
200<br />
18<br />
12<br />
NiCD<br />
persons without supervision. Children must be supervised<br />
to ensure they do not play with the appliance.<br />
The appliance should be supplied via a residual current<br />
device (RCD) with a tripping current of not more than<br />
30mA.<br />
After use<br />
Unplug the charger before cleaning the charger or charging<br />
base.<br />
When not in use, the appliance should be stored in a dry<br />
place.<br />
Children should not have access to stored appliances.<br />
Inspection and repairs<br />
Before use, check the appliance for damaged or defective<br />
parts. Check for breakage of parts, damage to switches<br />
and any other conditions that may affect its operation.<br />
Do not use the appliance if any part is damaged or defective.<br />
Have any damaged or defective parts repaired or replaced<br />
by an authorized repair agent.<br />
Regularly check the charger lead for damage. Replace the<br />
charger if the lead is damaged or defective.<br />
Never attempt to remove or replace any parts other than<br />
Additional safety instructions - batteries and chargers<br />
Batteries<br />
Never attempt to open for any reason.<br />
Do not expose the battery to water.<br />
Do not expose the battery to heat.<br />
Do not store in locations where the temperature may<br />
exceed 40°C.<br />
Charge only at ambient temperatures between 10°C and<br />
40°C.<br />
Charge only using the charger provided with the appliance/tool.<br />
Using the wrong charger could result in an<br />
electric shock or overheating of the battery.<br />
When disposing of batteries, follow the instructions given<br />
in the section "Protecting the environment".<br />
Do not damage/deform the battery pack either by puncture<br />
Do not charge damaged batteries.<br />
Under extreme conditions, battery leakage may occur.<br />
When you notice liquid on the batteries carefully wipe the<br />
liquid off using a cloth. Avoid skin contact.<br />
In case of skin or eye contact, follow the instructions<br />
below.<br />
Warning!<br />
damage to property. In case of skin contact, immediately rinse<br />
with water. If redness, pain or irritation occurs seek medical<br />
attention. In case of eye contact, rinse immediately with clean<br />
water and seek medical attention.<br />
Chargers<br />
check that the mains voltage corresponds to the voltage on<br />
the rating plate.<br />
Warning! Never attempt to replace the charger unit with a<br />
regular mains plug.<br />
Use your <strong>Black</strong> & <strong>Decker</strong> charger only to charge the bat-<br />
4
(Original instructions)<br />
ENGLISH<br />
tery in the appliance/tool with which it was supplied. Other<br />
batteries could burst, causing personal injury and damage.<br />
Never attempt to charge nonrechargeable batteries.<br />
If the supply cord is damaged, it must be replaced by the<br />
manufacturer or an authorised <strong>Black</strong> & <strong>Decker</strong> <strong>Service</strong><br />
Centre in order to avoid a hazard.<br />
Do not expose the charger to water.<br />
Do not open the charger.<br />
Do not probe the charger.<br />
The appliance/tool/battery must be placed in a well ventilated<br />
area when charging.<br />
Safety of others<br />
This appliance is not intended for use by persons (including<br />
children) with reduced physical, sensory or mental<br />
capabilities, or lack of experience and knowledge, unless<br />
they have been given supervision or instruction concerning<br />
the use of the appliance by a person responsible for<br />
their safety.<br />
Children should be supervised to ensure that they do not<br />
play with the appliance.<br />
Residual risks.<br />
Additional residual risks may arise when using the tool which<br />
may not be included in the enclosed safety warnings. These<br />
risks can arise from misuse, prolonged use etc.<br />
Even with the application of the relevant safety regulations<br />
and the implementation of safety devices, certain residual<br />
risks can not be avoided. These include:<br />
Injuries caused by touching any rotating/moving<br />
parts.<br />
Injuries caused when changing any parts, blades or<br />
accessories.<br />
Injuries caused by prolonged use of a tool. When<br />
using any tool for prolonged periods ensure you take<br />
regular breaks.<br />
Impairment of hearing.<br />
Health hazards caused by breathing dust developed<br />
when using your tool (example:- working with wood,<br />
especially oak, beech and MDF.)<br />
Electrical safety<br />
check that the mains voltage corresponds to the voltage on<br />
the rating plate. Never attempt to replace the charger unit with<br />
a regular mains plug.<br />
Symbols on the charger<br />
#<br />
Read all of this manual carefully before using the<br />
appliance.<br />
This tool is double insulated; therefore no earth wire<br />
is required. Always check that the power supply<br />
corresponds to the voltage on the rating plate.<br />
w<br />
x<br />
$<br />
Short circuit proof safety isolating transformer. The<br />
mains supply is electrically separated from the<br />
transformer output.<br />
The charger automatically shuts off if the ambient<br />
temperature becomes too high. As a consequence<br />
the charger will be inoperable. The charging base<br />
must be disconnected from the mains supply and<br />
taken to an authorised service centre for repair.<br />
The charging base is intended for indoor use only.<br />
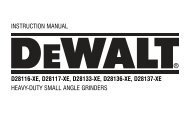
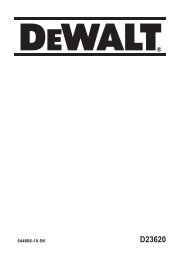
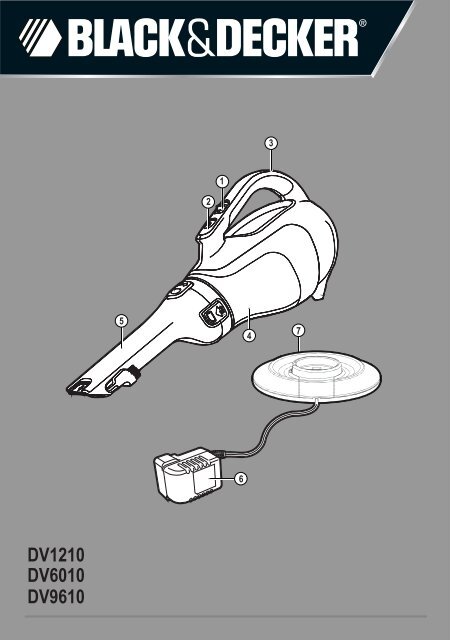
Features<br />
This tool includes some or all of the following features.<br />
1. On/off switch<br />
2. Bowl release button<br />
3. Charging indicator<br />
4. Dust bowl<br />
5. Dust collector<br />
6. Charger<br />
7. Charging base<br />
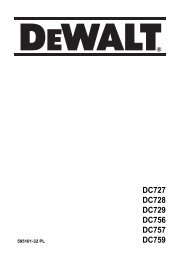
Assembly<br />
Fail-safe isolating transformer. The mains supply is<br />
electrically separated from the transformer output.<br />
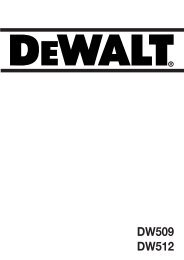
A ( <strong>DV9610</strong>, <strong>DV1210</strong> Only)<br />
These models may be supplied with some of the following<br />
accessories:<br />
An Integrated brush tool (8) for furniture and stairs.<br />
<br />
9<br />
The integrated brush tool (Fig. A). (<strong>DV9610</strong>, <strong>DV1210</strong> Only)<br />
Flip down the brush tool (8) at the end of the dust collector.<br />
The integrated crevice tool (Fig. B). (<strong>DV9610</strong>, <strong>DV1210</strong> Only)<br />
Extend the crevice tool (9) by pulling the crevice tool (9)<br />
until it locks into position.<br />
Retract the crevice tool (9) by pressing the area (10) and<br />
pushing the crevice tool (9) back into the dust collector<br />
(5).<br />
Use<br />
<br />
24 hours.<br />
Place the appliance on the charging base whenever it is<br />
not in use.<br />
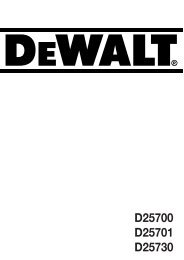
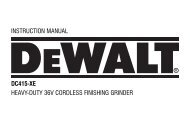
Charging the battery (Fig.C)<br />
Make sure that the appliance is switched off. The battery<br />
will not be charged with the on/off switch in the on position.<br />
Place the appliance on the charging base (7) (Fig. C).<br />
Plug in the charger. Switch on at the mains. The charging<br />
indicator (3) will be lit.<br />
5
ENGLISH<br />
(Original instructions)<br />
Leave the appliance to charge for at least 16 hours.<br />
While charging, the charger may become warm. This is<br />
normal and does not indicate a problem. The appliance can<br />
indicator (3) will be lit as long as the appliance is connected to<br />
the plugged-in charger.<br />
Warning! Do not charge the battery at ambient temperatures<br />
below 4 °C or above 40 °C.<br />
D<br />
To switch the appliance on, slide the on/off switch (1)<br />
forward to position 1.<br />
To switch the appliance off, slide the on/off switch (1) back<br />
to position 0.<br />
E <strong>DV9610</strong> & <strong>DV1210</strong><br />
Only)<br />
The nozzle can be rotated for better access in tight spots.<br />
Press the rotation release catch (12).<br />
Rotate the nozzle to the left or right until it clicks into<br />
place.<br />
Optimising the suction force<br />
cleared regularly during use.<br />
Emptying and cleaning the product.<br />
Press the release latchs (11) and pull the dust collector (5)<br />
straight off.<br />
Empty the contents of the bowl.<br />
To replace the dust collector, place it back onto the handle<br />
G, H, I & J<br />
Warning!<br />
regularly.<br />
Press the release latch (2) and pull the dust bowl (4)<br />
straight off.<br />
While holding the dust bowl over a bin or sink, pull out the<br />
3<br />
To replace the dust bowl, place it back onto the handle<br />
Warning! -<br />
<br />
<br />
<br />
7<br />
6<br />
6<br />
for more thorough cleaning.<br />
water.<br />
ever worn or damaged.<br />
dealer.<br />
Maintenance<br />
Your <strong>Black</strong> & <strong>Decker</strong> corded/cordless appliance/tool has been<br />
designed to operate over a long period of time with a minimum<br />
of maintenance. Continuous satisfactory operation depends<br />
upon proper tool care and regular cleaning.<br />
Warning! Before performing any maintenance on corded/<br />
cordless power tools:<br />
Switch off and unplug the appliance/tool.<br />
Or switch off and remove the battery from the appliance/<br />
tool if the appliance/tool has a separate battery pack.<br />
Or run the battery down completely if it is integral and then<br />
switch off.<br />
Unplug the charger before cleaning it. Your charger does<br />
not require any maintenance apart from regular cleaning.<br />
Regularly clean the ventilation slots in your appliance/tool/<br />
charger using a soft brush or dry cloth.<br />
Regularly clean the motor housing using a damp cloth. Do<br />
not use any abrasive or solvent-based cleaner.<br />
Protecting the environment<br />
Z<br />
Separate collection. This product must not be<br />
disposed of with normal household waste.<br />
needs replacement, or if it is of no further use to you, do not<br />
dispose of it with household waste. Make this product available<br />
for separate collection.<br />
5<br />
cleaning.<br />
<br />
<br />
<br />
I<br />
<strong>DV6010</strong><br />
4<br />
3<br />
J (<strong>DV9610</strong> & <strong>DV1210</strong> )<br />
5<br />
z<br />
Separate collection of used products and packaging<br />
allows materials to be recycled and used again.<br />
Re-use of recycled materials helps prevent environmental<br />
pollution and reduces the demand for raw<br />
materials.<br />
Local regulations may provide for separate collection of electrical<br />
products from the household, at municipal waste sites or<br />
by the retailer when you purchase a new product.<br />
6
(Original instructions)<br />
ENGLISH<br />
Battery<br />
Z<br />
If you want to dispose of the product yourself, the<br />
battery must be removed as described below and<br />
disposed of in accordance with local regulations.<br />
Preferably discharge the battery by operating the appliance<br />
until the motor stops.<br />
Press the release button (2) and remove the dust bowl (4).<br />
Remove the seven screws holding the body of the appliance<br />
together.<br />
Lift the housing cover away from the assembly.<br />
Detach all lead connections from the battery pack.<br />
Remove battery pack.<br />
Place the battery in a suitable packaging to ensure that<br />
the terminals cannot be short-circuited.<br />
Take the battery to your service agent or to a local recycling<br />
station.<br />
7
한글<br />
기술자료<br />
전압<br />
무게<br />
충전기<br />
사용전압<br />
출력전압<br />
전류<br />
완전충전시간<br />
(대략)<br />
배터리<br />
전압<br />
타입<br />
사용처<br />
귀하께서 구매하신 블랙앤데커 소형 진공청소기는<br />
건조상태에서의 가벼운 진공청소작업을 위해 특별히<br />
설계된것 입니다. 본 제품은 가정용 청소기입니다.<br />
안전 지침<br />
경고! 모 든 안 전 지 침 과 사 용 설 명 서 를<br />
읽으십시오. 아래에 나열된 경고사항과 설명을<br />
따르지 않을 경우 감전, 화재 및/또는 심한<br />
부상을 초래할 수 있습니다.<br />
경고! 주 전원으로 작동하는 기기를 사용할<br />
경우 다음과 같은 기본 안전 예방조치들을<br />
항상 따라야만 화재, 감전, 신체 부상 및 기기<br />
파손 등 현상을 줄일 수 있습니다.<br />
기기를 사용하기 전에 본 사용설명서의 모든<br />
내용을 자세히 읽으십시오.<br />
사용방법은 본 사용설명서에 설명되어 있습니다.<br />
본 사용설명서에서 권장한 사용법을 따르지 않고<br />
다른 액세서리 또는 부착물을 사용할 경우에는<br />
신체 부상 위험이 따를 수 있습니다.<br />
사용설명서를 잘 보관하여 나중에 참조할 수<br />
있도록 하십시오.<br />
제품 사용시<br />
V DC<br />
kg<br />
V DC<br />
<strong>DV6010</strong>(H1)<br />
6<br />
1.12<br />
<strong>DV9610</strong>(H1)<br />
9.6<br />
KA100020B KA150020D KA150020G<br />
V AC<br />
220<br />
220<br />
220<br />
V<br />
AC<br />
10 15 15<br />
mA 200<br />
200<br />
200<br />
h 16 16 18<br />
6<br />
NiCD<br />
1.26<br />
9.6<br />
NiCD<br />
<strong>DV1210</strong>(H1)<br />
12<br />
본 제품으로 화재를 일으킬 수 있는 액체나 물질을<br />
빨아들이지 마십시오.<br />
물과 가까이에서 청소기를 사용하지 마십시오.<br />
충전기를 소켓에서 분리할 때 절대로 충전기 전원<br />
선을 잡아당기지 마십시오. 충전기 전원 선이 열,<br />
기름 및 날카로운 모서리에 닿지 않도록 하십시오.<br />
본 제품을 어린이나 심신 허약자 또는 초보자가<br />
사용할 때는 안전을 책임질 수 있는 사람의<br />
관리하에 있어야 합니다. 어린이가 본 제품을<br />
가지고 놀지 못하도록 항상 주시해야 합니다.<br />
본 청소기는 어린이나 노약자가 사용하기에<br />
적합하지 않으므로 이들이 사용할 경우에는<br />
보호자의 적절한 안전 지도가 필요합니다. 특히<br />
어린이들이 청소기를 가지고 놀지 않도록 해야<br />
합니다.<br />
1.4<br />
12<br />
NiCD<br />
본 기 구 는 전 류 차 단 기 와 연 결 되 여 야 하 며 ,<br />
전류차단기의 전류량은 최저로 30mA이여야<br />
합니다.<br />
제품 사용후<br />
충전기 또는 충전 거치대를 청소하기 전에<br />
충전기의 플러그를 뽑으십시오.<br />
사용하지 않을 때에는 본 제품을 습기가 없는<br />
건조한 장소에 보관해야 합니다.<br />
어린이들의 손이 닿지 않는 곳에 보관하여<br />
주십시요.<br />
검사 및 수리<br />
사용전엔 반드시 각 부품들의 상황을 자세히<br />
검사하셔야 합니다. 부속품 및 스위치에 파손이<br />
있는지 혹은 다른 부위에 이상이 있는지를 자세히<br />
체크한 뒤에 본 제품을 사용 합니다.<br />
부속품에 파손이 갔거나 결여가 있는경우 본<br />
제품을 사용하시지 않습니다.<br />
파손되였거나 결여가 있는 부속품의 수리 혹은<br />
교체는 반드시 당사에서 지정한 수리점을 이용해야<br />
합니다.<br />
항상 충전기리드의 상황을 체크하 여야 합니다.<br />
리드에 파손이 갔거 나 결여가 있는 경우 반드시<br />
충전기를 새것으로 교체하셔야 합 니다.<br />
부품의 제거와 교체는 반드시 사용 설명서의<br />
지시대로 진행하셔야 합니다.<br />
배터리 및 충전기에 대한 추가 안전 지시<br />
사항<br />
배터리<br />
어떤 이유로든 배터리 팩을 절대 열지 마십시오.<br />
배터리에 물이 닿지 않도록 하십시오.<br />
배터리가 열에 노출되지 않도록 하십시오.<br />
온도가 40ºC를 초과될 수 있는 곳에 보관하지<br />
마십시오.<br />
주변 온도가 10°C-40°C 사이에 있을 때에만<br />
충전하십시오.<br />
충전할 때는 이 제품과 함께 제공된 충전기만<br />
사용해야 합니다.<br />
배터리를 폐기할 때는 "환경 보호" 섹션에 나와<br />
있는 지시 사항을 따르십시오.<br />
구멍를 내거나 충격을 주는 등의 방식으로 배터리<br />
팩을 훼손/변형시키지 마십시오. 부상이나 화재를<br />
일으킬 위험이 있습니다.<br />
파손된 배터리를 충전하지 마세요.<br />
극단적인 상황에서 배터리 누출이 발생할수있습니다.<br />
만약 배터리에 액체가 있는것을 발견하셨다면<br />
천으로 조심스레 액체를 닦으시고 피부와<br />
접촉하는것을 피하세요.<br />
만약 피부와 눈에 닿았다면 아래의 설명대로<br />
하세요.<br />
8
한글<br />
경고! 배터리 액체는 개인적인 손상과 재산 손실을<br />
초래할 수 있습니다.만일 피부에 닿았다면 즉각 물로<br />
씻어내세요.만약 홍조,통증 혹 과민증이 나타난다면<br />
치료를 받으세요.만약 눈에 닿았다면 즉각 맑은 물로<br />
씻어내고 치료를 받으세요.<br />
충전기<br />
사용하는 충전기의 전압은 220V 60Hz에서 사용하도록<br />
제작되었습니다. 전원전압이 제품 표기 사항에 적힌<br />
전압과 부합되도록 항상 확인하세요.<br />
경고! 충전기를 일반 전원플러그와 대체하려고<br />
시도하지 마세요.<br />
청소기와 함께 제공된 배터리를 충전할 때는<br />
<strong>Black</strong> & <strong>Decker</strong> 충전기만 사용하십시오. 다른<br />
배터리를 사용하면 배터리가 폭발하여 신체<br />
부상을 당하거나 손해를 입을 수 있습니다.<br />
절대로 비충전식 배터리를 충전하려고 하지<br />
마십시오.<br />
손상된 코드는 즉시 교체하십시오.<br />
충전기에 물이 닿지 않도록 하십시오.<br />
충전기를 해체하거나 열지 마십시오.<br />
충전기를 시험하지 마십시오.<br />
전기제품/청소기/배터리는 충전시 통풍이 잘 되는<br />
곳에 두어야 합니다.<br />
기타 안전주의사항<br />
신체나 감각기관 또는 정신적으로 취약하신<br />
분들(어린이들을 포함)은 본제품을 함부로<br />
사용하지말아 주십시오.<br />
무경험자나 사용방법을 잘 이해하지못하는 분들도<br />
함부로 사용하지말아주십시오. 이런 분들은 안전을<br />
보장해줄수있는 보호자나 숙련자의 감독하에서<br />
사용해주십시오.<br />
어린이들은 절대로 본 제품에 손이 닿지않게<br />
잘 감독해주십시오.<br />
전기의 사용안전<br />
본 청소기는 이중절연처리가 되였습니다; 그러므로<br />
지선이 필요없습니다. 실제 전원공급과 청소기에<br />
명시되여있는 전압과의 부합여부를 항상 체크하십시오.<br />
청소기의 사용에서 안전수직을 철저히 준수하였음에도<br />
불구하고 이런 잔여위험들의 발생을 완벽히 피할수가<br />
없습니다. 이런 잔여위험들은 아래와 같습니다:<br />
회전하거나/운동하고 있는 부품들을 접촉하신<br />
경우 신체상해가 발생할수가 있습니다.<br />
<br />
청력손상의 위험이 있습니다.<br />
전기의 사용안전<br />
본 제품은 이중절연처리가 되였습니다; 그러므로<br />
지선이 필요없습니다. 실제 전원공급과 제품에 명<br />
시되여있는 전압과의 부합여부를 항상 체크하십시오.<br />
충전기에 붙은 기호<br />
F<br />
130 o C<br />
청소기를 사용하기 전에 본 사용설명서의<br />
모든 내용을 자세히 읽으십시오.<br />
본 충전기는 이중절연 형식으로 되어 있으므로<br />
접지선이 필요하지 않습니다. 전원 전압이<br />
명판에 표시된 전압과 일치하는지 항상<br />
점검하십시오.<br />
변압기의 안전 분리의 실패를 뜻 합니다.<br />
주 전원이 변압기 출력장치에서 분리되였음을<br />
뜻합니다.<br />
단락 보호기능을 가진 안전 절연 변압기입니다.<br />
전원이 변압기 출력으로 부터 전기적으로<br />
분리되어 있습니다.<br />
주변 온도가 너무 높게 상승하면 충전기는<br />
자동으로 차단됩니다. 따라서, 충전기는<br />
작동되지 않습니다. 충전 거치대를 전원에서<br />
떼어낸 다음 지정 서비스 센터에 수리를<br />
의뢰하십시오.<br />
충전기 판은 실내사용으로만 되여있습니다.<br />
각부 명칭<br />
본 청소기는 아래의 기능 중 일부 또는 전부를 포함하고<br />
있습니다.<br />
1. 켜기/끄기(On/Off) 버튼<br />
2. 볼 해제 버튼 (몸통 위치)<br />
3. 충전 표시등<br />
4. 먼지통 (먼지통 위치)<br />
5. 집진기 (흡입구 방향 조절구)<br />
6. 충전기<br />
7. 충전 거치대<br />
조립<br />
액세서리 조립 (그림 A와 B)(<strong>DV9610</strong>, <strong>DV1210</strong>에만<br />
제공됨)<br />
모델별 다음과 같은 액세서리들이 있을 수 있습니다.<br />
가구,계단용 직물 브러시 (8)<br />
제한 된 공간에서 사용가능한 틈새노즐 (9)<br />
종합브러시(그림A).(<strong>DV9610</strong>, <strong>DV1210</strong>에만 제공됨)<br />
집진기 뒤쪽의 브러시(8)를 뒤집어주세요.<br />
9
한글<br />
종합틈새노즐(그림B). (<strong>DV9610</strong>, <strong>DV1210</strong>에만<br />
제공됨)<br />
틈새노즐(9)를 잠금위치에까지 앞쪽으로 잡아당겨<br />
틈새노즐(9)를 최대한 연장시켜주세요.<br />
틈새노즐(9)를 원위치로 회복하려는 경우 (10)의<br />
위치를 눌러주면서 틈새노즐(9)를 집진기(5)속으로<br />
밀어넣어주세요.<br />
사용법<br />
처음 사용하기 전에 배터리를 적어도 24시간 동안<br />
충전해야 합니다.<br />
제품을 사용하지 않을 때에는 항상 충전 거치대에<br />
놓아 두십시오.<br />
배터리 충전(그림 C)<br />
청 소 기 의 스 위 치 가 꺼 짐 위 치 에 있 는 지 를<br />
확인해주세요. 청소기의 스위치가 ON위치에 있을때<br />
배터리는 충전이 안됩니다.<br />
청소기를 충전 거치대(7)(그림 C)에 올려놓습니다.<br />
충전기의 플러그를 콘센트에 꽂습니다. 전원을<br />
켭니다. 충전 표시등(3)이 켜집니다.<br />
제품을 적어도 16시간 동안 충전하십시오. 충전<br />
중에 충전기가 뜨거워질 수 있는데 이는 정상적인<br />
현상으로 고장을 뜻하지 않습니다. 제품을 충전기에<br />
연결한 상태로 계속 놔두어도 괜찮습니다. 제품이<br />
충전기에 연결되어 있는 동안 충전 표시등(3)은<br />
계속 켜져 있습니다.<br />
경고! 주변 온도가 4°C 미만이거나 40°C 이상인<br />
경우에는 배터리를 충전하지 마십시오.<br />
전원 켜기 및 끄기(그림 D)<br />
제품을 켜려면 On/Off 스위치(1)를 “1” 위치로<br />
밀어냅니다.<br />
제품을 끄려면 On/Off 스위치(1)를 “O” 위치로<br />
되돌려 놓습니다.<br />
입구 방향 조절구(그림E) (<strong>DV9610</strong>, <strong>DV1210</strong>에만<br />
제공됨) 의 회전<br />
비좁은 구석지역의 진출이 편리해질수있도록<br />
회전할수있는 노즐을 설계하였습니다.<br />
회전해제캐치(12)를 눌러주세요.<br />
노즐을 왼쪽 또는 오른쪽으로 회전시키되 딸깍<br />
소리가 나면 제대로 고정된것 입니다.<br />
최고의 흡입효과의 유지<br />
최고의 흡입효과를 유지하려면, 필터를 정기적으로<br />
청소하여야 합니다.<br />
청소기 속 내용물을 비우고 청소하기<br />
먼지통을 비우기(그림F)<br />
해 제 래 치 ( 1 1 ) 을 눌 러 서 집 진 기 ( 5 ) 를 바 로<br />
꺼내주세요.<br />
볼속의 내용물을 비워주세요.<br />
집진기를 원위치로 복귀시키려면 손잡이쪽으로<br />
다 시 꽂 아 넣 되 딸 깍 소 리 가 나 면 제 대 로<br />
고정된것입니다.<br />
먼지통과 필터의 제거(그림G,H,I & J)<br />
경고! 필터는 재사용될수 있는 부품으로 정기적으로<br />
청소해주어야 합니다.<br />
해제리치(2)를 눌러서 먼지통(4)을 바로 분리해주세요.<br />
먼지통을 쓰레기통위로 추켜들고 필터(13)를<br />
떼어내어 볼속의 내용물을 비워주세요.<br />
먼지통을 원위치로 복귀시키려면 손잡이쪽으로<br />
다 시 꽂 아 넣 되 딸 깍 소 리 가 나 면 제 대 로<br />
고정된것입니다.<br />
경고! 필터가 없이 청소기를 사용하면 절대로 안됩니다.<br />
먼지청소효과는 필터가 깨끗해야만이 최고의 효과를<br />
발휘할수 있습니다.<br />
프리필터(그림I)(<strong>DV6010</strong>)<br />
필터와 프리필터를 분리시켜 한결 업그레이드된<br />
청소효과를 얻을수가 있습니다.<br />
프리필터(14)를 시계바늘방향으로 비틀면서<br />
필터(13)에서 제거해주세요.<br />
퀵 클린 필터(그림J)(<strong>DV9610</strong>&<strong>DV1210</strong>)<br />
필터청소손잡이(17)를 위로 들어주세요.<br />
퀵 클린 필터 몸체(15)를 잡고있는 동안 퀵<br />
클린 손잡이(17)를 돌려서 필터(16)의 퀵 클린을<br />
실시해주세요.<br />
필터(16)를 퀵 클린 필터 하우징(15)에서 분리해내여<br />
철저히 청소해주세요.<br />
먼지통과 필터의 청소<br />
먼지통과 필터는 따스한 비누물에서 씻어주세요.<br />
먼지통과 필터를 세탁하고나서 완전히 물기를<br />
없앤뒤 청소기에 설치해주세요.<br />
필터 교체<br />
필터는 매 6~9 개월 마다, 또는 마모/파손된 경우에는<br />
새것으로 교체해야 합니다.<br />
교체용 필터 <strong>Black</strong> & <strong>Decker</strong> 판매점에서 구입할 수<br />
있습니다.<br />
유지보수 및 청결유지<br />
<strong>Black</strong> & <strong>Decker</strong> 무선 진공 청소기는 사용수명이<br />
긴 반면에 유지보수를 최소화하도록 설계되었습니다.<br />
청소기에 대한 적당한 유지보수와 정기적인 청결유지<br />
작업은 청소기의 지속적이고 만족스런 작동수명을<br />
보장해 주는 관건입니다.<br />
경고! 무선 진공 청소기에 대한 유지보수 작업을<br />
진행하기 전에:<br />
청소기를 끄고 플러그를 뽑으십시오.<br />
청소기에 별도의 배터리 팩이 있는 경우에는<br />
청소기를 끄고 배터리 팩을 제거하십시오.<br />
10
한글<br />
만일 배터리 팩이 내장된 것이어서 분리가 불가능한<br />
경우에는 배터리를 완전히 방전시킨 다음 청소기를<br />
끄십시오.<br />
충전기 청소를 하기 전에 충전기의 플러그를<br />
뽑으십시오. 충전기는 자주 청소하는 외에 기타<br />
유지보수가 필요하지 않습니다.<br />
부드러운 브러시나 마른 천으로 청소기의 환기공을<br />
자주 청소하십시오.<br />
젖은 천으로 청소기의 겉면을 자주 닦으십시오.<br />
연마세척제나 유성 세제를 사용하지 마십시오.<br />
환경 보호<br />
분리 수거. 본 제품을 일반 가정용 쓰레기로<br />
처리하면 안됩니다.<br />
<strong>Black</strong> & <strong>Decker</strong>제품을 교체해야 할 경우, 또는 제품이<br />
더 이상 필요되지 않을 경우, 일반 가정쓰레기와<br />
구분하여 처리해야 합니다. 분리 수거하십시오.<br />
사용하던 제품과 포장을 분리 수거하면<br />
자원을 재활용 및 재사용할 수 있습니다.<br />
재활용 자원을 이용하면 환경 오염이 방지되고<br />
고철 자원에 대한 수요를 줄일 수 있습니다.<br />
지역쓰레기처리장 또는 판매처에 현재 규정에 따라<br />
전자제품 및 가정 쓰레기 구분에 관한 정보를<br />
문의하십시오.<br />
배터리<br />
제품을 직접 폐기하실 경우, 아래의 절차에<br />
따라 배터리를 분리하시고 지역 법규에 따라<br />
처리해야 합니다.<br />
청소기를 멈출때까지 작동시켜 배터리를 충분히<br />
방전시켜주세요.<br />
해제버튼(2)을 눌러서 먼지통(4)를 제거하여주세요.<br />
청소기의 본체를 하나로 고정하는 나사 개를 모두<br />
제거하십시오.<br />
몸체 커버를 들어 올려서 어셈블리로 부터<br />
제거하십시오.<br />
모터 어셈블리에서 모든 연결선을 제거하십시오.<br />
모터 어셈블리를 제거하십시오.<br />
배터리를 적절한 포장에 넣어 전극이 합선되지<br />
않도록 하십시오.<br />
배터리를 서비스 센터나 현지 재활용 센터에<br />
보내십시오. 배터리는 일단 제거되면 다시 장착할<br />
수 없습니다.<br />
배터리는 일단 제거되면 다시 장착할 수 없습니다.<br />
11
90576718 08/2011