Set-Up Instructions - Innovative Medical Products
Set-Up Instructions - Innovative Medical Products
Set-Up Instructions - Innovative Medical Products

Create successful ePaper yourself
Turn your PDF publications into a flip-book with our unique Google optimized e-Paper software.
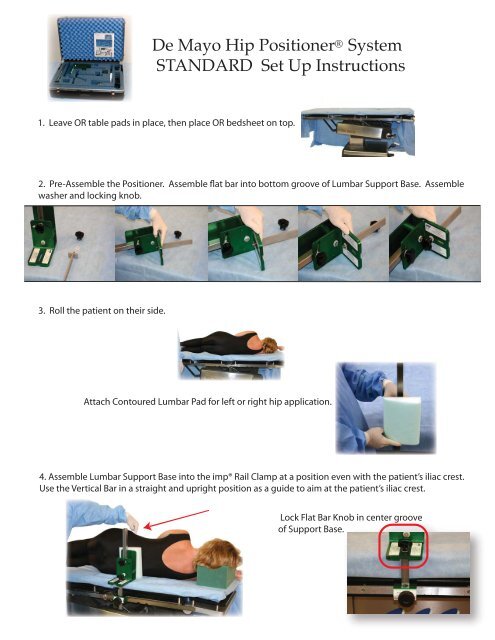
De Mayo Hip Positioner ® System<br />
STANDARD <strong>Set</strong> <strong>Up</strong> <strong>Instructions</strong><br />
1. Leave OR table pads in place, then place OR bedsheet on top.<br />
2. Pre-Assemble the Positioner. Assemble flat bar into bottom groove of Lumbar Support Base. Assemble<br />
washer and locking knob.<br />
3. Roll the patient on their side.<br />
Attach Contoured Lumbar Pad for left or right hip application.<br />
4. Assemble Lumbar Support Base into the imp® Rail Clamp at a position even with the patient’s iliac crest.<br />
Use the Vertical Bar in a straight and upright position as a guide to aim at the patient’s iliac crest.<br />
Lock Flat Bar Knob in center groove<br />
of Support Base.
De Mayo Hip Positioner ® System<br />
STANDARD <strong>Set</strong> <strong>Up</strong> <strong>Instructions</strong> page 2<br />
5. Angle the Vertical Support Bar towards the head of the patient. Assemble the Horizontal Crossover<br />
Standard Bar #1 onto the Vertical Bar #1. Allow 2 fingerbreadths space between the patient and the Bar.<br />
Standard<br />
6. Place Anterior Patient Protector Pad. Attach pre-assembled #2, #3, #4<br />
Anterior Support Assembly* on Crossover Bar #2.<br />
*Anterior Support Assembly semb<br />
(includes Anterior Support, Anterior Vertical Support (Std), Anterior Pelvic Support)<br />
CAUTION: Make sure the<br />
threaded knob fits into groove ove<br />
on #3
De Mayo Hip Positioner ® System<br />
STANDARD <strong>Set</strong> <strong>Up</strong> <strong>Instructions</strong> page 3<br />
7. Rotate Anterior Vertical Bar #3 and adjust Anterior Pelvic Support #4, so that the Anterior Patient Protector Pad<br />
contacts the superior iliac crest.<br />
8. Compress Anterior Support Assembly pulling toward Lumbar Support. Lock Anterior Support Knob #2.<br />
TIGHTEN ALL KNOBS FOR SECURITY<br />
If any readjustments are required,<br />
release Compression Knob #2, then adjust<br />
any other knobs to achieve greatest stability.
De Mayo Hip Positioner ® System<br />
STANDARD <strong>Set</strong> <strong>Up</strong> <strong>Instructions</strong> page 4<br />
On very small patients, the Adjustable Lateral Support (707) with Patient Protector Pad (707-P)<br />
can be used to contact the patient’s inferior iliac crest to prevent pelvic tilt and movement.<br />
Slide the Vertical Bar into the imp® Rail Clamp.<br />
Adjust Horizontal Bar to make contact with the<br />
patient’s inferior iliac crest.<br />
De Mayo Hip Positioner® is a registered trademark of <strong>Innovative</strong> <strong>Medical</strong> <strong>Products</strong>, Inc.<br />
De Mayo Hip Positioner® US Patent #6,820,621<br />
imp® Rail Clamp is a trademark of <strong>Innovative</strong> <strong>Medical</strong> <strong>Products</strong>, Inc.<br />
© 2011 <strong>Innovative</strong> <strong>Medical</strong> <strong>Products</strong>, Inc.<br />
All Rights Reserved