Surgical Technique - Innovative Medical Products
Surgical Technique - Innovative Medical Products
Surgical Technique - Innovative Medical Products

You also want an ePaper? Increase the reach of your titles
YUMPU automatically turns print PDFs into web optimized ePapers that Google loves.
US Patent No. 6,309,396B1<br />
G. David Ritland, M.D.
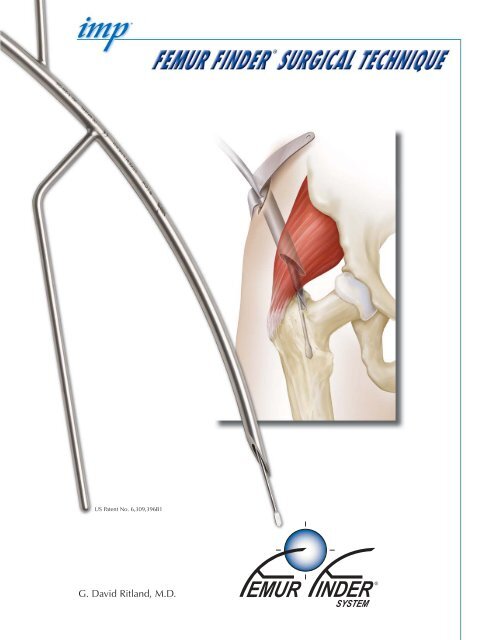
The Femur Finder ® is designed<br />
to direct the guide wire into<br />
the medullary canal. Do not<br />
use it to manipulate the<br />
fracture fragments, reduce the<br />
fracture, or direct the guide<br />
wire across the fracture site.<br />
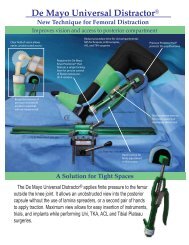
INTRODUCTION<br />
The Femur Finder ® System is used in the<br />
management of femur fractures suitable for<br />
closed antegrade rodding. The technique<br />
requires less than a two centimeter incision<br />
to introduce the guide wire into the<br />
medullary canal. It can be used when the<br />
entry point is at either the piriformis fossa or<br />
the greater trochanter. The surgeon does<br />
not need to expose the neck or trochanter of<br />
the femur by deep dissection. With this<br />
system, introduction of the guide wire is a<br />
percutaneous procedure. This reduces the<br />
operative time required to place the guide<br />
wire. There is less weakening of the abductor<br />
muscles, postoperative morbidity, and pain.<br />
Guide Tube<br />
Handle<br />
Figure 1<br />
Guide Rod<br />
- 2 -<br />
DESCRIPTION<br />
The Femur Finder (IMP #198) is made of<br />
stainless steel. It directs the guide wire into<br />
the medullary canal. It has three components<br />
as shown in Figure 1.<br />
1. The guide tube is curved to allow the<br />
beveled tip to align on the femur neck<br />
tangent to the center line of the canal and<br />
place the entry point in the skin proximal<br />
and lateral to the tip of the greater<br />
trochanter. The beveled point will slide<br />
through the skin, subcutaneous fat, tensor<br />
fascia and abductor muscles with minimal<br />
dissection. The point itself solidly locks<br />
into the bone with hand pressure and<br />
prevents the guide wire from “walking”<br />
as it is drilled through the cortex.<br />
2. The guide rod is a visual aid for aligning<br />
the path of the guide wire to the femur<br />
center line. The long portion of the guide<br />
rod is parallel to the path the guide wire<br />
takes as it exits the tip. The rounded end<br />
marks the end of the guide tube bevel as<br />
shown by the perpendicular line to be a<br />
visual aid for estimating the depth of<br />
penetration.<br />
3. The handle allows one handed<br />
manipulation of the guide tube as it is<br />
advanced toward the femur.
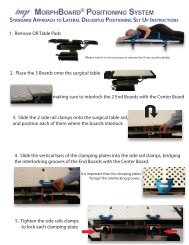
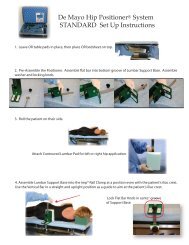
ROOM SET-UP AND<br />
PATIENT POSITIONING<br />
1. Position the patient supine with the<br />
ipsilateral arm flexed at the shoulder and<br />
the forearm supported over the chest.<br />
Traction and positioning of the legs is at<br />
the surgeons discretion.<br />
2. The surgeon stands at the patient’s<br />
shoulder facing the foot of the table. Set<br />
the video display so that the proximal<br />
femur image is at the BOTTOM of the<br />
screen and the distal femur is at the TOP<br />
(Fig. 2). This will assure that the right-left<br />
motion of the tip of the Femur Finder<br />
correlates with the right-left motion of its<br />
silhouette on the screen. All of the<br />
drawings in this protocol are oriented in<br />
this manner so the surgeon can become<br />
familiar with this view.<br />
3. Proceed with skin prep and drape of<br />
choice.<br />
Figure 2<br />
- 3 -
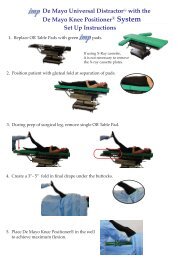
LOCATING THE INCISION<br />
Left Side of Monitor<br />
MONITOR<br />
Distal<br />
Right Side of Monitor<br />
Left Side of Monitor<br />
MONITOR<br />
Distal<br />
Right Side of Monitor<br />
1. Apply traction to the leg and make<br />
preliminary adjustments to reduce the<br />
fracture.<br />
2. From an AP view of the hip mark an “X”<br />
on the anterior thigh directly over the<br />
image of the piriformis fossa. Place a<br />
straight edge on the thigh passing through<br />
the “X” estimating the center line of the<br />
femur. Draw a center line on the anterior<br />
thigh from the “X” to the fracture site<br />
(line A, Fig. 3A). This locates the center<br />
of the medullary canal in the parasagittal<br />
plane.<br />
3. Draw a line from the “X” perpendicular to<br />
the anterior center line around laterally on<br />
the thigh (line B, Fig. 3A).<br />
4. Change to a lateral view and draw another<br />
line, as in step one, to mark the center line<br />
in the lateral plane (line C, Fig. 3B). Extend<br />
this line proximally to the iliac crest<br />
5. Start the incision on the lateral centerline<br />
about 12 centimeters proximal to this<br />
intersection point with line B. Incise<br />
through the skin and subcutaneous fat<br />
down to the tensor fascia. Split the fascia<br />
and abductor muscles a bit to allow entry<br />
of the tissue protector. Insert the IMP<br />
Tissue Protector (#198-TP) into this tract.<br />
Bend the wings on the Tissue Protector to<br />
conform to the thigh (Fig. 4). Clip them to<br />
the drapes to keep the Tissue Protector in<br />
place for the rest of the procedure. It will<br />
protect the muscle from shredding by the<br />
reamers.<br />
Proximal<br />
Figure 3A<br />
Proximal<br />
Figure 3B<br />
Figure 4<br />
- 4 -
IMP 3mm sterile guide wires (IMP<br />
198-GW) are designed for use with<br />
the Femur Finder. The spade tip is<br />
shaped so it will not scrape on the<br />
curved lumen and release metal<br />
chips. Other brands of guide wires<br />
do not have this feature. Always<br />
use a new straight guide wire. Do<br />
not use a guide wire that is bent.<br />
Even if the bent wire can be forced<br />
into the lumen as it rotates it will<br />
rub and metal particles will be<br />
worn off the guide wire.<br />
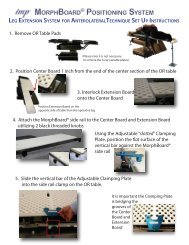
INSERTING THE FEMUR<br />
FINDER ® AND GUIDE WIRE<br />
1. While the surgeon proceeds with the above<br />
steps the scrub tech can load the power<br />
drill with a new IMP sterile 3mm guide<br />
wire (IMP #198-GW). Insert it so the<br />
etched band at the center of the wire is just<br />
exposed at the jaws of the chuck. This<br />
assures there will be enough wire<br />
protruding forward to penetrate ten<br />
centimeters into the femoral canal when<br />
the chuck is bottomed out on the Femur<br />
Finder.<br />
2. Guided by an AP view of the femur<br />
centered on the piriformis fossa, insert the<br />
Femur Finder through the Tissue Protector<br />
and advance it towards the estimated<br />
location of the piriformis fossa. As a visual<br />
aid, align the guide arm parallel with the<br />
two center lines so the exiting guide wire<br />
will be tangent to the femur center line<br />
(Fig. 5). Hold pressure against the bone to<br />
prevent losing position of the bevel point.<br />
For the trochanteric approach to IM nailing<br />
use the same technique except locate the<br />
point of the Femur Finder so the guide<br />
wire is centered on the tip of the greater<br />
trochanter.<br />
Figure 5<br />
- 5 -
Do not hammer the Femur<br />
Finder ® into the bone. Do not<br />
insert the Femur Finder into<br />
the femur to try to manipulate<br />
the bone to reduce the fracture.<br />
This instrument is not designed<br />
for that purpose. There is<br />
danger of splitting a fragment<br />
off the trochanter.<br />
3. Remember: For a right femur fracture the<br />
lateral view will show the anterior surface<br />
of the femur on the left side of the screen<br />
and the posterior surface, (lesser<br />
trochanter) on the right side of the screen<br />
(Fig 3B, Fig 5). For a left femur fracture<br />
the lateral view will show the anterior<br />
surface of the femur on the right side of<br />
the screen and the posterior surface, (lesser<br />
trochanter) on the left side of the screen.<br />
4. Verify the point location in both views.<br />
Maintain the point pressed against the<br />
bone with one hand and, with the other<br />
holding the power drill, slide the guide<br />
wire into the Femur Finder and advance it<br />
without rotating the drill until it emerges<br />
from the bevel and pushes against the<br />
femur (Fig. 6). Then start the power drill<br />
and drill the guide wire into the bone.<br />
Because the Femur Finder point is locked<br />
on the bone the guide wire tip will not tend<br />
to “walk” as it tries to get a ”bite” on the<br />
slanted surface of the bone. Be sure to<br />
maintain the alignment of the guide wire<br />
on the center line as it advances.<br />
5. Advance the guide wire until the chuck<br />
contacts the Femur Finder. Holding the<br />
guide wire in place at its proximal end,<br />
remove the power drill. Extract the Femur<br />
Finder. Careful! Don’t pull out the guide<br />
wire too.<br />
6. Done! The Femur Finder has done its job.<br />
7. Proceed in the surgeon’s chosen manner<br />
to advance the guide wire and reduce the<br />
fracture.*<br />
8. Insert the exchange tube and replace the<br />
guide wire with the ball tip guide wire<br />
(IMP#198-BT). Proceed with opening the<br />
canal and reaming in customary manner.<br />
Figure 6<br />
* The Ducharme Fracture Alignment Device (Cat. # 701) from<br />
IMP aids in reduction of the fracture.<br />
- 6 -
FEMUR FINDER ®<br />
STERILIZATION PROCEDURES<br />
Hi-Vac Sterilization:<br />
1. Proper cleaning of the instrument is necessary. Ensure cannula of the<br />
Femur Finder is thoroughly cleaned with the specially designed IMP<br />
cleaning brush (Cat. # 399). Thoroughly wash and decontaminate the<br />
instrument.<br />
2. Double wrap Sterilization Case (Cat. # 198-Case) containing Femur Finder<br />
and Tissue Protector with CSR wrap.<br />
3. Run normal vacuum cycle for your institution. Minimum recommended<br />
parameters are:<br />
Time: 4 minutes exposure<br />
Temperature: 270° F (132° C)<br />
Pressure: 30 PSI<br />
Drying Time: 20 minutes<br />
Cool at room temperature<br />
Flash Cycle:<br />
1. Minimum recommended cycle parameters for Sterilization Case containing<br />
Femur Finder and Tissue Protector unwrapped are:<br />
Temperature: 272° F (133° C)<br />
Time: 4 minute exposure<br />
Cool at room temperature<br />
- 7 -
<strong>Innovative</strong><br />
<strong>Medical</strong> <strong>Products</strong>, Inc.<br />
US Patent No. 6,309,396B1<br />
Femur Finder is a registered trademark of <strong>Innovative</strong> <strong>Medical</strong> <strong>Products</strong>, Inc.<br />
6029 .2M ©2006 <strong>Innovative</strong> <strong>Medical</strong> <strong>Products</strong>, Inc. All rights reserved. 1/07<br />
AGLOBAL LEADER IN PATIENT POSITIONING<br />
87 Spring Lane, Plainville, CT 06062<br />
PH: 860-793-0391 FAX: 860-793-8975<br />
Toll Free: PH: 800-467-4944 FAX: 888-229-1452<br />
www.impmedical.com